NETGEAR N300 Wireless USB Adapter WNA3100 Installation Guide
NETGEAR N300 Wireless USB Adapter WNA3100 Installation Guide
NETGEAR N300 Wireless USB Adapter WNA3100 Installation Guide

You also want an ePaper? Increase the reach of your titles
YUMPU automatically turns print PDFs into web optimized ePapers that Google loves.
<strong>N300</strong> <strong>Wireless</strong> <strong>USB</strong> <strong>Adapter</strong> <strong>WNA3100</strong><br />
<strong>Installation</strong> <strong>Guide</strong><br />
This guide explains express installation with the <strong>NETGEAR</strong> Smart Wizard. For help<br />
with custom installation, see the User Manual on the Resource CD.<br />
Estimated completion time: 10 minutes.<br />
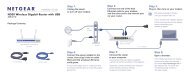
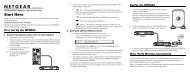
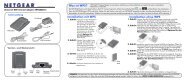
Package Contents<br />
<strong>N300</strong> <strong>Wireless</strong> <strong>USB</strong> <strong>Adapter</strong><br />
<strong>USB</strong> cable with adapter cradle<br />
Resource CD<br />
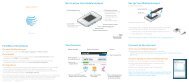
Install the Software<br />
1. Insert the Resource CD in your computer’s CD drive. If the CD Welcome<br />
screen does not display, browse the files on the CD and double-click<br />
Autorun.exe.<br />
2. Click Install the Software. The Software Update Check screen displays.<br />
3. If you are connected to the Internet,<br />
click Check for Updates. If not, then<br />
click Install from CD.<br />
4. Accept the license agreement. Then<br />
click Next on the Setup Type screen<br />
for Express (recommended) setup.<br />
5. Follow the wizard steps to install the<br />
software.<br />
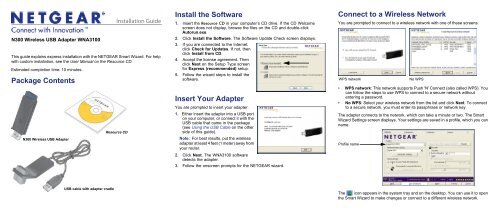
Insert Your <strong>Adapter</strong><br />
You are prompted to insert your adapter.<br />
1. Either insert the adapter into a <strong>USB</strong> port<br />
on your computer, or connect it with the<br />
<strong>USB</strong> cable that came in the package<br />
(see Using the <strong>USB</strong> Cable on the other<br />
side of this guide).<br />
Note: For best results, put the wireless<br />
adapter at least 4 feet (1 meter) away from<br />
your router.<br />
2. Click Next. The <strong>WNA3100</strong> software<br />
detects the adapter.<br />
3. Follow the onscreen prompts for the <strong>NETGEAR</strong> wizard.<br />
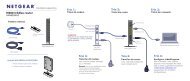
Connect to a <strong>Wireless</strong> Network<br />
You are prompted to connect to a wireless network with one of these screens:<br />
WPS network No WPS<br />
• WPS network: This network supports Push 'N' Connect (also called WPS). You<br />
can follow the steps to use WPS to connect to a secure network without<br />
entering a password.<br />
• No WPS: Select your wireless network from the list and click Next. To connect<br />
to a secure network, you must enter its passphrase or network key.<br />
The adapter connects to the network, which can take a minute or two. The Smart<br />
Wizard Settings screen displays. Your settings are saved in a profile, which you can<br />
name.<br />
Profile name<br />
The icon appears in the system tray and on the desktop. You can use it to open<br />
the Smart Wizard to make changes or connect to a different wireless network.
Standalone Driver <strong>Installation</strong><br />
1. Insert the Resource CD in your computer’s<br />
CD drive. If the CD main screen does not<br />
display, browse the files on the CD and<br />
double-click Autorun.exe.<br />
2. Click Install Windows Standalone Driver.<br />
The driver is installed on your computer.<br />
3. When prompted, either insert the adapter<br />
into a <strong>USB</strong> port on your computer. or<br />
connect it with the <strong>USB</strong> cable that came in<br />
the package.<br />
Note: For best results, put the wireless adapter at least 4 feet (1 meter) away from<br />
your router.<br />
4. When this message displays, click<br />
Finish.<br />
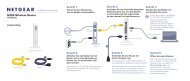
Connect to a Network<br />
The screen that displays after you install<br />
the driver depends on the Windows<br />
version on your computer. This example<br />
shows a Windows XP connection screen.<br />
The icon appears in the system tray.<br />
You can use it to make changes or<br />
connect to a different wireless network.<br />
For help managing wireless connections<br />
in Windows, see your Windows<br />
documentation.<br />
August 2010<br />
Using the <strong>USB</strong> Cable<br />
You can use the <strong>USB</strong> cable and adapter cradle to extend the range of your adapter<br />
and obtain better wireless reception. Insert the adapter in the plastic cradle and<br />
attach the <strong>USB</strong> cable to the adapter and the computer.<br />
Technical Support<br />
Thank you for selecting <strong>NETGEAR</strong> products.<br />
After installing your device, locate the serial number on the label of your product and<br />
use it to register your product at http://www.<strong>NETGEAR</strong>.com/register. Registration is<br />
required before you can use the telephone support service. Registration via our<br />
website is strongly recommended.<br />
Go to http://kbserver.netgear.com for product updates and Web support.<br />
For additional information about setting up, configuring, and using your <strong>N300</strong><br />
<strong>Wireless</strong> <strong>USB</strong> <strong>Adapter</strong>, see the User Manual.<br />
For complete DoC please visit the <strong>NETGEAR</strong> EU Declarations of Conformity<br />
website at: http://kb.netgear.com/app/answers/detail/a_id/11621/<br />
This symbol was placed in accordance with the European Union Directive 2002/96 on the Waste<br />
Electrical and Electronic Equipment (the WEEE Directive). If disposed of within the European Union,<br />
this product should be treated and recycled in accordance with the laws of your jurisdiction<br />
implementing the WEEE Directive.<br />
©2010 by <strong>NETGEAR</strong>, Inc. All rights reserved. <strong>NETGEAR</strong> and the <strong>NETGEAR</strong> logo are registered trademarks of<br />
<strong>NETGEAR</strong>, Inc. in the United States and/or other countries. Other brand and product names are trademarks or<br />
registered trademarks of their respective holders. Information is subject to change without notice.