HRAM Balloon Attachment and Removal ... - Sandhill Scientific
HRAM Balloon Attachment and Removal ... - Sandhill Scientific
HRAM Balloon Attachment and Removal ... - Sandhill Scientific

You also want an ePaper? Increase the reach of your titles
YUMPU automatically turns print PDFs into web optimized ePapers that Google loves.
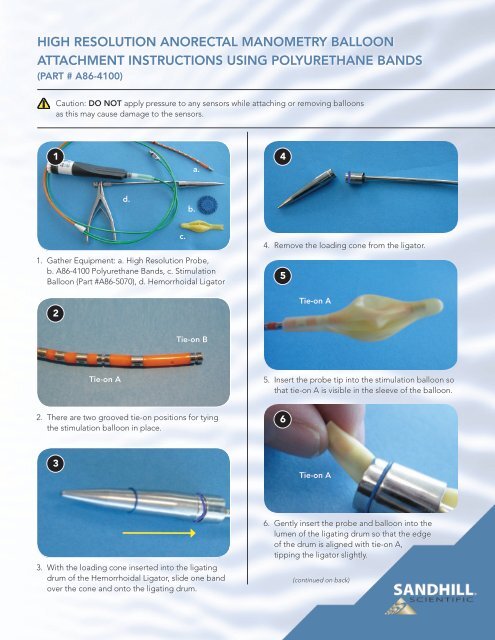
High Resolution Anorectal Manometry <strong>Balloon</strong><br />
<strong>Attachment</strong> Instructions Using Polyurethane B<strong>and</strong>s<br />
(Part # A86-4100)<br />
Caution: Do Not apply pressure to any sensors while attaching or removing balloons<br />
as this may cause damage to the sensors.<br />
1 4<br />
a.<br />
d.<br />
b.<br />
1. Gather Equipment: a. High Resolution Probe,<br />
b. A86-4100 Polyurethane B<strong>and</strong>s, c. Stimulation<br />
<strong>Balloon</strong> (Part #A86-5070), d. Hemorrhoidal Ligator<br />
2<br />
c.<br />
4. Remove the loading cone from the ligator.<br />
5<br />
Tie-on A<br />
Tie-on B<br />
Tie-on A<br />
5. Insert the probe tip into the stimulation balloon so<br />
that tie-on A is visible in the sleeve of the balloon.<br />
2. There are two grooved tie-on positions for tying<br />
the stimulation balloon in place.<br />
6<br />
3<br />
Tie-on A<br />
3. With the loading cone inserted into the ligating<br />
drum of the Hemorrhoidal Ligator, slide one b<strong>and</strong><br />
over the cone <strong>and</strong> onto the ligating drum.<br />
6. Gently insert the probe <strong>and</strong> balloon into the<br />
lumen of the ligating drum so that the edge<br />
of the drum is aligned with tie-on A,<br />
tipping the ligator slightly.<br />
(continued on back)
High Resolution Anorectal<br />
Manometry <strong>Balloon</strong><br />
<strong>Attachment</strong> Instructions<br />
Using Polyurethane B<strong>and</strong>s<br />
(Part # A86-4100)<br />
High Resolution Anorectal<br />
Manometry <strong>Balloon</strong><br />
REMOVAL Instructions<br />
Using Polyurethane B<strong>and</strong>s<br />
(Part # A86-4100)<br />
7 1<br />
7. Squeeze the h<strong>and</strong>le of the ligator to release the<br />
b<strong>and</strong> onto the probe. Check to make sure the<br />
b<strong>and</strong> is aligned properly in the groove.<br />
1. Gather equipment: Suture <strong>Removal</strong> Scissors <strong>and</strong><br />
Forceps<br />
2<br />
8<br />
Tie-on B<br />
2. Gently stabilize b<strong>and</strong> with forceps taking care not<br />
to apply pressure to the sensors.<br />
8. Slide the tip of the balloon down so that tie-on B<br />
is visible in the nipple at the end of the stimulation<br />
balloon<br />
3<br />
9<br />
3. Slide suture removal scissors under each b<strong>and</strong><br />
<strong>and</strong> cut. Remove balloon from probe <strong>and</strong> discard<br />
balloon.<br />
9. In the same manner as for tie-on A, attach a b<strong>and</strong><br />
onto the probe at tie-on B.<br />
S<strong>and</strong>hill <strong>Scientific</strong>, Inc<br />
9150 Commerce Center Circle, #500<br />
Highl<strong>and</strong>s Ranch, CO 80129 USA<br />
800.468.4556 303.470.7020<br />
Fax: 303.470.2975<br />
PM-11-002, Rev 1.1