Mini External Fixator. - Osteosyntese
Mini External Fixator. - Osteosyntese
Mini External Fixator. - Osteosyntese

Create successful ePaper yourself
Turn your PDF publications into a flip-book with our unique Google optimized e-Paper software.
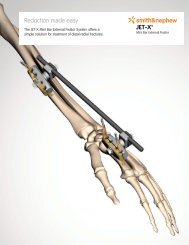
<strong>Mini</strong> <strong>External</strong> <strong>Fixator</strong><br />
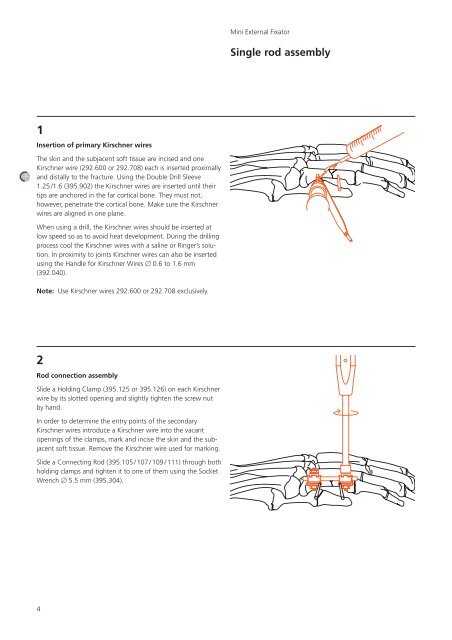
Single rod assembly<br />
1<br />
Insertion of primary Kirschner wires<br />
The skin and the subjacent soft tissue are incised and one<br />
Kirschner wire (292.600 or 292.708) each is inserted proximally<br />
and distally to the fracture. Using the Double Drill Sleeve<br />
1.25 /1.6 (395.902) the Kirschner wires are inserted until their<br />
tips are anchored in the far cortical bone. They must not,<br />
however, penetrate the cortical bone. Make sure the Kirschner<br />
wires are aligned in one plane.<br />
When using a drill, the Kirschner wires should be inserted at<br />
low speed so as to avoid heat development. During the drilling<br />
process cool the Kirschner wires with a saline or Ringer’s solution.<br />
In proximity to joints Kirschner wires can also be inserted<br />
using the Handle for Kirschner Wires 0.6 to 1.6 mm<br />
(392.040).<br />
Note: Use Kirschner wires 292.600 or 292.708 exclusively.<br />
2<br />
Rod connection assembly<br />
Slide a Holding Clamp (395.125 or 395.126) on each Kirschner<br />
wire by its slotted opening and slightly tighten the screw nut<br />
by hand.<br />
In order to determine the entry points of the secondary<br />
Kirschner wires introduce a Kirschner wire into the vacant<br />
openings of the clamps, mark and incise the skin and the subjacent<br />
soft tissue. Remove the Kirschner wire used for marking.<br />
Slide a Connecting Rod (395.105 / 107 / 109 / 111) through both<br />
holding clamps and tighten it to one of them using the Socket<br />
Wrench 5.5 mm (395.304).<br />
4