El Toro Fountain Pen Hardware Kit 88K76.50+ - Lee Valley Tools
El Toro Fountain Pen Hardware Kit 88K76.50+ - Lee Valley Tools
El Toro Fountain Pen Hardware Kit 88K76.50+ - Lee Valley Tools

You also want an ePaper? Increase the reach of your titles
YUMPU automatically turns print PDFs into web optimized ePapers that Google loves.
<strong>El</strong> <strong>Toro</strong> <strong>Fountain</strong> <strong>Pen</strong> <strong>Hardware</strong> <strong>Kit</strong><br />
<strong>88K76.50+</strong><br />
Requires standard "A" mandrel, el toro pen bushings (88K78.81), 31 /64Й (for the<br />
lower/short barrel) and 35 /64Й (for the upper/long barrel) drill bits, and minimum 3 /4Й<br />
square by 3 3 /4Й long blank.<br />
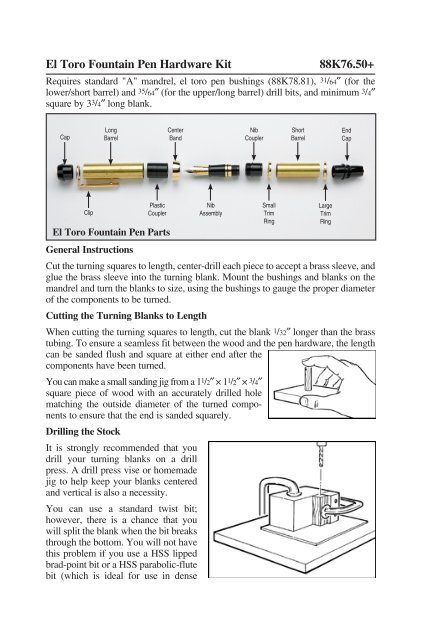
Cap<br />
Long<br />
Barrel<br />
Center<br />
Band<br />
Nib<br />
Coupler<br />
Short<br />
Barrel<br />
End<br />
Cap<br />
Clip<br />
Plastic<br />
Coupler<br />
<strong>El</strong> <strong>Toro</strong> <strong>Fountain</strong> <strong>Pen</strong> Parts<br />
Nib<br />
Assembly<br />
General Instructions<br />
Cut the turning squares to length, center-drill each piece to accept a brass sleeve, and<br />
glue the brass sleeve into the turning blank. Mount the bushings and blanks on the<br />
mandrel and turn the blanks to size, using the bushings to gauge the proper diameter<br />
of the components to be turned.<br />
Cutting the Turning Blanks to Length<br />
When cutting the turning squares to length, cut the blank 1 /32Й longer than the brass<br />
tubing. To ensure a seamless fit between the wood and the pen hardware, the length<br />
can be sanded flush and square at either end after the<br />
components have been turned.<br />
You can make a small sanding jig from a 1 1 /2Й × 1 1 /2Й × 3 /4Й<br />
square piece of wood with an accurately drilled hole<br />
matching the outside diameter of the turned components<br />
to ensure that the end is sanded squarely.<br />
Drilling the Stock<br />
It is strongly recommended that you<br />
drill your turning blanks on a drill<br />
press. A drill press vise or homemade<br />
jig to help keep your blanks centered<br />
and vertical is also a necessity.<br />
You can use a standard twist bit;<br />
however, there is a chance that you<br />
will split the blank when the bit breaks<br />
through the bottom. You will not have<br />
this problem if you use a HSS lipped<br />
brad-point bit or a HSS parabolic-flute<br />
bit (which is ideal for use in dense<br />
Small<br />
Trim<br />
Ring<br />
Large<br />
Trim<br />
Ring
hardwoods, epoxy-stabilized woods, acrylic acetate, or other challenging materials).<br />
Whichever bit you choose, withdraw the drill frequently to clear chips from the<br />
flutes.<br />
For exotic woods that have a more unstable moisture content, you can prevent<br />
cracking by first drilling a 1 /8Й diameter hole. Let the wood blanks dry for about<br />
a week, then redrill with the size of drill required for the sleeves. Other turners<br />
prefer to drill the wood and insert the sleeves immediately on bringing the wood<br />
in the shop, since thin walls are less likely to crack.<br />
Gluing the Brass Sleeves<br />
Use quick-setting epoxy, polyurethane or cyanoacrylate to glue the brass sleeves<br />
into the wood blanks. Spread a small amount of glue onto the outside of the brass<br />
sleeve and slide the sleeve into the wood. Do not put the glue into the hole in the<br />
wood because you will inevitably end up with glue inside the brass sleeve.<br />
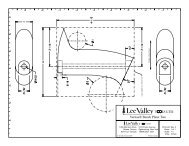
Turning the Bodies<br />
Mount the bushings and turning blanks on the mandrel, as shown in the photo<br />
below. Additional spacers are required to fill the remaining gap so that all the<br />
components on the mandrel fit tightly. (You can use the bushings used to turn<br />
a standard 7mm pen/pencil, or make your own by cutting a hardwood blank to<br />
length and drilling a 7mm center through hole.) In the example shown below,<br />
three standard pen bushings (88K71.08) were placed at regular intervals to<br />
provide ample room for turning the bodies. Slide one spacer, the clip and cap<br />
bushing, the long (upper) blank, the center band bushing, another spacer, the pen<br />
tip bushing, the shorter (lower) blank, the end cap bushing, and one final spacer<br />
onto the mandrel. Be sure that the bushings are a snug fit on the mandrel. Clamp<br />
the components in place by threading the nut onto the end of the mandrel only<br />
finger tight.<br />
"A"<br />
Mandrel<br />
Clip and<br />
Cap Bushing<br />
(15.8mm)<br />
Center Band<br />
Bushing<br />
(17mm)<br />
<strong>Pen</strong> Tip<br />
Bushing<br />
(13.9mm)<br />
End Cap<br />
Bushing<br />
(15.4mm)<br />
Long Barrel/Blank<br />
Spacers<br />
(not included)<br />
Short Barrel/Blank
Turn the long barrel blank slightly oversize, and the shorter barrel blank to the<br />
desired size. Use the bushings as guides for the exact diameter that each end<br />
of the turned components should be. On the longer barrel blank, cut a 1 /8Й long<br />
tenon down to the brass tube to accommodate the center band. Sand and finish<br />
the turned pieces on the lathe.<br />
Assembly<br />
Refer to the pen parts photo for the correct order. The pen components press-fit<br />
together. Once the components are pressed together, it is almost impossible to<br />
take them apart. Do not try to dry fit the assembly before the components are<br />
completely finished.<br />
1. Press the unthreaded end of the black plastic coupler into the tenon end of the<br />
longer barrel, and then press the center band onto the tenon. (Use cyanoacrylate,<br />
if desired.)<br />
2. Press the clip and cap into the other end of the longer barrel.<br />
3. Slide the large trim ring onto the end cap. Press the end cap assembly into the<br />
appropriate end of the shorter barrel.<br />
4. Place the small trim ring onto the nib coupler; then press this assembly into<br />
the other end of the shorter barrel.<br />
5. Insert the ink cartridge into the nib, and then screw the nib into the nib coupler.<br />
www.leevalley.com<br />
1090 Morrison Drive 814 Proctor Avenue<br />
Ottawa, Ontario Ogdensburg, New York<br />
K2H 1C2 Canada 13669-2205 USA<br />
1-800-267-8761 1-800-267-8735<br />
© <strong>Lee</strong> <strong>Valley</strong> <strong>Tools</strong> Ltd. 2009 customerservice@leevalley.com Printed in Canada.