
Create successful ePaper yourself
Turn your PDF publications into a flip-book with our unique Google optimized e-Paper software.
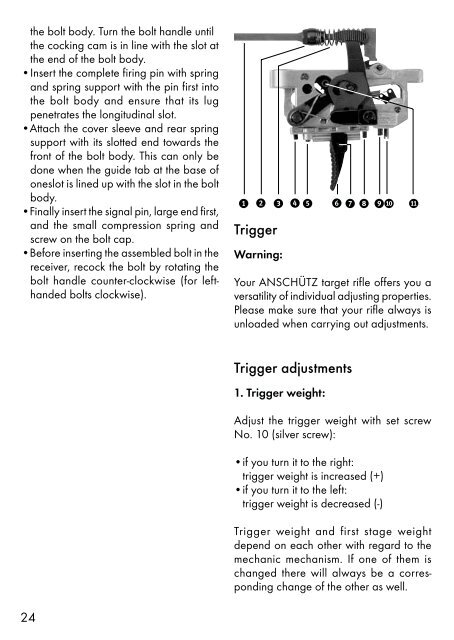
the bolt body. Turn the bolt handle until<br />
the cocking cam is in line with the slot at<br />
the end of the bolt body.<br />
•Insert the complete firing pin with spring<br />
and spring support with the pin first into<br />
the bolt body and ensure that its lug<br />
penetrates the longitudinal slot.<br />
•Attach the cover sleeve and rear spring<br />
support with its slotted end towards the<br />
front of the bolt body. This can only be<br />
done when the guide tab at the base of<br />
oneslot is lined up with the slot in the bolt<br />
body.<br />
•Finally insert the signal pin, large end first,<br />
and the small compression spring and<br />
screw on the bolt cap.<br />
•Before inserting the assembled bolt in the<br />
receiver, recock the bolt by rotating the<br />
bolt handle counter-clockwise (for lefthanded<br />
bolts clockwise).<br />
e r t ui<br />
opasd f<br />
Trigger<br />
Warning:<br />
Your ANSCHÜTZ target rifle offers you a<br />
versatility of individual adjusting properties.<br />
Please make sure that your rifle always is<br />
unloaded when carrying out adjustments.<br />
Trigger adjustments<br />
1. Trigger weight:<br />
Adjust the trigger weight with set screw<br />
No. 10 (silver screw):<br />
•if you turn it to the right:<br />
trigger weight is increased (+)<br />
•if you turn it to the left:<br />
trigger weight is decreased (-)<br />
Trigger weight and first stage weight<br />
depend on each other with regard to the<br />
mechanic mechanism. If one of them is<br />
changed there will always be a corresponding<br />
change of the other as well.<br />
24