Owner's Manual - Digitech
Owner's Manual - Digitech
Owner's Manual - Digitech

Create successful ePaper yourself
Turn your PDF publications into a flip-book with our unique Google optimized e-Paper software.
DECLARATION OF CONFORMITY<br />
Manufacturer’s Name: DigiTech®<br />
Manufacturer’s Address: 8760 S. Sandy Parkway<br />
Sandy, Utah 84070, U.S.A.<br />
declares that the product:<br />
Product name: EX 7<br />
Product option: all (requires Class II power adapter that conforms<br />
to the requirements of EN60065, EN60742, or<br />
equivalent.)<br />
conforms to the following Product Specifications:<br />
Safety IEC 60065 (1998)<br />
EMC EN 55013 (2001 + A1)<br />
EN 55020 (1998)<br />
Supplementary Information:<br />
The product herewith complies with the requirements of the Low Voltage<br />
Directive 73/23/EEC and the EMC Directive 89/336/EEC as amended by<br />
Directive 93/68/EEC.<br />
Vice-President of Engineering - MI<br />
8760 S. Sandy Parkway<br />
Sandy, Utah 84070, U.S.A.<br />
Date: December 27, 2004<br />
European Contact: Your local DigiTech Sales and Service Office or<br />
Harman Music Group<br />
8760 South Sandy Parkway<br />
Sandy, Utah, 84070 U.S.A.<br />
Ph: (801) 566-8800<br />
Fax: (801) 568-7583<br />
Warning<br />
For your protection, please read the following:<br />
Important Safety Instructions<br />
1. Read these instructions.<br />
2. Keep these instructions.<br />
3. Heed all warnings.<br />
4. Do not use this apparatus near water.<br />
5. Clean only with dry cloth.<br />
6. Do not block any ventilation openings. Install in accordance<br />
with the manufacturer’s instructions.<br />
7. Do not install near any heat sources such as radiators,<br />
heat registers, stoves, or other apparatus (including<br />
amplifiers) that produce heat.<br />
8. Protect the power cord from being walked on or<br />
pinched particularly at plugs, convenience receptacles,<br />
and the point where they exit from the apparatus.<br />
9. Unplug this apparatus during lightning storms or when<br />
unused for long periods of time.<br />
10. No user serviceable parts inside. Refer all servicing to<br />
qualified service personnel. Servicing is required when<br />
the apparatus has been damaged in any way, such as<br />
power-supply cord or plug is damaged, liquid has been<br />
spilled or objects have fallen into the apparatus, the<br />
apparatus has been exposed to rain or moisture, does<br />
not operate normally, or has been dropped.<br />
11. WARNING: To reduce the risk of fire or electric shock,<br />
do not expose this apparatus to rain or moisture.<br />
12. Refer to labels on the unit, including bottom cover, or<br />
other markings and pertinent information.
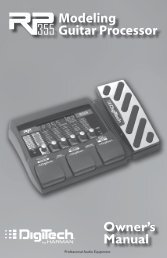
Congratulations and special thanks from DigiTech ® for choosing the<br />
Expression Factory TM Pedal.<br />
When you want to express emotion with your guitar, two hands are great,<br />
but two hands and a foot are better. Years ago, pioneering musicians and<br />
engineers developed technology that let your foot alter and enhance your<br />
guitar’s tone while your fingers are busy playing the notes. These pedals<br />
were so revolutionary, they’ve endured and evolved through the years: the<br />
wah pedal, the flanger, the rotary speaker, the pitch bender, the chorus,<br />
and the volume swell. These pedals placed guitarists’ feet on the path to<br />
the future of modern music.<br />
The DigiTech Expression Factory captures seven of the most versatile and<br />
dramatic pedal-controlled effects in guitar equipment history: the Vox ®<br />
Clyde McCoy Wah TM * and the Dunlop ® Cry Baby TM Wah*, the Leslie ®<br />
147 Rotary Speaker*, the A/DA TM Flanger*, the Unicord Uni-Vibe TM *,<br />
the DigiTech ® XP300 Space Station TM Synth Swell TM *, and the DigiTech<br />
Whammy ® *. The Expression Factory lets you walk in the shoes of many<br />
mighty guitarists before you, who discovered that with one foot on the<br />
stage or the studio floor, and the other foot on an expression pedal, the<br />
journey through exciting and dramatic guitar tones will never end.<br />
* DigiTech, X-Series, CIT, Flexible Output Mode, DOD, Whammy, Space Station, Synth Swell, Metal Master,<br />
Expression Factory, Johnson Amplification, and Distortion Factory are trademarks of Harman International<br />
Industries, Inc. Other product names modeled in this product are trademarks of their respective companies<br />
that do not endorse and are not associated or affiliated with DigiTech. They are trademarks of other manufacturers<br />
and were used merely to identify products whose sounds were reviewed in the creation of this<br />
product.
Included Items<br />
The DigiTech ® Expression Factory TM Pedal includes the following items:<br />
• DigiTech Expression Factory Pedal<br />
• PS0913B Power Supply<br />
• This Owner’s <strong>Manual</strong><br />
• DigiTech Warranty Card<br />
• DigiTech Brochure<br />
Please make sure that all of these items have been included before you<br />
get started.
Setup Directions<br />
Follow these setup directions before use:<br />
1. Turn the volume down on the amplifier/mixer you are connecting to.<br />
2. Connect the pedal output to the amplifier/mixer input.<br />
3. Connect the guitar to the pedal input.<br />
4. Connect the power supply to the pedal.<br />
5. Turn up your amplifier/mixer level to your desired listening level.<br />
6. Turn on the Effect Model by pressing the TOE SWITCH (or turn on<br />
the Effect + Distortion Model by pressing the HEEL SWITCH).
The Expression Factory TM Features at a Glance<br />
The Expression Factory TM has seven Effect Models that you can select<br />
(one at a time) and control with your foot by using the Expression Pedal.<br />
You can also modify each Effect Model’s tone and behavior with three<br />
knobs.<br />
The Expression Factory also has seven selectable Distortion Models that<br />
can only be used (one at a time) in conjunction with any Effect Model.<br />
You can modify each Distortion Model with three knobs.<br />
The Expression Factory has six Cabinet Models (based on the cabinets<br />
of popular amplifiers) which are associated with the seven Distortion<br />
Models.<br />
The Expression Factory can also be used as a volume pedal.
The Expression FactoryTM outputs can be configured in one of four Output<br />
Modes:<br />
1. Mono Mode – Outputs a mono signal through either the OUT 1 (AMP)<br />
jack or the OUT 2 (MIXER) jack.<br />
2. Stereo Mixer Mode – Outputs a stereo signal through both the OUT 1<br />
(AMP) and OUT 2 (MIXER) jacks, suitable for connecting to a mixer or<br />
recording device.<br />
3. Stereo Amp Mode – Outputs a stereo signal through both the OUT 1<br />
(AMP) and OUT 2 (MIXER) jacks, suitable for connecting to an amplifier.<br />
4. Amp + Mixer Mode – Outputs a mono signal through the OUT 1<br />
(AMP) jack suitable for connecting to an amplifier, and also outputs a<br />
mono signal through the OUT 2 (MIXER) jack, suitable for connecting<br />
to a mixer or recording device.<br />
When the Expression Factory is shipped from the factory, the default<br />
modes are Mono Mode and Stereo Mixer Mode. Refer to the Flexible<br />
Output ModeTM Setup section of this manual for more information.
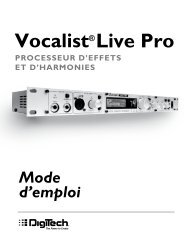
1. OUT 1 (AMP)*<br />
Connect this output jack to your<br />
guitar amplifier. Refer to the Flexible<br />
Output Mode TM Setup section<br />
for more information.<br />
2. OUT 2 (MIXER)*<br />
This output has been specifically<br />
tailored for use with a full range<br />
audio system and is designed to be<br />
plugged directly into a mixer or<br />
recording device for optimal performance.<br />
Refer to the Flexible<br />
Output Mode Setup section for<br />
more information.<br />
3. (Tip) - CONTROL 1<br />
Model dependent. Refer to the Effect<br />
Model Control table for more<br />
information.<br />
(Ring) - DIST LEVEL<br />
Controls distortion level.<br />
* Use only unbalanced TS instrument cables.
4. INDICATOR LED<br />
This LED indicates the status of<br />
the selected Model or the current<br />
Mode: OFF=bypass, GREEN=Effect<br />
Model on, RED=Effect Model and<br />
Distortion Model on, FLASHING<br />
YELLOW=Distoriton Model Select<br />
mode.<br />
5. (Tip) - CONTROL 2<br />
Model dependent. Refer to the Effect<br />
Model Control table for more<br />
information.<br />
(Ring) - DIST TONE<br />
Controls distortion tone.<br />
6. POWER SUPPLY JACK<br />
Connect only the included PS0913B<br />
(9V AC) power supply to this jack.<br />
Note that the Expression Factory TM<br />
is not equipped for battery power.<br />
7. (Tip) - CONTROL 3<br />
Model dependent. Refer to the Effect<br />
Model Control table for more<br />
information.<br />
(Ring) - DIST GAIN<br />
Controls distortion gain.<br />
8. MODEL<br />
This knob selects one of the seven<br />
different Effect Models:<br />
1. Dunlop ® Cry BabyTM Wah<br />
2. Vintage Vox ® Clyde McCoy TM<br />
Wah<br />
3. DigiTech ® XP300 Space<br />
StationTM Synth SwellTM 4. DigiTech Whammy ®<br />
5. Unicord Uni-VibeTM 6. Leslie ® 147 Rotary Speaker<br />
7. A/DATM Flanger<br />
Refer to the Model Descriptions<br />
section for detailed explanations of<br />
each model’s controls.
9. INPUT<br />
Connect your instrument to this<br />
jack.<br />
10. FOOTSWITCH<br />
Plug in the optional FS3X<br />
footswitch here. Refer to the<br />
Using the Optional FS3X<br />
Footswitch section to see what<br />
the FS3X can do with the Expression<br />
Factory TM .<br />
11. EXPRESSION PEDAL<br />
Serves as a variable control for each<br />
of the Effect Models. Also used<br />
for engaging the HEEL and TOE<br />
SWITCHES, which enable the<br />
selected Effect Models and Distortion<br />
Models. (Refer to the Effect<br />
Model Control table for more<br />
information about the EXPRES-<br />
SION PEDAL.)<br />
To enable the HEEL or TOE<br />
SWITCHES, press firmly on the<br />
heel or toe of the EXPRESSION<br />
PEDAL. The INDICATOR LED<br />
will change color when the HEEL<br />
or TOE SWITCH is engaged.<br />
If the EXPRESSION PEDAL’s<br />
range becomes diminished over<br />
time, it may be necessary to re-calibrate<br />
the pedal. Refer to the<br />
Calibrating the Expression Pedal<br />
section for more information.
Selecting and Enabling an Effect Model<br />
1. Use the MODEL KNOB to select an Effect Model. (Refer to the Effect<br />
Model Control table for a list of Effect Models.)<br />
2. Rock the pedal forward and press firmly on the TOE SWITCH.<br />
The INDICATOR LED lights green to show that the Effect Model is<br />
enabled.<br />
3. To bypass the Effect Model, rock the pedal forward and press firmly on<br />
the TOE SWITCH. The INDICATOR LED turns off to show that<br />
the Effect Model is bypassed.
MODEL DESCRIPTIONS<br />
MODEL 1. Dunlop ® Cry Baby TM<br />
As the Wah pedal increased in popularity, slight changes were made to the<br />
original design. One of the most popular versions of the Wah pedal was<br />
(and is) the Dunlop ® Cry Baby TM . By using an Italian-made Fasel inductor<br />
(and making some other design alterations), the Dunlop Cry Baby creates<br />
a slightly thicker tone that is reminiscent of guitar legends of the late 60s<br />
and early 70s.<br />
Control 1 (tip): Frequency Range – Changes the high and low frequency<br />
centers of the Wah sweep.<br />
Control 2 (tip): Q (Shape) – Changes the bandwidth of the frequency<br />
centers. Lower settings produce a mild Wah effect, higher settings produce<br />
extreme Wah filtering.<br />
Control 3 (tip): Volume – Boosts or cuts the output level when the<br />
Wah is enabled.<br />
Expression Pedal – Controls the Wah effect.
MODEL 2. Vox ® Clyde McCoy TM Wah<br />
In 1966, an L.A. session guitarist and a Vox ® electrical engineer tinkered<br />
around with an amp’s tone circuit and created an archetype of electric<br />
guitar tone: the original Clyde McCoy TM Wah pedal. Though it was<br />
designed for the guitar, Vox initially thought they’d sell more to trumpet<br />
players; that’s why trumpet player Clyde McCoy’s name graces the pedal<br />
to this day. Few horn players use the pedal today, but countless guitarists<br />
know the unmistakable tone and range acheived by this pedal, thanks to<br />
its active circuit and dinstinctive high peak.<br />
Control 1 (tip): Frequency Range – Changes the high and low frequency<br />
centers off the Wah sweep.<br />
Control 2 (tip): Q (Shape) – Changes the bandwidth of the frequency<br />
centers. Lower settings produce a mild Wah effect, higher settings produce<br />
extreme Wah filtering.<br />
Control 3 (tip): Volume – Boosts or cuts the output level when the<br />
Wah is enabled.<br />
Expression Pedal – Controls the Wah effect.
MODEL 3. DigiTech ® XP300 Space Station TM<br />
Synth Swell TM<br />
This model recreates the most popular tone on a rare and hard-to-find<br />
pedal. The DigiTech ® XP300 Space Station TM Synth Swell TM packs an entire<br />
outer-space string orchestra into your guitar, and lets you create other-<br />
worldly effects and flourishes which you can<br />
control with the Expression Pedal.<br />
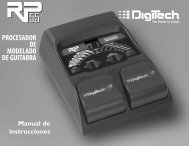
Control 1 (tip): Pitch Shift – Selects one<br />
of the seven different pitch shift intervals for<br />
the swell effect. (See diagram.)<br />
5th Up<br />
4th Up<br />
Detune<br />
Control 2 (tip): Chorus/Pitch Balance – Pitch Shift Interval Positions<br />
Balances the pitch and chorus effects.<br />
Minimum position has chorus and no pitch shift; maximum position has<br />
pitch shift and no chorus.<br />
Control 3 (tip): Swell Attack Time – Adjusts the volume attack<br />
time. When in the minimum position, Autoswell attack is off (swell is<br />
controlled via the Expression Pedal). The maximum position has over 3<br />
seconds of volume attack.<br />
Expression Pedal – Controls the input level (volume swell).<br />
Octave Up<br />
4th Down<br />
5th Down<br />
Octave Down
MODEL 4. DigiTech Whammy ®<br />
Model 4 captures the unmistakable sound of DigiTech ® ’s legendary pitchbender,<br />
the Whammy ® . You can now command smooth pitch bends, rich<br />
detuning, accurate dive bombs, and fast-tracking harmony shifts, just like<br />
the original.<br />
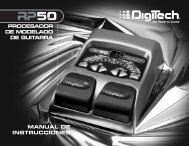
Octave Up<br />
Control 1 (tip):<br />
5th Up<br />
2 Octaves Up<br />
Whammy Amount –<br />
Adjusts the Whammy pitch<br />
2nd Up > M3rd Up<br />
Octave Down > Octave Up<br />
interval. (See diagram.)<br />
Detune<br />
Reverse 2nd Down<br />
Whammy Amount Interval Positions<br />
Control 2 (tip): Tone –<br />
Adjusts the overall tone of the Whammy effect. Lower settings decrease<br />
high frequencies; higher settings increase high frequencies.<br />
Control 3 (tip): Wet/Dry Mix – Controls the dry level and effect level<br />
mix.<br />
Expression Pedal – Controls the Whammy pitch shift.
MODEL 5. Unicord Uni-Vibe TM<br />
This is the one that set the standard for all chorus pedals. The lush Unicord<br />
Uni-Vibe TM chorus effect adds depth and dimension to your music<br />
that is both subtle and spectacular. No wonder the Unicord Uni-Vibe was<br />
the choice of so many guitar greats when it was created in the late 60s.<br />
True to the original, this model also offers a vibrato option.<br />
Control 1 (tip): Chorus/Vibrato – Selects either the chorus or the<br />
vibrato effect. Turn the knob all the way to the left to select chorus, or all<br />
the way to the right to select vibrato.<br />
Control 2 (tip): Intensity – Adjusts the amount of the effect.<br />
Control 3 (tip): Volume – Controls the output level of the effect.<br />
Expression Pedal – Controls the modulation speed. Rocking the pedal<br />
all the way back (toe up) bypasses the effect just like the original pedal.
MODEL 6. Leslie ® 147 Rotary Speaker<br />
Long prized by organ players for their rich sound and spine-chilling effects,<br />
rotating Leslie ® speakers caught guitarists’ attention after being masterfully<br />
applied by experimenting vocalists and guitar virtuosos in the mid and<br />
late 60s. Many stompboxes simulate a rotating speaker effect, but Model<br />
6 approximates the sound of the Leslie 147 rotary speaker specifically,<br />
with all its subtle nuances and characteristics.<br />
Control 1 (tip): Drive – Controls the preamp drive/distortion of the<br />
pedal.<br />
Control 2 (tip): Minimum Speed – Controls the minimum speed<br />
reached when the pedal is rocked back (toe up).<br />
Control 3 (tip): Volume – Controls the output level of the Leslie<br />
effect.<br />
Expression Pedal – Controls the rotary speaker speed.
MODEL 7. A/DA TM Flanger<br />
Model 7 recreates the granddaddy of all flangers: the A/DA TM Flanger. This<br />
stompbox set the stage for all flangers that followed in its footsteps. Afficionados<br />
recognize its dramatic jet-engine flyby sweep and appreciate its<br />
utter lack of background noise.<br />
Control 1 (tip): Range – Controls the amount of delay time variation<br />
from the Speed control. When Range is set to its minimum position, the<br />
Speed control has no effect on the delay time. When Range is set to its<br />
maximum position, the Speed control sweeps the entire delay time and<br />
the Expression pedal is effectively disabled.<br />
Control 2 (tip): Speed – Controls the LFO speed of the flanger effect<br />
based on the Range setting. When Range is set to its minimum position,<br />
the Speed control is effectively disabled and the flange sweep is controlled<br />
by the Expression Pedal.<br />
Control 3 (tip): Enhance – Controls the amount of feedback in the<br />
flanger effect. Higher settings produce more dramatic comb filtering.<br />
Expression Pedal – <strong>Manual</strong>ly controls the sweep of the flanger effect.<br />
The Expression Pedal acts like the <strong>Manual</strong> knob on the original pedal.
Effect Model Control Table<br />
Effect Model<br />
Expression<br />
Pedal<br />
1 Dunlop ® Cry Baby TM Wah<br />
2 Vox ® Clyde McCoy Wah TM Wah<br />
DigiTech 3 ® XP300 Space StationTM Synth SwellTM 4 DigiTech Whammy ® Pitch Shift<br />
5 Unicord Uni-Vibe TM Speed<br />
Control 1 Control 2 Control 3<br />
Frequency<br />
Range<br />
Frequency<br />
Range<br />
Volume Pitch Shift<br />
Whammy<br />
Shift<br />
Chorus/<br />
Vibrato<br />
6 Leslie ® 147 Rotary Speaker Speed Drive<br />
7 A/DA TM Flanger<br />
Effect<br />
Sweep*<br />
Q (shape) Volume<br />
Q (shape) Volume<br />
Chorus/Pitch<br />
Balance<br />
Tone<br />
Swell Attack<br />
Time<br />
Wet/Dry<br />
Mix<br />
Intensity Volume<br />
Minimum<br />
Speed<br />
Volume<br />
Range Speed Enhance<br />
* Volume Pedal Function<br />
When Model 7 is selected and bypassed, the Expression Pedal behaves<br />
as a volume pedal. This volume pedal control is disabled when either<br />
the Effect Model or the Effect + Distortion Model is enabled in<br />
Model 7.
Settings to Get You Going<br />
To recreate each Effect Model’s original tone and behavior, set Control<br />
Knobs 1-3 to the 12 o’clock position. And here are a few famous and<br />
familiar settings to get you started.<br />
Cry Baby ® – This setup models the stock Cry<br />
Baby ® wah tone favored by giants like Page, Slash,<br />
and Hammett. Adjust the Frequency (Control 1)<br />
and Q (Control 2) settings for a custom Wah.<br />
Vox ® Wah – Set the Control knobs in this fashion<br />
to make the Wah pedal behave like a tone control<br />
on your guitar. Or set the Control knobs to 12<br />
o’clock to recreate Jimi Hendrix’s and Stevie Ray<br />
Vaughan’s favorite Wah.<br />
XP300 – This setup gives you an octave synth<br />
swell effect very similar to what you hear in<br />
Audioslave’s “I Am The Highway.”
Whammy TM – This setup models the octave<br />
Whammy TM shifting made famous by Rage Against<br />
the Machine. Set the Wet/Dry Mix (Control 3)<br />
knob to 12 o’clock to create harmony shifting.<br />
Uni-Vibe TM – Setting the knobs to this position<br />
and rocking the Expression Pedal just off of the<br />
heel gets that great Gilmour “Breathe” tone. Kick<br />
in the Big Muff ® model and rock the pedal forward<br />
a bit for the Woodstock national anthem sound.<br />
Leslie ® – Set the knobs in this position to give<br />
you a great rotary speaker tone. This effect added<br />
a subtle aura of mystery to the intro to “Hotel<br />
California” and the guitar solo in “Let It Be.”<br />
Flanger – For that classic jet flange sound, set the<br />
knobs to this position. The setting may remind<br />
you of the unmistakable intro to Van Halen’s<br />
“Unchained.”
Selecting and Activating a Distortion Model + Effect<br />
Model<br />
The Expression Factory TM has seven Distortion Models that can be<br />
selected using the MODEL knob. This is done by accessing the Distortion<br />
Model Select mode. Once this mode is accessed, the MODEL knob<br />
selects a Distortion Model while the rest of the knobs maintain their<br />
labeled functions. To enter Distortion Model Select mode, follow these<br />
steps:<br />
1. Rock the EXPRESSION PEDAL forward and then press and hold<br />
the TOE SWITCH for three seconds until the INDICATOR LED<br />
begins flashing yellow. If the distortion was already active, it will turn<br />
off first, and then turn back on once Distortion Model Select mode is<br />
active.<br />
2. Once the INDICATOR LED begins flashing yellow, use the MODEL<br />
knob to select between the different Distortion Models. The Effect<br />
Model that was selected prior to entering Distortion Model Select<br />
mode remains active and does not change as the MODEL knob selects
the different Distortion Models. This lets you audition different Distortion<br />
Models with the current Effect Model. Use the three ring knobs<br />
labeled DIST LEVEL, DIST TONE, and DIST GAIN to adjust the<br />
distortion settings.<br />
3. Once a distortion model has been selected, you can exit Distortion<br />
Model Select mode by pressing the TOE SWITCH again. The Expression<br />
Factory will then return to normal operation with both the effect<br />
and distortion bypassed. (The MODEL knob now might be on a different<br />
Effect Model than before it was entered; if so, just turn it back to<br />
the desired Effect Model and press the TOE SWITCH to activate it.)<br />
NOTE: Once Distortion Model Select mode has been exited, the Distortion<br />
Model that was selected will be saved off with the Effect Model that<br />
was active when the distortion was selected. This lets you select and save<br />
a specific or different Distortion Model to use with each Effect Model.<br />
For a list of Distortion Models, refer to the Distortion and Cabinet<br />
Models section.
Distortion and Cabinet Models<br />
Each Distortion Model also has CIT cabinet modeling associated with<br />
it when using the Out 2 (Mixer) output or when the pedal is in Stereo<br />
Mixer mode (see Flexible Output Mode)*. Here is a list of the cabinet<br />
models for each distortion:<br />
1<br />
2<br />
3<br />
4<br />
5<br />
6<br />
7<br />
Distortion Model<br />
Ibanez ® TS-9<br />
DOD ® Overdrive/preamp 250<br />
Boss ® DS -1 TM<br />
ProCo Rat TM<br />
Boss ® Metal Zone ®<br />
DigiTech ® Metal Master TM<br />
EH ® Big Muff ® Pi<br />
Cabinet Model<br />
Fender ® ’65 Deluxe Reverb ® 1x12<br />
Marshall ® 4x12 w/Celestion ® GT-75s<br />
Johnson Amplification TM 4x12 w/Celestion V30s<br />
Fender Bassman ® Blonde 2x12<br />
Johnson Amplification 4x12 w/Celestion V30s<br />
VHT Amplification TM 4x12 w/Celestion V30s<br />
Marshall 4x12 w/Celestion 25W Greenbacks<br />
* Model 6 already emulates a Leslie ® speaker cabinet, so no Cabinet Model is applied<br />
to the Distortion Model in any output mode.
Flexible Output Mode TM<br />
The Expression Factory TM has four Flexible Output Modes: Mono, Stereo<br />
Mixer, Stereo Amp, and Amp/Mixer. These modes let you send a mono signal<br />
to an amp or a mixer, or a stereo signal to two amps or two channels<br />
of a mixer, or a mono signal to an amp and a mixer simultaneously.<br />
Mode 1 (MONO) is automatically selected when only one cable is<br />
plugged into either the OUT 1 (AMP) or OUT 2 (MIXER) output. Mode<br />
2 (STEREO MIXER), Mode 3 (STEREO AMP), and Mode 4 (AMP/MIXER)<br />
are enabled when two cables are plugged into both the OUT 1 (AMP)<br />
and OUT 2 (MIXER) outputs. Mode 2 (STEREO MIXER) is the factory<br />
default stereo output mode. Mode 3 (STEREO AMP) and Mode 4 (AMP/<br />
MIXER) can be enabled using the Flexible Output Mode Setup (Modes<br />
2-4 are all selected using the Flexible Output Mode Setup).
Connections Diagram - Flexible Output Mode 1 (Mono)<br />
MIXER<br />
AMPLIFIER<br />
OR<br />
PS0913<br />
FS3X FOOTSWITCH<br />
(OPTIONAL)
Connections Diagram - Flexible Output Mode 2<br />
(Stereo Mixer)<br />
MIXER<br />
PS0913<br />
FS3X FOOTSWITCH<br />
(OPTIONAL)
Connections Diagram - Flexible Output Mode 3<br />
(Stereo Amp)<br />
AMPLIFIER<br />
AMPLIFIER<br />
PS0913<br />
FS3X FOOTSWITCH<br />
(OPTIONAL)
Connections Diagram - Flexible Output Mode 4<br />
(Amp + Mixer)<br />
MIXER<br />
AMPLIFIER<br />
AND<br />
PS0913<br />
FS3X FOOTSWITCH<br />
(OPTIONAL)
Flexible Output Mode TM Setup<br />
1. Power up the Expression Factory TM Pedal.<br />
2. Select Model 7 using the MODEL knob.<br />
3. Press and hold the HEEL SWITCH for three seconds. The INDICA-<br />
TOR LED begins to flash green.<br />
4. Release the HEEL SWITCH.<br />
5. Turn the MODEL knob to Model 5 if you want to use AMP/MIXER<br />
mode (which lets you plug into both an amplifier and a mixer simultaneously).<br />
Turn the MODEL knob to Model 6 to select STEREO AMP mode.<br />
Leave the MODEL knob at Model 7 to keep the factory default STE-<br />
REO MIXER mode selected.<br />
6. Press the TOE SWITCH to exit Flexible Output Mode Setup; the<br />
INDICATOR LED turns off and the pedal is bypassed.<br />
NOTE: Selecting any other Models besides 5, 6, or 7 will prevent you<br />
from exiting Flexible Output Mode Setup.
Calibrating the Expression Pedal<br />
If the Expression Pedal’s range becomes diminished over time, it may be<br />
necessary to re-calibrate the pedal. Here is the procedure for calibration:<br />
1. Begin with the power disconnected from the Expression Factory TM .<br />
2. Select Model 1 using the MODEL knob.<br />
3. Insert a standard mono (TS) guitar cable into the FOOTSWITCH<br />
jack.<br />
4. Connect the power supply to the Expression Factory. The INDICA-<br />
TOR LED begins flashing green.<br />
5. Rock the EXPRESSION PEDAL forward (toe down).<br />
6. Select Model 2 using the MODEL knob. The INDICATOR LED<br />
begins flashing yellow.<br />
7. Rock the EXPRESSION PEDAL back (toe up).<br />
8. Select Model 3 using the MODEL knob. The INDICATOR LED<br />
should flash green three times if calibration was successful.<br />
If the calibration procedure fails, the INDICATOR LED will flash red<br />
instead of green during step 8 and the unit will not return to normal<br />
operation until the Expression Pedal has been properly calibrated. Select<br />
Model 1 using the MODEL knob at this time and repeat steps 5-8 until<br />
Expression Pedal calibration is successful.
Using the Optional FS3X Footswitch<br />
The Expression Factory TM accommodates the optional FS3X 3-button<br />
footswitch.<br />
When an Effect Model or an Effect + Distortion Model is enabled, the<br />
MODE footswitch toggles between Effect Model only (green LED) and<br />
Effect + Distortion Model (red LED), until either the Expression Factory’s<br />
TOE SWITCH (Effect Model) or HEEL SWITCH (Effect Model +<br />
Distortion Model) has been pressed to put the Expression Factory into<br />
bypass.<br />
The DOWN footswitch selects the next model down. Pressing and<br />
holding the DOWN footswitch for three seconds selects Model 1.<br />
The UP footswitch selects the next model up. Pressing and holding the<br />
UP footswitch for three seconds selects Model 7.<br />
NOTE: Use only the stereo TRS cable that ships with the FS3X<br />
Footswitch to connect the Footswitch to the Expression Factory.
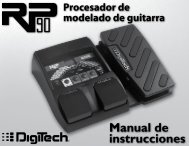
FS3X Footswitch (Optional)<br />
MODE<br />
Toggles between Effect Model only<br />
(green LED) and Effect + Distortion<br />
Model (red LED).<br />
DOWN<br />
Selects the next lower Model.<br />
Hold for three seconds to select<br />
MODEL 1.<br />
UP<br />
Selects the next higher Model.<br />
Hold for three seconds to select<br />
MODEL 7.
WARRANTY: We at DigiTech ® are proud of our products and back up each one with the following warranty:<br />
1. The warranty registration card must be mailed within ten days after purchase date to validate this warranty.<br />
2. DigiTech warrants this product, when used solely within the U.S., to be free from defects in materials and<br />
workmanship under normal use and service.<br />
3. DigiTech liability under this warranty is limited to repairing or replacing defective materials that show<br />
evidence of defect, provided the product is returned to DigiTech WITH RETURN AUTHORIZATION,<br />
where all parts and labor will be covered up to a period of one year (this warranty is extended to a period<br />
of six years when the product has been properly registered by mail or through our website). A Return<br />
Authorization number may be obtained from DigiTech by telephone. The company shall not be liable for any<br />
consequential damage as a result of the product’s use in any circuit or assembly.<br />
4. Proof-of-purchase is considered to be the burden of the consumer.<br />
5. DigiTech reserves the right to make changes in design, or make additions to, or improvements upon this<br />
product without incurring any obligation to install the same on products previously manufactured.<br />
6. The consumer forfeits the benefits of this warranty if the product’s main assembly is opened and tampered<br />
with by anyone other than a certified DigiTech technician or, if the product is used with AC voltages outside<br />
of the range suggested by the manufacturer.<br />
7. The foregoing is in lieu of all other warranties, expressed or implied, and DigiTech neither assumes nor<br />
authorizes any person to assume any obligation or liability in connection with the sale of this product. In<br />
no event shall DigiTech or its dealers be liable for special or consequential damages or from any delay in the<br />
performance of this warranty due to causes beyond their control.<br />
NOTE: The information contained in this manual is subject to change at any time without notification. Some<br />
information contained in this manual may also be inaccurate due to undocumented changes in the product or<br />
operating system since this version of the manual was completed. The information contained in this version of<br />
the owner’s manual supersedes all previous versions.
Specifications:<br />
• Controls – CONTROL 1/DIST LEVEL, CONTROL 2/DIST TONE,<br />
CONTROL 3/DIST GAIN, MODEL<br />
• Jacks – INPUT, FOOTSWITCH, OUT 1 (AMP), OUT 2 (MIXER)<br />
• Input Impedance – 1M Ohms<br />
• Output Impedance – 200 Ohms<br />
• Power Consumption – 4.5 Watts<br />
• Dimensions – 10.14"(L) x 3.84"(W) x 2.47"(H)<br />
• Weight – 3.38 lbs.<br />
• Included Power Supply (one of the following):<br />
PS0913B – 100 (100V ~ 50/60Hz)<br />
PS0913B – 120 (120V ~ 60Hz)<br />
PS0913B – 230 (230V ~ 50Hz)<br />
PS0913B – 240 (240V ~ 60Hz)
DigiTech®<br />
8760 South Sandy Parkway<br />
Sandy, Utah 84070<br />
PH (801) 566-8800<br />
FAX (801) 566-7005<br />
www.digitech.com<br />
Manufactured in the U.S.A.<br />
Printed 12/2005<br />
Expression Factory TM Owner’s <strong>Manual</strong> 18-0351-A<br />
©2005 Harman International Industries, Incorporated, all rights reserved.<br />
DigiTech, X-Series, CIT, Flexible Output Mode, DOD, Whammy, Space Station, Synth Swell, Metal Master,<br />
Expression Factory, Johnson Amplification, and Distortion Factory are trademarks of Harman International<br />
Industries, Inc. Other product names modeled in this product are trademarks of their respective companies<br />
that do not endorse and are not associated or affiliated with DigiTech. They are trademarks of other<br />
manufacturers and were used merely to identify products whose sounds were reviewed in the<br />
creation of this product.