Usb to serial cable driver - Natus Medical Incorporated
Usb to serial cable driver - Natus Medical Incorporated
Usb to serial cable driver - Natus Medical Incorporated

You also want an ePaper? Increase the reach of your titles
YUMPU automatically turns print PDFs into web optimized ePapers that Google loves.
USB <strong>to</strong> Serial Cable Driver<br />
Installing the USB-<strong>to</strong>-Serial Cable Driver for EchoLink<br />
Note: This procedure is only required if using the USB-<strong>to</strong>-Serial adapter.<br />
If your PC is equipped with a built-in <strong>serial</strong> port, this installation can be<br />
skipped.<br />
To connect the computer running EchoLink <strong>to</strong> either an Echo-Screen or<br />
Cochlea-Scan, you may need <strong>to</strong> use the special USB-<strong>to</strong>-Serial <strong>cable</strong> provided.<br />
The side with the USB connec<strong>to</strong>r will be attached <strong>to</strong> your computer; the side<br />
with the <strong>serial</strong> connec<strong>to</strong>r will attach <strong>to</strong> the <strong>serial</strong> <strong>cable</strong> from the device.<br />
Before using the USB-<strong>to</strong>-Serial <strong>cable</strong>, you’ll need <strong>to</strong> install a <strong>driver</strong> on the<br />
computer. To help you install the <strong>driver</strong>, an Install Wizard is provided.<br />
To install the USB-<strong>to</strong>-Serial <strong>cable</strong> <strong>driver</strong>:<br />
Windows XP 1. Navigate <strong>to</strong> the folder where the EchoLink supporting software is installed.<br />
This can be a CD-ROM, or it could be a local folder if the software has been<br />
distributed electronically.<br />
2. Double click on the USB-<strong>to</strong>-Serial Driver direc<strong>to</strong>ry, and then double click<br />
on the Windows_XP direc<strong>to</strong>ry.<br />
3. Double-click on the UC-232ADriverInstaller__XP.exe file <strong>to</strong> begin the<br />
installation.<br />
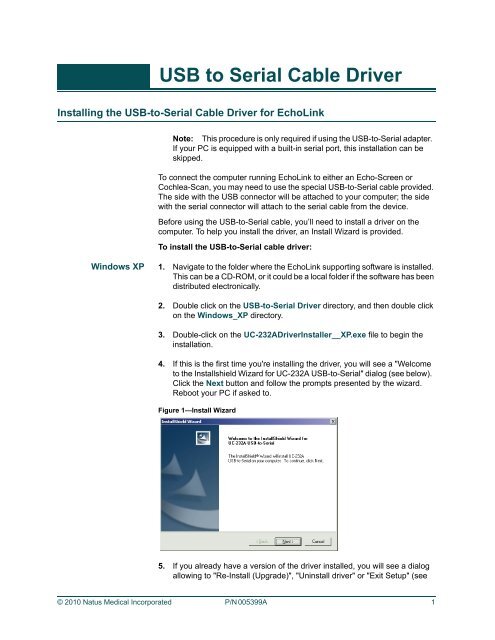
4. If this is the first time you're installing the <strong>driver</strong>, you will see a "Welcome<br />
<strong>to</strong> the Installshield Wizard for UC-232A USB-<strong>to</strong>-Serial" dialog (see below).<br />
Click the Next but<strong>to</strong>n and follow the prompts presented by the wizard.<br />
Reboot your PC if asked <strong>to</strong>.<br />
Figure 1—Install Wizard<br />
5. If you already have a version of the <strong>driver</strong> installed, you will see a dialog<br />
allowing <strong>to</strong> "Re-Install (Upgrade)", "Uninstall <strong>driver</strong>" or "Exit Setup" (see<br />
© 2010 <strong>Natus</strong> <strong>Medical</strong> <strong>Incorporated</strong> P/N 005399A 1
USB <strong>to</strong> Serial Cable Driver Installing the USB-<strong>to</strong>-Serial Cable Driver for EchoLink<br />
below). Select the "Re-Install (Upgrade Option)" and click the Next but<strong>to</strong>n<br />
and follow the prompts presented by the wizard. Reboot your PC if asked<br />
<strong>to</strong>.<br />
Figure 2—USB Driver Setup Type<br />
6. Connect the USB-<strong>to</strong>-<strong>serial</strong> adapter <strong>to</strong> a USB port on your computer. The<br />
New Hardware Wizard appears:<br />
Figure 3—New Hardware Wizard<br />
7. Select No, not this time, and then click Next <strong>to</strong> continue. The following<br />
dialog box appears:<br />
2 P/N 005399A © 2010 <strong>Natus</strong> <strong>Medical</strong> <strong>Incorporated</strong>
USB <strong>to</strong> Serial Cable Driver Installing the USB-<strong>to</strong>-Serial Cable Driver for EchoLink<br />
Figure 4—Install USB Driver Au<strong>to</strong>matically<br />
8. Leave the default choice (Install the software au<strong>to</strong>matically) and then<br />
click Next <strong>to</strong> continue.<br />
9. Windows displays the following warning. Click Continue Anyway <strong>to</strong><br />
continue installing new hardware.<br />
Figure 5—Windows Logo Warning<br />
10. When finished, you will see the following dialog. Press Finish <strong>to</strong> complete<br />
the installation.<br />
© 2010 <strong>Natus</strong> <strong>Medical</strong> <strong>Incorporated</strong> P/N 005399A 3
USB <strong>to</strong> Serial Cable Driver Installing the USB-<strong>to</strong>-Serial Cable Driver for EchoLink<br />
Figure 6—Hardware Wizard Complete<br />
Windows Vista or<br />
Windows 7 1. Navigate <strong>to</strong> the folder where the Echo-Screen Firmware Update is located<br />
(this can be a CD-ROM drive or a local folder location if the firmware had<br />
been distributed electronically).<br />
2. Double-click the USB-<strong>to</strong>-Serial Driver direc<strong>to</strong>ry and then double-click the<br />
Windows_Vista direc<strong>to</strong>ry<br />
3. Double-click on the UC-232ADriverInstaller__Vista.exe file <strong>to</strong> begin the<br />
installation.<br />
4. You will see a "Welcome <strong>to</strong> the Installshield Wizard for PL-2303 Vista<br />
Driver Installer-ATEN" dialog. Click the Next but<strong>to</strong>n and follow the<br />
prompts presented by the wizard.<br />
5. Connect the USB-<strong>to</strong>-<strong>serial</strong> adapter <strong>to</strong> a USB port on your computer.<br />
Windows Vista will au<strong>to</strong>matically install the <strong>driver</strong>s.<br />
Older Windows<br />
Operating Systems In the unlikely event your computer is still running Windows 98, Windows ME<br />
or Windows 2000, <strong>driver</strong>s have been provided for these operating systems as<br />
well. Navigate <strong>to</strong> the proper direc<strong>to</strong>ry for your operating system as above. The<br />
installation wizard may be slightly different than depicted for XP or Vista, but<br />
using the guidelines above will allow for a successful installation of these<br />
<strong>driver</strong>s.<br />
4 P/N 005399A © 2010 <strong>Natus</strong> <strong>Medical</strong> <strong>Incorporated</strong>