Prolink Hurricane 6300G Wireless 802.11g ADSL2+ Ethernet ...
Prolink Hurricane 6300G Wireless 802.11g ADSL2+ Ethernet ...
Prolink Hurricane 6300G Wireless 802.11g ADSL2+ Ethernet ...

Create successful ePaper yourself
Turn your PDF publications into a flip-book with our unique Google optimized e-Paper software.
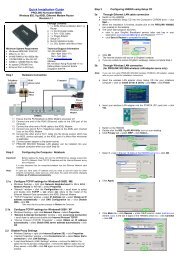
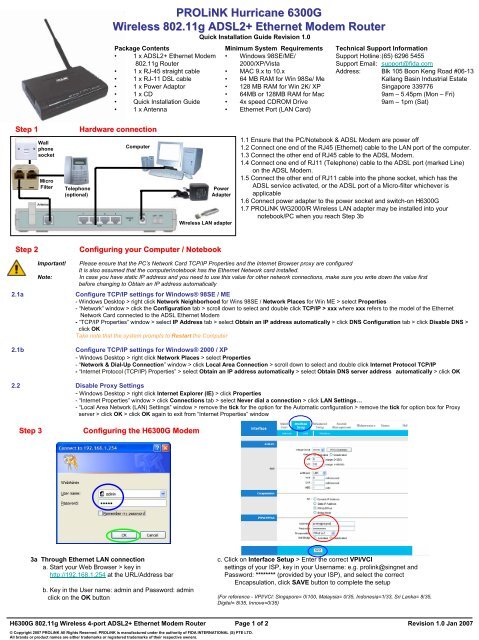
Step 1 Hardware connection<br />
Wall<br />
phone<br />
socket<br />
Micro<br />
Filter<br />
Telephone<br />
(optional)<br />
PROLiNK <strong>Hurricane</strong> <strong>6300G</strong><br />
<strong>Wireless</strong> <strong>802.11g</strong> <strong>ADSL2+</strong> <strong>Ethernet</strong> Modem Router<br />
Package Contents<br />
• 1 x <strong>ADSL2+</strong> <strong>Ethernet</strong> Modem<br />
<strong>802.11g</strong> Router<br />
• 1 x RJ-45 straight cable<br />
• 1 x RJ-11 DSL cable<br />
• 1 x Power Adaptor<br />
• 1 x CD<br />
• Quick Installation Guide<br />
• 1 x Antenna<br />
Computer<br />
Step 2 Configuring your Computer / Notebook<br />
Quick Installation Guide Revision 1.0<br />
Minimum System Requirements<br />
• Windows 98SE/ME/<br />
2000/XP/Vista<br />
• MAC 9.x to 10.x<br />
• 64 MB RAM for Win 98Se/ Me<br />
• 128 MB RAM for Win 2K/ XP<br />
• 64MB or 128MB RAM for Mac<br />
• 4x speed CDROM Drive<br />
• <strong>Ethernet</strong> Port (LAN Card)<br />
H<strong>6300G</strong> <strong>802.11g</strong> <strong>Wireless</strong> 4-port <strong>ADSL2+</strong> <strong>Ethernet</strong> Modem Router Page 1 of 2 Revision 1.0 Jan 2007<br />
© Copyright 2007 PROLiNK All Rights Reserved. PROLiNK is manufactured under the authority of FIDA INTERNATIONAL (S) PTE LTD.<br />
All brands or product names are either trademarks or registered trademarks of their respective owners.<br />
1.1 Ensure that the PC/Notebook & ADSL Modem are power off<br />
1.2 Connect one end of the RJ45 (<strong>Ethernet</strong>) cable to the LAN port of the computer.<br />
1.3 Connect the other end of RJ45 cable to the ADSL Modem.<br />
1.4 Connect one end of RJ11 (Telephone) cable to the ADSL port (marked Line)<br />
on the ADSL Modem.<br />
1.5 Connect the other end of RJ11 cable into the phone socket, which has the<br />
ADSL service activated, or the ADSL port of a Micro-filter whichever is<br />
applicable<br />
1.6 Connect power adapter to the power socket and switch-on H<strong>6300G</strong><br />
1.7 PROLiNK WG2000/R <strong>Wireless</strong> LAN adapter may be installed into your<br />
notebook/PC when you reach Step 3b<br />
Important! Please ensure that the PC’s Network Card TCP/IP Properties and the Internet Browser proxy are configured<br />
It is also assumed that the computer/notebook has the <strong>Ethernet</strong> Network card installed.<br />
Note: In case you have static IP address and you need to use this value for other network connections, make sure you write down the value first<br />
before changing to Obtain an IP address automatically<br />
2.1a Configure TCP/IP settings for Windows® 98SE / ME<br />
- Windows Desktop > right click Network Neighborhood for Wins 98SE / Network Places for Win ME > select Properties<br />
- “Network” window > click the Configuration tab > scroll down to select and double click TCP/IP > xxx where xxx refers to the model of the <strong>Ethernet</strong><br />
Network Card connected to the ADSL <strong>Ethernet</strong> Modem<br />
- “TCP/IP Properties” window > select IP Address tab > select Obtain an IP address automatically > click DNS Configuration tab > click Disable DNS ><br />
click OK<br />
Take note that the system prompts to Restart the Computer<br />
2.1b Configure TCP/IP settings for Windows® 2000 / XP<br />
- Windows Desktop > right click Network Places > select Properties<br />
-“Network & Dial-Up Connection” window > click Local Area Connection > scroll down to select and double click Internet Protocol TCP/IP<br />
- “Internet Protocol (TCP/IP) Properties” > select Obtain an IP address automatically > select Obtain DNS server address automatically > click OK<br />
2.2 Disable Proxy Settings<br />
- Windows Desktop > right click Internet Explorer (IE) > click Properties<br />
- “Internet Properties” window > click Connections tab > select Never dial a connection > click LAN Settings…<br />
- “Local Area Network (LAN) Settings” window > remove the tick for the option for the Automatic configuration > remove the tick for option box for Proxy<br />
server > click OK > click OK again to exit from “Internet Properties” window<br />
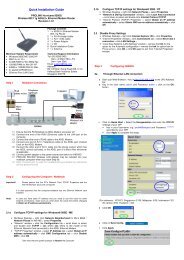
Step 3 Configuring the H<strong>6300G</strong> Modem<br />
3a Through <strong>Ethernet</strong> LAN connection<br />
a. Start your Web Browser > key in<br />
http://192.168.1.254 at the URL/Address bar<br />
b. Key in the User name: admin and Password: admin<br />
click on the OK button<br />
Power<br />
Adapter<br />
<strong>Wireless</strong> LAN adapter<br />
Technical Support Information<br />
Support Hotline: (65) 6296 5455<br />
Support Email: support@fida.com<br />
Address: Blk 105 Boon Keng Road #06-13<br />
Kallang Basin Industrial Estate<br />
Singapore 339776<br />
9am – 5.45pm (Mon – Fri)<br />
9am – 1pm (Sat)<br />
c. Click on Interface Setup > Enter the correct VPI/VCI<br />
settings of your ISP, key in your Username: e.g. prolink@singnet and<br />
Password: ******** (provided by your ISP), and select the correct<br />
Encapsulation, click SAVE button to complete the setup<br />
(For reference - VPI/VCI: Singapore= 0/100, Malaysia= 0/35, Indonesia=1/33, Sri Lanka= 8/35,<br />
Digitel= 8/35, Innove=0/35)
Step 3 Configuring the H<strong>6300G</strong> Modem (ctn ( ctn’d) )<br />
d. Click on Status<br />
i. once a WAN IP address is established, you may proceed<br />
to surf the internet<br />
3b Through <strong>Wireless</strong> LAN connection (for PROLiNK WG2000/R wireless LAN adapter users only)<br />
Note:If you are not using PROLiNK wireless<br />
adapter, please refer to your vendor for<br />
installation instructions<br />
a. Insert the wireless USB adapter driver Setup<br />
CD into your notebook computer > click on<br />
Driver & Utility Installation , follow the<br />
instruction on the screen to finish the<br />
installation<br />
Configuring Macintosh Computer / Notebook<br />
Important! It is assumed that the Macintosh computer has the <strong>Ethernet</strong> Adapter installed.<br />
Note: In case you have static IP address in your Computer/Notebook and you need to use this value for other network connections make sure you<br />
write down the value first before making the change<br />
1. Configure TCP/IP settings for Mac OS 9.x<br />
(skip this section and go to section 1a if the<br />
computer has Mac OS 10.x)<br />
- Apple Menu > scroll down to select<br />
Control Panels > select TCP/IP<br />
-“TCP/IP” dialogue box > select <strong>Ethernet</strong><br />
from “Connect via” field > select Using<br />
DHCP Server from “Configure” field<br />
b. Insert your wireless USB adapter into the<br />
USB slot<br />
c. Double-click the Intelligent <strong>Wireless</strong> Utility icon<br />
on your desktop<br />
d. Click Site Survey tab > click Rescan > under<br />
SSID column: select <strong>Prolink</strong>-H<strong>6300G</strong> ><br />
click Connect > click OK<br />
e. Ensure that your wireless connection to<br />
<strong>Prolink</strong>-H<strong>6300G</strong> is established<br />
f. go back to Step 3a to configure your<br />
modem settings<br />
1.1 Configure TCP/IP settings for Mac OS 10.x<br />
• Apple Menu > scroll down to select System<br />
Preference > select Network<br />
•“Preference” dialogue box > key in H<strong>6300G</strong><br />
Broadband in the location field > select Build-in<br />
<strong>Ethernet</strong> in the “Show” field<br />
• click TCP/IP tab > select Using DHCP in the<br />
Configure IPV4 field > click Apply Now<br />
© Copyright 2007 PROLiNK All Rights Reserved. PROLiNK is manufactured under the authority of FIDA INTERNATIONAL (S) PTE LTD.<br />
All brands or product names are either trademarks or registered trademarks of their respective owners.<br />
2. Disable Proxy Settings<br />
• click the Apple icon on desktop > scroll<br />
down to select System Preferences > click<br />
on Network icon<br />
• Under the Proxies tab:<br />
-Removethe tick in the option box for Web Proxy<br />
(HTTP)<br />
- click Apply Now<br />
H<strong>6300G</strong> <strong>802.11g</strong> <strong>Wireless</strong> 4-port <strong>ADSL2+</strong> <strong>Ethernet</strong> Modem Router Page 2 of 2 Revision 1.0 Jan 2007