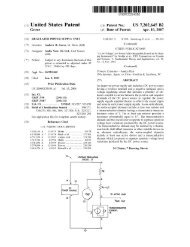
Aikido All in One.pdf - Tube CAD Journal
Aikido All in One.pdf - Tube CAD Journal
Aikido All in One.pdf - Tube CAD Journal

Create successful ePaper yourself
Turn your PDF publications into a flip-book with our unique Google optimized e-Paper software.
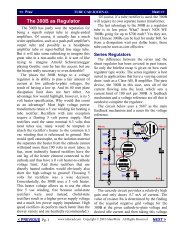
GlassWare Audio Design<br />
Assembly & Test<strong>in</strong>g<br />
Assembly Cleanl<strong>in</strong>ess is essential. Before solder<strong>in</strong>g, be sure to clean both sides the<br />
PCB with 90% to 99% isopropyl alcohol. Do not use dull-look<strong>in</strong>g solder; solder<br />
should sh<strong>in</strong>e. If it doesn’t, first clean away the outer oxidation with some steel wool<br />
or a copper scour<strong>in</strong>g pad. If the resistor leads look <strong>in</strong> the least gray, clean away the<br />
oxidation with either steel wool or a wire sniper’s sharp edges. Admittedly, with new<br />
resistors and a fresh PCB, such metal dull<strong>in</strong>g is rare; but if the parts have sat <strong>in</strong> your<br />
closet for a year or two, then expect a good amount of oxidation to have developed.<br />
First, solder all the small diodes <strong>in</strong> place, and then solder the resistors, rectifiers,<br />
capacitors, and heats<strong>in</strong>ks. Be consistent <strong>in</strong> orient<strong>in</strong>g the resistors; keep all the<br />
tolerance bands on the resistor’s body at the right side as you face the resistor<br />
straight on. This will pay dividends later, if you need to locate a soldered a resistor <strong>in</strong><br />
the wrong location. Because the board is double sided, with traces and pads on each<br />
side, it is easier to solder the resistors from their top side. It is often easier to attach<br />
the LD1085 (heater regulator) to its heats<strong>in</strong>k first (us<strong>in</strong>g the heats<strong>in</strong>k hardware kit)<br />
and then to solder both the heats<strong>in</strong>k and regulator to the PCB at once. As the PCB is<br />
so overbuilt, it is extremely difficult to remove an <strong>in</strong>correctly placed part. Be sure to<br />
confirm all the electrolytic capacitor orientations, as a reversed polarized capacitor<br />
can easily vent (or even explode) when presented with high-voltage. Confirm twice,<br />
solder once.<br />
Test<strong>in</strong>g Before test<strong>in</strong>g, visually <strong>in</strong>spect the PCB for breaks <strong>in</strong> symmetry between left<br />
and right sides. Wear safety eye goggles, which is not as pantywaist a counsel as it<br />
sounds, as a vent<strong>in</strong>g power-supply capacitor will spray hot caustic chemicals. Make a<br />
habit of us<strong>in</strong>g only one hand, with the other hand beh<strong>in</strong>d your back, while attach<strong>in</strong>g<br />
probes or handl<strong>in</strong>g high-voltage gear, as a current flow across your chest can result <strong>in</strong><br />
death. In addition, wear rubber-soled shoes and work <strong>in</strong> dry environment.<br />
Remember, safety first, second, and last.<br />
1. Attach only the heater power supply’s transformer w<strong>in</strong>d<strong>in</strong>g, leav<strong>in</strong>g the<br />
high-voltage transformer leads unattached and electrical tape shrouded, with<br />
no tubes <strong>in</strong> their sockets.<br />
2. Use a variac and slowly br<strong>in</strong>g up the AC voltage, while look<strong>in</strong>g for smoke<br />
or part discoloration or bulg<strong>in</strong>g.<br />
3. Measure the heater regulator’s output voltage without and with a load. If<br />
the heater regulator fails to regulate, try either lower<strong>in</strong>g the heater voltage a<br />
tad, for example 12V <strong>in</strong>stead of 12.6V, as the 0.6V difference might be<br />
enough to br<strong>in</strong>g the regulator back <strong>in</strong>to regulation.<br />
4. Next, power down the heater regulator and attach the high-voltage w<strong>in</strong>d<strong>in</strong>gs<br />
and <strong>in</strong>sert the tubes <strong>in</strong> their sockets.<br />
5. Attach the transformer to a variac and slowly br<strong>in</strong>g up the AC voltage.<br />
6. Measure the voltage across ground and B-plus pads <strong>in</strong> the center of the<br />
PCB; then measure the voltage across capacitors, C4 & C5. If the two<br />
channels differ by more than 10Vdc, try switch<strong>in</strong>g tubes from one channel<br />
to the other. If the imbalance does not follow the tubes, there is a problem,<br />
probably a misplaced part.<br />
Only after you are sure that both heater and B-plus power supplies are work<strong>in</strong>g well,<br />
should you attach the l<strong>in</strong>e-stage amplifier to a power amplifier.