13973: Lightbar Roof Rack Mount - Whelen Engineering
13973: Lightbar Roof Rack Mount - Whelen Engineering
13973: Lightbar Roof Rack Mount - Whelen Engineering

You also want an ePaper? Increase the reach of your titles
YUMPU automatically turns print PDFs into web optimized ePapers that Google loves.
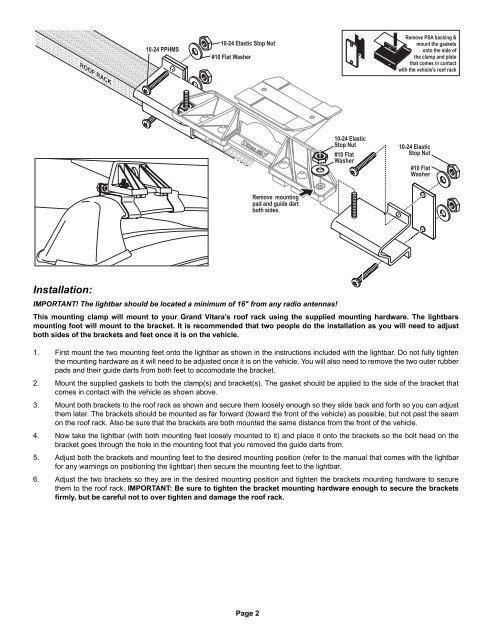
10-24 PPHMS<br />
10-24 Elastic Stop Nut<br />
#10 Flat Washer<br />
Remove PSA backing &<br />
mount the gaskets<br />
onto the side of<br />
the clamp and plate<br />
that comes in contact<br />
with the vehicle's roof rack<br />
ROOF RACK<br />
10-24 Elastic<br />
Stop Nut<br />
#10 Flat<br />
Washer<br />
10-24 Elastic<br />
Stop Nut<br />
#10 Flat<br />
Washer<br />
Remove mounting<br />
pad Remove and guide mounting dart<br />
both sides.<br />
Installation:<br />
IMPORTANT! The lightbar should be located a minimum of 16" from any radio antennas!<br />
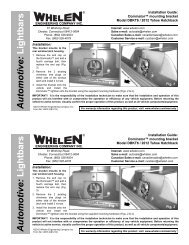
This mounting clamp will mount to your Grand Vitara’s roof rack using the supplied mounting hardware. The lightbars<br />
mounting foot will mount to the bracket. It is recommended that two people do the installation as you will need to adjust<br />
both sides of the brackets and feet once it is on the vehicle.<br />
1. First mount the two mounting feet onto the lightbar as shown in the instructions included with the lightbar. Do not fully tighten<br />
the mounting hardware as it will need to be adjusted once it is on the vehicle. You will also need to remove the two outer rubber<br />
pads and their guide darts from both feet to accomodate the bracket.<br />
2. <strong>Mount</strong> the supplied gaskets to both the clamp(s) and bracket(s). The gasket should be applied to the side of the bracket that<br />
comes in contact with the vehicle as shown above.<br />
3. <strong>Mount</strong> both brackets to the roof rack as shown and secure them loosely enough so they slide back and forth so you can adjust<br />
them later. The brackets should be mounted as far forward (toward the front of the vehicle) as possible, but not past the seam<br />
on the roof rack. Also be sure that the brackets are both mounted the same distance from the front of the vehicle.<br />
4. Now take the lightbar (with both mounting feet loosely mounted to it) and place it onto the brackets so the bolt head on the<br />
bracket goes through the hole in the mounting foot that you removed the guide darts from.<br />
5. Adjust both the brackets and mounting feet to the desired mounting position (refer to the manual that comes with the lightbar<br />
for any warnings on positioning the lightbar) then secure the mounting feet to the lightbar.<br />
6. Adjust the two brackets so they are in the desired mounting position and tighten the brackets mounting hardware to secure<br />
them to the roof rack. IMPORTANT: Be sure to tighten the bracket mounting hardware enough to secure the brackets<br />
firmly, but be careful not to over tighten and damage the roof rack.<br />
Page 2