14616: Dominator™ Mounting Bracket (2012 Tahoe Hatchback)
14616: Dominator™ Mounting Bracket (2012 Tahoe Hatchback)
14616: Dominator™ Mounting Bracket (2012 Tahoe Hatchback)

Create successful ePaper yourself
Turn your PDF publications into a flip-book with our unique Google optimized e-Paper software.
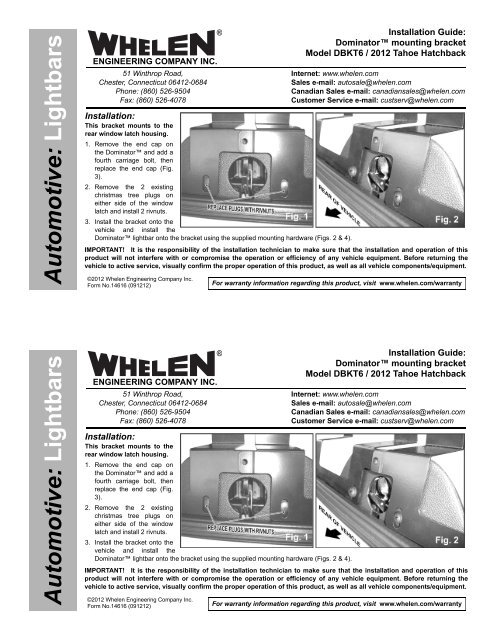
Automotive: LightbarsENGINEERING COMPANY INC.51 Winthrop Road,Chester, Connecticut 06412-0684Phone: (860) 526-9504Fax: (860) 526-4078©<strong>2012</strong> Whelen Engineering Company Inc.Form No.<strong>14616</strong> (091212)®Installation Guide:Dominator mounting bracketModel DBKT6 / <strong>2012</strong> <strong>Tahoe</strong> <strong>Hatchback</strong>Internet: www.whelen.comSales e-mail: autosale@whelen.comCanadian Sales e-mail: canadiansales@whelen.comCustomer Service e-mail: custserv@whelen.comInstallation:This bracket mounts to therear window latch housing.1. Remove the end cap onthe Dominator and add afourth carriage bolt, thenreplace the end cap (Fig.3).2. Remove the 2 existingchristmas tree plugs oneither side of the windowlatch and install 2 rivnuts.3. Install the bracket onto thevehicle and install theDominator lightbar onto the bracket using the supplied mounting hardware (Figs. 2 & 4).IMPORTANT! It is the responsibility of the installation technician to make sure that the installation and operation of thisproduct will not interfere with or compromise the operation or efficiency of any vehicle equipment. Before returning thevehicle to active service, visually confirm the proper operation of this product, as well as all vehicle components/equipment.For warranty information regarding this product, visit www.whelen.com/warrantyAutomotive: LightbarsENGINEERING COMPANY INC.51 Winthrop Road,Chester, Connecticut 06412-0684Phone: (860) 526-9504Fax: (860) 526-4078©<strong>2012</strong> Whelen Engineering Company Inc.Form No.<strong>14616</strong> (091212)®Installation:This bracket mounts to therear window latch housing.1. Remove the end cap onthe Dominator and add afourth carriage bolt, thenreplace the end cap (Fig.3).2. Remove the 2 existingchristmas tree plugs oneither side of the windowlatch and install 2 rivnuts.3. Install the bracket onto thevehicle and install theDominator lightbar onto the bracket using the supplied mounting hardware (Figs. 2 & 4).Installation Guide:Dominator mounting bracketModel DBKT6 / <strong>2012</strong> <strong>Tahoe</strong> <strong>Hatchback</strong>Internet: www.whelen.comSales e-mail: autosale@whelen.comCanadian Sales e-mail: canadiansales@whelen.comCustomer Service e-mail: custserv@whelen.comIMPORTANT! It is the responsibility of the installation technician to make sure that the installation and operation of thisproduct will not interfere with or compromise the operation or efficiency of any vehicle equipment. Before returning thevehicle to active service, visually confirm the proper operation of this product, as well as all vehicle components/equipment.For warranty information regarding this product, visit www.whelen.com/warrantyPage 1
Fig. 3 MOUNTING THE LIGHTBAR TO THE BRACKETFig. 4EXTRUSIONBRACKETDISK GASKET#10-24 X 5/8CARRIAGE BOLT#10-24ELASTICSTOP NUT#10 FLATWASHER#10 X 1/2" PHILLIPSPAN HEAD SHEETMETAL SCREW (1)1/4 - 20 X 1-1/4PHILLIPS PANHEAD METALSCREW (2)1/4 " INTERNALTOOTH LOCKWASHER (2)1/4X .328 IDFLATWASHER(2)End view ofextrusion withendcap removed.1/4 - 20 X .580"RIV NUT (2)10 - 24 X 5/8"CARRIAGEBOLT (4)DISK GASKET#10 FLATWASHER(4)#10-24ELASTICSTOP NUT(4)IMPORTANT NOTE:This installation uses Rivnuts® to securethe brackets to the vehicle. This type ofhardware requires the use of a specializedinstallation tool. Refer to the owners manualincluded with this tool for proper installation.Be sure to follow the mounting holespecifications precisely.WINDOWLATCHHOUSINGBASEEXTRUSIONREAR OF VEHICLE#10 X 1/2" PHILLIPSPAN HEAD SHEETMETAL SCREW (2)Fig. 3 MOUNTING THE LIGHTBAR TO THE BRACKETFig. 4EXTRUSIONBRACKETDISK GASKET#10-24 X 5/8CARRIAGE BOLT#10-24ELASTICSTOP NUT#10 FLATWASHER#10 X 1/2" PHILLIPSPAN HEAD SHEETMETAL SCREW (1)1/4 - 20 X 1-1/4PHILLIPS PANHEAD METALSCREW (2)1/4 " INTERNALTOOTH LOCKWASHER (2)1/4X .328 IDFLATWASHER(2)End view ofextrusion withendcap removed.1/4 - 20 X .580"RIV NUT (2)BASEEXTRUSION10 - 24 X 5/8"CARRIAGEBOLT (4)DISK GASKET#10 FLATWASHER(4)#10-24ELASTICSTOP NUT(4)IMPORTANT NOTE:This installation uses Rivnuts® to securethe brackets to the vehicle. This type ofhardware requires the use of a specializedinstallation tool. Refer to the owners manualincluded with this tool for proper installation.Be sure to follow the mounting holespecifications precisely.WINDOWLATCHHOUSINGREAR OF VEHICLE#10 X 1/2" PHILLIPSPAN HEAD SHEETMETAL SCREW (2)Page 2