Install Guide - Bose FreeSpace DS 16S, DS16SE, and DS100Se ...
Install Guide - Bose FreeSpace DS 16S, DS16SE, and DS100Se ...
Install Guide - Bose FreeSpace DS 16S, DS16SE, and DS100Se ...
Create successful ePaper yourself
Turn your PDF publications into a flip-book with our unique Google optimized e-Paper software.
Trim Plate Kit for <strong>FreeSpace</strong> ® <strong>DS</strong> <strong>16S</strong>, <strong>DS</strong> <strong>16S</strong>E, <strong>and</strong> <strong>DS</strong> 100SE Loudspeakers<br />
US-ONLY • KUN USA • NUR USA • SÓLO EE UU • ÉTATS-UNIS UNIQUEMENT • SOLO USA • ALLEEN VS • ENDAST USA<br />
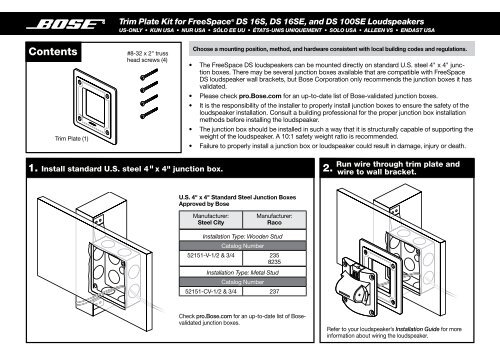
Contents<br />
Trim Plate (1)<br />
#8-32 x 2" truss<br />
head screws (4)<br />
Choose a mounting position, method, <strong>and</strong> hardware consistent with local building codes <strong>and</strong> regulations.<br />
• The <strong>FreeSpace</strong> <strong>DS</strong> loudspeakers can be mounted directly on st<strong>and</strong>ard U.S. steel 4" x 4" junction<br />
boxes. There may be several junction boxes available that are compatible with <strong>FreeSpace</strong><br />
<strong>DS</strong> loudspeaker wall brackets, but <strong>Bose</strong> Corporation only recommends the junction boxes it has<br />
validated.<br />
• Please check pro.<strong>Bose</strong>.com for an up-to-date list of <strong>Bose</strong>-validated junction boxes.<br />
• It is the responsibility of the installer to properly install junction boxes to ensure the safety of the<br />
loudspeaker installation. Consult a building professional for the proper junction box installation<br />
methods before installing the loudspeaker.<br />
• The junction box should be installed in such a way that it is structurally capable of supporting the<br />
weight of the loudspeaker. A 10:1 safety weight ratio is recommended.<br />
• Failure to properly install a junction box or loudspeaker could result in damage, injury or death.<br />
1. <strong>Install</strong> st<strong>and</strong>ard U.S. steel 4" x 4" junction box.<br />
2.<br />
Run wire through trim plate <strong>and</strong><br />
wire to wall bracket.<br />
U.S. 4" x 4" St<strong>and</strong>ard Steel Junction Boxes<br />
Approved by <strong>Bose</strong><br />
Manufacturer:<br />
Steel City<br />
Manufacturer:<br />
Raco<br />
<strong>Install</strong>ation Type: Wooden Stud<br />
Catalog Number<br />
52151-V-1/2 & 3/4 235<br />
8235<br />
<strong>Install</strong>ation Type: Metal Stud<br />
Catalog Number<br />
52151-CV-1/2 & 3/4 237<br />
Check pro.<strong>Bose</strong>.com for an up-to-date list of <strong>Bose</strong>validated<br />
junction boxes.<br />
Refer to your loudspeaker’s <strong>Install</strong>ation <strong>Guide</strong> for more<br />
information about wiring the loudspeaker.
3. Attach loudspeaker wall bracket to trim plate.<br />
Use (2) #8-32 x 2" truss head screws provided.<br />
Note: Trim plate has two threaded inserts which should be oriented at the corners<br />
opposite of the junction box tabs.<br />
4. Secure wall bracket <strong>and</strong> trim plate to junction box.<br />
Use (2) #8-32 x 2" truss head screws provided.<br />
Do not overtighten.<br />
If using a power<br />
drill, set to a low<br />
torque setting.<br />
5. Mount loudspeaker to wall bracket.<br />
Do not overtighten.<br />
If using a power drill, set to a low torque setting.<br />
Refer to your<br />
loudspeaker’s<br />
<strong>Install</strong>ation <strong>Guide</strong><br />
for more information<br />
about mounting the<br />
loudspeaker to the<br />
wall bracket<br />
©2008 <strong>Bose</strong> Corporation, The Mountain, Framingham, MA 01701-9168 USA AM316792 Rev.02


