ice maker combo / refrigerador con maquina de ... - Avanti Products
ice maker combo / refrigerador con maquina de ... - Avanti Products
ice maker combo / refrigerador con maquina de ... - Avanti Products

Create successful ePaper yourself
Turn your PDF publications into a flip-book with our unique Google optimized e-Paper software.
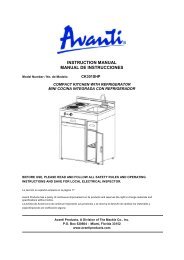
ICE MAKER COMBO / REFRIGERADOR CON MAQUINA DE HACER HIELO<br />
INSTRUCTION MANUAL / MANUAL DE INSTRUCCIONES<br />
MODEL NUMBER / NO. DE MODELO:<br />
IMR28SS<br />
BEFORE USE, PLEASE READ AND FOLLOW ALL SAFETY RULES AND OPERATING<br />
INSTRUCTIONS.<br />
LA SECCION EN ESPAÑOL EMPIEZA EN LA PAGINA 15.<br />
AVANTI HAS A POLICY OF CONTINUOUS IMPROVEMENT ON ITS PRODUCTS AND RESERVES THE RIGHT TO CHANGE<br />
MATERIALS AND SPECIFICATIONS WITHOUT NOTICE.<br />
AVANTI PRODUCTS, A DIVISION OF THE MACKLE CO., INC.<br />
P.O. BOX 520604 - MIAMI, FLORIDA 33152<br />
WWW.AVANTIPRODUCTS.COM
ICE MAKER SAFETY<br />
Your safety and the safety of others are very important.<br />
We have provi<strong>de</strong>d many important safety messages in this manual for your appliance. Always read and<br />
obey all safety messages.<br />
This is the Safety Alert Symbol. This symbol alerts you to<br />
potential hazards that can kill or injure you and others.<br />
All safety messages will follow the Safety Alert Symbol<br />
with either the words” DANGER”, “WARNING” or “CAUTION”.<br />
Danger means that failure to<br />
heed this safety statement may<br />
result in severe personal injury or <strong>de</strong>ath.<br />
Warning means that failure to heed this<br />
safety statement may result in extensive<br />
product damage, serious personal injury, or<br />
<strong>de</strong>ath.<br />
Caution means that failure to heed this safety<br />
statement may result in minor or mo<strong>de</strong>rate<br />
personal injury, property or equipment<br />
damage.<br />
All safety messages will alert you to what the potential hazard is, tell you how to reduce the chance of<br />
injury, and let you know what can happen if the instructions are not followed.<br />
2
IMPORTANT SAFEGUIDES<br />
Before the appliance is used, it must be properly positioned and installed as<br />
<strong>de</strong>scribed in this manual, so read the manual carefully. To reduce the risk of fire,<br />
electrical shock or injury when using the appliance, follow basic precautions,<br />
including the following:<br />
• Plug into a groun<strong>de</strong>d 3-prong outlet, do not remove grounding prong, do not use an adapter, and do not use an<br />
extension cord.<br />
• Replace all panels before operating.<br />
• It is recommen<strong>de</strong>d that a separate circuit, serving only your appliance be provi<strong>de</strong>d. Use receptacles that<br />
cannot be turned off by a switch or pull chain.<br />
• Never clean appliance parts with flammable fluids. These fumes can create a fire hazard or explosion. And do<br />
not store or use gasoline or other flammable vapors and liquids in the vicinity of this or any other appliance.<br />
The fumes can create a fire hazard or explosion.<br />
• Before proceeding with cleaning and maintenance operations, make sure the power line of the unit is<br />
dis<strong>con</strong>nected.<br />
• Do not <strong>con</strong>nect or dis<strong>con</strong>nect the electric plug when your hands are wet.<br />
• Unplug the appliance or dis<strong>con</strong>nect power before cleaning or servicing. Failure to do so can result in electrical<br />
shock or <strong>de</strong>ath.<br />
• Do not attempt to repair or replace any part of your appliance unless it is specifically recommen<strong>de</strong>d in this<br />
manual. All other servicing should be referred to a qualified technician.<br />
FOLLOW WARNING CALL OUTS BELOW ONLY WHEN APPLICABLE TO YOUR MODEL<br />
• Use two or more people to move and install appliance. Failure to do so can result in back or other injury.<br />
• To ensure proper ventilation for your appliance, the front of the unit must be completely unobstructed. Choose<br />
a well-ventilated area with temperatures above 60°F (16°C) and below 90°F (32°C). This unit must be installed<br />
in an area protected from the elements, such as wind, rain, water spray or drips.<br />
• The appliance should not be located next to ovens, grills or other sources of high heat.<br />
• The appliance must be installed with all electrical, water and drain <strong>con</strong>nections in accordance with state and<br />
local co<strong>de</strong>s. A standard electrical supply (115 V AC only, 60 Hz), properly groun<strong>de</strong>d in accordance with the<br />
National Electrical Co<strong>de</strong> and local co<strong>de</strong>s and ordinances is required.<br />
• Do not kink or pinch the power supply cord of appliance.<br />
• The fuse (or circuit breaker) size should be 15 amperes.<br />
• It is important for the appliance to be leveled in or<strong>de</strong>r to work properly. You may need to make several<br />
adjustments to level it.<br />
• All installation must be in accordance with local plumbing co<strong>de</strong> requirements.<br />
• Make certain that the pipes are not pinched or kinked or damaged during installation.<br />
• Check for leaks after <strong>con</strong>nection.<br />
• Never allow children to operate, play with or crawl insi<strong>de</strong> the ICE MAKER.<br />
• If you use the drainage <strong>con</strong>tainer, you MUST set the Drain Select switch to OFF or the water can overflow from<br />
the drainage <strong>con</strong>tainer<br />
• Although the unit has been tested at the factory, due to long-term transit and storage, the first batch of <strong>ice</strong><br />
cubes must be discar<strong>de</strong>d.<br />
• Do not use solvent-based cleaning agents or abrasives on the interior. These cleaners may damage or<br />
discolor the interior.<br />
• Do not use this apparatus for other than its inten<strong>de</strong>d purpose.<br />
3
HELP US HELP YOU …<br />
READ THIS GUIDE CAREFULLY.<br />
IT IS INTENDED TO HELP YOU OPERATE<br />
AND MAINTAIN YOUR NEW APPLIANCE<br />
PROPERLY.<br />
KEEP IT HANDY TO ANSWER YOUR<br />
QUESTIONS.<br />
IF YOU DON'T UNDERSTAND SOMETHING<br />
OR YOU NEED FURTHER assistance,<br />
PLEASE CALL:<br />
AVANTI CUSTOMER SERVICE<br />
800-220-5570<br />
KEEP PROOF OF ORIGINAL PURCHASE<br />
DATE (SUCH AS YOUR SALES SLIP) WITH<br />
THIS GUIDE TO ESTABLISH THE<br />
WARRANTY PERIOD.<br />
CAUTION:<br />
THIS APPLIANCE IS NOT DESIGNED<br />
FOR THE STORAGE OF MEDICINE<br />
OR OTHER MEDICAL PRODUCTS.<br />
WRITE DOWN THE MODEL AND SERIAL<br />
NUMBERS.<br />
YOU'LL FIND THEM ON A PLATE LOCATED<br />
ON THE REAR WALL OF THE APPLIANCE.<br />
PLEASE WRITE THESE NUMBERS HERE:<br />
____________________________________<br />
DATE OF PURCHASE<br />
____________________________________<br />
MODEL NUMBER<br />
____________________________________<br />
SERIAL NUMBER<br />
USE THESE NUMBERS IN ANY<br />
CORRESPONDENCE OR SERVICE CALLS<br />
CONCERNING YOUR APPLIANCE.<br />
IF YOU RECEIVED A DAMAGED<br />
APPLIANCE, IMMEDIATELY CONTACT THE<br />
DEALER (OR BUILDER) THAT SOLD YOU<br />
THE APPLIANCE.<br />
SAVE TIME AND MONEY. BEFORE YOU<br />
CALL FOR SERVICE, CHECK THE<br />
TROUBLESHOOTING GUIDE. IT LISTS<br />
CAUSES OF MINOR OPERATING<br />
PROBLEMS THAT YOU CAN CORRECT<br />
YOURSELF.<br />
IF YOU NEED SERVICE<br />
WE'RE PROUD OF OUR SERVICE AND<br />
WANT YOU TO BE PLEASED. IF FOR SOME<br />
REASON YOU ARE NOT HAPPY WITH THE<br />
SERVICE YOU RECEIVE, HERE ARE SOME<br />
STEPS TO FOLLOW FOR FURTHER<br />
ASSISTANCE.<br />
FIRST, CONTACT THE PEOPLE WHO<br />
SERVICED YOUR APPLIANCE. EXPLAIN<br />
WHY YOU ARE NOT PLEASED. IN MOST<br />
CASES, THIS WILL SOLVE THE PROBLEM.<br />
NEXT, IF YOU ARE STILL NOT PLEASED,<br />
WRITE ALL THE DETAILS, INCLUDING<br />
YOUR TELEPHONE NUMBER, AND SEND IT<br />
TO:<br />
CUSTOMER SERVICE<br />
AVANTI PRODUCTS<br />
10880 NW 30 th STREET<br />
MIAMI, FL 33172 USA<br />
4
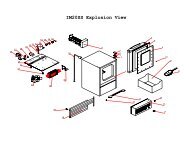
PARTS AND FEATURES<br />
1. FREEZER DOOR<br />
2. ICE BOX<br />
3. GLASS CRISPER LID<br />
4. CRISPER DRAWERS<br />
5. ON / OFF CONTROL SWITCH<br />
6. TEMPERATURE CONTROL<br />
7. DOOR BINS<br />
8. BOTTOM GRILLE<br />
9. ADJUSTABLE LEG<br />
5
TABLE OF CONTENTS<br />
ICE MAKER SAFETY 2<br />
IMPORTANT SAFEGUIDES 3<br />
HELP US AND HELP YOU … 4<br />
PARTS AND FEATURES 5<br />
IMPORTANT SAFETY INSTRUCTIONS 7<br />
INSTALLATION INSTRUCTIONS 7<br />
BEFORE USING YOUR APPLIANCE 7<br />
INSTALLATION OF YOUR APPLIANCE 7<br />
ELECTRICAL CONNECTION 8<br />
EXTENSION CORD 8<br />
CONNECTING THE WATER SUPPLY 8<br />
REVERSING THE DOOR SWING OF YOUR APPLIANCE 9<br />
OPERATING YOUR ICE MAKER 9<br />
INTIAL START-UP ICE MAKING OPERATION 9<br />
CARE AND MAINTENANCE 11<br />
CLEANING YOUR APPLIANCE 11<br />
POWER FAILURE 11<br />
VACATION TIME/STORAGE 11<br />
MOVING YOUR APPLIANCE 11<br />
ENERGY SAVING TIP 11<br />
TROUBLESHOOTING GUIDE 12<br />
SERVICE FOR YOUR APPLIANCE 13<br />
WIRING DIAGRAM 13<br />
YOUR AVANTI PRODUCTS WARRANTY 14<br />
INSTRUCCIONES EN ESPAÑOL 15~18<br />
REGISTRATION INFORMATION 19<br />
6
IMPORTANT SAFETY INSTRUCTIONS<br />
WARNING<br />
TO REDUCE THE RISK OF FIRE,<br />
ELECTRICAL SHOCK, OR INJURY WHEN<br />
USING YOUR APPLIANCE, FOLLOW THESE<br />
BASIC PRECAUTIONS:<br />
• READ ALL INSTRUCTIONS BEFORE USING THE APPLIANCE.<br />
• DANGER OR WARNING: RISK OF CHILD ENTRAPMENT.<br />
CHILD ENTRAPMENT AND SUFFOCATION ARE NOT PROBLEMS OF THE PAST.<br />
JUNKED OR ABANDONED APPLIANCES ARE STILL DANGEROUS. . . EVEN IF THEY<br />
WILL “JUST SIT IN THE GARAGE A FEW DAYS.”<br />
• BEFORE YOU THROW AWAY YOUR APPLIANCE: REMOVE THE DOORS. LEAVE THE<br />
SHELVES IN PLACE SO THAT CHILDREN MAY NOT EASILY CLIMB INSIDE.<br />
• NEVER ALLOW CHILDREN TO OPERATE, PLAY WITH, OR CRAWL INSIDE THE<br />
APPLIANCE.<br />
• NEVER CLEAN APPLIANCE PARTS WITH FLAMMABLE FLUIDS. THE FUMES CAN<br />
CREATE A FIRE HAZARD OR EXPLOSION.<br />
• DO NOT STORE OR USE GASOLINE OR ANY OTHER FLAMMABLE VAPORS AND<br />
LIQUIDS IN THE VICINITY OF THIS OR ANY OTHER APPLIANCE. THE FUMES CAN<br />
CREATE A FIRE HAZARD OR EXPLOSION.<br />
-SAVE THESE INSTRUCTIONS-<br />
INSTALLATION INSTRUCTIONS<br />
BEFORE USING YOUR APPLIANCE<br />
• Remove the exterior and interior packing.<br />
• Check to be sure you have all of the following parts:<br />
• 1 <strong>ice</strong> box<br />
• 2 door bins<br />
• 2 crisper drawers<br />
• 2 glass shelves<br />
• 1 plastic scoop<br />
• 25 feet hose<br />
• 1 glass crisper lid<br />
• 1 instruction manual<br />
• 1 door handle assembly<br />
• Before <strong>con</strong>necting the appliance to the power source, let it stand upright for approximately 2 hours.<br />
This will reduce the possibility of a malfunction in the cooling system from handling during<br />
transportation.<br />
• Clean the interior surface with lukewarm water using a soft cloth.<br />
INSTALLATION OF YOUR APPLIANCE<br />
• This appliance is <strong>de</strong>signed to be recessed or built-in (fully recessed).<br />
• Place your appliance on a floor that is strong enough to support the appliance when it is fully<br />
loa<strong>de</strong>d. Remember that the unit will be significantly heavier once it is fully loa<strong>de</strong>d. To level your<br />
appliance, adjust the legs at the front of the appliance.<br />
• Locate the appliance away from direct sunlight and sources of heat (stove, heater, radiator, etc.).<br />
Direct sunlight may affect the acrylic coating and heat sources may increase electrical<br />
<strong>con</strong>sumption. Extreme cold ambient temperatures may also cause the appliance not to perform<br />
properly.<br />
• Avoid locating the appliance in moist areas. Too much moisture in the air will cause frost to form<br />
quickly on the evaporator requiring more frequent <strong>de</strong>frosting of the appliance.<br />
• Plug the appliance into an exclusive properly-installed and groun<strong>de</strong>d wall outlet. Do not un<strong>de</strong>r any<br />
7
circumstances cut or remove the third (ground) prong from the power cord. Any questions<br />
<strong>con</strong>cerning power and/or grounding should be directed toward a certified electrician or an<br />
authorized <strong>Avanti</strong> <strong>Products</strong> serv<strong>ice</strong> center.<br />
ELECTRICAL CONNECTION<br />
WARNING<br />
IMPROPER USE OF THE GROUNDED PLUG CAN RESULT IN THE RISK OF ELECTRICAL<br />
SHOCK. IF THE POWER CORD IS DAMAGED, HAVE IT REPLACED BY AN AUTHORIZED<br />
AVANTI PRODUCTS SERVICE CENTER.<br />
• This appliance should be properly groun<strong>de</strong>d for your safety. The power cord of this appliance is<br />
equipped with a three-prong plug which mates with standard three prong wall outlets to minimize<br />
the possibility of electrical shock.<br />
• Do not un<strong>de</strong>r any circumstances cut or remove the third ground prong from the power cord<br />
supplied.<br />
• Never use an extension cord to <strong>con</strong>nect power to the unit.<br />
• Never use a two-prong grounding adapter.<br />
• Where a two-prong wall receptacle is encountered, <strong>con</strong>tact a qualified electrician to have it replaced<br />
with a 3-prong receptacle in accordance with applicable electrical co<strong>de</strong>s.<br />
• This appliance requires a standard 115/120 volts a.c.~/60hz electrical ground outlet with<br />
three-prong receptacle.<br />
• The cord should be secured behind the appliance and not left exposed or dangling, in or<strong>de</strong>r to<br />
prevent acci<strong>de</strong>ntal injury.<br />
• The appliance should always be plugged into its own individual electrical outlet which has a voltage<br />
rating that matches the rating label on the appliance. This provi<strong>de</strong>s the best performance and also<br />
prevents overloading of house wiring circuits, which could result in a fire hazard. Never unplug the<br />
appliance by pulling the power cord. Always grip the plug firmly and pull straight out from the<br />
receptacle. Repair or replace immediately all power cords that have become frayed or otherwise<br />
damaged. Do not use a cord that shows cracks or abrasion damage along its length or at either end.<br />
When moving the appliance, be careful not to damage the power cord.<br />
EXTENSION CORD<br />
Because of potential safety hazards un<strong>de</strong>r certain <strong>con</strong>ditions, it is strongly recommen<strong>de</strong>d that you do<br />
not use an extension cord with this appliance. However, if you must use an extension cord it is<br />
absolutely necessary that it be a UL/CUL-Listed, 3-wire grounding type appliance extension cord<br />
having a grounding type plug and outlet, and that the electrical rating of the cord be 115 volts and at<br />
least 10 amperes.<br />
‣ CONNECTING THE WATER SUPPLY<br />
• Review the state and local plumbing co<strong>de</strong>s before you install the unit. All the necessary hardware is<br />
not provi<strong>de</strong>d for installation so you must hire a professional l<strong>ice</strong>nsed plumber to complete the<br />
installation.<br />
• Connect tubing (supplied with unit) to the nearest cold water source. Connect sufficient tubing to the<br />
unit to allow the appliance to be moved freely for cleaning and serv<strong>ice</strong>. Also make sure that the<br />
tubing is not pinched or damaged during transportation.<br />
• Position unit to allow free airflow through the front grille (see sketch 1). Wipe off insi<strong>de</strong> of unit and<br />
<strong>ice</strong> bucket with a damp cloth.<br />
8
REVERSING THE DOOR SWING OF YOUR APPLIANCE<br />
This appliance has the capability of the door opening from either the left or right si<strong>de</strong>. The unit is<br />
<strong>de</strong>livered to you with the door opening from the left si<strong>de</strong>. Should you <strong>de</strong>sire to reverse the opening<br />
direction, please call customer serv<strong>ice</strong> for reversal instructions.<br />
OPERATING YOUR ICE MAKER<br />
★ INITIAL START-UP ICE MAKING OPERATION<br />
1. Plug the appliance into a 115/120v polarized and groun<strong>de</strong>d wall electrical outlet.<br />
2. To run the refrigerator, place the on-off switch, located on the front grille, in the “on” position<br />
★ RAPID ICE MAKING<br />
1. When the rapid <strong>ice</strong> button is pushed, the system will begin to make <strong>ice</strong>. The rapid <strong>ice</strong> indicator will<br />
appear on display, and “00” will be displayed on temperature window.<br />
2. During rapid <strong>ice</strong> making cycle, other buttons are disabled.<br />
3. Push the rapid <strong>ice</strong> button again and the system will be switched to refrigerator mo<strong>de</strong>. You can set<br />
temperature as you <strong>de</strong>sire.<br />
SETTING THE TEMPERATURE<br />
1. The temperature range is between 37 to 50°F (3-10°C). You can set the temperature as you <strong>de</strong>sire<br />
by pushing the UP or DOWN button. When you push the two buttons for the first time, the LED<br />
readout will show the original temperature set previously (the <strong>de</strong>fault temperature preset is 46°F)<br />
2. The temperature setting will increase 1°F or 1°C each time the UP button is pressed, and will<br />
<strong>de</strong>crease 1°F or 1°C each time the DOWN button is pressed<br />
★ SETTING DEFROST<br />
1. System will <strong>de</strong>frost automatically every 6 hours.<br />
2. If you wish to <strong>de</strong>frost the unit manually, push all the 4 buttons simultaneous for 2 se<strong>con</strong>ds, the<br />
system will <strong>de</strong>frost.<br />
FAHRENHEIT / CELSIUS SWITCH<br />
You can switch the temperature display setting from Fahrenheit to Celsius by pushing the<br />
“Thermometer” button. An indicator will appear on the display accordingly.<br />
INTERIOR LIGHT<br />
When the door is opened or closed, the interior LED light will turn on or off automatically.<br />
Note:<br />
1. When there is system malfunction, “ex” will be displayed on the digital LED display.<br />
2. If the unit is unplugged, has lost power, or is turned off, you must wait 2 minutes before restarting<br />
the unit. If you attempt to restart before this time <strong>de</strong>lay, the appliance will not start.<br />
IMPORTANT: Throw away all <strong>ice</strong> cubes ma<strong>de</strong> during the first 3 hours of operation.<br />
• Make sure the water supply is on. As soon as the inner mechanism reaches the proper temperature,<br />
the <strong>ice</strong><strong>maker</strong> mechanism will fill the mold with water.<br />
• The first cubes may be small because of air in the water line. Later cubes will be of standard<br />
9
crescent moon type size and shape.<br />
• Approximate time for the first cycle is between 30-40 minutes.<br />
• Each cycle will use approximately 140 ml of water, so you should have a full tray after 11 hours.<br />
• When the <strong>ice</strong> bucket is full, the <strong>ice</strong> making mechanism will automatically shut off.<br />
However the refrigeration system will <strong>con</strong>tinue to cool and maintain the cube<br />
supply.<br />
• Ice <strong>de</strong>livery may be interrupted by raising the metal arm into an upright position<br />
(see sketch 2)<br />
• If the <strong>ice</strong><strong>maker</strong> is not used regularly, it is recommen<strong>de</strong>d that the <strong>ice</strong> bucket be<br />
SKETCH 2<br />
emptied periodically to ensure fresh <strong>ice</strong>.<br />
• Sometimes the cubes may appear cloudy. This no cause for <strong>con</strong>cern and has nothing to do with the<br />
taste or chemical make-up of the water.<br />
• The front bottom grille should be kept free of dust and lint to permit free airflow.<br />
10
CARE AND MAINTENANCE<br />
Cleaning your appliance<br />
• Turn the unit off, unplug the appliance and remove all buckets, drawers, crispers and shelves.<br />
• Wash the insi<strong>de</strong> with a warm water and baking soda solution. The solution should be about 2<br />
tablespoons of baking soda to a quart of water.<br />
• Wash the bucket, drawers and crispers with a mild <strong>de</strong>tergent solution.<br />
• The outsi<strong>de</strong> of the appliance should be cleaned with mild <strong>de</strong>tergent and warm water.<br />
• The <strong>con</strong><strong>de</strong>nser should be vacuumed when it becomes dusty or dirty.<br />
CAUTION:<br />
Failure to unplug the appliance could result in electrical shock or personal injury.<br />
Power failure<br />
Most power failures are corrected within a few hours and should not affect the temperature of your<br />
appliance if you minimize the number of times the door is opened. If the power is going to be off for a<br />
longer period of time, you need to take the proper steps to protect your food.<br />
Vacation time/storage<br />
1. Shut off water supply at the main water valve.<br />
2. Dis<strong>con</strong>nect the water supply line from the valve.<br />
3. Allow unit to run for an hour or two until all remaining <strong>ice</strong> cubes have been ejected.<br />
4. Dis<strong>con</strong>nect unit from main power source.<br />
5. Dry out excess water from <strong>ice</strong> making mechanism.<br />
6. Leave the door open at least two inches.<br />
Moving your appliance<br />
• Securely tape down all loose items insi<strong>de</strong> your appliance.<br />
• Turn the leveling screw up to the base to avoid damage.<br />
• Tape the door shut.<br />
• Be sure the appliance stays in the upright position during transportation.<br />
Energy saving tip<br />
• The appliance should be located in the coolest area of the room, away from heat producing<br />
appliances or heating ducts, and out of the direct sunlight.<br />
11
PROBLEMS WITH YOUR APPLIANCE<br />
You can solve many common appliance problems easily, saving you the cost of a possible serv<strong>ice</strong> call.<br />
Try the suggestions below to see if you can solve the problem before calling a serv<strong>ice</strong>r.<br />
TROUBLESHOOTING GUIDE<br />
PROBLEM<br />
POSSIBLE CAUSE<br />
Appliance does not operate<br />
Not plugged in.<br />
The circuit breaker tripped or there is a blown fuse.<br />
The appliance has not been turned on.<br />
Not producing <strong>ice</strong>, unit not cold enough<br />
Airflow to front grille blocked.<br />
The appliance arm is set to the off position.<br />
Water supply is turned off.<br />
Water line is crimped.<br />
Compressor turns on and off frequently<br />
Vibrations<br />
The appliance seems to make too much noise.<br />
The door will not close properly<br />
Ice cubes are melted together<br />
The room temperature is hotter than normal.<br />
The door is opened too often.<br />
The door is not closed completely.<br />
The door gasket does not seal properly.<br />
The appliance does not have the correct<br />
clearances.<br />
Check to assure that the appliance is level.<br />
The rattling noise may come from the flow of the<br />
refrigerant, which is normal.<br />
As each cycle ends, you may hear gurgling<br />
sounds caused by the flow of refrigerant in your<br />
appliance.<br />
Contraction and expansion of the insi<strong>de</strong> walls may<br />
cause popping and crackling noises.<br />
The appliance is not level.<br />
The appliance is not level.<br />
The door is reversed and not properly installed.<br />
The gasket is dirty.<br />
The bucket is out of position.<br />
Appliance door is opened too often.<br />
12
SERVICE FOR YOUR APPLIANCE<br />
We are proud of our customer serv<strong>ice</strong> organization and the network of professional serv<strong>ice</strong> technicians<br />
that provi<strong>de</strong> serv<strong>ice</strong> on your <strong>Avanti</strong> appliance. With the purchase of your <strong>Avanti</strong> appliance, you can be<br />
<strong>con</strong>fi<strong>de</strong>nt that if you ever need additional information or assistance, the <strong>Avanti</strong> <strong>Products</strong> customer<br />
serv<strong>ice</strong> team will be here for you. Just call us toll-free.<br />
PRODUCT INFORMATION<br />
800-323-5029<br />
PART ORDERS<br />
800-220-5570<br />
IN-HOME REPAIR SERVICE<br />
800-220-5570<br />
AVANTI PRODUCTS CUSTOMER SERVICE<br />
Whatever your questions are about our products,<br />
help is available.<br />
You may or<strong>de</strong>r parts and accessories that will be<br />
<strong>de</strong>livered directly to your home, by personal<br />
check, money or<strong>de</strong>r, MasterCard, or Visa.<br />
WIRING DIAGRAM<br />
An <strong>Avanti</strong> <strong>Products</strong> authorized serv<strong>ice</strong> center will<br />
provi<strong>de</strong> expert repair serv<strong>ice</strong>, scheduled at a time<br />
that is <strong>con</strong>venient for you. Our trained serv<strong>ice</strong>rs<br />
know your appliance insi<strong>de</strong> and out.<br />
13
YOUR AVANTI PRODUCTS<br />
WARRANTY<br />
STAPLE YOUR SALES RECEIPT HERE.<br />
PROOF OF ORIGINAL PURCHASE DATE IS<br />
NEEDED TO OBTAIN SERVICE UNDER<br />
WARRANTY.<br />
WHAT IS COVERED<br />
LIMITED ONE-YEAR<br />
WARRANTY<br />
FOR ONE YEAR FROM THE DATE OF<br />
PURCHASE BY THE ORIGINAL OWNER,<br />
AVANTI PRODUCTS WILL, AT ITS OPTION,<br />
REPAIR OR REPLACE ANY PART OF THE<br />
APPLIANCE WHICH PROVES TO BE<br />
DEFECTIVE IN MATERIAL OR<br />
WORKMANSHIP UNDER NORMAL USE.<br />
DURING THIS PERIOD AVANTI PRODUCTS<br />
WILL PROVIDE ALL PARTS AND LABOR<br />
NECESSARY TO CORRECT SUCH<br />
DEFECTS FREE OF CHARGE, SO LONG AS<br />
THE APPLIANCE HAS BEEN INSTALLED<br />
AND OPERATED IN ACCORDANCE WITH<br />
THE WRITTEN INSTRUCTIONS IN THIS<br />
MANUAL. IN RENTAL OR COMMERCIAL<br />
USE, THE WARRANTY PERIOD IS 90 DAYS.<br />
ALL AVANTI APPLIANCES OF 3.5 CUBIC<br />
FEET CAPACITY OR LESS MUST BE<br />
BROUGHT/SENT TO THE APPLIANCE<br />
SERVICE SHOP FOR REPAIR.<br />
LIMITED SECOND THROUGH<br />
FIFTH YEAR WARRANTY<br />
FOR THE SECOND THROUGH THE FIFTH YEAR<br />
FROM DATE OF ORIGINAL PURCHASE, AVANTI<br />
PRODUCTS WILL PROVIDE A REPLACEMENT<br />
COMPRESSOR FREE OF CHARGE DUE TO A<br />
FAILURE. YOU ARE RESPONSIBLE FOR THE<br />
SERVICE LABOR AND FREIGHT CHARGES. IN<br />
RENTAL OR COMMERCIAL USE, THE LIMITED<br />
COMPRESSOR WARRANTY IS ONE YEAR AND<br />
NINE MONTHS. COST TO MOVE THE APPLIANCE<br />
TO THE SERVICERS’ SHOP AND BACK TO THE<br />
USER'S HOME, AS MAY BE REQUIRED, ARE THE<br />
USER'S RESPONSIBILITY.<br />
WHAT IS NOT COVERED<br />
• INCIDENTAL OR CONSEQUENTIAL<br />
DAMAGES.<br />
• PARTS AND LABOR COSTS FOR THE<br />
FOLLOWING WILL NOT BE CONSIDERED<br />
AS WARRANTY:<br />
• DOOR SPRINGS AND/OR FRAMES.<br />
• INNER DOOR PANELS AND/OR DOOR<br />
SUPPORTS.<br />
• CHEST APPLIANCE LID LINERS.<br />
• PLASTIC CABINET LINERS.<br />
• THE REMOVAL AND REINSTALLATION OF<br />
YOUR APPLIANCE IF IT IS INSTALLED IN AN<br />
INACCESSIBLE LOCATION OR IS NOT<br />
INSTALLED IN ACCORDANCE WITH<br />
PUBLISHED INSTALLATION INSTRUCTIONS.<br />
• SHIPPING AND HANDLING COSTS<br />
ASSOCIATED WITH THE REPLACMENT OF<br />
THE UNIT.<br />
14<br />
• REPAIRS PERFORMED BY UNAUTHORIZED<br />
SERVICERS.<br />
• SERVICE CALLS THAT DO NOT INVOLVE<br />
DEFECTS IN MATERIAL OR WORKMANSHIP SUCH<br />
AS CUSTOMER EDUCATION, DOOR REVERSAL,<br />
OR PROPER INSTALLATION.<br />
• SERVICE CALLS THAT ARE RELATED TO<br />
EXTERNAL PROBLEMS, SUCH AS ABUSE,<br />
MISUSE, INADEQUATE ELECTRICAL POWER,<br />
ACCIDENTS, FIRE, FLOODS, OR ACTS OF GOD.<br />
• SURCHARGES INCLUDING, BUT NOT LIMITED TO,<br />
ANY AFTER HOUR, WEEKEND, OR HOLIDAY<br />
SERVICE CALLS , TOLLS, FERRY TRIP CHARGES,<br />
OR MILEAGE EXPENSES FOR SERVICE CALLS TO<br />
REMOTE AREAS, INCLUDING THE STATE OF<br />
ALASKA<br />
• REPLACEMENT OF HOUSE FUSES OR<br />
RESETTING CIRCUIT BREAKERS.<br />
• FAILURE OF THE PRODUCT IF IT IS USED FOR<br />
OTHER THAN ITS INTENDED PURPOSE.<br />
• THIS WARRANTY DOES NOT APPLY OUTSIDE THE<br />
CONTINENTAL U.S.A.
INSTRUCCIONES EN ESPAÑOL<br />
PRECAUCION<br />
PARA REDUCIR EL RIESGO DE INCENDIO,<br />
DESCARGA ELECTRICA, O DAÑO CUANDO<br />
USE SU ELECTRODOMESTICO, SIGA LAS<br />
SIGUIENTES PRECAUCIONES.<br />
• LEA TODAS LAS INSTRUCCIONES ANTES DE USAR SU ELECTRODOMESTICO.<br />
• PELIGRO O PRECAUCION: EXISTE EL RIESGO QUE LOS NIÑOS QUEDEN<br />
ATRAPADOS.<br />
• NIÑOS ATRAPADOS O SOFOCAMIENTO NO SON UN PROBLEMA DEL PASADO. LOS<br />
ELECTRODOMESTICOS SON PELIGROSOS AUN SI SOLO LOS DEJA EN EL GARAJE<br />
POR UN PAR DE DIAS.<br />
• ANTES DE DESECHAR SU MAQUINA DE HACER HIELO O REFRIGERADOR USADO:<br />
QUITELE LAS PUERTAS. DEJE LAS REPISAS EN SU LUGAR PARA EVITAR QUE LOS<br />
NIÑOS SE QUEDEN ATRAPADOS.<br />
• NO PERMITA QUE LOS NIÑOS MANEJEN, JUEGUEN O ENTREN DENTRO DEL<br />
ELECTRODOMESTICO.<br />
• NO LIMPIE SU ELECTRODOMESTICO CON LIQUIDOS INFLAMABLES. LOS GASES<br />
PUEDEN OCASIONAR FUEGO O UNA EXPLOSION.<br />
• NO GUARDE NI USE GASOLINA U OTROS LIQUIDOS INFLAMABLES CERCA DE ESTE<br />
O DE CUALQUIER OTRO ELECTRODOMESTICO. LOS VAPORES PUEDEN<br />
OCASIONAR FUEGO O EXPLOSION.<br />
- GUARDE ESTAS INSTRUCCIONES.-<br />
INSTRUCCIONES PARA LA INSTALACION<br />
‣ ANTES DE USAR SU EQUIPO<br />
• RETIRE LA ENVOLTURA INTERNA Y EXTERNA.<br />
• VERIFIQUE QUE TENGA LAS SIGUIENTES PARTES:<br />
o UNA GAVETA PARA HIELO<br />
o DOS GAVETAS CON FRENTE TRANSPARENTE, CON CRISTAL EN LA PARTE<br />
SUPERIOR<br />
o 2 COMPARTIMENTOS EN LA PUERTA<br />
o UN MANUAL DE INSTRUCCIONES<br />
o UN RECOJEDOR PLASTICO PARA DE HIELO<br />
o 8 METROS DE LINEA DE AGUA<br />
o UNA MANIJA<br />
• ANTES DE CONECTAR SU ELECTRODOMESTICO A LA CORRIENTE ELECTRICA, UBIQUELO<br />
EN UNA SUPERFICIE PLANA POR LO MENOS POR 2 HORAS. ESTO REDUCIRA LA<br />
POSIBILIDAD DE MALFUNCIONAMIENTO EN EL SISTEMA DE ENFRIAMIENTO POR LA<br />
MANIPULACION DURANTE EL TRANSPORTE.<br />
• LIMPIE LA SUPERFICIE INTERIOR CON AGUA TIBIA USANDO UN PAÑO SUAVE.<br />
• COLOQUE LA UNIDAD DE MANERA QUE PERMITA LA CIRCULACION DEL AIRE A TRAVES<br />
DE LA REJILLA DELANTERA (DIBUJO 1). CON UN TRAPO LIMPIO Y HUMEDO LIMPIE LA<br />
UNIDAD POR DENTRO Y EL DEPOSITO DE HIELO.<br />
DIBUJO 1<br />
15
‣ INSTALACION DE SU MAQUINA DE HACER HIELO<br />
• UBIQUE SU MAQUINA DE HACER HIELO EN UN PISO QUE SEA LO SUFICIENTEMENTE<br />
FUERTE, PARA SOPORTAR SU PESO CUANDO ESTE TOTALMENTE LLENO O CARGADO.<br />
PARA NIVELAR LA MAQUINA DE HACER HIELO, AJUSTE LAS PATAS DELANTERAS.<br />
• NO ES NECESARIO DEJAR ESPACIO ENTRE LA PARTE TRASERA Y LOS COSTADOS DE SU<br />
ELECTRODOMESTICO SI LO QUIERE EMPOTRAR EN UN GABINETE.<br />
• MANTENGA SU MAQUINA DE HACER HIELO ALEJADA DEL AIRE CALIENTE, VAPOR O<br />
LIQUIDOS QUE PUEDAN SALPICARLA, YA QUE LA UNIDAD PODRIA AVERIARSE.<br />
• LOS RAYOS SOLARES DIRECTOS PUEDEN DAÑAR LA CAPA ACRILICA, Y LAS FUENTES DE<br />
CALOR PUEDEN OCASIONAR UN AUMENTO EN EL CONSUMO ELECTRICO. MANTENGALO<br />
LO MAS ALEJADO POSIBLE DEL AGUA PARA PREVENIR ALGUN CHOQUE ELECTRICO.<br />
EVITE LOS SITIOS HUMEDOS Y LOS AMBIENTES EXTREMADAMENTE FRIOS YA QUE ESTO<br />
PUEDE AFECTAR LA EFICIENCIA DEL ENFRIAMIENTO DE SU MAQUINA DE HACER HIELO.<br />
• EVITE UBICAR SU MAQUINA DE HACER HIELO EN AREAS MOJADAS O MUY HUMEDAS.<br />
MUCHA HUMEDAD EN EL AIRE PUEDE CAUSAR LA FORMACION DE ESCARCHA<br />
RAPIDAMENTE Y NECESITARA DESCONGELAR SU MAQUINA DE HACER HIELO MAS<br />
FRECUENTEMENTE.<br />
• CONECTE LA MAQUINA DE HACER HIELO A UN ENCHUFE DE PARED EXCLUSIVO E INSTALE<br />
EL CABLE DE TIERRA. BAJO NINGUNA RAZON SE DEBE RETIRAR LA TERCERA PUNTA DEL<br />
ENCHUFE. CUALQUIER CONSULTA CON RESPECTO A LA ENERGIA Y/O CABLE DE TIERRA<br />
DEBE SER DIRIGIDA A UN ELECTRICISTA CERTIFICADO O AUTORIZADO POR EL SERVICIO<br />
TECNICO DE AVANTI PRODUCTS.<br />
‣ CONEXION ELECTRICA-<br />
ESTE ELECTRODOMESTICO DEBE SER CONECTADO A TIERRA. EN EL CASO QUE OCURRA<br />
UN CORTO CIRCUITO, LA CONEXION A TIERRA REDUCE EL RIESGO DE RECIBIR UN CHOQUE<br />
ELECTRICO YA QUE CUENTA CON UN ALAMBRE PARA EL ESCAPE DE LA CORRIENTE<br />
ELECTRICA. ESTE ELECTRODOMESTICO ESTA EQUIPADO CON UN ENCHUFE QUE CONSTA<br />
DE TRES PUNTAS, LA TERCERA PUNTA ES LA CONEXION A TIERRA. ESTE ENCHUFE DEBE<br />
SER INSERTADO A UN ENCHUFE DE PARED QUE ESTE CORRECTAMENTE INSTALADO CON<br />
LA CONEXION A TIERRA.<br />
ADVERTENCIA<br />
• EL USO INAPROPIADO DEL ENCHUFE A TIERRA PUEDE DESENCADENAR UN CHOQUE<br />
ELECTRICO. CONSULTE EL PERSONAL AUTORIZADO DE AVANTI PRODUCTS SI TIENE<br />
ALGUNA DUDA SOBRE LAS INSTRUCCIONES O SI TIENE ALGUNA CONSULTA SI EL<br />
ELECTRODOMESTICO ESTA CORRECTAMENTE INSTALADO A LA CORRIENTE ELECTRICA<br />
Y A TIERRA. SI EL CORDON DEL ENCHUFE DEL ELECTRODOMESTICO SE ENCUENTRA<br />
DAÑADO, DEBE SER REEMPLAZADO POR EL SERVICIO TECNICO DE AVANTI PRODUCTS.<br />
• EL CORDON DEL ENCHUFE ESTA EQUIPADO CON TRES PUNTAS QUE ENCAJAN<br />
PERFECTAMENTE EN UN ENCHUFE DE PARED STANDARD PARA REDUCIR EL RIESGO DE<br />
UN CHOQUE ELECTRICO.<br />
• BAJO NINGUNA CIRCUNSTANCIA CORTE O SAQUE LA TERCERA PUNTA DEL ENCHUFE, YA<br />
QUE ESTE ES PARA QUE VAYA CONECTADO A TIERRA.<br />
• NO USE UNA EXTENSION.<br />
• EL VOLTATE DE ESTE ELECTRODOMESTICO ES DE 120 VOLTIOS AC, TIENE UNA SALIDA<br />
ELECTRICA DE 60 HZ. Y CONSTA DE UN ENCHUFE DE TRES PUNTAS QUE VA CONECTADO<br />
AL ENCHUFE DE PARED.<br />
• EL CORDON DEL ENCHUFE DEBE SER ASEGURADO ATRAS DEL ELECTRODOMESTICO Y<br />
NO DEJARLO EXPUESTO PARA EVITAR ACCIDENTES.<br />
16
CONEXION A FUENTE DE AGUA<br />
• ANTES DE INSTALAR LA UNIDAD VERIFIQUE LOS CODIGOS DE PLOMERIA EN SU ESTADO.<br />
RECOMENDAMOS QUE PARA LA INSTALACION USE UN PLOMERO PROFESIONAL Y CON<br />
LICENCIA.<br />
• CONECTE EL TUBO (INCLUIDO) A LA FUENTE DE AGUA FRIA MAS CERCANA . INSTALE<br />
SUFICIENTE TUBERIA A LA UNIDAD PARA PERMITIRLE MOVIMIENTO LIBRE DURANTE LA<br />
LIMPIEZA Y EL SERVICIO. ASEGURESE QUE LA TUBERIA NO SEA APLASTADA O DAÑADA<br />
DURANTE EL TRANSPORTE.<br />
OPERACION INICIAL<br />
1. CONECTE EL APARATO A UN ENCHUFE DE PARED DE 120V AC, POLARIZADO Y CON<br />
SALIDA A TIERRA.<br />
2. PARA PRODUCIR HIELO, ENCIENDA LA UNIDAD COLOCANDO EL INTERRUPTOR EN LA<br />
POSICION “ON”.<br />
3. EMPUJE EL BOTON MARCADO “RAPID ICE” (HIELO RAPIDO) Y LA MAQUINA EMPEZARA A<br />
HACER HIELO. EL INDICADOR LLAMADO “RAPID ICE” APARECERA ILUMINADO EN LA<br />
PANTALLA. DURANTE ESTE PROCESO TODAS LAS OTRAS OPERACIONES SON<br />
INVALIDAS<br />
4. EL RANGO DE TEMPERATURA ES DE 3 – 10ºC (37 – 50ºF). UD. PUEDES SELECCIONAR LA<br />
TEMPERATURA APRETANDO EL BOTON MARCADO “UP” (ARRIBA) O “DOWN” (ABAJO). LA<br />
TEMPERATURA SUBE O BAJA UN GRADO CENTIGRADO O FARENHEIT CADA VEZ QUE EL<br />
BOTON MARCADO “UP” O “DOWN” ES EMPUJADO.<br />
5. VERIFIQUE QUE LA FUENTE DE AGUA ESTE ABIERTA. EL AGUA ENTRARA AL MECANISMO<br />
DE HACER HIELO CUANDO LA UNIDAD ALCANCE LA TEMPERATURA APROPIADA.<br />
6. LOS PRIMEROS CUBOS DE HIELO PODRIAN SALIR PEQUEÑOS DEBIDO AL AIRE EN LA<br />
ENTRADA DEL AGUA. LOS SIGUIENTES CUBOS TENDRAN EL TAMAÑO NORMAL EN<br />
FORMA DE MEDIA LUNA.<br />
7. EL PRIMER CICLO TOMARA APROXIMADAMENTE 30-40 MINUTOS.<br />
8. PARA LLENAR EL DEPOSITO SE REQUIEREN 140 ML DE AGUA Y APROXIMADAMENTE 11<br />
HORAS.<br />
IMPORTANTE: DESHAGASE DE LOS CUBOS DE HIELO HECHOS DURANTE LAS 3 PRIMERAS<br />
HORAS DE OPERACION.<br />
• CUANDO EL DEPOSITO DE HIELO ESTE LLENO, EL MECANISMO PARA<br />
HACER HIELO SE DETIENE AUTOMATICAMENTE. SIN EMBARGO EL<br />
MOTOR CONTINUA ENFRIANDO Y MANTIENE LOS CUBOS DE HIELO<br />
CONGELADOS.<br />
• PARA DETENER LA CAIDA DE CUBOS AL DEPOSITO, LEVANTE EL<br />
BRAZO DE METAL (DIBUJO 2).<br />
• SI LA MAQUINA DE HACER HIELO NO ES USADA REGULARMENTE,<br />
RECOMENDAMOS QUE VACIE EL DEPOSITO DEL HIELO<br />
PERIODICAMENTE PARA ASEGURAR QUE TENGA HIELO FRESCO.<br />
DIBUJO 2<br />
• A VECES LOS CUBOS PUEDEN SALIR BLANCOS O TURBIOS, ESTO ES NORMAL Y NO<br />
AFECTA EL SABOR O COMPOSICION DEL AGUA.<br />
• LA REJILLA DELANTERA DEBE ESTAR LIBRE DE POLVO O PELUSAS PARA PERMITIR LA<br />
LIBRE CIRCULACION DEL AIRE.<br />
DESCONGELAMIENTO<br />
EL SISTEMA LO HACE AUTOMATICAMENTE CADA 6 HORAS.<br />
SI EL SISTEMA DE NO HACER ESCARCHA SE DESCOMPONE, APRIETE LOS 4 BOTONES<br />
SIMULTANEAMENTE Y SE ARREGLARA.<br />
COMO CAMBIAR LA DIRECCION DE APERTURA DE LA PUERTA<br />
EN CASO DE QUE NECESITE CAMBIAR EL LADO DE APERTURA DE LA PUERTA, POR FAVOR<br />
CONSULTE AL SERVICIO POS-VENTA DE SU LOCALIDAD.<br />
17
USANDO SU MAQUINA DE HACER HIELO<br />
ADVERTENCIA<br />
NO USE AGUA HIRVIENDO PORQUE DAÑARA LAS PARTES DE PLASTICO. TAMPOCO USE PUNTAS<br />
O INSTRUMENTOS METALICOS PARA RETIRAR LA ESCARCHA YA QUE DAÑARA EL ESPIRAL DE<br />
ENFRIAMIENTO Y CANCELARA LA GARANTIA. LE RECOMENDAMOS USAR UNA ESPATULA DE<br />
PLASTICO.<br />
CUIDADO Y MANTENIMIENTO<br />
‣ LIMPIANDO SU MAQUINA DE HACER HIELO<br />
• EMPUJE EL CONTROL A “0FF”. DESCONECTE EL APARATO Y RETIRE LOS HIELOS.<br />
• LAVE EL INTERIOR CON AGUA TIBIA Y UN PAÑO SUAVE REMOJADO EN UNA SOLUCION DE<br />
BICARBONATO DE SODIO. LA SOLUCION CONSISTE EN 2 CUCHARADAS DE BICARBONATO DE<br />
SODIO EN UN LITRO DE AGUA.<br />
• LAVE LA CANASTA DE ALMACENAJE CON UN DETERGENTE SUAVE.<br />
• LAS PARTES EXTERNAS DE SU MAQUINA DEBEN SER LIMPIADAS CON UN DETERGENTE SUAVE<br />
Y AGUA TIBIA.<br />
• EL ESPIRAL DEL CONDENSADOR DEBE SER LIMPIADO CUANDO ESTE SUCIO O TENGA POLVO.<br />
ADVERTENCIA<br />
ASEGURESE DE DESCONECTAR LA MAQUINA DE HACER HIELO DE LA CORRIENTE ELECTRICA.<br />
SI NO LO HACE, PUEDE OCASIONAR UN CHOQUE ELECTRICO O HERIRSE.<br />
SI FALLA EL SUMINISTRO ELECTRICO<br />
USUALMENTE LA ELECTRICIDAD REGRESA EN UNAS POCAS HORAS SIN AFECTAR LA<br />
TEMPERATURA DE SU MAQUINA DE HACER HIELO, SIEMPRE QUE LA PUERTA NO SE ABRA MUY<br />
FRECUENTEMENTE. SI LE VA FALTAR ELECTRICIDAD POR UN PERIODO DE TIEMPO MAS LARGO,<br />
USTED DEBE TOMAR LOS PASOS APROPIADOS PARA PROTEGER SU ELECTRODOMESTICO.<br />
PROBLEMA<br />
SU ELECTRODOMESTICO NO<br />
FUNCIONA<br />
GUIA PARA SOLUCIONAR PROBLEMAS<br />
SOLUCION<br />
NO ESTA CONECTADO A LA CORRIENTE ELECTRICA.<br />
EL INTERRUPTOR SALTO O SE QUEMO UN FUSIBLE<br />
EL CONTROL ESTA EN “OFF”<br />
NO HACE HIELO EL CONTROL DE TEMPERATURA NO ESTA EN LA POSICION 5<br />
EL COMPRESOR SE ENCIENDE Y SE<br />
APAGA FRECUENTEMENTE<br />
VIBRACION.<br />
SONIDO DE BURBUJEO, GOTEO, COMO<br />
AGUA QUE HIERVE O CRUJIDOS.<br />
LA PUERTA NO CIERRA<br />
COMPLETAMENTE<br />
Ó 6.<br />
LA TEMPERATURA DE LA HABITACION ES MAS CALIENTE DE<br />
LO NORMAL.<br />
LA PUERTA PERMANECE ABIERTA MUCHO TIEMPO.<br />
LA PUERTA NO QUEDO COMPLETAMENTE CERRADA.<br />
LA EMPAQUETADURA DE LA PUERTA NO ESTA SELLADA<br />
ADECUADAMENTE.<br />
LA MAQUINA DE HACER HIELO NO TIENE EL SUFICIENTE<br />
ESPACIO LIBRE.<br />
HAY MUCHA ESCARCHA.<br />
DESCONGELAR INMEDIATAMENTE.<br />
ASEGURESE QUE LA MAQUINA DE HACER HIELO ESTE<br />
UBICADA EN UN LUGAR TOTALMENTE PLANO.<br />
ESTO ES NORMAL. ES EL REFRIGERANTE (USADO PARA<br />
ENFRIAR LA MAQUINA DE HACER HIELO) QUE ESTA<br />
CIRCULANDO A TRAVES DEL SISTEMA.<br />
LA CONTRACCION Y EXPANSION DE LAS PAREDES<br />
INTERNAS PUEDE OCASIONAR SONIDOS COMO CRUJIDOS.<br />
LA MAQUINA DE HACER HIELO NO ESTA TOTALMENTE<br />
NIVELADA.<br />
LA DIRECCION DE APERTURA DE LA PUERTA FUE INVERTIDA<br />
PERO INSTALADA INCORRECTAMENTE.<br />
EL SELLADOR DE LA PUERTA ESTA SUCIO.<br />
LA CANASTA DE ALMACENAJE ESTA FUERA DE SU SITIO<br />
OBSTACULIZANDO EL CIERRE DE LA PUERTA.<br />
18
REGISTRATION INFORMATION<br />
THANK YOU FOR PURCHASING THIS FINE AVANTI PRODUCT. PLEASE FILL OUT THIS CARD<br />
AND RETURN IT WITHIN 100 DAYS OF PURCHASE TO RECEIVE THESE IMPORTANT BENEFITS<br />
AND RECEIVE THESE IMPORTANT BENEFITS TO THE FOLLOWING ADDRESS:<br />
AVANTI PRODUCTS, A DIVISION OF THE MACKLE CO., INC.<br />
P.O. BOX 520604 - MIAMI, FLORIDA 33152 USA<br />
‣ PROTECT YOUR PRODUCT:<br />
WE WILL KEEP THE MODEL NUMBER AND DATE OF PURCHASE OF YOUR NEW AVANTI<br />
PRODUCT ON FILE TO HELP YOU REFER TO THIS INFORMATION IN THE EVENT OF AN<br />
INSURANCE CLAIM SUCH AS FIRE OR THEFT.<br />
‣ PROMOTE BETTER PRODUCTS:<br />
WE VALUE YOUR INPUT. YOUR RESPONSES WILL HELP US DEVELOP PRODUCTS<br />
DESIGNED TO BEST MEET YOUR FUTURE NEEDS.<br />
-----------------------------------------------------(DETACH HERE)--------------------------------------------------------<br />
AVANTI REGISTRATION CARD<br />
__________________________________<br />
___________________________________________<br />
NAME MODEL # SERIAL #<br />
______________________________________<br />
________________________________________________<br />
ADDRESS DATE PURCHASED STORE/DEALER NAME<br />
______________________________________<br />
________________________________________________<br />
CITY STATE ZIP OCCUPATION<br />
______________________________________<br />
AS YOUR PRIMARY RESIDENCE, DO YOU:<br />
AREA CODE PHONE NUMBER OWN RENT<br />
DID YOU PURCHASE AN ADDITIONAL WARRANTY: YOUR AGE:<br />
EXTENDED FOOD LOSS NONE UNDER 18 18-25 26-30<br />
REASON FOR CHOOSING THIS AVANTI PRODUCT: 31-35 36-50 OVER 50<br />
PLEASE INDICATE THE MOST IMPORTANT FACTORS MARITAL STATUS:<br />
THAT INFLUENCED YOUR DECISION TO PURCHASE MARRIED SINGLE<br />
THIS PRODUCT.<br />
IS THIS PRODUCT USED IN THE:<br />
PRICE HOME BUSINESS<br />
PRODUCT FEATURES<br />
HOW DID YOU LEARN ABOUT THIS PRODUCT:<br />
AVANTI REPUTATION<br />
ADVERTISING<br />
PRODUCT QUALITY IN STORE DEMO PERSONAL DEMO<br />
SALESPERSON RECOMMENDATION<br />
OTHER___________________________________<br />
FRIEND/RELATIVE RECOMMENDATION<br />
COMMENTS________________________________<br />
WARRANTY<br />
___________________________________________<br />
OTHER_______________________<br />
___________________________________________<br />
19
20<br />
PRINTED IN CHINA