installation and servicing - The Initiative Group
installation and servicing - The Initiative Group
installation and servicing - The Initiative Group

You also want an ePaper? Increase the reach of your titles
YUMPU automatically turns print PDFs into web optimized ePapers that Google loves.
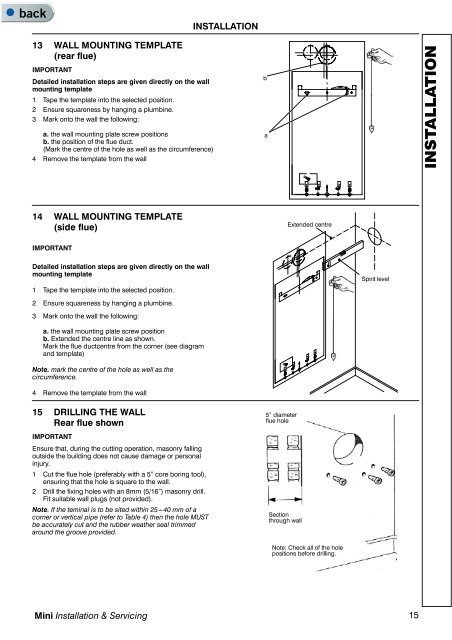
13 WALL MOUNTING TEMPLATE<br />
(rear flue)<br />
IMPORTANT<br />
Detailed <strong>installation</strong> steps are given directly on the wall<br />
mounting template<br />
1 Tape the template into the selected position.<br />
2 Ensure squareness by hanging a plumbine.<br />
3 Mark onto the wall the following:<br />
a. the wall mounting plate screw positions<br />
b. the position of the flue duct.<br />
(Mark the centre of the hole as well as the circumference)<br />
4 Remove the template from the wall<br />
INSTALLATION<br />
b<br />
a<br />
INSTALLATION<br />
14 WALL MOUNTING TEMPLATE<br />
(side flue)<br />
Extended centre<br />
IMPORTANT<br />
Detailed <strong>installation</strong> steps are given directly on the wall<br />
mounting template<br />
1 Tape the template into the selected position.<br />
2 Ensure squareness by hanging a plumbine.<br />
3 Mark onto the wall the following:<br />
Spirit level<br />
a. the wall mounting plate screw position<br />
b. Extended the centre line as shown.<br />
Mark the flue ductcentre from the corner (see diagram<br />
<strong>and</strong> template)<br />
Note. mark the centre of the hole as well as the<br />
circumference.<br />
4 Remove the template from the wall<br />
15 DRILLING THE WALL<br />
Rear flue shown<br />
IMPORTANT<br />
Ensure that, during the cutting operation, masonry falling<br />
outside the building does not cause damage or personal<br />
injury.<br />
1 Cut the flue hole (preferably with a 5” core boring tool),<br />
ensuring that the hole is square to the wall.<br />
2 Drill the fixing holes with an 8mm (5/16”) masonry drill.<br />
Fit suitable wall plugs (not provided).<br />
Note. If the teminal is to be sited within 25---40 mm of a<br />
corner or vertical pipe (refer to Table 4) then the hole MUST<br />
be accurately cut <strong>and</strong> the rubber weather seal trimmed<br />
around the groove provided.<br />
5” diameter<br />
flue hole<br />
Section<br />
through wall<br />
Note: Check all of the hole<br />
positions before drilling.<br />
Mini Installation & Servicing 15