installation and servicing - The Initiative Group
installation and servicing - The Initiative Group
installation and servicing - The Initiative Group
Create successful ePaper yourself
Turn your PDF publications into a flip-book with our unique Google optimized e-Paper software.
SERVICING<br />
SERVICING<br />
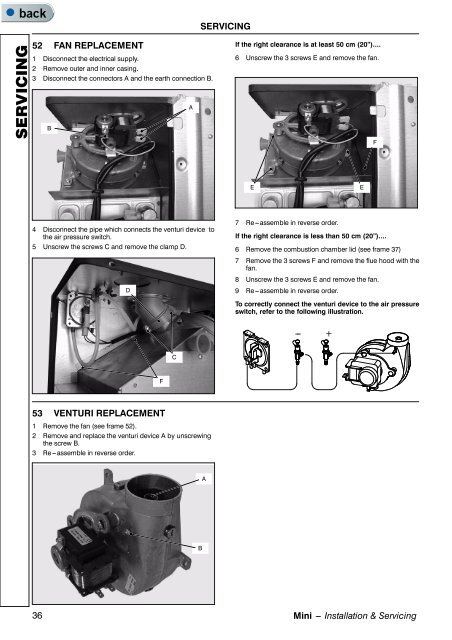
52 FAN REPLACEMENT<br />
1 Disconnect the electrical supply.<br />
2 Remove outer <strong>and</strong> inner casing.<br />
3 Disconnect the connectors A <strong>and</strong> the earth connection B.<br />
A<br />
B<br />
If the right clearance is at least 50 cm (20”)....<br />
6 Unscrew the 3 screws E <strong>and</strong> remove the fan.<br />
F<br />
E<br />
E<br />
4 Disconnect the pipe which connects the venturi device to<br />
the air pressure switch.<br />
5 Unscrew the screws C <strong>and</strong> remove the clamp D.<br />
D<br />
7 Re---assemble in reverse order.<br />
If the right clearance is less than 50 cm (20”)....<br />
6 Remove the combustion chamber lid (see frame 37)<br />
7 Remove the 3 screws F <strong>and</strong> remove the flue hood with the<br />
fan.<br />
8 Unscrew the 3 screws E <strong>and</strong> remove the fan.<br />
9 Re---assemble in reverse order.<br />
To correctly connect the venturi device to the air pressure<br />
switch, refer to the following illustration.<br />
--- +<br />
C<br />
F<br />
53 VENTURI REPLACEMENT<br />
1 Remove the fan (see frame 52).<br />
2 Remove <strong>and</strong> replace the venturi device A by unscrewing<br />
the screw B.<br />
3 Re---assemble in reverse order.<br />
A<br />
B<br />
36<br />
Mini --- Installation & Servicing


