1/10 XXX-SCT Brushless - English - Horizon Hobby
1/10 XXX-SCT Brushless - English - Horizon Hobby
1/10 XXX-SCT Brushless - English - Horizon Hobby
You also want an ePaper? Increase the reach of your titles
YUMPU automatically turns print PDFs into web optimized ePapers that Google loves.
EN<br />
Transmitter and Receiver Binding<br />
Your Spektrum DX2L comes prebound to the vehicle.<br />
1. Make sure the transmitter and vehicle are both powered OFF.<br />
2. Install a bind plug in the receiver battery/bind port. You do not need to remove<br />
any of the other plugs to re-bind.<br />
3. With the bind plug installed, power ON the vehicle. The receiver LED will flash green.<br />
4. With the steering and throttle in the desired preset failsafe positions (neutral), press and<br />
hold the bind button and power ON the transmitter. The transmitter's red LED will flash<br />
after 4 seconds when the transmitter is in bind mode. Release the bind button once<br />
the red LED flashes. Continue holding the failsafe positions until the binding<br />
process is complete.<br />
5. When the receiver binds to the transmitter, the receiver LED will turn solid.<br />
6. Power OFF the vehicle, then the transmitter.<br />
7. Disconnect the battery from the ESC. Remove the bind plug from the receiver.<br />
8. Safely store the bind plug in the bind plug compartment in the transmitter.<br />
9. The receiver will keep the binding to the transmitter until another binding is done.<br />
If you encounter problems, obey binding instructions and refer to the transmitter<br />
troubleshooting guide for other instructions. If needed, contact the appropriate<br />
<strong>Horizon</strong> Product Support office.<br />
Control Test<br />
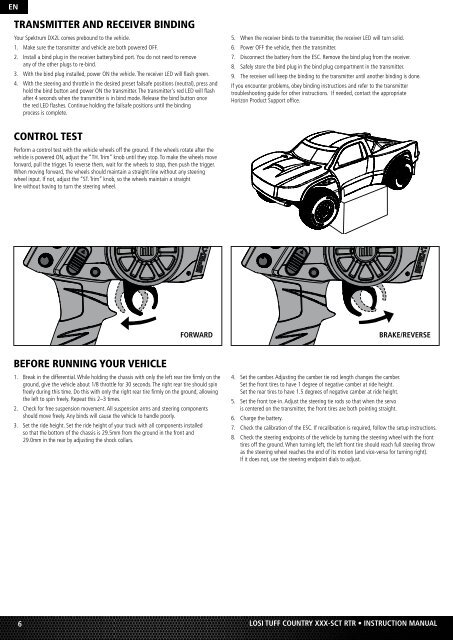
Perform a control test with the vehicle wheels off the ground. If the wheels rotate after the<br />
vehicle is powered ON, adjust the “TH. Trim” knob until they stop. To make the wheels move<br />
forward, pull the trigger. To reverse them, wait for the wheels to stop, then push the trigger.<br />
When moving forward, the wheels should maintain a straight line without any steering<br />
wheel input. If not, adjust the “ST. Trim” knob, so the wheels maintain a straight<br />
line without having to turn the steering wheel.<br />
Forward<br />
Brake/Reverse<br />
Before Running Your Vehicle<br />
1. Break in the differential. While holding the chassis with only the left rear tire firmly on the<br />
ground, give the vehicle about 1/8 throttle for 30 seconds. The right rear tire should spin<br />
freely during this time. Do this with only the right rear tire firmly on the ground, allowing<br />
the left to spin freely. Repeat this 2–3 times.<br />
2. Check for free suspension movement. All suspension arms and steering components<br />
should move freely. Any binds will cause the vehicle to handle poorly.<br />
3. Set the ride height. Set the ride height of your truck with all components installed<br />
so that the bottom of the chassis is 29.5mm from the ground in the front and<br />
29.0mm in the rear by adjusting the shock collars.<br />
4. Set the camber. Adjusting the camber tie rod length changes the camber.<br />
Set the front tires to have 1 degree of negative camber at ride height.<br />
Set the rear tires to have 1.5 degrees of negative camber at ride height.<br />
5. Set the front toe-in. Adjust the steering tie rods so that when the servo<br />
is centered on the transmitter, the front tires are both pointing straight.<br />
6. Charge the battery.<br />
7. Check the calibration of the ESC. If recalibration is required, follow the setup instructions.<br />
8. Check the steering endpoints of the vehicle by turning the steering wheel with the front<br />
tires off the ground. When turning left, the left front tire should reach full steering throw<br />
as the steering wheel reaches the end of its motion (and vice-versa for turning right).<br />
If it does not, use the steering endpoint dials to adjust.<br />
6<br />
LOSI Tuff Country <strong>XXX</strong>-<strong>SCT</strong> RTR • INstruction manual


