1/10 XXX-SCT Brushless - English - Horizon Hobby
1/10 XXX-SCT Brushless - English - Horizon Hobby
1/10 XXX-SCT Brushless - English - Horizon Hobby

You also want an ePaper? Increase the reach of your titles
YUMPU automatically turns print PDFs into web optimized ePapers that Google loves.
EN<br />
Dynamite Tazer Waterproof 45A Sensorless <strong>Brushless</strong> ESC (DYN4940)<br />
Specifications<br />
Type<br />
Constant/Peak<br />
Resistance<br />
Function<br />
Operation<br />
Battery Type/Input Voltage<br />
BEC Output<br />
Overload Protection<br />
Dimensions (LxWxH)<br />
Weight<br />
ESC LED STATUS<br />
Sensorless <strong>Brushless</strong>/Waterproof<br />
45A/290A<br />
0.0012 Ohm<br />
Forward Only with Brake<br />
Forward/Reverse with Brake<br />
Proportional forward,<br />
proportional reverse with braking delay<br />
2- to 3-cell Li-Po/Li-Fe 4- to 9-cell Ni-MH/Ni-Cd<br />
6V/3A<br />
Thermal<br />
1.89 x 1.39 x 1.39 in (48 x 35.2 x 35.2mm)<br />
2.61 oz (74 g) with wires<br />
• No ESC LEDs will glow when there is no throttle input from the transmitter.<br />
• The red ESC LED glows when there is any throttle input from the transmitter.<br />
AUDIBLE WARNING TONES<br />
• Input voltage The ESC checks the in put voltage when it is powered ON. If a voltage<br />
problem is detected, the ESC continuously sounds 2 beeps with a 1 second pause<br />
(xx-xx-xx). Power OFF the ESC and ensure the connections are secure and that<br />
the battery power is not too low for safe operation.<br />
• Radio connection The ESC checks radio signal input when it is powered ON.<br />
If a problem is detected, the ESC continuously sounds 1 beep with a 2 second pause<br />
(x--x--x). Power OFF the ESC and ensure the radio system is operating correctly.<br />
ESC CALIBRATION PROCEDURE<br />
Ensure proper ESC function by calibrating the ESC to your transmitter inputs.<br />
1. Power OFF the ESC.<br />
2. Ensure your transmitter is powered ON, the throttle is not reversed, the throttle trim is<br />
neutral and the throttle travel range is at <strong>10</strong>0%.<br />
3. Press the SET button while powering ON the ESC. Release the button as soon as the<br />
green LED starts to flash.<br />
4. Calibrate the throttle points by pressing the SET button once after each step.<br />
--<br />
Neutral (1 flash)—leave the throttle at rest, untouched<br />
--<br />
Full throttle (2 flashes)—pull the throttle fully back<br />
--<br />
Full brake/reverse (3 flashes)—push the throttle fully forward<br />
5. The motor vibrates for 3 seconds after the last step is completed.<br />
ESC FUNCTIONS AND MODES<br />
The ESC includes programming options so you can adjust the way your vehicle performs.<br />
Refer to the included settings table to adjust the ESC for your driving conditions.<br />
ESC programming procedure<br />
Programming is accomplished using the SET button on the ON/OFF switch.<br />
1. Connect a fully charged battery to the ESC.<br />
2. Power ON the ESC.<br />
3. Hold the SET button for 1 second until the green LED blinks, then release the SET button<br />
to enter programming mode.<br />
4. Press and release the SET button as needed to get to the desired menu option (the green<br />
LED will blink corresponding to the menu item number).<br />
5. When at the desired menu item, hold the SET button for 3 seconds until the red LED blinks.<br />
6. Press the SET button to move among the settings based on how many times the red LED<br />
blinks (Refer to the table for more information).<br />
7. Save the setting by holding the SET button for 3 seconds.<br />
8. Power OFF the ESC and repeat the instructions above to change other settings.<br />
Tip: If desired, the ESC programming can be returned to default settings<br />
by powering ON the ESC and holding the SET button for 5 seconds.<br />
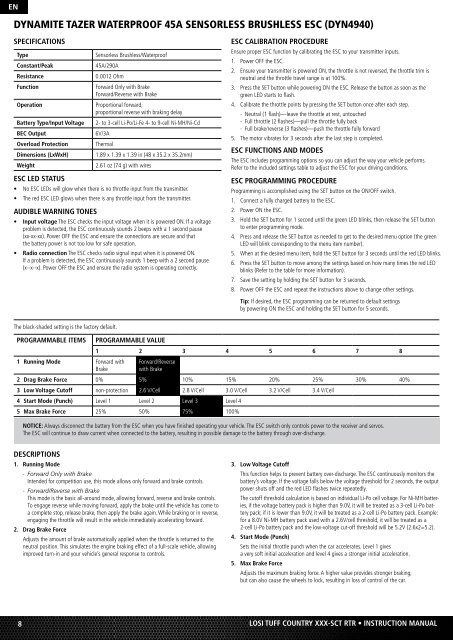
The black-shaded setting is the factory default.<br />
Programmable Items<br />
1 Running Mode Forward with<br />
Brake<br />
Programmable Value<br />
1 2 3 4 5 6 7 8<br />
Forward/Reverse<br />
with Brake<br />
2 Drag Brake Force 0% 5% <strong>10</strong>% 15% 20% 25% 30% 40%<br />
3 Low Voltage Cutoff non-protection 2.6 V/Cell 2.8 V/Cell 3.0 V/Cell 3.2 V/Cell 3.4 V/Cell<br />
4 Start Mode (Punch) Level 1 Level 2 Level 3 Level 4<br />
5 Max Brake Force 25% 50% 75% <strong>10</strong>0%<br />
NOTICE: Always disconnect the battery from the ESC when you have finished operating your vehicle. The ESC switch only controls power to the receiver and servos.<br />
The ESC will continue to draw current when connected to the battery, resulting in possible damage to the battery through over-discharge.<br />
Descriptions<br />
1. Running Mode<br />
--<br />
Forward Only with Brake<br />
Intended for competition use, this mode allows only forward and brake controls.<br />
--<br />
Forward/Reverse with Brake<br />
This mode is the basic all-around mode, allowing forward, reverse and brake controls.<br />
To engage reverse while moving forward, apply the brake until the vehicle has come to<br />
a complete stop, release brake, then apply the brake again. While braking or in reverse,<br />
engaging the throttle will result in the vehicle immediately accelerating forward.<br />
2. Drag Brake Force<br />
Adjusts the amount of brake automatically applied when the throttle is returned to the<br />
neutral position. This simulates the engine braking effect of a full-scale vehicle, allowing<br />
improved turn-in and your vehicle’s general response to controls.<br />
3. Low Voltage Cutoff<br />
This function helps to prevent battery over-discharge. The ESC continuously monitors the<br />
battery’s voltage. If the voltage falls below the voltage threshold for 2 seconds, the output<br />
power shuts off and the red LED flashes twice repeatedly.<br />
The cutoff threshold calculation is based on individual Li-Po cell voltage. For Ni-MH batteries,<br />
if the voltage battery pack is higher than 9.0V, it will be treated as a 3-cell Li-Po battery<br />
pack; if it is lower than 9.0V, it will be treated as a 2-cell Li-Po battery pack. Example:<br />
for a 8.0V Ni-MH battery pack used with a 2.6V/cell threshold, it will be treated as a<br />
2-cell Li-Po battery pack and the low-voltage cut-off threshold will be 5.2V (2.6x2=5.2).<br />
4. Start Mode (Punch)<br />
Sets the initial throttle punch when the car accelerates. Level 1 gives<br />
a very soft initial acceleration and level 4 gives a stronger initial acceleration.<br />
5. Max Brake Force<br />
Adjusts the maximum braking force. A higher value provides stronger braking,<br />
but can also cause the wheels to lock, resulting in loss of control of the car.<br />
8<br />
LOSI Tuff Country <strong>XXX</strong>-<strong>SCT</strong> RTR • INstruction manual