EMS-2 Operating Instructions - CONTA-CLIP
EMS-2 Operating Instructions - CONTA-CLIP
EMS-2 Operating Instructions - CONTA-CLIP

You also want an ePaper? Increase the reach of your titles
YUMPU automatically turns print PDFs into web optimized ePapers that Google loves.
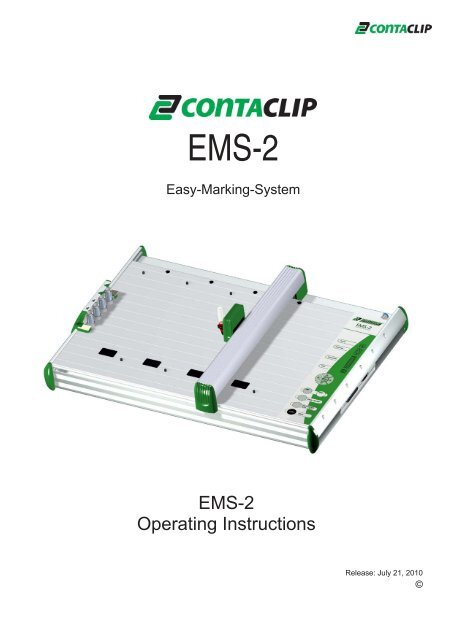
<strong>EMS</strong>-2<br />
Easy-Marking-System<br />
<strong>EMS</strong>-2<br />
<strong>Operating</strong> <strong>Instructions</strong><br />
Release: July 21, 2010<br />
©
<strong>EMS</strong>-2<br />
Easy-Marking-System<br />
<strong>Operating</strong> <strong>Instructions</strong><br />
<strong>EMS</strong>-2<br />
1. Introduction...................................................................................................2<br />
2. Items supplied ..............................................................................................3<br />
3. Product overview ..........................................................................................4<br />
4. Set-up ...........................................................................................................5<br />
5. Operation......................................................................................................6<br />
6. Cleaning and product care ...........................................................................9<br />
7. Accessories ................................................................................................10<br />
8. Troubleshooting ..........................................................................................11<br />
9.Technical information...................................................................................12<br />
10. <strong>Instructions</strong> for packaging the plotter <strong>EMS</strong>-2............................................13<br />
11. Safety instructions ....................................................................................14<br />
1
1. Introduction:<br />
Thank you for purchasing the <strong>EMS</strong>-2, a flexible plotter that helps you label marking<br />
elements quickly and easily.<br />
Rugged construction in stylish aluminium<br />
Labelling area A3 size 440 mm x 305 mm, A4 size 220 mm x 305 mm<br />
Easy to change fixtures to suit a variety of marking elements<br />
Automatic fixture recognition largely avoids the need to select marking elements<br />
Optimum plotter pen seal. The pens can be stored in the plotter's pen station<br />
Auto calibration no adjustment necessary<br />
Capable of labelling marking elements up to 10.5 mm in height.<br />
Special solutions for up to 15 mm are possible<br />
Universal power supply of 100-240V AC<br />
The special start-up function for the plotter pens ensures neat labelling right from<br />
the very first marking element<br />
PC interfaces: centronics parallel and USB ports<br />
Control language: HPGL<br />
I/O interface for connecting peripheral equipment, e.g. handlings, etc.<br />
Material held in place by vacuum contact (option)<br />
Possible to update <strong>EMS</strong>-2 software through PC connection and downloading from<br />
the Internet<br />
2
Release: July 21, 2010<br />
2. Items supplied<br />
Please check you have received all the items supplied with your labelling device<br />
(see list below).<br />
Please retain the packaging in case you need to return the device.<br />
The following items are supplied as standard:<br />
1. Plotter <strong>EMS</strong>-2<br />
2. Power supply with corresponding mains power cord<br />
3. Centronics parallel cable<br />
4. USB cable<br />
5. <strong>Operating</strong> instructions<br />
1.<br />
2. 3. 4. 5.<br />
<strong>EMS</strong>-2<br />
Easy-Marking-System<br />
<strong>EMS</strong>-2<br />
<strong>Operating</strong> <strong>Instructions</strong><br />
©<br />
3
3. Product overview<br />
6 7 8 9<br />
5<br />
4<br />
2<br />
16<br />
Segment 1 Segment 2 Segment 3 Segment 4<br />
3<br />
1<br />
10<br />
11<br />
12<br />
13<br />
5<br />
15 14<br />
1) Plotting area<br />
2) Pen station<br />
3) Sealed storage holders in pen station<br />
4) Start-up writing area<br />
5) Pin stops for fixtures<br />
6) Vacuum supply for the individual segments<br />
7) Penholder<br />
8) Drop pen unit<br />
9) Vacuum connection point<br />
10) Mains connection<br />
11) Interface for optional external devices<br />
12) Centronics printer port<br />
13) USB port<br />
14) Control panel/control keys<br />
15) Writing arm<br />
16) Fixture recognition sensors<br />
4
4. Setting up the Plotter <strong>EMS</strong>-2<br />
LOCATION<br />
A dry, dust-free room is the ideal environment for the plotter. If possible, do not install<br />
the device in damp or very dusty areas. Do not expose the system to direct sunlight.<br />
Please ensure that the connections on the right-hand side of the device are accessible<br />
at all times. Position the <strong>EMS</strong>-2 firmly on the work surface where it is to be used,<br />
ensuring it is level.<br />
Please ensure that the writing arm can move freely and is not obstructed by other<br />
objects.<br />
CONNECTIONS<br />
Plug the device into a correctly installed mains socket using the power supply included<br />
with the product.<br />
The power supply features a variable AC input voltage of 100-240V~50-60Hz.<br />
The power connection can be replaced by way of adapter plugs.<br />
Plug the connector from the output cable on the power supply into the top right-hand<br />
side of the plotter.<br />
Then hook up the device using either the centronics parallel or USB cable provided.<br />
The respective ports are located on the right-hand side of the <strong>EMS</strong>-2.<br />
5
5. Operation<br />
Once you have installed the <strong>EMS</strong>-2 and connected the power supply and data cable,<br />
you can switch the plotter on.<br />
Important:<br />
Before switching the device on please ensure that there are no objects on the<br />
writing/plotting area which might prevent the writing arm from moving freely.<br />
All settings and commands are entered using the control panel.<br />
Control Panel<br />
Manual movement in<br />
X and Y directions,<br />
lower the plotter pen<br />
Switch device on/off<br />
Open and close pen<br />
station to insert/remove<br />
plotter pen<br />
Delete data<br />
downloaded from PC<br />
Pause or stop plotter<br />
activity<br />
ON/OFF buttons<br />
The ON/OFF buttons are used to activate and deactivate the device. When the plotter<br />
is switched on, the writing arm moves to the top right-hand corner of the labelling area<br />
and auto calibration takes place. The green light comes on when the system is ready<br />
for use and to receive data from the PC.<br />
Clear buffer<br />
If the <strong>EMS</strong>-2 contains data the yellow light will come on. You can delete this data by<br />
pressing the 'Clear buffer' key.<br />
To do this the system must be in stop mode (red light on).<br />
6
Open/close pen station<br />
Before using the <strong>EMS</strong>-2, insert the plotter pen with the desired tip width into the pen<br />
station.<br />
Important:<br />
Only plotter pens of the types shown here may be used as<br />
the sealing system is designed specifically for these plotter<br />
pens. Using other plotter pens and writing instruments may<br />
damage the device.<br />
To insert plotter pens into the pen station, press the<br />
'Penstation open/close' key. This is only possible when the system is in stop mode.<br />
When the pen station has been opened, you can insert the plotter pens into the<br />
corresponding storage holders and then re-close the pen station by pressing the<br />
open/close key again.<br />
Please note:<br />
Do not leave the pen station open for extended periods as there is a danger the pens<br />
will dry out. You can leave plotter pens in the pen station because the optimised seal<br />
largely prevents pens from drying out. If the storage holders become soiled over time<br />
you can replace them. The procedure for changing the storage holders can be found<br />
in the accessories section.<br />
Please note:<br />
Should you wish to use other plotter pens with HP fixing system, you must insert them<br />
directly into the writing arm holder and ensure that they are not stored in the pen<br />
station.<br />
Stop/view key<br />
If the 'stop/view' key is activated while the plotter is in action, the job will pause<br />
immediately and the plotter pen will move into the top right-hand corner. The red light<br />
will signal the interruption. Pressing the key again will calibrate the writing arm and the<br />
plotter will continue with the job. The red light will go out.<br />
Important:<br />
Inserting a pen into the writing arm holder by hand can involve inadvertently moving<br />
the writing arm and compromising calibration. After inserting the pen, press the 'stop/<br />
view' key twice in succession to recalibrate the system.<br />
Cursor keys / Pen up/down key<br />
These keys can be used to move the writing arm manually in all directions. The 'pen<br />
up/down' key lowers and raises the plotter pen. The system must be in stop mode.<br />
Please note:<br />
These key functions are not used for normal operation. They are intended solely for<br />
adjusting settings and carrying out servicing.<br />
7
Placing the fixtures on the Plotter<br />
There are eight pin stops on the plotting area where up to four different fixtures can be<br />
loaded. Different fixtures are available depending on the size of the marking elements.<br />
They can occupy one, two or four segments on the plotting area.<br />
Please note:<br />
When fitting fixtures or inserting marking elements into the fixtures it is possible for the<br />
writing arm to be moved out of place, altering the calibration.<br />
If the writing arm is moved, press the 'stop/view' key twice in succession to recalibrate<br />
the system.<br />
Different size fixtures:<br />
1 segment 2 segments 4 segments<br />
Placing the elements in the fixtures<br />
Choose the appropriate fixture for the elements to be labelled and insert the elements<br />
carefully into the fixture. You can also add the elements first and then place the<br />
fixtures in the plotter.<br />
8
6. Cleaning and product care<br />
Protect the <strong>EMS</strong>-2 from dust and other dirt. When not in use, cover the plotter.<br />
A special cover is available as an accessory.<br />
Wipe the device occasionally after use with a dry, lint-free cloth or a mild cleaning<br />
agent.<br />
If the pen station storage holders are heavily soiled, please replace them.<br />
The description for the sealed unit can be found in the section on accessories.<br />
Important:<br />
Under no circumstances use harsh cleaning products to clean the plotter.<br />
Never oil the mechanical parts of your plotter.<br />
9
7. Accessories<br />
Plotter Pen-R<br />
available in six tip-widths<br />
Ink Cartridges<br />
Pen holder<br />
Plotter Pen-D<br />
available in six tip-widths<br />
Cleaning Set Pen Cleaner Cleaning Fluid<br />
Dust Protection Cap<br />
Service Kit for Pen-Station<br />
TO EXCHANGE A SEALING UNIT IN THE PEN STATION:<br />
To remove the sealing station To insert the sealing station<br />
from the pen station:<br />
into the pen station:<br />
To adjust the sealing station<br />
in the pen station:<br />
TO REMOVE ONE OF THE SEALING UNITS FROM THE PEN STATION:<br />
Firstly open the pen station by pressing the “Open/Close-button”.<br />
Apply the enclosed key to the sealing unit as illustrated and carefully lever the sealing unit out<br />
of the holding device.<br />
TO INSERT AND ADJUST ONE OF THE SEALING UNITS:<br />
Insert the new sealing unit into the pen station. Press the sealing unit carefully up to the<br />
limit-stop into the aluminium tube. Now, by use of the key, adjust the sealing unit until the key<br />
is parallel with the plotter surface. The opening at the side of the sealing unit should now be<br />
centered.<br />
TO EXCHANGE THE PRIMING PLATES (for starting the plotter pen):<br />
The small plates can be removed by pulling them out sideways. Insert the new ones by sliding<br />
them into the guide at the side of the clamping device until they fit tightly.<br />
10
8. Troubleshooting<br />
If your plotter <strong>EMS</strong>-2 is not functioning correctly, please check the following:<br />
Device fails to switch on<br />
Check whether the mains plug and connecting plug<br />
are plugged in correctly.<br />
Check whether the socket being used is functioning<br />
properly. Is the green light on the power supply<br />
illuminated If not, please replace the power supply.<br />
Plotter does not respond to<br />
data downloaded from PC<br />
Is the interface cable connected properly<br />
Replace the data cable if necessary.<br />
Is the correct interface on the PC being used<br />
No labelling is taking place<br />
even though a plotter pen has<br />
been inserted.<br />
Check whether the plotter pen has dried out or if<br />
there is sufficient ink in the pen.<br />
Refill or replace the pen if necessary.<br />
Poor labelling quality, uneven<br />
line thickness, missing items<br />
The plotter pen tip may be soiled. Clean the tip<br />
carefully using a lint-free cloth dipped inspecial<br />
cleaning fluid.<br />
Replace the plotter pen if necessary.<br />
11
9. Technical Information<br />
<strong>EMS</strong>-2 plotter specifications<br />
Type of plotter:<br />
Flatbed plotter<br />
Maximum plotting area:<br />
A3: 440 mm x 305 mm, A4: 220 mm x 305 mm<br />
Plotting speed:<br />
Max. 40 cm/s<br />
Plotter pen:<br />
Special plotter pens with HP fixing<br />
Ports: Parallel (centronics) / USB Level 1.1<br />
Control language:<br />
Based on HP-GL 7475A<br />
Buffer:<br />
16 MB<br />
Drive:<br />
Two-phase step motor<br />
Pen station:<br />
Max. 4 plotter pens with double seal<br />
Addressable resolution:<br />
.01 mm<br />
Repeat accuracy:<br />
.05 mm<br />
Repeat accuracy after pen change: .05 mm with optimum pen<br />
Power supply:<br />
Power supply input voltage:<br />
Power supply input current:<br />
Power supply output voltage:<br />
Power supply output current:<br />
Environmental conditions:<br />
Via separate power supply with exchangeable<br />
mains power connection<br />
100-240V AC 50-60Hz<br />
.7 A max.<br />
24 V DC<br />
1.25 A max.<br />
In use: 10°C-35°C<br />
35%-75% relative humidity<br />
Storage: -10°C-50°C<br />
10%-90% relative humidity<br />
Safety certificate: EN 60950-1<br />
Interference safety compliance:<br />
Dimensions:<br />
Weight:<br />
EN 55022 B<br />
EN 61000-4-2 to 6<br />
EN 61000-4-11<br />
A3: 660 mm (A4: 440 mm) x 440 mm x 125 mm<br />
A3: Approx. 8 kg, A4: Approx. 6 kg<br />
12
10. <strong>Instructions</strong> for packaging the plotter <strong>EMS</strong>-2<br />
two corner pieces<br />
with inlay<br />
center piece covering<br />
the y-arm<br />
two corner pieces<br />
without inlay<br />
inside the white<br />
box<br />
accessory box<br />
inside the white<br />
box complete<br />
13
11. Safety instructions<br />
Safety instructions<br />
●Keep the operating instructions in a safe place.<br />
●This device complies with all recognised technical standards and all relevant safety<br />
regulations.<br />
●The mains power supply used must correspond with that specified on the name<br />
plate.<br />
●Use in dry conditions only.<br />
●Disconnect the device from the mains socket by pulling the plug, not the cord.<br />
●All repairs, including replacement of mains power supply components, must be<br />
performed by a qualified service technician.<br />
Säkerhetsföreskrifte<br />
●Förvara bruksanvisningen på säker plats.<br />
●Denna apparat är tillverkad enligt modern teknik och i enlighet med gällande<br />
säkerhetsföreskrifter för elektriska apparater.<br />
●Kontrollera uppgifterna på typmärket innan anslutning till eluttag.<br />
●Apparaten får endast användas i torra utrymmen.<br />
●Dra inte ur kontakten ur eluttaget genom att rycka i sladden.<br />
●Reparationer av denna apparat, inklusive utbyte av el-sladd, får endast utföras av<br />
fackman.<br />
Sicherheitshinweise<br />
●Bewahren Sie die Gebrauchsanweisung sorgfältig auf.<br />
●Dieses Gerät entspricht den anerkannten Regeln der Technik und den einschlägigen<br />
●Sicherheitsbestimmungen für Gerätesicherheit.<br />
●Elektrische Anschlussbedingungen und Angaben auf dem Typenschild müssen<br />
übereinstimmen<br />
●Gerätenutzung nur in trockenen Räumen<br />
●Netzstecker nicht am Kabel aus der Steckdose ziehen<br />
●Reparaturen an diesem Gerät, einschließlich der Austausch der Netzzuleitung,<br />
dürfen nur von Fachkräften durchgeführt werden<br />
14
<strong>Instructions</strong> de sécurité<br />
●Conserver ces instructions dans un endroit sûr.<br />
●Cet appareil répond aux normes techniques et satisfait toutes les règles de sécurité.<br />
●Le courant utilisé doit être identique à celui spécifié sur l'appareil.<br />
●Ne pas utiliser cet appareil dans un environnement humide.<br />
●Débrancher l'appareil en tirant sur la prise, pas sur le câble.<br />
●Toutes les réparations y compris le remplacement des composants électriques,<br />
doivent être effectuées par un technicien qualifié.<br />
Instrucciones de Seguridad<br />
●Conserve las instrucciones de seguridad en un lugar seguro.<br />
●Este equipo cumple con todas las normas técnicas de seguridad eléctrica y<br />
requisitos de seguridad eléctrico aplicables en el país de uso.<br />
●La fuente de alimentación debe corresponderse con los valores de tensión y<br />
corriente citados en la placa de identificación del producto.<br />
●Las características de la fuente de alimentación a utilizar con el producto son las<br />
siguientes : entrada : 100-240Vca, 50/60Hz, 700mA. Salida : 24Vcc/1,25A<br />
●Utilice el equipo en condiciones secas únicamente.<br />
●Desconecte el equipo de la red de alimentación por medio de la ficha, nunca tirando<br />
del cordón.<br />
●Todas las reparaciones, incluyendo el reemplazo del cordón de alimentación, deben<br />
ser realizadas por personal técnico calificado.<br />
15