Installation Instructions - JOST International
Installation Instructions - JOST International
Installation Instructions - JOST International

You also want an ePaper? Increase the reach of your titles
YUMPU automatically turns print PDFs into web optimized ePapers that Google loves.
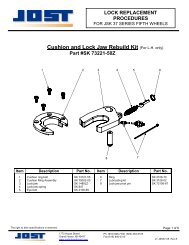
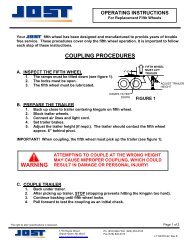
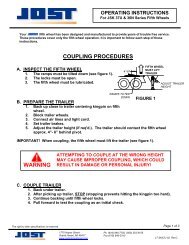
INSTALLATION INSTRUCTION<br />
For JSK 37H Fifth Wheel Topplate<br />
Replacement for Holland Models FW 8, FW 35, FW 2000 & FW 3500<br />
WARNING<br />
FAILURE TO FOLLOW THESE INSTRUCTIONS<br />
COULD CAUSE A HAZARDOUS CONDITION!<br />
CAUTION<br />
INSTALLING YOUR JSK37H TOPPLATE WILL RAISE<br />
THE INSTALLED FIFTH WHEEL HEIGHT BY 3/4”.<br />
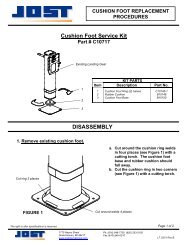
A. REMOVE OLD TOPPLATE:<br />
1. Remove the excess grease from the topplate as required.<br />
2. Remove the bracket pins and discard.<br />
3. Using a suitable lifting device, lift the old topplate from the mounting<br />
bracket and discard.<br />
4. Inspect the bracket bushings. Remove and replace if distorted or damaged.<br />
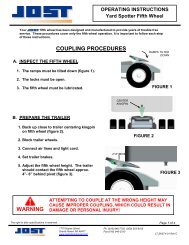
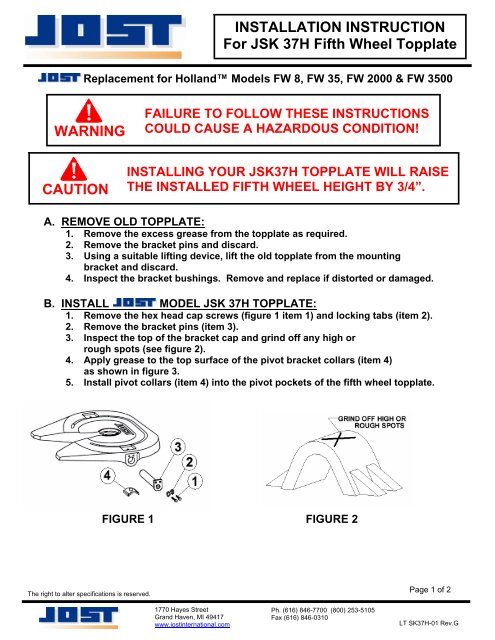
B. INSTALL MODEL JSK 37H TOPPLATE:<br />
1. Remove the hex head cap screws (figure 1 item 1) and locking tabs (item 2).<br />
2. Remove the bracket pins (item 3).<br />
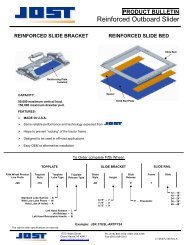
3. Inspect the top of the bracket cap and grind off any high or<br />
rough spots (see figure 2).<br />
4. Apply grease to the top surface of the pivot bracket collars (item 4)<br />
as shown in figure 3.<br />
5. Install pivot collars (item 4) into the pivot pockets of the fifth wheel topplate.<br />
FIGURE 1 FIGURE 2<br />
The right to alter specifications is reserved.<br />
Page 1 of 2<br />
1770 Hayes Street<br />
Grand Haven, MI 49417<br />
www.jostinternational.com<br />
Ph. (616) 846-7700 (800) 253-5105<br />
Fax (616) 846-0310<br />
LT SK37H-01 Rev.G
B. INSTALL MODEL JSK 37H TOPPLATE (CONT.):<br />
6. Using a suitable lifting device, lower the new Jost topplate onto the<br />
mounting bracket.<br />
7. Install the pivot pins (item 3) aligning the flange with the threaded holes<br />
in the topplate casting.<br />
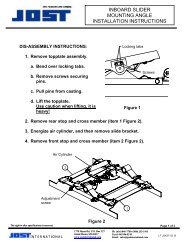
8. Align a locking tab (item 2) with each pivot pin and install the hex head<br />
cap screws (item 1) thru the locking tabs, the pivot pin flange and into<br />
the topplate casting ears.<br />
9. Bend the locking tabs over each cap screw as shown in figure 4.<br />
FIGURE 3 FIGURE 4<br />
C. INSPECTION AND LUBRICATION PRIOR TO USE:<br />
1. Review the installation. Be certain that all steps were completed properly.<br />
2. Check the fifth wheel locking mechanism using a lock tester. It must lock and<br />
unlock as described in the Maintenance Procedures provided with your fifth<br />
wheel. For additional copies of the Maintenance Procedures contact Jost.<br />
WARNING<br />
CHECK THE LOCKING MECHANISM PRIOR TO USE. DO NOT<br />
USE ANY FIFTH WHEEL THAT FAILS TO OPERATE PROPERLY!<br />
3. Apply grease to the top of the fifth wheel (where it contacts the trailer plate).<br />
The right to alter specifications is reserved.<br />
Page 2 of 2<br />
1770 Hayes Street<br />
Grand Haven, MI 49417<br />
www.jostinternational.com<br />
Ph. (616) 846-7700 (800) 253-5105<br />
Fax (616) 846-0310<br />
LT SK37H-01 Rev.G