String Inlay Made Easy - Lee Valley Tools
String Inlay Made Easy - Lee Valley Tools
String Inlay Made Easy - Lee Valley Tools

You also want an ePaper? Increase the reach of your titles
YUMPU automatically turns print PDFs into web optimized ePapers that Google loves.
<strong>String</strong> <strong>Inlay</strong> <strong>Made</strong> <strong>Easy</strong><br />
Woodworking Newsletter<br />
Vol. 7, Issue 1 - September 2012<br />
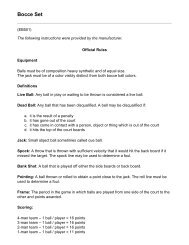
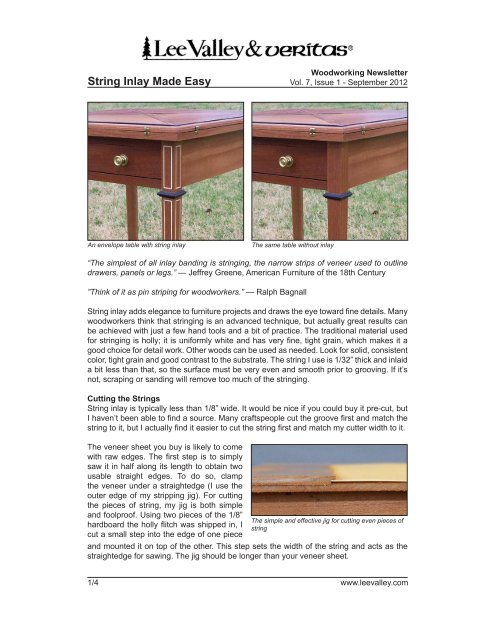
An envelope table with string inlay<br />
The same table without inlay<br />
“The simplest of all inlay banding is stringing, the narrow strips of veneer used to outline<br />
drawers, panels or legs.” — Jeffrey Greene, American Furniture of the 18th Century<br />
”Think of it as pin striping for woodworkers.” — Ralph Bagnall<br />
<strong>String</strong> inlay adds elegance to furniture projects and draws the eye toward fine details. Many<br />
woodworkers think that stringing is an advanced technique, but actually great results can<br />
be achieved with just a few hand tools and a bit of practice. The traditional material used<br />
for stringing is holly; it is uniformly white and has very fine, tight grain, which makes it a<br />
good choice for detail work. Other woods can be used as needed. Look for solid, consistent<br />
color, tight grain and good contrast to the substrate. The string I use is 1/32” thick and inlaid<br />
a bit less than that, so the surface must be very even and smooth prior to grooving. If it’s<br />
not, scraping or sanding will remove too much of the stringing.<br />
Cutting the <strong>String</strong>s<br />
<strong>String</strong> inlay is typically less than 1/8” wide. It would be nice if you could buy it pre-cut, but<br />
I haven’t been able to find a source. Many craftspeople cut the groove first and match the<br />
string to it, but I actually find it easier to cut the string first and match my cutter width to it.<br />
The veneer sheet you buy is likely to come<br />
with raw edges. The first step is to simply<br />
saw it in half along its length to obtain two<br />
usable straight edges. To do so, clamp<br />
the veneer under a straightedge (I use the<br />
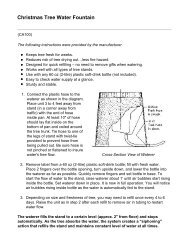
outer edge of my stripping jig). For cutting<br />
the pieces of string, my jig is both simple<br />
and foolproof. Using two pieces of the 1/8”<br />
hardboard the holly flitch was shipped in, I<br />
cut a small step into the edge of one piece<br />
The simple and effective jig for cutting even pieces of<br />
string<br />
and mounted it on top of the other. This step sets the width of the string and acts as the<br />
straightedge for sawing. The jig should be longer than your veneer sheet.<br />
1/4 www.leevalley.com
<strong>String</strong> <strong>Inlay</strong> <strong>Made</strong> <strong>Easy</strong><br />
Woodworking Newsletter<br />
Vol. 7, Issue 1 - September 2012<br />
The veneer can easily be cut using a knife, but the blade tends to follow the wood grain<br />
and that can spoil your string pieces. Sawing it using a fine-toothed veneer saw is the best<br />
way to create consistent strips. Slip the edge of the sheet under the lip of the jig and use<br />
the step as a straightedge. Keep the saw straight and take light strokes, letting the blade<br />
do the work; too much force can wrinkle or break the veneer. Saw the ends from the inside<br />
out to avoid damaging the veneer. Cutting the string pieces is surprisingly fast once you get<br />
a feel for it. For this article, I cut 12 strips in about 20 minutes.<br />
Sawing creates consistent strips<br />
The cut pieces of string<br />
Filing the Cutter<br />
The groove for the string can be cut using a beading tool, a scratch stock or even a marking<br />
gauge fitted with the proper blade. Whichever tool you use, shop built or store bought, you<br />
will need to create a properly sized cutter for your strings.<br />
Commercial beading tools usually come with blank cutters. You can also buy blank cutters<br />
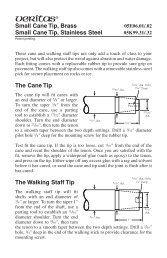
to fit antique tools such as the Stanley #66. To shape the cutter, simply file a tooth into it.<br />
Since the tooth needs to be only as deep as the string thickness, using a mill file to remove<br />
the shoulders from the edge takes just a few minutes. Cut a test groove that’s a bit wide<br />
and then carefully file the tooth to final width, testing as you go. The ideal fit is when the<br />
string has to be lightly tapped into the groove. The advantage with this system is that your<br />
jig will always cut the same sized strings, so the jig and cutter will be a matched pair. The<br />
next time you use this size of string, all of the prep work is done.<br />
Filing the cutter to fit the string width<br />
The filed cutter ready for use<br />
2/4 www.leevalley.com
<strong>String</strong> <strong>Inlay</strong> <strong>Made</strong> <strong>Easy</strong><br />
Woodworking Newsletter<br />
Vol. 7, Issue 1 - September 2012<br />
Cutting the Grooves<br />
Secure the cutter into the tool and set the<br />
depth of cut a bit less than the thickness<br />
of the string. You want the inlay to be just<br />
a bit proud of the surface so that it can be<br />
scraped smooth. Set the fence to place the<br />
groove where you want it.<br />
Begin cutting the groove using a light<br />
scraping cut. Make several passes, letting<br />
the cutter do the work. The groove is<br />
complete when the edge of the tool rides<br />
along the material and the cutter stops<br />
removing material. On larger panels, the<br />
beading tool can be used to cut all four<br />
sides, but it may be prudent to score the<br />
edges of the groove first to prevent tear<br />
out. For shorter cross cuts, the groove can<br />
be cut quickly using a sharp chisel.<br />
The cutter set in the beading tool<br />
Creating the groove for the string<br />
<strong>Inlay</strong>ing the <strong>String</strong> Pieces<br />
Apply a very light bead of glue into the groove and lay the string down. Use a mallet and a<br />
flat block to tap it into the groove. Don’t be worried that the inlay does not look precise at<br />
this stage; the next step will take care of that.<br />
3/4 www.leevalley.com
<strong>String</strong> <strong>Inlay</strong> <strong>Made</strong> <strong>Easy</strong><br />
Woodworking Newsletter<br />
Vol. 7, Issue 1 - September 2012<br />
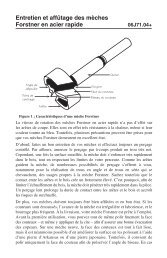
Prior to scraping the surface<br />
The smooth, even surface after scraping<br />
After the glue has dried, use a scraper to<br />
make the string level with the substrate.<br />
I prefer to use a scraping plane, since the<br />
flat sole helps keep the parts level and<br />
smooth. The strings can be sanded smooth,<br />
but scraping is faster and leaves a sharper<br />
edge. Take light passes with your tool; when<br />
both the string and the substrate materials<br />
appear in your shavings, you’re done.<br />
Whether you are scraping or sanding the<br />
inlay, don’t be too aggressive. If you do<br />
remove too much material, you can re-cut<br />
the groove and replace the damaged inlay.<br />
There are a number of simple details you can<br />
add to a piece to take it from good looking to<br />
great looking, and stringing is one of them. I<br />
hope that you now feel confident enough to<br />
try it out on an upcoming project.<br />
When both the string and substrate materials show,<br />
it’s time to stop scraping<br />
Text and photos by Ralph W. Bagnall<br />
When both the string and substrate materials show,<br />
it’s time to stop scraping<br />
Ralph Bagnall is a woodworking consultant and author who has been writing freelance<br />
woodworking articles for more than 10 years. He provides physical plant consulting to<br />
woodworking companies as well as written and video marketing support for woodworking<br />
manufacturers and retailers. http://www.consultingwoodworker.com<br />
4/4 www.leevalley.com