PERCEPTION AND ILLUSIONS - Science World Resources
PERCEPTION AND ILLUSIONS - Science World Resources
PERCEPTION AND ILLUSIONS - Science World Resources

You also want an ePaper? Increase the reach of your titles
YUMPU automatically turns print PDFs into web optimized ePapers that Google loves.
Illusions<br />
<strong>PERCEPTION</strong> <strong>AND</strong> <strong>ILLUSIONS</strong><br />
Is seeing believing<br />
OBJECTIVES:<br />
Students will be able to:<br />
• Understand that visual<br />
information is processed by<br />
the brain<br />
• Explain that the brain bases<br />
its interpretations on past<br />
experiences<br />
• Describe how optical<br />
illusions occur<br />
CURRICULUM<br />
CONNECTIONS<br />
BY GRADE:<br />
K. Physical <strong>Science</strong><br />
2. Physical <strong>Science</strong><br />
4. Physical <strong>Science</strong><br />
5. Life <strong>Science</strong><br />
LIST OF ACTIVITIES:<br />
Optical Illusions<br />
• Image Decoder<br />
• Do As I Say, Not As I do!<br />
• Seeing Spots<br />
• Random Dot Stereograms<br />
• Necker Cube<br />
• Size Perception<br />
• What Do You See<br />
• Stroop Effect<br />
• Canadian Flag After-Image<br />
• Benham’s Disk (make & take)<br />
• Thaumatrope (make & take)<br />
• Stroboscope (make & take)<br />
Auditory Illusions<br />
• P-O-T-S<br />
• Speech-to-Song Illusion<br />
Tactile Illusions<br />
• Numb Fingers<br />
• Finger-to-Elbow<br />
• Fake Hand<br />
• Comb Dot<br />
Introduction<br />
It is often said that seeing is believing, but can we really trust what our eyes are telling<br />
us In this resource, students explore optical illusions and how our brain strives to make<br />
sense of the information it receives.<br />
Background<br />
An optical illusion occurs when the brain perceives something that does not reflect<br />
reality. In fact, the word illusion comes from the Latin verb illudere or "to mock."<br />
Optical illusions can result in three ways:<br />
1. Your brain makes faulty assumptions based on patterns you have experienced in the<br />
past (cognitive illusion),<br />
2. Your eyes have structural quirks that misinterpret visual cues (physical illusion), or<br />
3. Your eyes or brain react to something they’ve been observing for a long time<br />
(physiological illusion).<br />
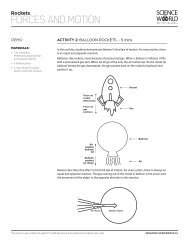
Your eyes are optical instruments, like a camera, microscope or telescope, but they<br />
adjust automatically. Your eyes can tell different colours apart, they can adapt very<br />
quickly to variations in the amount of light they're receiving, and they can focus<br />
themselves automatically.<br />
Iris<br />
Pupil<br />
Lens<br />
Retina<br />
Optic Nerve<br />
to Brain<br />
Cones on retina<br />
The iris controls the quantity of light entering the eye. The lens focuses the light to form<br />
an upside-down image on the retina. Right at the beginning of your development as a<br />
baby, your brain learned to turn the reversed image right-side up.<br />
The back wall of the human eye (retina) is lined with two kinds of receptors for<br />
distinguishing light: there are 12 million rod cells and 7 million cone cells.<br />
Rods respond to all wavelengths of visible light in low light conditions. They allow us<br />
to see objects when the lights are dim. Cones, on the other hand, respond to certain<br />
wavelengths, sending colour information to the brain.<br />
RESOURCES.SCIENCEWORLD.CA
Illusions<br />
<strong>PERCEPTION</strong> <strong>AND</strong> <strong>ILLUSIONS</strong><br />
There are 3 different types of cone receptors for coloured light: one is most sensitive<br />
to red light, one to green light, and one to blue light. With these three colour receptors<br />
we are able to perceive more than a million different shades of colour. Cones are less<br />
sensitive than rods, requiring higher levels of light. This is why it is difficult to make out<br />
the colour of objects in low light conditions.<br />
Ghostly coloured or squirmy after-images can appear when rod or cone cells get tired. An<br />
image that your eye collects is just the first step in the creation of meaning. Where the<br />
information from your senses is unclear, incomplete or seemingly backwards, your brain<br />
works to understand the world by filling in gaps, ignoring data or making decisions,<br />
usually based on your previous experience. This interpretation may not reflect reality: it<br />
can result in an illusion.<br />
Although this resource emphasizes optical illusions, both tactile and auditory illusions also<br />
result from the brain’s faulty interpretation of data received from these senses. To reinforce<br />
this concept, tactile and auditory illusions have been included as activities and extensions.<br />
Teacher’s Tip:<br />
We suggest that you rotate between the different types of illusions, ideally<br />
setting up stations around the classroom for students to visit in turn.<br />
RESOURCES.SCIENCEWORLD.CA
Illusions<br />
<strong>PERCEPTION</strong> <strong>AND</strong> <strong>ILLUSIONS</strong><br />
Vocabulary<br />
Auditory illusion: an illusion involving the brain’s misinterpretation of sound signals.<br />
Lateral inhibition: when one cell reduces the activity of a neighbouring cell.<br />
Mirage: an optical illusion where light rays are refracted, or ‘bent’, to produce a displaced image of<br />
faraway objects.<br />
Optical illusion: an illusion involving the brain’s misinterpretation of visual signals.<br />
Proprioception: our sense of the relative positioning of the different parts of our body (i.e. our<br />
internal “map”).<br />
Sensory Receptor: a sensory nerve ending that responds to a stimulus.<br />
Tactile illusion: an illusion involving the brain’s misinterpretation of tactile signals.<br />
Illusion: something that deceives by producing a false or misleading impression<br />
of reality.<br />
Thaumatrope: a card with different pictures on opposite sides, such as a horse on one side and a<br />
rider on the other, which appear as if combined when the card is twirled rapidly, thus illustrating<br />
the persistence of visual impressions.<br />
Stroboscope: a device for studying the motion of a body, especially a body in rapid revolution or<br />
vibration, by making the motion appear to slow down or stop, as by periodically illuminating the<br />
body or viewing it through widely spaced openings in a revolving disk.<br />
References<br />
»»<br />
Listverse | Top 10 Incredible Sound Illusions<br />
http://listverse.com/2008/02/29/top-10-incredible-sound-illusions/<br />
»»<br />
Accoustical Society of America | The Speech-to-Song Illusion<br />
http://www.acoustics.org/press/156th/deutsch.html<br />
»»<br />
Wikipedia | Sensory receptor<br />
http://en.wikipedia.org/wiki/Sensory_receptor<br />
»»<br />
Wikipedia | Lateral inhibition<br />
http://en.wikipedia.org/wiki/Lateral_inhibition<br />
»»<br />
Wikipedia | Hermann grid<br />
http://en.wikipedia.org/wiki/File:HermannGrid.gif<br />
»»<br />
Magic Eye | Frequently Asked Questions<br />
http://www.magiceye.com/faq.htm<br />
»»<br />
Vern’s SIRDS Gallery<br />
http://www.vern.com/<br />
»»<br />
SIRDS | List of Random Dot Stereogram Websites<br />
http://www.nottingham.ac.uk/~etzpc/sirds.html<br />
»»<br />
Interactive Mathematics Miscellany and Puzzles | Single Image Stereograms<br />
http://www.cut-the-knot.org/Curriculum/Geometry/Stereo.shtml<br />
»»<br />
Gary Beene’s Stereograms Information Center | How to Create Stereograms<br />
http://www.garybeene.com/stereo/rds-over.htm<br />
RESOURCES.SCIENCEWORLD.CA
Illusions<br />
<strong>PERCEPTION</strong> <strong>AND</strong> <strong>ILLUSIONS</strong><br />
»»<br />
Wikipedia | Necker Cube<br />
http://en.wikipedia.org/wiki/File:Necker_cube.svg<br />
»»<br />
Wapedia | Wiki | Necker Cube<br />
http://wapedia.mobi/en/Necker_cube<br />
»»<br />
Wise Bread | Optical Illusions That Make You Fatter and Your Wallet Lighter | Circle size<br />
http://www.wisebread.com/optical-illusions-that-make-you-fatter-and-your-wallet-lighter<br />
»»<br />
Braingle | Brainteasers | Old or Young Woman<br />
http://www.braingle.com/wii/brainteasers/teaser.phpid=26745<br />
»»<br />
Squidoo | Optical Illusions Images | Duck or Rabbit<br />
http://www.squidoo.com/optical-illusion-images<br />
»»<br />
Dartmouth Computer <strong>Science</strong> | Hany Farid | A Collection of Visual Illusions<br />
http://www.cs.dartmouth.edu/farid/Hany_Farid/Illusions/Illusions.html<br />
»»<br />
Wikipedia | Thaumatrope<br />
http://en.wikipedia.org/wiki/Thaumatrope<br />
Other resources<br />
»»<br />
Thomas FX Group Inc. | Rubber Hand (to purchase)<br />
http://www.thomasfx.com/<br />
NOTES<br />
RESOURCES.SCIENCEWORLD.CA
Illusions<br />
<strong>PERCEPTION</strong> <strong>AND</strong> <strong>ILLUSIONS</strong><br />
GAME<br />
Materials<br />
• small container (box,<br />
bucket, bin)<br />
• image templates<br />
ACTIVITY 1: Image decoder - 20mins<br />
This relay-race/puzzle game will reinforce the similar, yet unique, functions of the rods<br />
and cones in our eyes. Images are formed by the combination of information received<br />
by rods and cones on the retina. Rods are better at discriminating between different<br />
brightness levels (light vs dark), while cones are better at perceiving different colours.<br />
What to Do<br />
Preparation:<br />
1. Print out templates (one colour, one black and white).<br />
2. Cut each image into 15 puzzle pieces. Laminate the pieces if desired.<br />
Instructions:<br />
1. Gather students at one end of an open space.<br />
2. Put the puzzle pieces into the container and place the container at the other end of the<br />
play area.<br />
3. Gather the class in a circle. Assign students to a team (rod or cones) by alternating their<br />
placement.<br />
4. Starting in one place on the circle, one member of each team will run to the container<br />
and pick up an image piece. If they’re on Team Rods, they should pick up a black &<br />
white puzzle piece; if they’re on Team Cones, they should pick up a colour puzzle piece.<br />
Students then run back to their place in the circle.<br />
5. Once a team has collected a few puzzle pieces, they can begin assembling their image.<br />
The completed image will contain all 15 pieces.<br />
6. The first team to assemble their image correctly wins.<br />
Key Questions<br />
»»<br />
Did rods and cones see the same image<br />
»»<br />
What was different about the image<br />
Extensions<br />
»»<br />
This activity can be run either as an outdoor game, or as a classroom activity<br />
without the relay-race component.<br />
RESOURCES.SCIENCEWORLD.CA
Illusions<br />
<strong>PERCEPTION</strong> <strong>AND</strong> <strong>ILLUSIONS</strong><br />
RESOURCES.SCIENCEWORLD.CA
Illusions<br />
<strong>PERCEPTION</strong> <strong>AND</strong> <strong>ILLUSIONS</strong><br />
RESOURCES.SCIENCEWORLD.CA
Illusions<br />
<strong>PERCEPTION</strong> <strong>AND</strong> <strong>ILLUSIONS</strong><br />
DEMO<br />
ACTIVITY 2: Do as I say, not as i do! - 5mins<br />
This demonstration shows the importance of visual cues.<br />
If we get conflicting information from our eyes and ears, many of us will default to the<br />
information we receive from our eyes. Most of us rely on vision as our dominant sense<br />
to understand the world around us because we can get so much information this way:<br />
shape, size, distance, motion, and colour.<br />
In this demonstration, the information from our eyes is different from the information<br />
from our ears. Most of us “listen” to our eyes in this situation.<br />
What to Do<br />
Instructions<br />
1. Lead the students through the following instructions, while performing the<br />
actions yourself:<br />
Stick out your hand.<br />
Now stick out your thumb.<br />
Now stick out your forefinger.<br />
Touch them together to make a ring.<br />
Now put the ring on your chin. [said while placing your ring on your cheek].<br />
How many of you are touching your CHIN”<br />
Key Questions<br />
»»<br />
Why are you touching your cheek<br />
»»<br />
Which sense took over: sight or hearing<br />
Extensions<br />
»»<br />
Create your own visual cue illusion and try it on family and friends!<br />
RESOURCES.SCIENCEWORLD.CA
Illusions<br />
<strong>PERCEPTION</strong> <strong>AND</strong> <strong>ILLUSIONS</strong><br />
DEMO<br />
Materials<br />
• Hermann Grid template, printed<br />
on either an overhead sheet<br />
or on a large sheet of paper<br />
overhead projector (optional)<br />
ACTIVITY 3: SEEING SPOTS - 5mins<br />
In this demonstration, students see imaginary spots and relate this illusion to the<br />
structure of the retina.<br />
The Hermann Grid is an illusion based on the way our eyes work. Most people "see" grey<br />
spots where lines of white space intersect, even though there is no grey there at all.<br />
This illusion is an example of lateral inhibition — a feature of our visual system.<br />
Light sensitive cells, or rods, are arranged in rows on the retina. It is possible that light<br />
hits just one rod, Rod X, which sends a signal to the brain. But if light also hits Rod X's<br />
neighbours, Rod X's signal won't be as strong. It’s as though the sensitivity of Rod X<br />
is ‘turned down’ when its neighbours also receive light.<br />
In Hermann's Grid, the places where the white lines cross have white surroundings<br />
in four different directions. The rods getting light from the middle of the intersection<br />
have neighbour cells in every direction that also get lots of light. So the middle rods are<br />
‘turned down’ and the intersection looks darker.<br />
These spots don’t generally appear directly where you’re looking but rather a little off<br />
to the side. This is due to the fact that there are no rods cells directly in the centre of the<br />
retina. It also explains why dim stars tend to ‘disappear’ when we look straight at them<br />
and look brighter when we look slightly beside them.<br />
Key Questions<br />
»»<br />
What do you see<br />
»»<br />
Are the gray dots really there<br />
»»<br />
Why do you think they appear<br />
NOTES<br />
RESOURCES.SCIENCEWORLD.CA
Illusions<br />
<strong>PERCEPTION</strong> <strong>AND</strong> <strong>ILLUSIONS</strong><br />
RESOURCES.SCIENCEWORLD.CA
Illusions<br />
<strong>PERCEPTION</strong> <strong>AND</strong> <strong>ILLUSIONS</strong><br />
DEMO<br />
Materials<br />
• a selection of single image<br />
random dot stereograms,<br />
printed on either an overhead<br />
sheet or on a large sheet of<br />
paper<br />
http://www.nottingham.<br />
ac.uk/~etzpc/sirds.html<br />
• overhead projector (optional)<br />
ACTIVITY 4: Random Dot Stereograms - 30mins<br />
In this demonstration, students discover how the structure and placement of the eyes<br />
creates depth perception.<br />
Depth perception occurs as your brain compares the pictures received in each eye to<br />
figure out how far objects are from you. Each eye sees a slightly different picture because<br />
they’re in slightly different places.<br />
If you use first one eye then the other to view an object, nearby objects tend to jump back<br />
and forth more, whereas faraway objects hardly seem to move at all.<br />
In the first part of the demonstration, one eye sees the object covered by the index<br />
finger. The other eye has an unobstructed view. This demonstrates that each eye is<br />
getting a different picture of the world.<br />
Single image random dot stereograms are the original versions of the popular ’Magic<br />
Eye’ pictures in which a 3D image pops out from what appears to be a sheet of random<br />
dots. The dots are arranged in repeating pattern, with slight differences in each<br />
repetition. Each eye sees a slightly different pattern because of the different angles<br />
between the page and each eye. Your brain tries to overlap the two patterns, and creates<br />
the virtual 3D object.<br />
If you want to view movies or pictures in 3D, you have to show a different picture to each<br />
eye. That’s why they give you glasses with 2 lenses of different colours (or let through<br />
light of different polarities.)<br />
What to Do<br />
Instructions<br />
Part 1: Depth Perception<br />
1. Focus on a person or object.<br />
2. Hold up your index finger at arm’s length.<br />
3. Close your left eye. Looking only with your right eye, move your finger so it covers the<br />
object.<br />
4. Now look with just your left eye.<br />
Part 2: Stereograms<br />
1. Show random dot stereograms to students.<br />
2. Try and see what image is “hidden” in the stereograms.<br />
Activity 4 cont.<br />
RESOURCES.SCIENCEWORLD.CA
Illusions<br />
<strong>PERCEPTION</strong> <strong>AND</strong> <strong>ILLUSIONS</strong><br />
Key Questions<br />
»»<br />
Do both eyes have the same point of view of the objects before them<br />
»»<br />
If you bring your finger closer to your face, do you find it jumps back and forth more or<br />
less than when it’s farther away<br />
»»<br />
What was your method for “seeing” the image<br />
Extensions<br />
»»<br />
How would being blind in one eye affect your depth perception Why<br />
»»<br />
How are random dot stereograms created<br />
NOTES<br />
RESOURCES.SCIENCEWORLD.CA
Illusions<br />
<strong>PERCEPTION</strong> <strong>AND</strong> <strong>ILLUSIONS</strong><br />
DEMO<br />
Materials<br />
• Wire Necker Cube template,<br />
printed on either an overhead<br />
sheet or on a large sheet of<br />
paper for the entire class to<br />
see.<br />
• overhead projector (optional)<br />
ACTIVITY 5: NECKER cUBE - 5mins<br />
In this demonstration, students are challenged to determine the orientation of the cube,<br />
but their brains have a difficult time making a decision.<br />
We use lines in objects for clues about depth. In the Wire Necker Cube, it is not clear<br />
which of the two vertical lines in the middle of the cube should be closer to you. Usually,<br />
we assume the longer line is the closer one and the shorter one is further away, but in<br />
this illusion the two lines are the same length.<br />
What to Do<br />
Instructions<br />
1. Show the Wire Necker Cube to the class.<br />
2. Ask whether the cube is popping out of the page or going into the page.<br />
Key Questions<br />
»»<br />
Is it difficult to decide which way the cube is going<br />
»»<br />
Why do you think it is so hard to decide<br />
»»<br />
What cues does our brain normally use to determine the orientation of an object<br />
Extensions<br />
»»<br />
Challenge students to draw their own Wire Necker Cube.<br />
NOTES<br />
RESOURCES.SCIENCEWORLD.CA
Illusions<br />
<strong>PERCEPTION</strong> <strong>AND</strong> <strong>ILLUSIONS</strong><br />
RESOURCES.SCIENCEWORLD.CA
Illusions<br />
<strong>PERCEPTION</strong> <strong>AND</strong> <strong>ILLUSIONS</strong><br />
DEMO<br />
Materials<br />
• circles template, printed on<br />
either an overhead sheet or on<br />
a large sheet of paper overhead<br />
projector (optional)<br />
• 2 loonies or toonies<br />
ACTIVITY 6: SIZE <strong>PERCEPTION</strong> - 5mins<br />
In this demonstration, students learn about the importance of context in our brain’s<br />
ability to interpret information.<br />
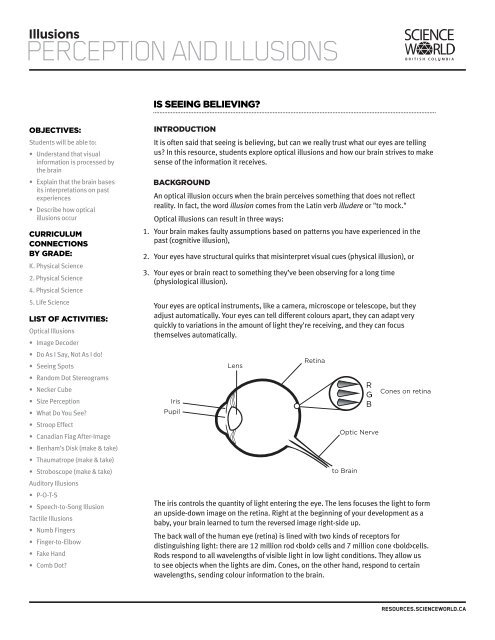
In this illusion, one circle seems small compared to its large neighbours and the other<br />
seems large compared to its small neighbours. This happens because we hardly ever<br />
look at objects by themselves: our brains automatically seek to compare them to<br />
surrounding objects in order to determine their size. When a coin is placed in the middle<br />
of each circle, the brain is able to directly compare their sizes, dissolving the illusion.<br />
This illusion can be used to the benefit of people who want to reduce their portion size<br />
when eating. Eating on a small dinner plate gives the illusion that we are eating more<br />
food than if it is served on a large dinner plate.<br />
What to Do<br />
Instructions<br />
1. Show the students the circle image.<br />
2. Borrow two large coins (loonies or toonies) and hold them in the middle of each circle.<br />
Key Questions<br />
»»<br />
Which middle circle is larger<br />
»»<br />
What made you think that the circles were different sizes<br />
Extensions <br />
»»<br />
Challenge students to create their own size illusion.<br />
»»<br />
How could this illusion help a person who is trying to control their portion size<br />
NOTES<br />
RESOURCES.SCIENCEWORLD.CA
Illusions<br />
<strong>PERCEPTION</strong> <strong>AND</strong> <strong>ILLUSIONS</strong><br />
RESOURCES.SCIENCEWORLD.CA
Illusions<br />
<strong>PERCEPTION</strong> <strong>AND</strong> <strong>ILLUSIONS</strong><br />
DEMO<br />
Materials<br />
• Old/Young Woman template,<br />
printed on either an overhead<br />
sheet or on a large sheet of<br />
paper<br />
• Duck to Rabbit template,<br />
printed on either an overhead<br />
sheet or on a large sheet of<br />
paper for the entire class to<br />
see.<br />
• overhead projector (optional)<br />
ACTIVITY 7: What do you see - 5mins<br />
In this demonstration, students may argue as they try to make sense of an ambiguous<br />
picture with two very different interpretations.<br />
This illusion works because the image is ambiguous, which means there is just enough<br />
information for you to make sense of it in a couple of different ways. Our brain is usually<br />
able to make sense of the information it receives. In this case, however, there are two<br />
reasonable interpretations that can be made.<br />
What to Do<br />
Instructions<br />
1. Show the students the Old/Young Woman image. Ask them whether they see a young<br />
woman or an old woman.<br />
2. Show the students the Duck to Rabbit image. Ask how many people see the rabbit.<br />
Rotate the illusion so that the rabbit ears are pointing up.<br />
Key Questions<br />
»»<br />
How old is the woman in the picture<br />
»»<br />
Who sees a young woman An old woman<br />
»»<br />
Why do you think we can see two different things<br />
»»<br />
If you concentrate on certain parts of the image, your brain will make sense of it in<br />
different ways. What parts help you see the old woman The young woman<br />
»»<br />
How is the Duck to Rabbit image similar/different from the Old/Young Woman image<br />
»»<br />
Why does the animal you see change when you rotate the image<br />
NOTES<br />
RESOURCES.SCIENCEWORLD.CA
Illusions<br />
<strong>PERCEPTION</strong> <strong>AND</strong> <strong>ILLUSIONS</strong><br />
RESOURCES.SCIENCEWORLD.CA
Illusions<br />
<strong>PERCEPTION</strong> <strong>AND</strong> <strong>ILLUSIONS</strong><br />
RESOURCES.SCIENCEWORLD.CA
Illusions<br />
<strong>PERCEPTION</strong> <strong>AND</strong> <strong>ILLUSIONS</strong><br />
DEMO<br />
Materials<br />
• Stroop Effect template, printed<br />
on either an overhead sheet or<br />
on a large sheet of paper<br />
• overhead projector (optional)<br />
• stopwatch (optional)<br />
ACTIVITY 8: stroop effect - 10mins<br />
In this fun demonstration, students try and consciously change the interpretation the<br />
brain naturally wants to give them.<br />
Our experiences in the past help us look for patterns and make assumptions in the<br />
present. This demonstration is known as the Stroop Effect, named after its discoverer,<br />
J. Ridley Stroop. Your natural tendency is to read words, not report the colour of the ink<br />
in which the word is written, which is why it’s difficult for you to say the colour instead<br />
of the word itself. Even if the Stroop words were upside down, the brain would still<br />
recognize the shapes as letters and group them together as words to read.<br />
Teacher’s Note: This image MUST be printed in colour.<br />
What to Do<br />
Instructions<br />
1. Challenge the class to read the names of the colours out loud together. This should be<br />
fairly easy.<br />
2. Challenge the students to name the colour that the words are written in. For example, if<br />
the word “green” is written in purple, the class would name the colour “purple”.<br />
3. If using stations, have students use a stopwatch to time themselves reading the words<br />
versus naming the colours and compare the results.<br />
Key Questions<br />
»»<br />
Why do you think it is so difficult to report the colour the word is written in<br />
Extensions<br />
»»<br />
Turn the words upside down and name the colours. Does this change the results Why<br />
NOTES<br />
RESOURCES.SCIENCEWORLD.CA
Illusions<br />
<strong>PERCEPTION</strong> <strong>AND</strong> <strong>ILLUSIONS</strong><br />
blue purple green red<br />
orange blue red green<br />
purple orange red blue<br />
green red blue purple<br />
orange blue red green<br />
green purple orange red<br />
RESOURCES.SCIENCEWORLD.CA
Illusions<br />
<strong>PERCEPTION</strong> <strong>AND</strong> <strong>ILLUSIONS</strong><br />
DEMO<br />
Materials<br />
• green Canadian flag template,<br />
printed on either an overhead<br />
sheet or on a large sheet of<br />
paper<br />
• overhead projector (optional)<br />
• large white board, wall or card<br />
ACTIVITY 9: Canadian flag after-image - 5mins<br />
In this demonstration, colours appear before the students’ eyes as they learn about cell<br />
fatigue and afterimages.<br />
Our central nervous system stops responding to information from our senses that is<br />
constantly repeated. You’re not aware of the feeling of your clothes on your skin (until<br />
I mentioned it) because that feeling doesn’t change. This is because you have adapted<br />
to the stimulus (the feeling of your clothes). This is useful so that you will notice a<br />
sudden and threatening change in your environment, such as a tiger attack. It would be<br />
unfortunate if your brain was busy paying attention to your clothes touching your skin<br />
and didn’t notice a tiger!<br />
Staring at the green colour in the flag tires out the cells in your retina that respond to green.<br />
Since the brain gets used to looking at the green in the flag, the cone cells send fewer and<br />
fewer signals saying “green stuff here!” to the brain. While you’re looking at the flag, your<br />
eyes are technically less sensitive to green since it is “old news” for the brain.<br />
When you switch over to a white surface, your eyes don’t register the green light and<br />
you see its complementary color red for a few moments. Remember that what our brain<br />
processes as “white” is actually the combination of all colours combined. It takes a few<br />
moments for the cones to start firing green signals to the brain again, which is why we<br />
see the complementary color red.<br />
In the same way, if you stare at a red color for 30 seconds or more, the cells in your<br />
retina that respond to red will fatigue more and fire less. When you switch over to a white<br />
surface, your eyes subtract the red and you see its complementary color green.<br />
Teacher’s Note: This image MUST be printed in colour.<br />
What to Do<br />
Instructions<br />
1. Hold up the peculiar version of the Canadian flag.<br />
2. Instruct students to stare at the image for 30 seconds (you can hum the National Anthem<br />
while they stare).<br />
3. Take the green flag away, and tell the students to stare at a white surface.<br />
Key Questions<br />
»»<br />
What do you see when you stare at the white wall<br />
»»<br />
Why don’t we see a green maple leaf, like the original flag we looked at<br />
Extensions<br />
»»<br />
Try making your own after-image. Use different colours and record the complementary<br />
colour that appears.<br />
RESOURCES.SCIENCEWORLD.CA
Illusions<br />
<strong>PERCEPTION</strong> <strong>AND</strong> <strong>ILLUSIONS</strong><br />
RESOURCES.SCIENCEWORLD.CA
Illusions<br />
<strong>PERCEPTION</strong> <strong>AND</strong> <strong>ILLUSIONS</strong><br />
make & take<br />
Materials<br />
Per student:<br />
• Benham’s disk template<br />
(printed on cardstock)<br />
• a pin<br />
• a pencil with an eraser tip<br />
• scissors<br />
ACTIVITY 10: benham's disk - 30mins<br />
Students make a contraption that appears to produce colours from black and white.<br />
Benham's Disk was invented by a nineteenth-century toymaker who noticed colours in a<br />
black-and-white pattern he had mounted on a spinning top.<br />
Why do we see colours There are three types of cones. One is most sensitive to red<br />
light, one to green light, and one to blue light. Each type of cone has a different latency<br />
time, the time it takes to respond to a stimulus, and a different persistence of response<br />
time, the time it keeps responding after the stimulus has been removed. Blue cones, for<br />
example, are the slowest to respond and keep responding the longest.<br />
When you gaze at one place on the spinning disk, you are looking at alternating flashes<br />
of black and white. When a white flash goes by, all three types of cones respond. Your<br />
eyes and brain see the colour white only when all three types of cones are responding<br />
equally. The fact that some types of cones respond more quickly than others and that<br />
some types of cones keep responding longer than others leads to an imbalance that<br />
partially explains why you see colours.<br />
The colours vary across the disk because the black arcs have different lengths, so that<br />
the flashing rate they produce on the retina is also different.<br />
What to Do<br />
Instructions<br />
1. Cut out the Benham’s disk template.<br />
2. Poke a pin through the middle of the circle and then fix the disk to the pencil by poking<br />
the pin into the eraser.<br />
3. Spin the disk and observe what happens.<br />
Key Questions<br />
»»<br />
What do you see What changes when you start spinning the disk<br />
»»<br />
Where do you think the colours come from<br />
»»<br />
Why are there different colours in different places on the disk<br />
Extensions<br />
»»<br />
Try spinning the disk in the opposite direction.<br />
»»<br />
Try spinning the disk in dim light.<br />
»»<br />
Full Lesson | Colour<br />
http://resources.scienceworld.ca/lessons-by-topic/light/1141-colour.html<br />
RESOURCES.SCIENCEWORLD.CA
Illusions<br />
<strong>PERCEPTION</strong> <strong>AND</strong> <strong>ILLUSIONS</strong><br />
RESOURCES.SCIENCEWORLD.CA
Illusions<br />
<strong>PERCEPTION</strong> <strong>AND</strong> <strong>ILLUSIONS</strong><br />
make & take<br />
Materials<br />
Per student:<br />
• bird and branch template<br />
• straw<br />
• scissors<br />
• 2 pieces of tape<br />
ACTIVITY 11: Thaumatrope - 30mins<br />
Students take advantage of persistence of vision to combine two separate images.<br />
This illusion takes advantage of something called “persistence of vision”. When an<br />
image is shown to your eyes, the retina keeps responding for a short time (about 1/30th<br />
of a second) after the image itself has gone away. If a new picture appears just before the<br />
previous one has faded away, your brain blends the two together.<br />
A thaumatrope is a toy, popular in Victorian times, that uses this persistence of vision.<br />
What to Do<br />
Instructions<br />
1. Cut out the circles containing the bird and the branch.<br />
2. Tape down the straw to the backside of one of the images.<br />
3. Tape the backs of the 2 images together.<br />
4. Spin the straw between your hands. The bird should appear on the branch.<br />
Key Questions<br />
»»<br />
What happens when you twirl the straw<br />
Extensions<br />
»»<br />
Design your own thaumatrope (e.g. fish in a bowl, spider on a web etc). The only tricky<br />
part is positioning the 2 images so that they line up correctly when you twirl them.<br />
»»<br />
How is this optical illusion similar to the Canadian Flag After-Image<br />
RESOURCES.SCIENCEWORLD.CA
Illusions<br />
<strong>PERCEPTION</strong> <strong>AND</strong> <strong>ILLUSIONS</strong><br />
RESOURCES.SCIENCEWORLD.CA
Illusions<br />
<strong>PERCEPTION</strong> <strong>AND</strong> <strong>ILLUSIONS</strong><br />
make & take<br />
Materials<br />
• large mirror for students to<br />
view their stroboscopes in<br />
motion<br />
Per student:<br />
• scissors<br />
• stroboscope template (printed<br />
on light cardboard)<br />
• pin<br />
• pencil with eraser at one end<br />
ACTIVITY 12: STROBOSCOPE - 30mins<br />
Students take advantage of persistence of vision with a simple apparatus that turns a<br />
series of static images into motion.<br />
In a stroboscope, slits open and close in front of your eye as the disc rotates. Each time a<br />
slit opens, you glimpse the scene on the far side of the disk. Each open-slit image lingers<br />
in your eye and brain long enough to merge with the next image. This phenomenon,<br />
called “persistence of vision”, will give your brain the illusion that motion is taking place.<br />
What to Do<br />
Instructions<br />
1. Cut out the stroboscope template. Don’t forget to cut out the slits around the edge!<br />
2. Poke a pin through the middle of the circle then fix the disk to the pencil by poking the<br />
pin into the eraser.<br />
3. Spin the template and look through the slits at the back towards a mirror.<br />
Key Questions<br />
»»<br />
What do you see in the mirror<br />
»»<br />
Why does it seem that the image is moving<br />
Extensions<br />
»»<br />
On the reverse side of the stroboscope you have cut out, create your own changing image<br />
using either dots (to represent a ball dropping), or your own drawing. Start off with<br />
something simple and then see if you can make it even more challenging!<br />
RESOURCES.SCIENCEWORLD.CA
Illusions<br />
<strong>PERCEPTION</strong> <strong>AND</strong> <strong>ILLUSIONS</strong><br />
RESOURCES.SCIENCEWORLD.CA
Illusions<br />
<strong>PERCEPTION</strong> <strong>AND</strong> <strong>ILLUSIONS</strong><br />
DEMO<br />
ACTIVITY 13: P-O-T-S - 5mins<br />
Students discover how auditory illusions are based on confounding assumptions<br />
and patterns.<br />
After repeating P-O-T-S several times, most people will say “Stop” because their brains<br />
have been “primed” by the letters P-O-T-S. The human brain is so good at finding<br />
patterns that it recognizes POTS as being the reverse spelling of STOP and relates it to<br />
our behaviour at a traffic light, all before our conscious mind can catch up.<br />
What to Do<br />
Instructions<br />
1. Ask the class to spell the word "POTS" along with you. This works best as a call and<br />
response:<br />
Instructor: P-O-T-S Class: P-O-T-S<br />
Instructor: P-O-T-S Class: P-O-T-S<br />
(repeat 5/6 times)<br />
2. Immediately ask the class: "What do you do at a green light"<br />
Key Questions<br />
»»<br />
If you know the answer to what you do at a green light, why do you think you answered<br />
the question incorrectly<br />
Extensions<br />
»»<br />
Create your own auditory illusion and test it on other students or your family<br />
RESOURCES.SCIENCEWORLD.CA
Illusions<br />
<strong>PERCEPTION</strong> <strong>AND</strong> <strong>ILLUSIONS</strong><br />
DEMO<br />
Materials<br />
• computer or mobile device with<br />
speakers (or headphones if<br />
using as a station)<br />
• audio link to the Diana<br />
Deutsch’s Speech-to-Song<br />
Illusion<br />
http://www.acoustics.org/<br />
press/156th/deutsch.html<br />
ACTIVITY 14: Speech-to-Song Illusion - 10mins<br />
Students listen to an auditory illusion that blurs the line between speech and song.<br />
This is an illusion discovered by Diana Deutsch at the University of California, San<br />
Diego. Some researchers spend their entire academic careers studying how the brain<br />
misinterprets information, leading to illusions.<br />
Exactly why this illusion occurs is not fully understood, but it does suggest a strong link<br />
between speech and music. In Deutch’s study, even professional vocalists with years<br />
of musical training and a well-tuned ear hear a melody where no melody exists. Her<br />
observations tell us that although the ear may hear the same words with no variation,<br />
the brain can transform the information into more than one result, such as spoken words<br />
or a melody.<br />
What to Do<br />
Instructions<br />
1. Ask students to close their eyes.<br />
2. Play the clip “Sound Demo 1”.<br />
3. Ask the class to repeat/sing the phrase they heard.<br />
4. If anyone in the class only heard the phrase as spoken, and not sung, either play “Sound<br />
Demo 1” again, or play “Sound Demo 3”.<br />
5. When everyone can hear the phrase as sung, sing the phrase as a class again.<br />
6. Play “Sound Demo 2”.<br />
7. Discuss what they heard.<br />
Key Questions<br />
»»<br />
How does the statement “sometimes behave so strangely” change from the beginning to<br />
the end of the demo<br />
»»<br />
At what point did the spoken phrase appear to transform into song<br />
Extension<br />
»»<br />
What makes a song a song Can you describe the difference between words spoken<br />
and sung<br />
»»<br />
Try other amazing auditory illusions | Top 10 Incredible Sound Illusions<br />
http://listverse.com/2008/02/29/top-10-incredible-sound-illusions/<br />
RESOURCES.SCIENCEWORLD.CA
Illusions<br />
<strong>PERCEPTION</strong> <strong>AND</strong> <strong>ILLUSIONS</strong><br />
ACTIVITY<br />
ACTIVITY 15: Numb Fingers - 5mins<br />
In this activity, students confuse their brains as they explore a phenomenon known as<br />
perceptual disjunction.<br />
Sometimes our brains fail to take all factors into account when processing sensory<br />
information. The sensation we think we feel is therefore incomplete. For example, in the<br />
activity below, our brains “forget” that there is another object (your partner’s finger)<br />
blocking us from feeling both sides of our index finger. Stroking only one side of our<br />
finger results in the feeling that our finger has gone numb.<br />
What to Do<br />
Instructions<br />
1. Pair up with a partner.<br />
2. Place the palm of your left hand against the palm of your partner’s right hand, making<br />
sure that all the fingers line up.<br />
3. Use the thumb and index finger on your right (other) hand to simultaneously stroke your<br />
and your partner’s index fingers (i.e. your right thumb should be touching your index<br />
finger, and your right index finger should be stroking your partner’s left index finger).<br />
4. Swap roles with your partner.<br />
Key Questions<br />
»»<br />
How does your finger feel<br />
»»<br />
How are you confusing your brain<br />
Extensions <br />
»»<br />
How is this illusion similar to optical illusions<br />
RESOURCES.SCIENCEWORLD.CA
Illusions<br />
<strong>PERCEPTION</strong> <strong>AND</strong> <strong>ILLUSIONS</strong><br />
ACTIVITY<br />
Materials<br />
Per pair of students:<br />
• paper clip<br />
ACTIVITY 16: finger-to-elbow - 10mins<br />
In this activity, students discover how the physical distribution of sensory receptors in<br />
our bodies can create a tactile illusion.<br />
Sensory receptors are not distributed evenly across our bodies. Some parts of our body,<br />
like our fingertips, are very densely packed with nerve endings and touch receptors.<br />
They are highly sensitive to touch, and can differentiate between even very fine, minute<br />
touch sensations. Other parts of our body, like our forearms, are less packed with touch<br />
receptors, so they are not as good at sensory discrimination. If you move from an area of<br />
higher sensory discrimination to a lower one, you can experience something very odd–<br />
two distinct sensations can suddenly feel like just one!<br />
What to Do<br />
Part 1: Finger<br />
1. Pair up with a partner and sit facing each other.<br />
2. Have your partner hold out their left arm and close their eyes.<br />
3. Lightly place your finger on their index fingertip, and SLOWLY move your finger up their<br />
forearm towards their elbow (keep your finger on the inside of their forearm and move<br />
towards the ‘crook’ of their elbow).<br />
4. Let your partner know to tell you when they think you’ve reached their elbow. They can<br />
open their eyes to see how accurate they were!<br />
5. Swap roles with your partner.<br />
Part 2: Paper Clip<br />
1. Unfold a paper clip into 1 straight line, then bend it in half so it looks like a horseshoe,<br />
with the clip-tips about 1cm apart.<br />
2. Repeat the activity of part one, but gently use the 2 tips of the paper clip instead of your<br />
finger.<br />
3. Have your partner tell you when they no longer feel 2 distinct clip-tips, but 1.<br />
4. Swap roles with your partner.<br />
Key Questions<br />
»»<br />
Why does it feel like your partner has reached your elbow, when they haven’t<br />
»»<br />
Where can you tell there are 2 clip-tips, and where can you only distinguish one<br />
»»<br />
Which part(s) of your arm have more sensory receptors How do you know<br />
Extensions<br />
»»<br />
Try parts 1 and 2 going the opposite way (i.e. from crook-of-the-elbow to fingertip).<br />
RESOURCES.SCIENCEWORLD.CA
Illusions<br />
<strong>PERCEPTION</strong> <strong>AND</strong> <strong>ILLUSIONS</strong><br />
ACTIVITY<br />
Materials<br />
• rubber fake hand (child-size<br />
rubber hand, if possible<br />
– available in Halloween/<br />
costume stores)<br />
• 2 paint brushes<br />
• 2 black cloths (big enough<br />
to cover a student’s entire<br />
forearm)<br />
• standing barrier (e.g. hardcovered<br />
book)<br />
• hammer (optional)<br />
ACTIVITY 17: fake hand - 10mins<br />
Which is our dominant sense If we get conflicting signals from different senses, which<br />
one do we tend to believe Students investigate the answers to these questions in the<br />
following activity.<br />
Can you touch your finger to your chin with your eyes closed Our brain has an internal<br />
“map” of our entire body that allows us to do things like this. Even without the visual<br />
guidance of our sense of sight, our fingers still know where to go. Our sense of the<br />
relative positioning of the different parts of our body is referred to as proprioception.<br />
This internal map is so ingrained in us, that people who have lost limbs due to accident<br />
or amputation will often report still being able to feel sensations from their (missing)<br />
limb–a phenomenon known as the Phantom Limb Syndrome. Many people will continue<br />
to experience this sensation for months after their accident, until their brain develops a<br />
new map of their body.<br />
Our proprioception can also be manipulated the other way around, such that we come<br />
to think that something that looks similar to one of our body parts actually IS one of our<br />
body parts. When we receive conflicting inputs from different senses, we tend to believe<br />
what our eyes are telling us above all else, as vision is the dominant sense in humans.<br />
In this activity, when we see a fake hand being stroked while also feeling our real-buthidden<br />
hand being stroked, we can be induced into believing that our real hand has<br />
somehow been transposed into the fake one.<br />
Teacher’s Tip: This activity is best performed as a station so that all of the students get a<br />
chance to give it a try.<br />
Fun Fact:<br />
»»<br />
Anecdotal evidence from <strong>Science</strong> <strong>World</strong> testing seems to indicate that males are more<br />
susceptible to this illusion than females.<br />
What to Do<br />
1. Have a volunteer sit at the table, with their left hand resting on the table a little off<br />
to the side.<br />
2. Cover their entire forearm with one black cloth, leaving only their hand and<br />
wrist exposed.<br />
3. Place the fake rubber hand directly in front of the volunteer, and cover it with a second<br />
black cloth, exposing the same amount of wrist/hand surface as the volunteer’s<br />
own hand.<br />
4. Set up the barrier between the fake hand and the real one, such that the volunteer<br />
cannot see their real hand.<br />
Activity 17 cont.<br />
RESOURCES.SCIENCEWORLD.CA
Illusions<br />
<strong>PERCEPTION</strong> <strong>AND</strong> <strong>ILLUSIONS</strong><br />
5. Take two paintbrushes and stroke the fake hand and real hand simultaneously (i.e. 1<br />
paintbrush for each hand), in long slow strokes from wrist to fingertip. It is CRUCIAL to<br />
have the exact same brush placement on both hands: if you are stroking the index finger<br />
on the fake hand, be sure you are also stroking the index finger on the volunteer’s real<br />
hand.<br />
6. After approximately 1 minute of stroking, take out the hammer (or use your fist) and<br />
pound hard on the fake hand. See if your volunteer jumps!<br />
Key Questions<br />
»»<br />
Why did you jump, even though you knew it wasn’t your hand that was hit<br />
»»<br />
In this activity we got conflicting signals from different senses. Which sense<br />
did you believe<br />
RESOURCES.SCIENCEWORLD.CA
Illusions<br />
<strong>PERCEPTION</strong> <strong>AND</strong> <strong>ILLUSIONS</strong><br />
ACTIVITY<br />
Materials<br />
Per pair of students:<br />
• a pencil<br />
• a plastic comb (flat comb<br />
with flexible bristles)<br />
ACTIVITY 18: comb dot - 10mins<br />
In this illusion, students take advantage of a (typically) unfamiliar sensation for our<br />
fingertips’ touch receptors: having the skin on our fingertips stretched.<br />
When we place our fingertips against a brush-like surface with semi-rigid bristles, and<br />
then move the bristles back and forth, the skin on our fingertips becomes alternately<br />
stretched and compressed by the undulating motions. Because of the novelty of this<br />
particular sensation, our touch receptors have difficulty interpreting it properly. Instead,<br />
we reinterpret the stretch/compress motion as the more familiar sensation of running<br />
our finger across a raised surface, like a dot.<br />
What to Do<br />
Instructions<br />
1. Pair up with a partner.<br />
2. Take the comb and hold it sideways (as it would naturally lie on a flat surface).<br />
3. Hold the comb in one hand, and place the index finger of your other hand on top of a<br />
section of bristles.<br />
4. Have your partner hold the pencil vertically–perpendicular to the horizontal comb–and<br />
run the pencil continuously along the bristles of the comb horizontally.<br />
5. Swap roles with your partner.<br />
Key Questions<br />
»»<br />
What do you feel<br />
»»<br />
Do you feel the bristles move from side to side<br />
»»<br />
Why do you think we feel something different to what is actually happening<br />
»»<br />
In this case, which sense has taken over: sight or touch<br />
RESOURCES.SCIENCEWORLD.CA