CURRENT ELECTRICITY - Science World Resources
CURRENT ELECTRICITY - Science World Resources
CURRENT ELECTRICITY - Science World Resources

Create successful ePaper yourself
Turn your PDF publications into a flip-book with our unique Google optimized e-Paper software.
Electricity<strong>CURRENT</strong> <strong>ELECTRICITY</strong>HOW <strong>ELECTRICITY</strong> MOVESOBJECTIVES:Students will be able to:• Describe the componentsrequired to complete an electriccircuit.• Demonstrate the different waysto complete a circuit (parallel orseries).• Identify how electricity is usedin household appliances.• Describe the relationshipbetween an electron andcurrent electricity.CURRICULUMCONNECTIONSBY GRADE:2. Physical <strong>Science</strong>6. Physical <strong>Science</strong>LIST OF ACTIVITIES:• Electrons On The Go• Conducting Currents• Lemon Battery• Lighting Light Bulbs• Conductivity Tester• Burglar Alarm• Steady Hand GameINTRODUCTIONElectric current is the flow of electrons through a completed circuit of conductors. Itis used to power everything from our lights to our trains. In these activities, studentswill explore different kinds of circuits and investigate what is required to make up acomplete circuit.BACKGROUNDElectricity is used to operate your cell phone, power trains and ships, run yourrefrigerator and power motors in machines like food processors. Electric energy must bechanged to other forms of energy such as heat, light or mechanical to be useful.Everything we see is made up of tiny little parts called atoms. The atoms are made ofeven smaller parts. These are called protons, electrons and neutrons. An atom usuallyhas the same number of protons (which have a positive charge) and electrons (whichhave a negative charge). Sometimes electrons can be moved away from their atoms.Electricity current is the movement of electrons through a wire. Electric current ismeasured in amperes (amps) and refers to the number of charges that move through thewire per second. In order for a current to flow, the circuit must be closed; in other words,there must be an uninterrupted path from the power source, through the circuit, andback to the power source.Voltage is measured in volts and is sometimes called electric potential. The voltagebetween two points in a circuit is the total energy required to move a small electriccharge from one point to the other, divided by the size of the charge.Resistance is measured in ohms and refers to the forces that oppose the flow of electroncurrent in a wire. We can use resistance to our benefit by transforming the electricalenergy lost in a resistor into heat energy (electric stove), light energy (light bulb), soundenergy (radio), mechanical energy (electric fan), or magnetic energy (electromagnet).However, if we want current to flow directly from one point to another, we should use awire that has as little resistance as possible.A neat analogy to help understand these terms is a system of plumbing pipes. Thevoltage is equivalent to the water pressure that pushes water out, the current isequivalent to the flow rate, and the resistance is like the pipe width. The thinner thepipe, the higher the resistance.In this series of activities, students will experiment with wires, batteries, and switchesto create their own circuits while learning about voltage, current, and resistance at thesame time.RESOURCES.SCIENCEWORLD.CA
Electricity<strong>CURRENT</strong> <strong>ELECTRICITY</strong>DEMONSTRATIONMATERIALS• students• stool, chair or box• masking tape• box of Smarties (or suitablesmall, nut free candy)ACTIVITY 1: ELECTRONS ON THE GO - 10minsIn this activity, students create a model of electric current and simulate the movement ofelectrons through a wire.You need three things in order to make a complete circuit: a conductor (e.g. wire), apower source (e.g. wall outlet or battery) and a resistance (e.g. light bulb or motor). Theconductor runs a circular path from the power source, through the resistance, and backto the power source. The power source moves the existing electrons in the conductoraround the circuit. This is called a current. The resistance uses the energy of theelectrons around the wire and slows down the flow of electrons.A battery is one way to generate electric current. Inside the battery, chemical reactionstake place. One reaction (at the negative end of the battery) creates loose electrons;the other (at the positive end) uses them up. Electrons move through a wire from thenegative end to the positive end.To recharge the battery, the chemical reactions must be reversed to move the electronsin the opposite direction.In this model, the students are the electrons, and the energy provided by the battery isrepresented by Smarties. The current is the amount of charge (electrons) moving in thecircuit per unit time, measured in amperes. In order to increase the electrical current,we must speed up the movement of electrons; we do this in the model by adding extraenergy in the form of extra Smarties.Students will feel warmer as they speed up, which mimics what takes place along a wirein a real circuit. This physical reaction can be used to build in a safety feature in a circuit:if there is a sudden surge of charge and the wire heats up to a certain temperature, awire could melt, stopping the current. This is basically how a fuse works. A fuse uses ametal wire that melts at a certain temperature, corresponding to the pre-determined limitfor the circuit.The problem with fuses is that they can only be used once. Once the metal within it hasmelted, it has to be replaced. Most new homes use circuit breakers to provide a safetymechanism to an electrical circuit. The excess heat will either bend a strip of metal oractivate an electromagnet that physically opens the circuit so that no more current canget through. To turn the current back on, a person goes to the circuit breaker box andflips the switch back to its original position, closing the circuit and allowing currentto flow.Activity 1 cont.RESOURCES.SCIENCEWORLD.CA
Electricity<strong>CURRENT</strong> <strong>ELECTRICITY</strong>If this safety feature were not included in a household circuit, a surge of electricity couldheat up its wires to the point that it would melt its surrounding insulation, potentiallyigniting the wood framing to which the wires are stapled.WHAT TO DO1. Students form a circle to represent the wire. It may help to tape a circle on the floor (oruse a circle marked on the gym floor).2. Explain that the students are electrons. There are always electrons in the wire, and theyare always moving randomly, a little bit in every direction.3. Choose one of the students to be the power source (battery). This student holds a box ofSmarties – the Smarties represent “energy”. The closest student to the battery movesforward to get a Smartie. As soon as the electrons start moving in one place, they startmoving everywhere.4. As the electrons pass the battery, they get energy5. Next pick someone to be a switch. The switch, when off, will completely stop the electronmovement. The switch could either put up their hand, or turn to the side to represent “off”6. Have the circuit practice on and off a couple times. Note that when the switch is off, allthe electrons stop at once (they don’t pile up somewhere).Now put a stool (or a chair ora box) in the circle. This represents a resistance. The electrons have to climb over thestool to move forward. The whole electron chain will slow down, showing that the currentslows down when there is a resistance.7. How could we convince the electrons to move faster through the resistance? We couldpass out more smarties! This represents a greater voltage (more energy per electron).8. When the box of Smarties is empty, the battery is “dead” and the current will stop.Note that the battery gets used up faster if you pass out more energy per electron.RESOURCES.SCIENCEWORLD.CA
Electricity<strong>CURRENT</strong> <strong>ELECTRICITY</strong>KEY QUESTIONS»»How could we increase the current (in other words, how can we make the electronsmove faster)?»»When we increased the current did you feel yourself get warmer?»»Can you think of some real examples where increasing a current and heating up a wirecould be useful?EXTENSIONS»»Investigate how a circuit breaker prevents electrical fireshttp://electronics.howstuffworks.com/circuit-breaker.htm»»Look around the classroom. How many items can you find that add resistance toa circuit?»»Take apart some everyday appliances e.g. toasters, hairdryers and identify the differentparts of the circuits inside. Which part of the toaster heats up and darkens the bread?How does the toast pop back up? Which part of the hairdryer moves the air? Which partsmake the air hot?http://www.scienceworld.ca/pdf/outreach/BSLH_Gadgets_Contraptions.pdf.NOTESRESOURCES.SCIENCEWORLD.CA
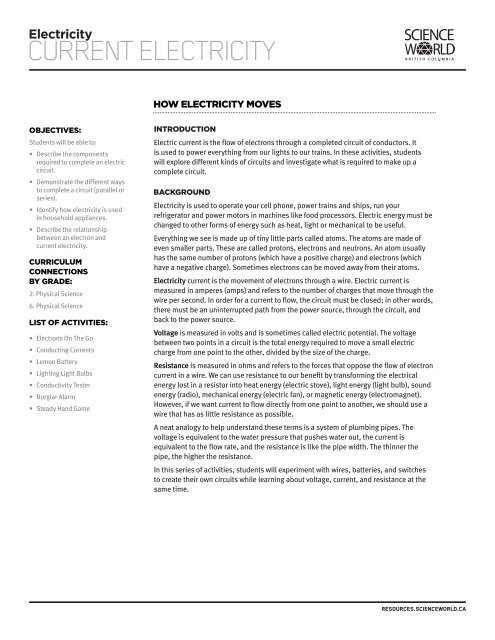
Electricity<strong>CURRENT</strong> <strong>ELECTRICITY</strong>DEMONSTRATIONMATERIALS• 3 insulated wires (about 20 cmlong each)• wire cutters• wire strippers ( would be agood idea to have the wires cutand stripped before hand)• 1 Christmas tree mini light bulbwith wire attached• tape• 2 D-cell batteries• bowl• water• salt• teaspoonACTIVITY 2: CONDUCTING <strong>CURRENT</strong>S - 10minsA circuit is a continuous path through which electricity travels. We usually think of thispath as a wire, but believe it or not, it can also be a liquid!Water is a poor conductor of electric current so will not usually complete a circuit.However, when you dissolve salt in water, the resulting ions can move through the waterand carry a charge that lights the bulb.It might surprise you to hear that water is a poor conductor, since you’ve been toldnever to use an electrical appliance near water because of the danger of electrocution.Absolutely pure water wouldn’t let charge move through it, so it wouldn’t conduct. Butwater around our houses or in nature always has other substances dissolved in it, andthose dissolved substances will allow charge to move.A substance may be an insulator if the voltage is low, but may conduct current if thevoltage is higher. The mini-light in this circuit won’t glow if there’s a gap between thewires–air doesn’t conduct current at this low voltage. But with the higher voltages in athunderstorm, the air molecules are ripped apart into ions and will conduct current quitewell – that’s why you see lightning!In this demonstration, students will see how a solution can complete a circuit.The problem with fuses is that they can only be used once. Once the metal within it hasmelted, it has to be replaced. Most new homes use circuit breakers to provide a safetymechanism to an electrical circuit. The excess heat will either bend a strip of metal oractivate an electromagnet that physically opens the circuit so that no more current canget through. To turn the current back on, a person goes to the circuit breaker box andflips the switch back to its original position, closing the circuit and allowing currentto flow.If this safety feature were not included in a household circuit, a surge of electricity couldheat up its wires to the point that it would melt its surrounding insulation, potentiallyigniting the wood framing to which the wires are stapled.Activity 2 cont.RESOURCES.SCIENCEWORLD.CA
Electricity<strong>CURRENT</strong> <strong>ELECTRICITY</strong>wire 1wire 3wire 2WHAT TO DOPreparation:1. Strip both ends of the three wires as well as those attached to the mini light bulb.2. Twist the first wire with one of the wires of the light bulb.3. Twist the second wire with the second wire of the light bulb. Tape the free end of the longwire to the positive end of the battery.4. Place the second battery so that its positive end is touching the first battery’s negativeend, and tape the batteries together.5. Tape one end of the third wire to the negative end of the second battery.Demonstration:1. Demonstrate that the circuit is working by touching the two free ends of the wirestogether. The bulb should light.2. Bend the two free ends of the wires over the bowl and tape them in place, making surethat they are not touching each other.3. Fill the bowl with water, submerging the free ends of the wires. Observe that the lightbulb does not come on.4. Add some salt to the water, one teaspoon at a time, and stir.5. Watch the light as the salt dissolves.RESOURCES.SCIENCEWORLD.CA
Electricity<strong>CURRENT</strong> <strong>ELECTRICITY</strong>KEY QUESTIONS»»What happens to the light bulb when we fill the bowl with water?»»What happens to the light bulb as the salt dissolves? Why do you think thisis happening?»»What changes as you add more salt?»»Why doesn’t the light bulb come on when the wire ends are in the plain water?»»Is water a good conductor of electrical current? Is salt a good conductor of electricalcurrent? How do you know?EXTENSIONS» » Replace the bulb with an ammeter to measure how the current changes with increasingamounts of salt.RESOURCES.SCIENCEWORLD.CA
Electricity<strong>CURRENT</strong> <strong>ELECTRICITY</strong>ACTIVITYMATERIALSPer pair of students:• lemon (and other fruit,optional)• 1 copper strip• 1 zinc strip (you can use agalvanized nail, which is coatedwith zinc)• knife• 2 copper wire leads (about 20cm long each) with alligatorclips on both ends• LED with a rating of no morethan 2 V (the smaller thevoltage, the better)• wire cutters• wire strippers• multimeter orvoltmeter(optional)ACTIVITY 3: LEMON BATTERY - 15minsCan you make a battery using a piece of fruit?Yes, but not a very strong one! The source of electric energy in this demonstration is thecombination of copper and zinc strips in the citric acid of the lemon. The citric acid of thelemon reacts with the zinc and loosens electrons. Copper pulls electrons more stronglythan zinc, so loose electrons will move towards the copper when the electrodes areconnected by wires. Moving electrons are called electric current, which is what lights upthe bulb.This is a classic electricity activity, but it can be very frustrating if you don’t have the rightequipment. We recommend having a multimeter or voltmeter on hand to test the voltage.WHAT TO DO1. Roll the lemon firmly on a counter to release some of the juices.2. Insert the one copper strip and one zinc strip vertically into the lemon, with one endsticking out.3. Connect one wire lead to each metal strip (electrode).4. Connect one of the free ends of the wire leads to one of the wires attached to the LED5. Connect the remaining free end of the wire lead to the remaining free wire on the bulb.Don’t be surprised if the bulb doesn’t light!Hint: If you’re using an LED, it will onlylight if it’s connected in the right direction.Try switching direction.Hint: Don’t try to test your LED byhooking it up to a commercial battery. Acommercial battery will be too powerfuland will wreck the LED.6. Use the voltmeter or multimeter to checkthe voltage between the two electrodes.It will probably be less than 1 volt! That’snot enough to light the LED, which needsabout 2 volts. Join together in groups ofthree or four lemons. Connect the lemonstogether in series (connect copper to zinctogether with wire) and attach the endsto ONE bulb. Use the voltmeter to checkthe voltage between the free wires at theends of the series.Activity 3 cont.RESOURCES.SCIENCEWORLD.CA
Electricity<strong>CURRENT</strong> <strong>ELECTRICITY</strong>KEY QUESTIONS»»What happens when you connect the wire to the bulb?»»What is the power source?»»What role does the lemon play in lighting up the bulb?»»When we use two strips of the same metal, does the bulb light up? Why?»»Is water a good conductor of electrical current? Is salt a good conductor of electricalcurrent? How do you know?EXTENSIONS»»Experiment with other fruits (e.g. oranges, grapefruits, apples, peaches, pears). Whichones produce the highest voltage? Why?»»Experiment with replacing the electrodes with two copper strips or two zinc strips and tryto light the bulb. Measure the voltage and explain the results.»»Experiment with replacing the electrodes with different metals (e.g. iron andmagnesium). Which combinations of electrodes give the highest voltage?NOTESRESOURCES.SCIENCEWORLD.CA
Electricity<strong>CURRENT</strong> <strong>ELECTRICITY</strong>EXPLORATIONMATERIALS• wire cutters• wire strippersPer pair of students:• 1 D-cell battery• four 10 cm lengths of insulatedwire• 2 light bulbs (with a rating of nomore than 2 volts each)• Electric Circuits Worksheets(one per student)ACTIVITY 4: LIGHTING LIGHT BULBS - 30-40minsIn this activity, students will experiment with batteries and light bulbs to learn aboutseries and parallel circuits.There are 2 different types of circuit:1. Series circuitsThere is only one path from the source through all of the loads (resistance) and backto the source. In other words, all of the bulbs are on the same loop. Each light addedin series makes all of the others dimmer, since each light bulb slows down the flow ofcurrent. A broken light will interrupt the whole circuit.2. Parallel circuitsEvery load (resistance) is connected in a separate path and receives the full circuitvoltage. In other words, each bulb is connected on a separate loop to the energy source.Two lights connected in a parallel circuit will be as bright as one by itself. The drawbackis that the energy source gets drained quickly.WHAT TO DOPreparation:1. Cut enough lengths of insulated wire for the class.2. Strip both ends of every wire.3. Gather together sets of materials, one for each group.Exploration:1. Divide students into groups of 2 or 3.2. Provide each group with one battery, one bulb and one wire.Part 1: Light the bulb1. Challenge the students to light the bulb using only the battery and 1 wire.2. As students find ways to light their bulbs, have them draw their configuration.3. Add a second wire and test more ways to light the bulb.Activity 4 cont.RESOURCES.SCIENCEWORLD.CA
Electricity<strong>CURRENT</strong> <strong>ELECTRICITY</strong>Circuit ACircuit BPart 2: Dimmer and brighter1. Give each group two mini-lights, two wires, and a pair of batteries. Tape the batteriestogether (it may be convenient to tape the batteries to the table or to a paper plate.2. Set up Circuit A and observe the bulbs.3. Remove one of the bulbs from its socket and see what happens.4. Set up Circuit B and observe the bulbs. Compare your findings with Circuit A.5. Remove one of the bulbs from its socket and see what happens.6. Option: Hand out the Electirical Circuit Worksheet.KEY QUESTIONSPart 1: Light the bulb»»In how many different ways can you light the bulb?»»Which of the configurations on the worksheet had you already tried?»»What is the same about all the circuits that light up the bulb? How about all the circuitsthat don’t light up the bulb?»»What other materials could we use instead of wires?Part 2: Light the bulb»»Why are the bulbs in Circuit A glowing dimly?»»Why are the bulbs in Circuit B glowing brightly?»»When you remove one of the bulbs from its holder in Circuit A, why does the other bulbturn off? In Circuit B, why does the second bulb stay on?»»What type of circuit do you think we have in our homes? How are decorative lights (likeChristmas tree lights) connected?EXTENSIONS»»Provide more bulbs and lengths of wire to compare longer series and parallel circuits.Alternatively, join the class together to create a giant series and a giant parallel circuit!»»Try and light a standard household bulb. You may have to use all the batteries in theclass lined up together!»»Provide students with different examples of everyday circuits e.g. Christmaslights, lamps, power bars etc. and investigate whether they are in series, parallel ora combination.RESOURCES.SCIENCEWORLD.CA
Electricity<strong>CURRENT</strong> <strong>ELECTRICITY</strong>ELECTRIC CIRCUITS WORKSHEETPart 2: Dimmer and BrighterCircuit ACircuit BCircuit AIntensity of the light bulbs: dim brightWhat happens when one of the bulbs is removed?Circuit BIntensity of the light bulbs: dim brightWhat happens when one of the bulbs is removed?With your team, brainstorm reasons why the answers in circuits A and B wouldbe different.RESOURCES.SCIENCEWORLD.CA
Electricity<strong>CURRENT</strong> <strong>ELECTRICITY</strong>ACTIVITYMATERIALS• wire cutters• wire strippers• variety of testing materialse.g. a penny, dime, nickel,quarter, aluminum foil, paper,wood, glass, cloth, ruler, pencil”lead”, eraser, etc.Per student:• D-cell battery• tape• 2 Christmas tree mini-light bulbwith wires attached• 3 x 10 cm lengths of insulatedwireACTIVITY 5: CONDUCTIVITY TESTER - 30minsCurrent electricity needs a completed circuit for electrons to flow continuously. In thisactivity, students will make a broken circuit. They will then use the loose wire ends totest the conductivity of various materials.When a conductor is placed between these loose wire ends, the circuit is completedand the light goes on. When an insulator is placed between the ends, the circuit isstill broken, because electrons cannot flow through insulators, and the light stays off.Objects that are made of metal are all conductors.Pencil ‘lead’ (graphite) conducts electric current but provides lots of resistance. Thelonger the path that the electric current must take through a conductor, the greaterthe resistance. The effect of changing the length of the path the current takes throughgraphite can be seen by watching the brightness of the bulb.WHAT TO DOPreparation:1. Cut enough lengths of insulated wire for the class.2. Strip both ends of every wire, including the wires attached to the bulb.Part 1: Making the tester1. Attach the first and second wires to each of the wires of the bulb.2. Tape the free end of one of the wires to the positive end of the battery.3. Tape one end of the third wire to the negative end of the second battery.4. The two loose ends are the test terminals.5. Test your conductivity tester by touching the two loose wire ends together. The light bulbshould come on.Activity 5 cont.RESOURCES.SCIENCEWORLD.CA
Electricity<strong>CURRENT</strong> <strong>ELECTRICITY</strong>Part 2: Making the tester1. Write the names of the testing materials on the board and ask students to predict whichones are conductors and which ones are insulators.2. Test some of the provided materials for conductivity by placing them between the twoloose terminals.3. Observe the light bulb and record what happens.KEY QUESTIONS»»How do you know if a material conducts electric current?»»If you are testing a material and the light does not go on, what does that mean?»»Which materials are conductors? Which materials are insulators?»»Which would you consider a “semiconductor”? What does a “semiconductor” mean?»»Can you complete the circuit by joining together several different materials?EXTENSIONS»»Replace the bulb with an ammeter and record the conductivity results for all the differentmaterials. List the materials in order of conductivity.»»Go on a conductivity “scavenger hunt” around the school to find and record conductorsand insulators.»»Make “squishy” conductors | University of St. Thomas’ Squishy Circuitshttp://courseweb.stthomas.edu/apthomas/SquishyCircuits/buildingCircuits.htmNOTESRESOURCES.SCIENCEWORLD.CA
Electricity<strong>CURRENT</strong> <strong>ELECTRICITY</strong>MAKE AND TAKEMATERIALS• tape• wire cutters• wire strippersPer student:• baggie or small paper bag• D-cell battery• paper plate• clothespin• 2 pieces of aluminum foil• 1 Christmas tree mini-lightbulb with wires attached, endsstripped of insulation• 20 cm length of insulated wire,ends stripped of insulation• small piece of cardboard• 30 cm length of fishing lineACTIVITY 6: BURGLAR ALARM - 30minsHave you ever wondered how a burglar alarm works? Its science revolves aroundcomplete and incomplete electric circuits. In this activity students will make a burglaralarm that they can use to protect something precious to them.In this burglar alarm, a piece of cardboard prevents completion of the circuit bypreventing the foil-lined tips of the clothespin from touching. Thus, when the alarm isset, the light is off. If someone steals the protected item, the thread and the attachedcardboard are pulled away. This permits the foil-lined tips of the clothespin to touch,completing the circuit and allowing the electrons to flow. The light turns on, to warn youthat the item was stolen.A real burglar alarm is triggered when the intruder breaks a light or laser beam, which isinvisible to the human eye, but needed to complete a circuit. When the beam is broken,the electronic system detects the change in the circuit, and sounds the alarm.WHAT TO DOPreparation:1. Put together a kit of supplies in a baggie for each student.Instructions:1. Tape the battery to the plate.2. Wrap aluminum foil around each leg of the clothespin.3. Tape the one end of the light bulb’s wire to one leg’s foil andone end of the length of wire to the other.4. Tape the free end of the length of wire to one batteryterminal, and the free end of the light bulb’s wire to theother terminal.5. Make sure the light comes on.Step 26. Tape one end of the fishing line to thepiece of cardboard and put the cardboardbetween the legs of the clothespin. Thelight should go out.7. Tape the other end of the fishing lineto something precious and watch whathappens if someone tries to steal it!Step 6Activity 6 cont.RESOURCES.SCIENCEWORLD.CA
Electricity<strong>CURRENT</strong> <strong>ELECTRICITY</strong>CardboardFishing lineKEY QUESTIONS»»What will happen to the light if someone steals your item?»»What is preventing the light bulb from switching on?»»What other materials could be used in place of the piece of cardboard? Are thesematerials conductors or insulators?EXTENSIONS»»To make your burglar alarm closer to the real thing, you could replace the light bulb witha buzzer.»»Smoke alarms work in a very similar way to burglar alarms. Take one apart and see if youcan identify all the parts of the circuit. Compare the inside to your burglar alarm.NOTESRESOURCES.SCIENCEWORLD.CA
Electricity<strong>CURRENT</strong> <strong>ELECTRICITY</strong>MAKE AND TAKEMATERIALS• wire cutters• wire strippersPer student:• paper plate• 1 Christmas tree mini-lightbulb with wires attached, endsstripped of insulation• 2 brass paper fasteners• short piece of insulated wire,20 cm long• long piece of insulated wire,45 cm long with about 6 cm ofinsulation stripped from oneend• piece of bare copper wire, 18gauge, about 45 cm long• 2 D-cell batteries• small baggie or paper bagACTIVITY 7: STEADY HAND GAME - 40minsStudents explore the direct repercussions of conduction in this fun activity!WHAT TO DOPreparation:1. Strip the ends of all the wires.2. Collect a set of materials for each student and place in a baggie.Instructions:1. Pierce the light bulb’s wires through the paper plate so that the light sits up near theedge of the plate.2. Bend the bare copper wire into a wiggly shape. Pierce one end of the bare copper wirethrough the paper plate and stick it to the underside of the plate with tape. Attach theother end of the bare wire to the top of the plate with a brass paper fastener.3. On the underside of the plate, attach the short piece of insulated wire to the fastener.4. Bend the 6 cm stripped end of the long insulated wire into a loop around the wigglyshape of the bare wire. Attach the other end of this wire to the plate with a secondbrass fastener.5. On the underside of the plate, attach one wire from the mini-light to this secondbrass fastener.6. You should have two ends of wire coming out from under your cardboard. One is from themini-light, the other connects to the wiggly shape. Attach these ends to the batteries onyour circuit board.7. Test your game out. When the loop touches the wiggly shape, the light bulb should lightup. If it doesn’t work, check all your connections carefully.8. Test how steady your friends’ hands are. Can you move the loop over the wiggles withoutlighting the bulb?Activity 7 cont.RESOURCES.SCIENCEWORLD.CA
Electricity<strong>CURRENT</strong> <strong>ELECTRICITY</strong>KEY QUESTIONS»»Why does the bulb light up when the loop touches the wiggly shape?»»Can you trace out the completed circuit with your finger?EXTENSIONS»»Modify the design to use a buzzer instead of, or as well as, the light bulb.»»A game called Operation works a lot like this steady hand game. Play the game, and thendescribe how you think it works. Carefully take the game apart to see how it is wired.NOTESRESOURCES.SCIENCEWORLD.CA