Make a Buka Fighter Kite with Photo Corners
Make a Buka Fighter Kite with Photo Corners
Make a Buka Fighter Kite with Photo Corners

Create successful ePaper yourself
Turn your PDF publications into a flip-book with our unique Google optimized e-Paper software.
-n217;,j'al<br />
/<br />
\<br />
ww.b>z<br />
.Ql<br />
nd<br />
\ $ ,r',<br />
\ e$/<br />
trq/<br />
\ E$// lE<br />
*-,{wu-<br />
t/t\<br />
-.l.<br />
tg<br />
;e}ili [F<br />
I5-<br />
iz<br />
a<br />
o<br />
c,<br />
1l$-sltnf,i.Ets<br />
il<br />
o<br />
t<br />
1<br />
truut RF<br />
E6<br />
Ec q<br />
fr<br />
Aril t"* U<br />
,/ i$ fl Y." ;p<br />
/ tF g 1'h'<br />
,/ ;:F \6.,<br />
F3P \<br />
l5f \<br />
F<br />
I<br />
I<br />
\<br />
-u\<br />
f =<br />
(A,<br />
{S<br />
n*<br />
;!3<br />
r*<br />
F g<br />
h<br />
rh<br />
f;<br />
z I<br />
+<br />
\<br />
Rrh<br />
s<br />
R.<br />
c<br />
a<br />
N ril<br />
v{<br />
\<br />
*<br />
t<br />
.o<br />
x<br />
c4<br />
,o<br />
s_<br />
\J<br />
\<br />
\<br />
x<br />
W<br />
3 s
Rev 11 2004<br />
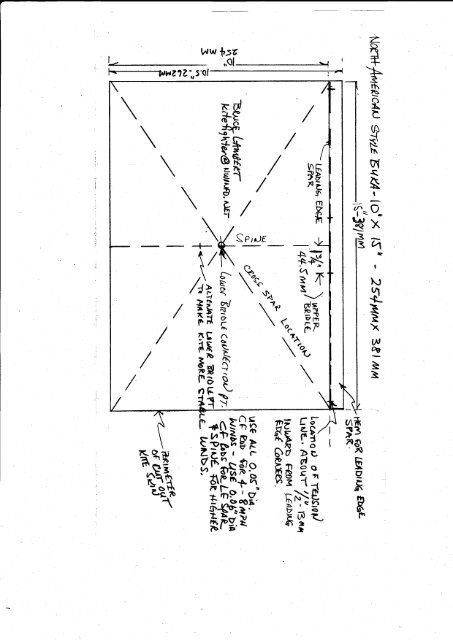
BRUCE'S EASY TO MAKE BUKA<br />
Bruce Lambert kitefighter@nwinfo.net<br />
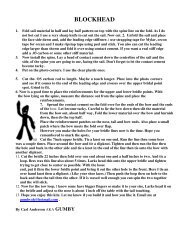
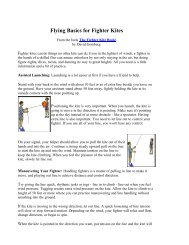
This is a quick and easy technique for making a buka. If you<br />
are relatively new to fighter kite making and have all the tools<br />
and materials at hand, it should take less than 2 hours to make<br />
this high performance buka.<br />
First, for those of you not familiar <strong>with</strong> a buka, it is a rectangular shaped traditional Japanese<br />
fighter kite. These traditional bukas are typically 3'x5'….very large kites. And as is traditional<br />
<strong>with</strong> most Japanese kites it is made <strong>with</strong> bamboo and paper. It is flown <strong>with</strong> its long side as the<br />
leading edge of the kite.<br />
The North American version of the buka is much smaller. . One of the most common sizes of<br />
North American bukas is 10"/254mm x 15"/381mm. <strong>Buka</strong>s are competitive, highly<br />
maneuverable, precise, fast, predictable and a fun fighter kite to fly.<br />
Being a simple rectangle, a buka appears easy to make and it is. However it is quite time<br />
consuming. This article shows an easy and quite quick technique for making a high<br />
performance buka.<br />
I suggest reading the article through a couple of times to become familiar <strong>with</strong> the flow of the<br />
process before you begin making the buka. This should cut your building time and also<br />
minimize frustrations.<br />
This article shows making a 10"/254mm x 15"/381mm sized buka.<br />
ADHESIVE BACKED PLASTIC PHOTO MOUNTING CORNERS<br />
The key to this building technique is the use of self adhesive plastic photo mounting corners.<br />
These are available at any craft department or craft store that sells scrapbook making<br />
materials and are inexpensive.<br />
The self adhesive plastic photo mounting corners are<br />
available in a few colors and clear. They come on a roll<br />
of about 250, depending on the brand. I have used<br />
several brands and they all work fine.<br />
1
Rev 11 2004<br />
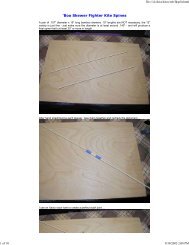
SIZES OF NORTH AMERICAN STYLE BUKAS<br />
North American style bukas can be any size rectangle. However they are typically in a 3 to 2<br />
ratio. The long side is 3 units long and the short side is 2 units long. This is just a general<br />
guide…..variations of this ratio also produce great flying bukas. The table below shows<br />
examples of proven North American style buka dimensions.<br />
Wind Range Height Width LE spar dia. Diagonal spar dia. Spine dia.<br />
2-6 mph 11"<br />
279mm<br />
17.5"<br />
445m<br />
.05"<br />
1.27mm<br />
.05"<br />
1.27mm<br />
.05"<br />
1.27mm<br />
5-10 mph 10" 15" .05" .05"<br />
.05"/1.27mm or .06"/1.52mm<br />
254mm 381mm 1.27mm 1.27mm<br />
7-15mph 9-3/4"<br />
248mm<br />
14.25"<br />
362mm<br />
.06"<br />
1.52mm<br />
.05"<br />
1.27mm<br />
.06"<br />
1.52mm<br />
SKIN MATERIAL<br />
In the photos I used black Orcon for the skin of the buka, however, any lightweight plastic film,<br />
polyfilm gift wrap, ripstop or Icarex will work just as well. I used Orcon because I have it and it<br />
shows up pretty well in the photos.<br />
SPARS<br />
All the spars in the kite for this article are made of 0.05"/1.27mm diameter carbon fiber rod.<br />
The lengths of each of the spars for the kite in the article are:<br />
Leading edge spar 14-7/8"/377.8mm<br />
Spine 9-3/4"/249.2mm<br />
Cross spars 17-13/16"/452.4mm<br />
Cut your spars slightly longer than the dimensions and sand or cut them to fit when the time<br />
comes. This is because the precise dimension of your kite skin and the location of the self<br />
adhesive photo corners may be slightly different from mine. This will make a slight difference<br />
in the exact dimensions of the spars as you'll see as you read further. The kite will perform<br />
perfectly <strong>with</strong>in a 1/4"/6.3mm dimension range. So don't worry about it if yours is slightly<br />
different in final dimensions from the one in this article.<br />
BRIDLE AND TENSION LINE<br />
You will need about 4'/100mm of 15#-20# test low stretch line to make the bridle. For making<br />
the tension line you will need about 4'/100mm of a stronger low stretch line, about 20#-30#<br />
test.<br />
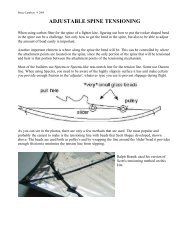
When bukas are made, they are flat. When they are flown, they must be bowed. Shortening<br />
the adjustable tension line on the back of the kite creates the bow or bend in the leading edge<br />
spar. Without a bend in the leading edge spar, the kite will not fly.<br />
GLUE<br />
CA glue or super glue and contact cement are the glues used to make this buka. You will only<br />
need a few drops of super glue to secure the knots of the bridle and the tension line. The<br />
contact cement is only used to secure the hem encasing the leading edge spar.<br />
2
Rev 11 2004<br />
TOOLS & OTHER MATERIALS YOU'LL NEED:<br />
ü Flat smooth work surface<br />
ü Hobby knife <strong>with</strong> new blade or new singe edged razor blade<br />
ü Scissors<br />
ü Ruler - 18"/460mm or longer, preferably metal<br />
ü Large eyed needle<br />
ü A pen that will write on the skin material you are using<br />
ü Several toothpicks<br />
ü Tape that will bond well to the material you are using for the skin. Packing tape, Orcon<br />
tape, filament tape and Icarex tape are some that work well on many skin materials.<br />
ü OPTIONAL – One piece of 1"/25mm long small diameter tubing. This can be heat shrink<br />
tubing or vinyl. The inside diameter should be slightly larger than the diameter of the<br />
leading edge spar.<br />
CUTTING OUT THE SKIN<br />
Measure a rectangle 10.5"/266.7mm x<br />
15"/381mm on your skin material. This<br />
dimension includes a ½"/12.7mm hem along the<br />
leading edge that will encase the leading edge<br />
spar.<br />
Cut out the skin.<br />
Now draw a parallel line ½"/12.7mm from onr<br />
long edge. This line indicates the actual leading<br />
edge of the kite. This line will be the location of<br />
the leading edge spar.<br />
Now draw a line from the trailing edge corners to<br />
the opposite corners created by the intersection of the leading edge line you drew and the<br />
edge of the skin. These cross lines are the locations of the cross spars.<br />
Then measure along the leading edge line 7.5"/190.5mm from the edge and make a mark. Do<br />
the same along the trailing edge. Connect the marks to form the vertical spine line.<br />
ATTACHING THE ADHESIVE BACKED PHOTO MOUNTING CORNERS<br />
and the edge of the kite.<br />
Use a toothpick to remove a photo<br />
corner from the package. This<br />
prevents your fingers from<br />
reducing the bonding power of the<br />
adhesive. Place a photo corner at<br />
the location of each corner of the<br />
finished kite. Note the location of<br />
the photo corners at the leading<br />
edge; they are on the corner<br />
created by the leading edge line<br />
3
Rev 11 2004<br />
Also place one at each end of the spine line, unless you are going to use a piece of tubing for<br />
the connection of the leading edge spar to the spine, (this option will be discussed a little later).<br />
If you use tubing, then you will place a photo corner only at the trailing edge end of the spine.<br />
INSTALLING THE SPARS<br />
Once you have the photo corners<br />
attached to the kite skin, it is time to fit<br />
and install the spars into the photo corner<br />
pockets. I use a toothpick to help open the<br />
photo corner enough to easily insert the<br />
end of a spar.<br />
Insert the leading edge spar first. If it is<br />
too long, cut and/or sand it to the length<br />
so it will fit. When fitting the spars into the<br />
corners, be sure the ends are pressed<br />
firmly into the corners. When installed,<br />
none of the spars should cause wrinkles<br />
to form in the kite skin. If you have<br />
wrinkles it probably indicates you have one or more of the spars just slightly too long.<br />
Into the photo corners at the leading edge corners,<br />
you will be placing the ends of both the leading<br />
edge spar and a cross spar.<br />
In the photo above showing all spars installed into the photo corner pockets you'll notice the<br />
point where the spine meets the leading edge spar, there is a photo corner. This is where the<br />
leading edge end of the spine is inserted.<br />
There is an optional method that is slightly more secure at holding the spine and leading edge<br />
in alignment; it uses a small piece of tubing. You<br />
puncture one wall of the tubing <strong>with</strong> a needle at<br />
about the 1/2 length mark of the tubing. Then insert<br />
one end of the leading edge spar into one end of the<br />
tubing and have the spar exit through the puncture<br />
you made <strong>with</strong> the needle.<br />
4
Rev 11 2004<br />
Decide which method you want to use, both work well, but using tubing as described is slightly<br />
more durable.<br />
FINDING THE 'NATURAL' CARBON FIBER BEND<br />
After all the spars are installed into the photo corner pockets, pick up the kite and hold it by the<br />
leading edge corners. While holding the leading edge corners, one in one hand one in the<br />
other hand, gently compress the leading edge spar so it begins to bend. When this happens,<br />
the cross spars will also begin to bend slightly.<br />
As the spars bend, they will automatically rotate to their 'natural' bending position. This is how<br />
you want the carbon fiber spars oriented. Once you have positioned the spars in this way,<br />
carefully lay the kite back onto your work surface and begin taping the spars in place.<br />
SECURING THE SPARS TO THE KITE SKIN<br />
After you have the spars oriented correctly, cut 7 pieces of tape, each about 2"/50mm long and<br />
about ½"/12.7mm wide and 2 pieces of tape about 1"/25.4mm square.<br />
Place a piece of tape on the cross spars at two places. In addition, at the bottom or trailing<br />
edge corners apply a piece of tape that is about 1"/25.4mm square to each cross spar. These<br />
tape squares will cover the photo corner. You can see in the photos where the tape is to be<br />
applied.<br />
The spine is taped at both ends and in the center. The tape at both ends covers the photo<br />
corners.<br />
Burnish all the tape well so it<br />
is bonded well around the<br />
spars and also onto the kite<br />
skin. I use a toothpick to<br />
assist in the burnishing.<br />
5
Rev 11 2004<br />
BONDING THE LEADING EDGE SPAR TO THE SKIN<br />
The leading edge<br />
hem is what secures<br />
the skin to the leading<br />
edge spar. The hem<br />
will be glued to the<br />
spar, using contact<br />
cement or a glue that<br />
bonds well to the skin<br />
material you are<br />
using.<br />
The hem covers and<br />
is glued onto the skin, the leading edge spar the spine photo corner and the leading edge<br />
photo corners. Apply contact cement to those mentioned surfaces and let it dry.<br />
Once the glue is dry, fold the hem around the<br />
leading edge spar and onto the back side of the<br />
kite skin and burnish well.<br />
6
Rev 11 2004<br />
After the hem is glued down, apply a piece of tape<br />
to each of the corners of the leading edge.<br />
Burnish them well. The tape is applied to the back<br />
of the kite and is wrapped around the leading edge<br />
spar and onto the front face of the kite.<br />
You want the corners to be strong. This is where<br />
much of the abuse and damage occurs on a buka,<br />
especially when they crash. Another place is at the<br />
junction of the spine and leading edge spar, so put<br />
a piece of tape there also. This piece of tape<br />
should also overlap from the back to the front of<br />
the kite.<br />
LOCATING THE CONNECTION POINTS FOR THE UPPER BRIDLE YOKE<br />
Place a ruler along the leading edge and make a mark on the leading edge that is 1.5"/38.1mm<br />
from the center of the spine. <strong>Make</strong> the mark on both sides of the spine. These marks are the<br />
location of where you will tie the ends of the upper bridle yoke onto the leading edge spar.<br />
Thread a large eyed needle <strong>with</strong> about<br />
12"/305mm of bridle line. Begin at one of<br />
the bridle marks you made on the leading<br />
edge and from the back side of the kite<br />
poke the needle thru the kite skin just<br />
below the leading edge spar. Pull the line<br />
through so there remains enough line to<br />
tie a secure knot. Then poke the needle<br />
from the front of the kite through the kite<br />
skin at the mark on the other side of the<br />
spine.<br />
Tie each end of the upper bridle yoke line<br />
around the leading edge spar. There will be a loop or yoke created on the front of the kite <strong>with</strong><br />
the line. Then place a drop of CA or super glue on each of the knots to secure the upper bridle<br />
yoke to the leading edge spar.<br />
Cut a second piece of bridle line about 24"/610mm<br />
long. This is the lower bridle line. At one end of the<br />
lower bridle line fold over about 6"/153mm and tie<br />
an overhand or figure eight knot to form a loop.<br />
Secure the loop at the end of the line to the center<br />
of the upper bridle yoke using a larkshead knot.<br />
Then thread your needle <strong>with</strong> the opposite end of<br />
the lower bridle line and poke the needle through<br />
the front face of the kite at the cross point of the<br />
spars in the center of the kite. Wrap the line<br />
7
Rev 11 2004<br />
around<br />
the spars<br />
and poke<br />
the<br />
needle<br />
from the<br />
back of<br />
the kite<br />
through<br />
to the<br />
front.<br />
Place the<br />
needle's<br />
entrance<br />
and exit<br />
so when wrapped around the spars and tied, the lower bridle line will secure both cross spars<br />
to the spine.<br />
Before tying the lower bridle line to the spine, pull the lower bridle line toward one of the<br />
leading edge corners. The length of the finished bridle should prevent the bridle from wrapping<br />
around the leading edge corners of the kite. After you've established the length of the bridle<br />
line, tie the loose end of the lower bridle line securely and apply a drop of CA or superglue to<br />
the knot to secure it to the spine.<br />
Cut a third piece of bridle line about<br />
6"/153mm, fold it in half and tie the loose<br />
ends together forming a loop. This is the tow<br />
point connection loop. It is where you connect<br />
your flying line to the bridle of the kite. Secure<br />
the loop to the lower bridle line using a<br />
larkshead knot.<br />
MAKING THE TENSIONING LINE<br />
Measure<br />
¼"/6.35mm from<br />
the leading edge<br />
corner and make a<br />
mark on the<br />
leading edge. Do<br />
the same on the<br />
opposite leading<br />
edge corner.<br />
8
Rev 11 2004<br />
The tension line consists of 2 separate pieces of line. First, cut a piece of bridle line about<br />
6"/153mm long, fold it in half and tie the ends together to<br />
form a loop. Thread the loop into the needle eye. Poke<br />
the needle through the corner tape, the kite skin and the<br />
photo corner at the mark you made at one of the leading<br />
edge corners. Create a larkshead knot <strong>with</strong> the two parts<br />
of the loop and pull tight. Place a drop of CA or super<br />
glue at the knot to secure it to the leading edge spar so it<br />
is on the back side of the kite.<br />
Cut another piece of line about 24"/609mm long, this<br />
is the second part of the tension line. Thread one<br />
end through the eye of the needle and poke the<br />
needle through the kite skin at the mark you made at<br />
opposite leading edge corner. Tie one end around<br />
the leading edge spar securely and place a drop of<br />
CA or super glue on the knot to secure the line to the<br />
leading edge spar.<br />
Feed the end of the line through the loop at the<br />
opposite leading edge corner and pull it snug. The<br />
tension line is on the back side of the kite.<br />
About 5"/127mm from the end of the loop, tie a<br />
tautline hitch adjustable knot onto the second tension<br />
line. This will allow the tension line to be shortened<br />
and the loop will act as a pulley.<br />
BEFORE YOU FLY YOUR NEW BUKA<br />
Before flying the buka, shorten the tension line<br />
which will create a bend or bow in the leading edge<br />
spar. The amount of bend you put into the leading<br />
edge spar will affect the way the kite flies. A very<br />
good average is to create enough of a bend so you<br />
can place 3 fingers stacked on top of each other<br />
between the leading edge spar and the tension line.<br />
KNOT NOTE: If you are unfamiliar <strong>with</strong> knots, search Google for the specific name of the<br />
knots you want to learn.<br />
9
Rev 11 2004<br />
The simplest and easiest knot for securing line to spars is the double half-hitch, other knots<br />
work great also, but this one is easy to tie. The other knots used in the bridle and tension line<br />
are the larkshead knot and the tautline hitch.<br />
PRE-TUNING<br />
A good way to find an average starting<br />
position bridle adjustments is to 'pre-tune' the<br />
bridle before you fly the kite. Here's how:<br />
position the lower bridle line's larkshead knot<br />
in the center of the upper bridle yoke. Then<br />
hang the kite by the tow connection loop<br />
above a flat surface, indoors. The leading<br />
edge spar should be tensioned as above so<br />
the leading edge has a '3-finger' bend in it.<br />
Slide the tow connection loop up or down<br />
along the lower bridle line until you position it<br />
at a point where the corners of the leading<br />
edge of the kite are about 2"/51mm above the flat surface when the trailing edge of the kite is<br />
barely touching the flat surface. The kite will be hanging at an angle. This adjusts the bridle at<br />
a good starting point that allows the kite to fly well in 5-10mph winds.<br />
After flying the buka, you will want to adjust the tow connection point location and the amount<br />
of leading edge spar bend to best accommodate the wind conditions and your flying style or<br />
what some flyers call their kite's 'sweet spot'. It may take a little experimenting to locate this<br />
'sweet spot', but it will be worth it!<br />
One aspect of bukas you should be aware of; they do not self launch after grounding. So<br />
when your buka lands on the ground, plan to walk out to retrieve it.<br />
Of all fighter kites I've flown, buka's are one of the most interesting, exciting and fun fighter<br />
kites to fly! I hope you enjoy flying yours as much as I enjoy flying mine!<br />
If after making and flying the buka you have questions about it, please don't hesitate to email<br />
me. I'm eager to assist, if I can. <strong>Buka</strong><strong>Buka</strong>!<br />
Big<strong>Buka</strong>Grins, Bruce kitefighter@nwinfo.net<br />
10