Template for Carl Anderson's 'Blockhead' - fighterkitecentral.com
Template for Carl Anderson's 'Blockhead' - fighterkitecentral.com
Template for Carl Anderson's 'Blockhead' - fighterkitecentral.com
- No tags were found...

You also want an ePaper? Increase the reach of your titles
YUMPU automatically turns print PDFs into web optimized ePapers that Google loves.
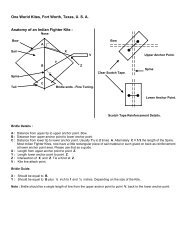
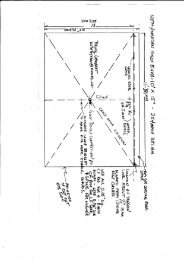
BLOCKHEAD1. Fold sail material in half and lay half pattern on top with the spine line on the fold. As I donot hot cut I use a very sharp knife to cut out the sail. Now cut. 2. Unfold the sail and placethe face side dawn and, add the leading edge stiffener. i use strapping tape <strong>for</strong> Mylar, orcontape <strong>for</strong> orcan and I make ripstap tape using peel and stick. You also can cut the leadingedge larger than shown and fold it over using contact cement. If you want a real stiff edgeadd a .03 carbon or some other stiff material.3. Now install the spine. Lay a bead of contact cement down the centerline of the sail and theside, of the spine you are going to use, facing the sail. Don't <strong>for</strong>get to let the contact cementbe<strong>com</strong>e tacky.4. Put on the photo corners. I use the clear plastic ones.5. Cut the. OS carbon rod to length. Maybe a touch longer. Place into the photo cornersand see if it <strong>com</strong>es to the end of the leading edge and crosses over the upper bridal pointspot. Grind to fit.6. Now is a good time to place the rein<strong>for</strong>cements <strong>for</strong> the upper and lower bridle points. Withthe bow lying on the spine, measure the distance out from the spine and place therein<strong>for</strong>cements.7. Spread the contact cement on the fold over <strong>for</strong> the ends of the bow and the endsof the bow. Let be<strong>com</strong>e tacky. Careful to lie the bow down then slit the materialfrom the bow out, about half way, Fold the lower material over the bow and burnishdown, then do the top half.Place the rein<strong>for</strong>cement patches on the nose, tail and bow ends. Also place a smallpatch where the bow meets the fold over flap.However you make the holes <strong>for</strong> your bridle lines now is the time. Hope youremembered to mark the spots,Cut the 7inch upper bridle. Tie a knot on one end. Run the line thru some beeswax a couple times. Place around the bow and tie a slipknot. Tighten and then run the line thruthe hole and back in the other side and tie a knot in the end of the line then tie onto the bow withanother slipknot.11. Cut the bridle 22 inches then fold over one end about one and a half inches to two. And tie aloop. Bees wax this line also about 5 times. Larks head this onto the upper bridle and tightentrying to get close to center as possible. With the looseend, put it thru the lower bridle point and bring it out the other hole to the front. Here I tie anover hand knot then a slipknot. (Like your shoe laces.) Then push the loop thru on hole to theback and then the tail thru the other. If it is waxed well enough you can spin the two togetherand the will stick.12. Now <strong>for</strong> the tow loop. I know some have bigger fingers so make it to your size, Larks head it onthe bridle and adjust so the nose is about 1 inch off the table with the tail touching.13. Hope you enjoy this kite. Let me know if you build it and how you like it. Email me atgumbyoh@hotmail.<strong>com</strong> .By <strong>Carl</strong> Anderson AKA GUMBY
n,aJr6
cBloC,( HEAvBv Cn cc APo(eeceatarfr GUnSyJt6.lltr^2-.a,a -b'aIt(F.j