Fusion Fighter Kite flight and tuning manual. - fighterkitecentral.com
Fusion Fighter Kite flight and tuning manual. - fighterkitecentral.com
Fusion Fighter Kite flight and tuning manual. - fighterkitecentral.com

Create successful ePaper yourself
Turn your PDF publications into a flip-book with our unique Google optimized e-Paper software.
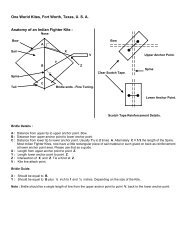
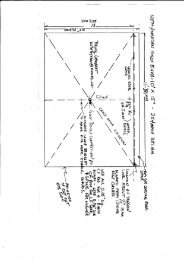
Installing a 3-point bridleon the FUSION FIGHTER kiteA 3-point bridle arrangement is re<strong>com</strong>mended because it provides 2 adjustment pointsfor <strong>tuning</strong> your kite. It’s an easy <strong>and</strong> quick bridle to make; however, it takes a few paragraphs<strong>and</strong> diagrams to clearly describe how to do it.1) Cut or tear out the ‘Upper Bridle Template’ located atthe end of this information. Lay the kite with its backsidefacing up. Lift the bow of the kite <strong>and</strong> slide the template underthe bow so the template’s ‘spine line’ is aligned with thekite’s spine <strong>and</strong> the ‘nose arrow ‘ on the template pointingtoward the kite’s nose. With a pen, pencil or marker, maketwo marks on the bamboo bow, directly above the template‘upper bridle marks’, these will be 1.5" or 4 cm from thespine on the right <strong>and</strong> left sides of the bow.402 10 10 10 2020 3030 40upper bridle marksfor bridleattachmentbowspineline11/2 inch / 4cmspine/bowcross pointholes in skinfor bridle0 1 2reinforcementmylar/tape2) Remove the template. Make a mark on the Mylar directly under the ‘upper bridle marks’ youmade on the bow, do the same on both sides of the kite.3) There are 3 parts to the bridle. The upper bridle yoke, the lower bridle line <strong>and</strong> the tow connectionloop.4) Using a sharpround toothpick, puncturethe kite skin at themarks you just made.Make 2 holes at eachmark, one on each sideof the bow. You’ll makea total of 4 holes withthe toothpick.5) Work from the front side of the kite to make the upperbridle yoke. Cut a piece of bridle line about 14" long. Pokeone end through one of the holes you just made with thetoothpick. Poke it from the front of the kite. Bring the bridleline around the back of the bow <strong>and</strong> make one <strong>com</strong>pletewrap around the bow with the line <strong>and</strong> then out to the frontof the kite through the other hole you made at that upperbridle mark <strong>and</strong> tie it with any knot that will hold securely.Owners Manual & Instructions Page 3
6) Now poke the other end of the upper bridle yoke throughone of the holes you made at the upper bridle mark on other sideof the kite <strong>and</strong> do the same with it as you did with the first end.You’ll have created a loop or yoke that is on the front of the kiteeach end tied to the bow. The actual length of the finished loop isnot critical.7) Instead of using a toothpick, you could use a large-eyedneedle. Thread the bridle line through the eye <strong>and</strong> followthe above directions for wrapping <strong>and</strong> tying the upper bridle line.8) Turn the kite over so the backside is facing up. Slide the bridlelines so they align with the marks you made on the bow <strong>and</strong> applya drop of nail polish to the bow <strong>and</strong> bridle line. If you are uncertainabout the security of the holding power of the knot you tied, put adrop of nail polish on the knots also.9) Cut a second piece of bridle line about 30" long. This is calledthe lower bridle line. Fold over about 4" on one end <strong>and</strong> tie anoverh<strong>and</strong> knot creating a loop about 2.5"-3" long.10) Using the loop you just made on the lower bridle line, attachthe lower bridle line to the center of the upper bridle yoke using alarkshead knot.11) Using the toothpick puncture two holes, one on either side ofthe spine in the area of the Mylar reinforcement patch on the lowerportion of the spine. The exact location is not critical as long asyou make the holes in the area of the reinforcing.12) Poke the end of the lower bridle line through one of the holesyou just made, wrap the line around the spine <strong>and</strong> out to the frontof the kite through the other hole. Tie a knot that will hold securely.If you are unsure about your knot’s ability to hold, put a dropof finger nail polish on the knot <strong>and</strong> on the line on the back of thespine.13) Cut a third piece of bridle line about 6"-7" long. Fold it in half<strong>and</strong> tie the loose ends together with an overh<strong>and</strong> knot to form asmall loop about 2.5"-3" long. Attach the loop to the lower bridleline using a larkshead knot. This loop is the place you will attachyour flying line to the kite. It is called the tow connection loop.Owners Manual & Instructions Page 4
14) The last step to getting the FUSION FIGHT-ER ready to fly is to tie the bow <strong>and</strong> the spinetogether at the point where they cross. Thisrequires applying a piece of clear tape on the kiteskin at the cross point <strong>and</strong> puncturing the skin attwo points, diagonally positioned so you can get apiece of line around both the spine <strong>and</strong> bow. Oryou can use a large eyed needle <strong>and</strong> use it to both puncture <strong>and</strong> feed the line through the skin.On the back side of the kite, tie a knot that secures the two ends of the line.ADJUSTMENTS TO MAKE BEFORE FLYING THE KITE1) After the bridle is <strong>com</strong>pleted, hold the kite by the tow connectionloop. Position the loop along the lower bridle line so thetail of the kite will barely touch a table top while the nose of thekite is elevated above the table top about 1.5"-2". This pre-tunesyour kite so it will fly. In most cases you’ll want to further adjustthe bridle to better match the flying conditions.2) Next, check the shape of the spine. Itshould be curved outward toward the front ofthe kite in a gentle rocker shape. If the spineis straight or nearly straight, hold the kite withits front against your stomach. Press on thebackside of the spine with your fingers about2" below the place where the spine <strong>and</strong> bowcross. Press hard enough so you push the frontside of the spine into your stomach about 1.5"<strong>and</strong> hold it there for 30 seconds or so, then move your h<strong>and</strong> down the spine about 2" closer to thetail of the kite; press <strong>and</strong> hold it for about 30 seconds. The heat from your body will set a slightbend in the spine that is needed to allow the kite to fly correctly.CAUTION: Bamboo can be broken if you try to bend it sharply at one spot. Gently presson various points along the back of the spine in the bend area of the spine. This will producethe modest “rocker” bend that is ideal. The tail portion of the spine starting about 2" (50mm)noseward from the lower bridle connection point on the spine to the tail of the spine should bestraight.NOTE: Bridle adjustment points are made to be adjusted. Carefully adjusting the bridle is howyour kite will be<strong>com</strong>e a ‘perfect flyer’.ATTACHING FLYING LINE TO YOUR KITE’S BRIDLEOn the end of your flying line fold over about 12" of line <strong>and</strong>use an overh<strong>and</strong> knot to form a loop about 10" long. Next, 2"from the end of that loop, tie another overh<strong>and</strong> knot, forming asmaller loop at the very end of the first loop. The larger loop iswhat you will use to make a larkshead knot around the knot ofthe tow connection loop on your bridle. This is how you attachyour flying line to your kite bridle. The small loop will help yourelease the larkshead knot easily when you’re finished flying bysimply pulling on it while holding the tow connection loop.Owners Manual & Instructions Page 5
UPPER BRIDLE TEMPLATEThere are two bridle templates for your conveniance4030 20 10 0 10 20 30 40upper bridle marksfor bridleattachment1 1 /2 inch / 4cmholes in skinfor bridlebowspinelinespine/bowcross pointreinforcementmylar/tape2 10 1 24030 20 10 0 10 20 30 40upper bridle marksfor bridleattachment1 1 /2 inch / 4cmholes in skinfor bridlebowspinelinespine/bowcross pointreinforcementmylar/tape2 10 1 2Owners Manual & Instructions Page 6
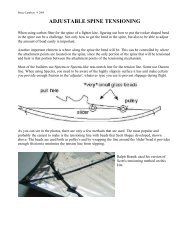
Tuning & Adjustment Tipsfor North American style <strong>Fighter</strong> <strong>Kite</strong>ssuch as the FUSION FIGHTERADJUSTING THE TOW CONNECTION LOOPThe tow connection loop can be moved up or down alongthe length of the lower bridle leg to create changes in thekite’s performance.Generally, moving the tow connection loop towards thenose of the kite does three things:A. Reduces the amount of pull you feel on the flying line.B. Increases the kite’s willingness to enter into a spinwhen the tension on the flying line is reduced.C. Increases the kite’s forward speed.Generally, moving the tow connection loop towards the tail of the kite does three things:A. Increases the amount of pull you feel on the flying line.B. Reduces the kite’s willingness to enter into a spin when the tension on the flying line is reduced.C. Reduces the kite’s forward speed.Move the tow connection loop along the lower bridle leg about ⅛" or less at a time. Fly the kiteafter moving the tow connection loop <strong>and</strong> see if the change is sufficient, if so fine, if not, continueadjusting until the kite is flying to your liking. There is no ‘RIGHT’ or ‘WRONG’ position of thetow connection loop. Experimenting is the way to learn what effect it has <strong>and</strong> how you like thevarious changes in the kite’s performance.IF YOUR KITE DOESN’T FLY STRAIGHTWhile flying your kite with strong tension or pulling sensation in the flying line, if it consistentlycurves, spins or veers to one side, <strong>and</strong> won’t fly straight, your kite’s bridle needs a small adjustment.In this case you’d adjust the ‘right-left’ balance adjustment of the bridle. The ‘right-left’balance adjustment is the adjustable larkshead knot on theupper bridle leg or ‘yoke’.HERE’S WHAT TO DOIf the kite is spinning or turning constantly to the rightside, it is telling you the length of bridle line on the rightside of the yoke is too short. So move the knot on the‘yoke’ to the left, this lengthens the right side portion ofthe bridle yoke. If the kite is constantly turning or spinningto the left, move the knot on the ‘yoke’ to the right.Owners Manual & Instructions Page 7
This ‘right-left’ adjustment is a very sensitive adjustment. Move the knot only about 1/64"(0.5mm) at a time, then fly the kite to see the results of your adjustment. Continue adjusting <strong>and</strong>flying until the kite is flying straight.NOTE: All the references to right <strong>and</strong> left are based on positioning the front face of the kite so itis facing you, like it would be when you are flying the kite.CONTROLLING YOUR FIGHTER KITE’S SPINThe Tow connection loop adjustment is the bridle adjustment that affects the kite’s tendency tospin. The spin rate itself is controlled more by the curve of the spine <strong>and</strong> the balance of the kite.Moving or sliding the tow connection loop’s along the lower bridle line toward the tail of the kitewill reduce the kite’s tendency to spin, it will slow the kite’s speed <strong>and</strong> will make the kite morestable.Moving the tow connection loop toward the nose of the kite will increase the kite’s tendency tospin <strong>and</strong> slightly increase its speed.Positioning the tow connection loop at an extreme position; whether nearer the nose end ornearer the tail of the lower bridle leg will create a bridle setting that may not allow the kite to fly.ADJUSTING THE BAMBOO BOWIf the bridle adjustments don’t provide a straight flying kite, then it may be necessary to makea slight adjustment to the bow. For example, if the kite is turning to the right consistantly <strong>and</strong>adjusting the bridle does not correct it, it may mean the left side of the bow is slightly stiffer orstonger than the right side.In the example above, to correct the constant ‘right’ turning of your kite, first, set the bridle knoton the upper bridle yoke to be centered above the spine; to do this unlock the larkshead knot<strong>and</strong> move the knot to the center location <strong>and</strong> relock it. Next put a pea sized piece of putty on thebackside of the left wingtip. Fly the kite <strong>and</strong> if it flies straight, all is good, but if it still consistantlyturns one way, adjust the amount of putty until the kite flies straight.If the kite is turning consistantly to the left, you will add the putty to the backside of the rightwingtip of the bow. A <strong>com</strong>bination of putty on the wingtip <strong>and</strong> bridle adjustments is typicallywhat will correct a severely turning kite. This is a rare occurance so you probably won’t need tobe concerned with it.NOTE: The type of putty that works well is the ‘sticky or tacky’ stuff used to hang pictures on thewall without using nails. It’s inexpensive <strong>and</strong> available at any hardward store, hardward or craftdepartments <strong>and</strong> in craft stores.Owners Manual & Instructions Page 8
REDUCING THE AMOUNT OF SPINMany flyers don’t care for a fighter kite to spin too fast or too often, especially when they arelearning how to fly one. The easiest <strong>and</strong> best solution for controlling this aspect of fighter kites isto add a tail to the kite. The tail can be made of almost any material <strong>and</strong> should be about 1" wide<strong>and</strong> about 6'-8' long. Use a small piece of tape to attach one end of the tail to the backside of thekite at the tail end of the spine. If you find a single tail does not control the activity of your kiteenough, add a second tail. If you want the kite to be<strong>com</strong>e more active, cut off about ⅓ to ½ of thetail ... this will increase the spinning <strong>and</strong> activity of the kite.INCREASING THE SPINIf you want t the kite to spin more than it does, add a pea sized piece of putty to the backside ofthe spine near the tail. After adding the putty, fly the kite to see if it spins to your liking, if not,add more putty until the kite spins as you want it to.NOTE: The type of putty that works well is the ‘sticky or tacky’ stuff used to hang pictures on thewall without using nails. It’s inexpensive <strong>and</strong> available at any hardward store, hardward or craftdepartments <strong>and</strong> in craft stores.Owners Manual & Instructions Page 9
TIPSfor Enhancing Durability & Performanceof Your FUSION FIGHTER <strong>Kite</strong>With most fighter kites, there are simple small changes that a flyer can make to the kite that addto its durability <strong>and</strong> performance; here are some of those changes. For the FUSION FIGHTERkite the changes are minor <strong>and</strong> easy to do. However, the FUSION FIGHTER needs none of theseto fly well, but some of us are curious <strong>and</strong> enjoy ‘tweaking’ our kites; I suppose it’s the ‘inventor’in all of us.DURABILITY ENHANCEMENTSAdding a small amount of ‘Scotch’ type clear tape to thelocations mentioned below will add to the durability ofyour kite <strong>and</strong> it takes very little time. NOTE: I used blacktape so it would show in the photos. The photos show onlyone side of the kite with tape, both sides must have tapeapplied.A. Apply ½" to ¾" wide clear tape to the nose leading edgeon the back side of the kite.B. Apply a piece of clear tape about ¾" x 1" to each of the‘corners’ where the nose leading edge meets the bow. Thispiece of tape will wrap from the front face of the kite skinto the backside around the bow.C. Apply a piece of clear tape about ¾" x ½" to each of the wingtips. Photo above.D. Apply a piece of tape about ¼" wide x 1½" long to boththe nose <strong>and</strong> tail of the spine. This piece of tape will foldover the end of the spine – about half of the tape will be onthe back of the spine <strong>and</strong> the other half on the front of thekite.PERFORMANCE CHANGESEach of the following changes in the kite will change the performance of the kite. Not all flyersagree that these changes actually improve performance, but most do. I suggest making onechange at a time <strong>and</strong> fly the kite following the change to notice the effect, <strong>and</strong> more importantly,determine if you like the new performance better or not. In the photos, the marker lines indicatethe general shape of the leading edge of the nose <strong>and</strong> the trailing edge. The marker lines are onlyshown on one side of the kite but the changes must be done equally to both sides of the kite.Owners Manual & Instructions Page 10
1. By removing a small amount of the nose leading edge material, you can increase the kite’sspeed slightly <strong>and</strong> quicken the kite’s reaction to your line manipulation. Here’s what to do. Afterapplying tape to the nose leading edge, cut the edge so the final shape is a slight scallop beginningat the nose continuing in a smooth shallow curve to the point where the nose leading edge meetsthe bow. At the maximum scallop point the distance inward from the st<strong>and</strong>ard nose leading edgeshould not be more than about ¼"; this is a slight curve. In the photoone side of the nose leading edge has tape, the other is without tape<strong>and</strong> marked with the general shape of the curve. However, cut thecurve only after you have applied the tape.2. By removing a small amount of the trailing edge material the kite’s speed may be increasedslightly. Some kite makers <strong>and</strong> flyers don’t think it is a benefit, <strong>and</strong> many do. Here’s what todo. Cut the trailing edge so the final shape is a slight curve or scallop beginning at the wingtipcontinuing in a smooth shallow curve to the tail of the spine. The maximum amount of scallopshould occur near the location of the batten <strong>and</strong> shouldn’t be more than about ½" inward fromthe trailing edge. This will require cutting off a small portion of thebattens <strong>and</strong> may require applying a small piece of clear tape to re-securethe battens to the kite skin.When cutting the trailing edge shape, make the entire cut with onepass with your razor blade or hobby knife. If you stop <strong>and</strong> restartthere is a chance you may create a nick in the skin material. The nickis a weak point <strong>and</strong> increases the chance of a tear in the skin.REPAIRSRepairing tears in the skin is easy to do. Simply use a piece of clear tape to secure the torn piece.If you damage a bow or spine, generally it is best to remove the damaged one <strong>and</strong> replace it with anew one.Owners Manual & Instructions Page 11
Flying Tips For New <strong>Fighter</strong> <strong>Kite</strong> FlyersWIND RANGEThe FUSION FIGHTER kite is designed to fly well in winds ranging from about 4mph to about11mph which includes most wind conditions. Skilled fighter kite flyers will have the most successflying the FUSION FIGHTER in winds lighter than 4mph, but it will take some ‘work’.Flying the FUSION FIGHTGER in winds stronger than 11-12mph could possibly damage thekite. The potential damage could include tears in the Mylar skin material <strong>and</strong>/or some gluedpoints <strong>com</strong>ing unglued allowing the skin to separate from parts of the bamboo frame. The gluemay release because of the unusual amount of vibration of the skin that takes place when flying insuch high winds.High wind damage is not difficult to repair. If any of the skin be<strong>com</strong>es unglued from the bamboo,use a toothpick to apply contact cement to the unglued areas, let the glue dry <strong>and</strong> then pressthe skin <strong>and</strong> bamboo together to secure the bond <strong>and</strong> they will be as good as new. If any tearsoccur in the Mylar skin, use clear packing tape or Scotch type tapes to patch a tear.CRASHESCrashes are a fact of life in the world of flying North American style fighter kites. The most experiencedflyers crash <strong>and</strong> they crash often. The difference between a crash of an experienced flyer<strong>and</strong> a beginning flyer is the intensity of the crash……how hard it hits the ground. The beginningflyers have the most violent crashes <strong>and</strong> are more likely to damage a kite during repeated crashes.This is NORMAL. If you are a beginning fighter kite flyer expect that you will damage a kite ortwo <strong>and</strong> possibly destroy one during your early learning. When learning to fly fighter kites expectcrashes to occur.Thankfully Crash damage to your FUSION FIGHTER kite is easy to repair in most cases. Usuallythe crash damage will be in the form of a tear in the Mylar. In that case, use packing tape orScotch type tapes to patch the tear.If crash damage occurs to a bamboo bow or spine, it is best to replace the damaged piece of bamboowhen you get home <strong>and</strong> for the moment, fly a different FUSION FIGHTER kite; a non-damagedone.FLYING YOUR KITEWhen teaching a person to fly a fighter kite, often their first question is, “how can I identifywhich of the 4 corners of the kite is the nose <strong>and</strong> which is the tail?” This is a natural point of confusionfor new flyers, especially if the kite is a solid color, because most fighter kites appear in thesky as a ‘square’ or ‘diamond’ shape with essentially four equal looking corners.One of the things I suggest is to put a large easy-to-see marking or decoration on the nose of thekite to make it easier to distinguish from the other “corners”. Or even better is to attach a temporarytail to the tail of the kite. The tail will do 2 things; (1) it will make it easy to determinewhich end of the kite is the nose, (2) it will slow the kite speed providing you with more controlof its <strong>flight</strong>.Owners Manual & Instructions Page 12
A fighter kite isn’t supposed to be stable staying in one spot in the sky like most single line kites.It’s designed to be active <strong>and</strong> basically ‘unstable’ or ‘erratic’ when left to its own way in the sky.Sometimes they are described as having unpredictable behavior. The truth is once you underst<strong>and</strong>them, they are <strong>com</strong>pletely controllable.When you are new to fighter flying, slowing the kite will make it easier for you to have immediatecontrol! The easiest method I know to do this is by adding a tail to the kite. Use a small pieceof masking tape to temporarily attach a tail to the backside of the tail end of the kite’s spine. Thetail should be about ½-1" wide <strong>and</strong> about 4'-6' long. It can be made of paper, survey tape, severalpieces of yarn or string, plastic bags cut in strips, or anything that is h<strong>and</strong>y.Once you have learned to control the fighter kite with the attached tail, you’ll be ready for a livelierkite. To make it more active reduce the length of the tail by about ¼ its length. Each time youare ready for a livelier kite, shorten the tail. When you have removed the tail <strong>com</strong>pletely, you willhave the flying skills to control the kite! Also you will have a good idea of the kite’s characteristics<strong>and</strong> will not be so surprised by its actions.BEFORE YOU BEGIN TO FLY1. The most <strong>com</strong>mon flying line reel is called a ‘Gator style’ reel.It is popular because it allows the line to freely spool off of the reelas it is sitting on the ground at your feet <strong>and</strong> it’s easy to wind theline onto when you are finished flying. When you buy flying line,it usually <strong>com</strong>es on a small diameter core of plastic or cardboard.Transfer the line from its original spool to the Gator Reel <strong>and</strong>you’re ready to go!2. After connecting the tow connection loop to the end of yourflying line, place your flying reel’s flat surface on the ground nearyour feet. With the reel in this position you are able to freely pullline off of the reel.3. Sometimes, the wind may blow the looseline around on the ground <strong>and</strong> cause the lineto get tangled <strong>and</strong> twisted. This is a normalpart of fighter flying <strong>and</strong> is easy to deal with!Just break or cut the line on either side of thetangle, remove the tangle, tie a knot to reconnectthe 2 ends of the line <strong>and</strong> get back to flying!Be sure to properly dispose of the tangledline. Don’t leave it on the flying field where itmight cause injury to children or animals!!Photo by Sharon Musto. Used with permission.Owners Manual & Instructions Page 13
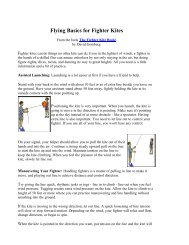
TWO IMPORTANT TERMSBefore describing some basics about fighter kite flying, there are two terms that are important tounderst<strong>and</strong>.The first is ‘flying line tension’, ‘pull’, ‘apply tension’, ‘pulling line’ or ‘retrieving line’. Each of theseterms means essentially the same thing. What all of these terms are referring to is the creation oftension or a feeling of ‘pull’ in your flying line between you <strong>and</strong> the kite.This can be caused or created by strong wind alone or by a <strong>com</strong>bination of you retrieving flyingline together with the wind strength or on very light wind days it can be caused exclusively fromthe action of you retrieving or pulling in flying line. When you pull in or retrieve line you dropthe retrieved line, one h<strong>and</strong> full at a time, on the ground at your feet <strong>and</strong> the retrieved line accumulateson the ground around your feet.The second term is ‘releasing’. This term refers to the easing or releasing of your grip on the flyingline. As you release your grip more <strong>and</strong> more you are allowing the flying line to flow throughyour fingers with very slight finger pressure on the line. The kite is ‘taking’ the line from you becausethe wind is pushing the kite away from you. The accumulated line at your feet will be takenby the kite in this situation.The flying line length is always changing. By pulling in line you shorten it <strong>and</strong> by easing orreleasing the line you lengthen it.EASIEST LAUNCHWhen flying a fighter kite ALWAYS st<strong>and</strong> with your back to the wind. Then have a friend walkyour kite down wind about 30' to 40'. Have the friend hold your kite above their head with thekite’s nose pointing straight up. When you are ready to fly, have your friend let go of the kite themoment you begin to pull in, or retrieve your flying line. If the wind is strong enough, you won’tneed to pull or retrieve much flying line, the wind will do most of the work of launching yourkite. If the wind is light, you will need to pull with gusto.Hopefully at the moment of launch, the nose of the kite was still pointed straight up so the kiteascends! If not, it most likely will crash. Crashing is part of learning, even the most expert flyerscrash. Just take it in stride!ALTERNATE LAUNCHHold the kite in the air at arms length above your head <strong>and</strong> in front of you, kite nose pointingstraight up. Then, as you keep a very slight amount of tension on the flying line, release the kite<strong>and</strong> allow the wind to take it away from you, it will be pulling line through your fingers, so besure to hold the line very lightly with your fingers so you let the line go with the kite. Then, eachtime you notice the nose of the kite pointing up, pull or tug firmly on the flying line to make thekite gain some altitude, then release your grip on the flying line so the kite takes out more of theline. While the kite is moving away from you <strong>and</strong> spinning, notice when the nose of the kite ispointed upward again. At that moment, tug or pull quite hard again on the line to make the kitegain more altitude <strong>and</strong> repeat this pulling <strong>and</strong> releasing process until the kite is as far away fromyou <strong>and</strong> as high up as you want.Owners Manual & Instructions Page 14
BASIC FIGHTER KITE CONTROLA fighter kite’s <strong>flight</strong> path is controlled by applying <strong>and</strong> changing the amount of tension or ‘pull’you feel in the flying line. It’s that simple.When you ease or release your grip on the line, the line be<strong>com</strong>es slack or may have very littletension. In this situation the kite will normally turn, or spin. When you apply strong tension or‘pull’ to the flying line, the kite will fly in a straight path; its direction will be the direction thenose of the kite was pointing the moment you applied the tension to the flying line.FUNDAMENTAL FLYING TIPS1. Always focus your attention on the nose of your kite. The kite nose is your indicator of thedirection the kite will be traveling next!2. The direction the nose of the kite is pointed at the time you apply tension to the flying line,by pulling on or retrieving the flying line, is the direction the kite will travel. It will continuetraveling in that direction so long as you continue to apply consistent tension to the flying line.When pulling line in, or retrieving line, use a h<strong>and</strong> over h<strong>and</strong> motion <strong>and</strong> drop the retrieved lineon the ground.3. H<strong>and</strong> over h<strong>and</strong> line retrieval works like this; jab one h<strong>and</strong> out toward your kite as fast <strong>and</strong>far as you can, grip the flying line at that point <strong>and</strong> quickly bring that h<strong>and</strong> in toward your body.At the same time as your h<strong>and</strong> holding the flying line is moving toward your body, you quicklyjab the other arm <strong>and</strong> h<strong>and</strong> out as far toward your kite as it will go <strong>and</strong> grip the line at that point.At the moment the second h<strong>and</strong> grabs the flying line, you let go of your grip with the first h<strong>and</strong>,dropping the line on the ground, <strong>and</strong> immediately jab it toward the kite as far as it will go <strong>and</strong>repeat the process. This is the normal way of h<strong>and</strong>ling flying line when you’re flying.4. If the kite is flying in a straight path <strong>and</strong> you reduce, ease or release the tension of the flyingline, the kite will most likely begin to turn, spin or change directions. Exactly what it doesdepends on the <strong>tuning</strong> of your kite <strong>and</strong> the degree of change in tension on the flying line at thatmoment. The change of tension you apply to the flying line is what causes the kite to change itsdirection.5. When the kite is spinning, watch the kite’s nose. When you anticipate the direction of nose isgoing to point up, or in the direction you want the kite to travel next, apply line tension by pullingin or retrieving the flying line <strong>and</strong> the kite will begin flying in a straight path in that direction.6. The amount of tension you apply to the flying line <strong>and</strong> the changes in tension you give the lineare the only <strong>com</strong>m<strong>and</strong>s you need to precisely control your fighter kite.UNIVERSAL LAWS OF FIGHTER KITE FLYINGWhen the kite is in a nose dive headed for the ground, the natural tendency of a new flyer is topull on the line in an effort to prevent an inevitable crash. However, pulling on the line at thatmoment will only insure a quicker more violent crash! The way to avoid a crash during the kite’snose dive toward the ground is to RELEASE THE LINE!!! Let the flying line be<strong>com</strong>e slack; let itrun freely through your fingers! Doing this will eliminate 90% of nose dive crashes.Owners Manual & Instructions Page 15
After you have released the line, <strong>and</strong> hopefully you did it in time to avoid a crash, you’ll noticethe kite is probably spinning or turning, plus, it’s being pushed away from you by the wind, <strong>and</strong>the flying line is flowing through your fingers. Watch the kite nose carefully <strong>and</strong> when the noseof the kite is pointed upward, begin retrieving or pulling in line. Remember to pull or retrieveline ONLY when the NOSE of the kite is pointed UP, if the nose is pointed down, release thetension on the flying line <strong>and</strong> let the line be pulled through your fingers. Remember, when youapply tension to the flying line, the kite goes in the direction the nose is pointing at that moment,even if the nose is pointed toward the ground!MORE FUN WITH FIGHTER KITE COMPETITIONSAfter you have enjoyed flying your FUSION FIGHTER kite <strong>and</strong> be<strong>com</strong>e proficient at controllingit, you may want to engage in fun <strong>com</strong>petitions with other fighter kite flyers. There are many different<strong>com</strong>petitive games fighter kite flyers play.Because the FUSION FIGHTER kites are essentially identical one to the other, it opens the doorto ‘One-Design’ <strong>com</strong>petitions, where each participant must fly the same kite as all other <strong>com</strong>petitors.The primary purpose of any fighter kite <strong>com</strong>petition is to have FUN! And that is especiallytrue in a one-design <strong>com</strong>petition because every participant’s kite has the same opportunity to bethe winner as any other participant’s, what fun!All you need to do is develop rules that you <strong>and</strong> your opponent agree on <strong>and</strong> begin the <strong>com</strong>petition….it’svery easy! If you want to use established North American style fighter kite games <strong>and</strong>rules, you can find the various rules on line at www.nafka.net <strong>and</strong> http://www.aka.kite.org/ .If you want more information about fighter kites check out www.nafka.net, the official website ofthe NORTH AMERICAN FIGHTER KITE ASSOCIATION. It has a ton of information, plans soyou can make your own fighter kites <strong>and</strong> other resources relating to fighter kites.I hope these ideas will add to your enjoyment of flying your FUSION FIGHTER kite!BigGrins,BruceCONTACT INFORMATIONBruce Lambert – kitefighter@nwinfo.netNAFKA - The North American <strong>Fighter</strong> <strong>Kite</strong> Association – http://nafka.net/The main network for fighter kites worldwide!http://www.one-world-trading.<strong>com</strong>Kirti Shah, owner – Ft Worth, Texas, USA.ACKNOWLEDGEMENTSRalph Resnik – design, creation <strong>and</strong> illustration – phighter@gralphica.<strong>com</strong>Owners Manual & Instructions Page 16