Technical Information Bulletin - New York Bus Sales
Technical Information Bulletin - New York Bus Sales
Technical Information Bulletin - New York Bus Sales

You also want an ePaper? Increase the reach of your titles
YUMPU automatically turns print PDFs into web optimized ePapers that Google loves.
<strong>Technical</strong> <strong>Information</strong> <strong>Bulletin</strong><br />
OIL CARRY OVER/OIL FILL QUANTITIES FOR THE C7 ON-HIGHWAY ENGINE<br />
Media Number -TIBU4451-00 Publication Date -19/01/2005 Date Updated -19/01/2005<br />
CONFIDENTIAL<br />
OIL CARRY OVER/OIL FILL QUANTITIES FOR<br />
THE C7 ON-HIGHWAY ENGINE<br />
SMCS - 1326; 1348<br />
TIBU44510001<br />
CONFIDENTIAL TIBU4451-00<br />
TECHNICAL INFORMATION BULLETIN JANUARY 19, 2005<br />
ON-HIGHWAY TRUCK ENGINE<br />
C7 (FML1-UP, FMM1-UP,<br />
KAL1-UP, YPG1-UP)<br />
Component Code 1326, 1348<br />
SUBJECT: OIL CARRY OVER/OIL<br />
FILL QUANTITIES FOR THE C7 ON-<br />
HIGHWAY ENGINE<br />
PROBLEM:<br />
Some C7 On-highway engines may be experiencing oil dripping<br />
from the breather tube, oil film coating frame rails, etc,<br />
or oil film on towed vehicles.<br />
SOLUTION:<br />
The oil fill quantities have been reviewed and have been<br />
adjusted to the following refill capacities listed in the<br />
table below.<br />
C7 On-highway Truck Engine<br />
Approximate Refill Capacities
Compartment or System<br />
Shallow Oil Sump Capacity<br />
Deep Oil Sump Capacity<br />
Refill<br />
w/filter<br />
Change (L)<br />
(Qts)<br />
18 (L)<br />
19 (qts)<br />
25 (L)<br />
27 (qts)<br />
Refill w/o Filter<br />
Change (L)<br />
(Qts)<br />
16 (L)<br />
17 (qts)<br />
23 (L)<br />
25 (qts)<br />
Table 1<br />
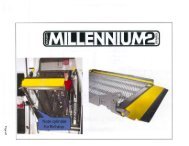
Illustration 2<br />
1. Shallow oil pan<br />
2. Deep oil pan
When troubleshooting oil carry over complaints follow the<br />
procedure below for draining the oil, refilling the oil,<br />
and oil level gauge calibration.<br />
The engine oil level will vary depending on the angle and<br />
the slant of the engine installation. The angle is the<br />
front to back tilt. The slant is the sideways tilt.<br />
The oil level gauge markings must be verified in order to<br />
ensure that the markings are correct. Verify the oil level<br />
gauge markings at the first oil change.<br />
Verify the "ADD" mark and verify the "FULL" mark that is on<br />
the oil level gauge. Use the following procedure.<br />
NOTICE<br />
The vehicle must be parked on a level surface in<br />
order to perform this maintenance procedure.<br />
1. Operate the engine until normal operating temperature is<br />
achieved. Stop the engine. Remove the crankcase oil drain<br />
plugs. The oil drain plug from the deep portion of the oil<br />
pan should be removed. Drain the oil from the crankcase for<br />
20 minutes.<br />
2. Remove the used oil filter(s). Install the new oil<br />
filter(s). Install the oil drain plugs and tighten to 70 ±<br />
15 N·m (50 ± 11 lb ft).<br />
Note: Only perform step 2 if engine is at normal<br />
maintenance interval per Operation and Maintenance Manual<br />
Note: Your engine may be equipped with auxiliary oil<br />
filters. The auxiliary oil filters require a different<br />
volume of oil. Refer to the OEM specifications for the<br />
auxiliary oil filter.<br />
3. Pour the following oil quantities into the crankcase:<br />
Shallow sump pans 13 (L) or 14 (qts)<br />
Deep sump pans 20(L) or 22(qts)
The 3 (L) or 3 (qts) is the difference between the "Add"<br />
and "Full" mark on the oil level gauge.<br />
4. Allow enough time for the oil to drain into the<br />
crankcase. Approximately 20 minutes should be allowed.<br />
Check the oil level. Wait for several minutes and check the<br />
oil level again. Proceed after the oil level stops<br />
changing.<br />
5. Check the oil level on the oil level gauge and calibrate<br />
oil gauge "Add Oil" mark. If the oil level is not at the<br />
existing "ADD" mark, grind off the "ADD" mark and engrave<br />
the new "ADD" level. Use an engraving pen in order to<br />
engrave the new "ADD" mark.<br />
6. Add the additional 3 (L) or 3 (qts) of oil to the<br />
engine. This additional oil should now bring the oil level<br />
to the full mark.<br />
7. Allow enough time for the oil to drain into the<br />
crankcase.<br />
8. Check the oil level on the oil level gauge and calibrate<br />
oil level gauge "Full" mark. If the oil level is not at the<br />
existing "FULL" mark, grind off the "FULL" mark. Use an<br />
engraving pen in order to engrave the new "FULL" mark.<br />
9. Start the engine and run the engine enough to ensure<br />
that the lubrication system is filled. Inspect the engine<br />
for oil leaks.<br />
NOTICE<br />
Do not crank the engine for more than 30 seconds.<br />
Allow the starting motor to cool for two minutes<br />
before cranking again.<br />
10. Stop the engine and allow enough time for the oil to<br />
drain into the crankcase.<br />
11. Verify the oil level is at the full mark.<br />
12. Steam clean underside of engine to remove existing oil<br />
residue.
13. Start the engine and run the engine to verify the fix.<br />
COPYRIGHT 2005 CATERPILLAR<br />
ALL RIGHTS RESERVED<br />
Copyright 1993 - 2005 Caterpillar Inc.<br />
All Rights Reserved.<br />
Private Network For SIS Licensees.<br />
Wed Jan 19 17:44:39 EST 2005