FLIGHT MANUAL - High Definition Radio Control
FLIGHT MANUAL - High Definition Radio Control
FLIGHT MANUAL - High Definition Radio Control

You also want an ePaper? Increase the reach of your titles
YUMPU automatically turns print PDFs into web optimized ePapers that Google loves.
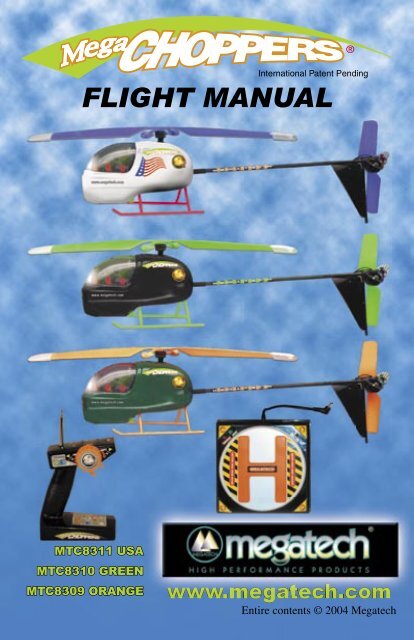
<strong>FLIGHT</strong> <strong>MANUAL</strong><br />
MTC8311 USA<br />
MTC8310 GREEN<br />
MTC8309 ORANGE<br />
www.megatech.com<br />
Entire contents © 2004 Megatech
2<br />
Table of Contents<br />
If you have questions about operating or installing your new Megatech<br />
product, or if you are missing parts... Please Call Megatech First!<br />
DO NOT RETURN THIS PRODUCT TO THE STORE<br />
Call our Customer Service Department at:<br />
(201) 662-2800<br />
10:00am - 5:00pm, EST Monday through Friday (except holidays)<br />
Technical assistance is also available on-line at www.megatech.com<br />
or by e-mail to info@megatech.com<br />
Congratulations on your purchase of a Megatech ® MegaChopper TM .<br />
The self-stabilizing GyroHelix rotor design makes the MegaChopper<br />
the easiest to fly radio-control helicopter ever offered. Flying<br />
has never been more fun! Get ready to launch into a new world of<br />
high-flying excitement! Your new MegaChopper comes completely<br />
assembled and within minutes of opening the box, it will be ready to<br />
soar through the sky at heights up to 70 feet. You simply charge the<br />
batteries and take off on your new adventure.<br />
Please read this entire flight manual carefully before you attempt<br />
to fly your MegaChopper.<br />
If you experience any problems, DO NOT take your MegaChopper<br />
back to the store! Call one of our MegaTechnicians at<br />
1-888-MEGA-911 or send an e-mail to: info@megatech.com<br />
10:00am-5:00pm EST, Monday through Friday (except holidays)<br />
Technical assistance is also available on-line at www.megatech.com<br />
or by e-mail to info@megatech.com<br />
DO NOT RETURN THIS PRODUCT TO THE STORE<br />
TABLE OF CONTENTS<br />
Safety Warnings ................................................................................... 3<br />
Getting Acquainted with your MegaChopper........................................... 4<br />
Installing the Batteries ......................................................................... 5<br />
Charging the Batteries ......................................................................... 5<br />
Preparing For Your First Flight ............................................................. 6<br />
Final Adjustments ................................................................................. 6<br />
Flying Your MegaChopper ..................................................................... 7<br />
Landing Your MegaChopper .................................................................. 7<br />
Alternate Launch Method .................................................................... 8<br />
Ordering Spare Parts ........................................................................ 8<br />
Crash Warranty .................................................................................. 9<br />
Limited Warranty ................................................................................. 9<br />
Troubleshooting ................................................................................... 10
Important! Before you begin, please read the warnings<br />
listed on the following page. Failure to comply with the<br />
following recommendations could lead to bodily harm or injury.<br />
The Megatech MegaChopper is not intended for those under 10<br />
years of age without proper adult supervision.<br />
Safety Warnings<br />
Please read these before operating your MegaChopper.<br />
• You alone are responsible for operating your helicopter in a safe<br />
manner. When flying, you are responsible for your own safety and<br />
the safety of others around you. Follow these basic safety guidelines<br />
at all times.<br />
• The spinning main rotor and tail rotor on this aircraft can be<br />
dangerous! When operating/flying, always be aware of the spinning<br />
rotors. Be careful not to let them come close to your body, other people<br />
or loose clothing. Keep your hands, fingers and any article of clothing<br />
away from the rotors. Keep spectators behind you when flying.<br />
• Fly only on calm days. Gusty winds and winds over 5 MPH will make it<br />
difficult (if not impossible) to control your helicopter<br />
properly.<br />
• Do not attempt to disassemble or modify any of the MegaChopper’s<br />
components or allow them to get wet. Electrical damage may occur that could<br />
affect safe operation.<br />
• Only use the rechargeable battery pack provided with your MegaChopper. Using<br />
any other type of battery will damage your helicopter and possibly make it dangerous<br />
to operate.<br />
• Since your MegaChopper is controlled by a radio link, it may be subject to interference<br />
from outside radio sources. Do not fly your helicopter if other models are<br />
being operated on the same frequency in the area. (27Mhz)<br />
• It is very important to always use fresh alkaline batteries in the transmitter.<br />
• Always fly your helicopter in a wide-open area. Do not fly near power lines,<br />
trees, buildings and other obstructions. We recommend an area approximately<br />
300 yards by 150 yards (the size of a football field). DO NOT FLY NEAR<br />
PEOPLE OR ANIMALS.<br />
• Always take off from the heliport base. Never hold the MegaChopper when<br />
launching. A sudden wind shift could send the helicopter in your direction, possibly<br />
resulting in injury.<br />
• Avoid flying in very hot or very cold weather. Your MegaChopper features an<br />
automatic temperature guard. When the helicopter gets too hot, it will automatically<br />
shut down and land to prevent overheating and protect the internal circuitry.<br />
3<br />
Safety Warnings
4<br />
Your MegaChopper Package<br />
• Always have an adult install the batteries into the transmitter and<br />
charger/heliport. Never mix old and new batteries. Do not use<br />
rechargeable batteries for the charger/heliport or the transmitter.<br />
Avoid mixing alkaline and other types of batteries.<br />
• After every two or three flights, let your MegaChopper cool down<br />
for 10-15 minutes. This will help prolong the life of your<br />
helicopter.<br />
• Always remove the batteries from your charger when you finish<br />
flying for the day. Do not store batteries inside the charger or<br />
transmitter.<br />
First make sure the contents of your package are complete:<br />
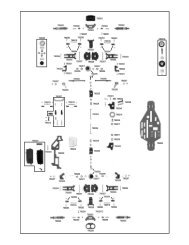
HELICOPTER<br />
A<br />
Getting Acquainted with Your MegaChopper<br />
B<br />
A. <strong>Radio</strong> <strong>Control</strong><br />
Transmitter<br />
B. Charger/Heliport<br />
C. MegaChopper<br />
C<br />
1. Fuselage<br />
2. Main Rotor<br />
3. Landing Gear<br />
4. Charging Port<br />
5. Charging/Off/On<br />
Switch<br />
6. Tail Rotor<br />
6<br />
5<br />
3<br />
2<br />
4<br />
1<br />
2<br />
1<br />
4<br />
CHARGER/HELIPORT<br />
1. Launch Pad<br />
2. On/Off Switch<br />
3. Charger Link<br />
4. Battery Compartment<br />
3<br />
Top<br />
Bottom
CONTROLLER<br />
1. Antenna 2. Power Light<br />
3. Battery Hatch 4. On/Off Switch<br />
5. Trigger/Throttle<br />
6. Directional <strong>Control</strong> Knob<br />
7. Steering Trim Adjustment Knob<br />
8. Throttle Trim Adjustment Knob<br />
NOTE:<br />
Keep the box and packaging to<br />
safely store your MegaChopper<br />
between flights. Proper storage<br />
will prevent the rotors from warping<br />
and help maintain flight performance.<br />
4<br />
1<br />
Installing the Batteries<br />
Bottom<br />
The Charger/Heliport<br />
Using a Philips screwdriver, unscrew the battery hatch. Paying careful attention to<br />
their direction, install 8 D-size alkaline batteries. Reattach the battery hatch and<br />
securely tighten the screws.<br />
NOTE: For best results, replace the 8 D-size alkaline batteries in the Charger/<br />
Heliport after every 6-12 flights.<br />
The <strong>Radio</strong> <strong>Control</strong>ler<br />
Using a Philips screwdriver,<br />
unscrew the battery hatch. Install<br />
6 AA alkaline batteries. Be sure<br />
the batteries are properly<br />
arranged or your controller will<br />
not function. Reattach the battery<br />
hatch and securely tighten the<br />
screws.<br />
2<br />
5<br />
Charging Your MegaChopper<br />
6<br />
7<br />
8<br />
3<br />
5<br />
Installing/Charging Batteries<br />
Your MegaChopper features a built-in Megatech extended run time <strong>High</strong> Performance<br />
rechargeable NiMH(Nickel-Metal-Hydride) Battery that must be charged before each<br />
flight (approximately 12-17 minutes charging time). NiMH Technology indicates that<br />
batteries improve performance and quicken charge time the more you use them. After<br />
the 5th or 6th charge you should notice an increase in performance and faster charge<br />
time. The Heliport is equipped with an automatic peak detection charger that will sense<br />
and adjust the amperage during the charge cycle. It will automatically shut off when<br />
the battery has reached maximum charged capacity. The approximate time to charge<br />
Megatech’s extended run time <strong>High</strong> Performance rechargeable NiMH battery is 12-17<br />
minutes.<br />
1. Begin by moving the Off/On switch on your MegaChopper to the “Off” position (all<br />
the way to the left, or toward the tail of the helicopter). If the switch is in the “On”<br />
position, your helicopter will not charge.<br />
2. Plug the Charger Link into the charge port beneath your MegaChopper. Make sure it<br />
is securely connected or charging will not occur.
6<br />
Preparing for Flight<br />
3. Place the MegaChopper onto the Charger/Heliport.<br />
4. Move the switch on the Charger/Heliport to the “On” position. The red light<br />
should start blinking. This indicates that it is charging the batteries on your<br />
MegaChopper.<br />
5. When the red light stops flashing and a green light begins to glow, your<br />
battery is fully charged. There will also be a beeping sound.<br />
6. You may now disconnect the MegaChopper from the Charger/Heliport.<br />
Switch in Off Plugging in Charger lights<br />
position. the charger link. show charging is<br />
in progress.<br />
Preparing For Your First Flight<br />
Before your first flight it is important to “cycle” the MegaChopper’s batteries at least twice.<br />
Here’s how: Charge the battery pack as instructed on page 5. Fully extend the transmitter antenna.<br />
Next, turn on the radio control transmitter first and then the receiver. Always remember to turn on the<br />
transmitter first. Firmly hold the helicopter at the center of the fuselage so the main rotor and tail rotor<br />
are unobstructed and away from fingers, loose clothing, etc. Now slowly squeeze the throttle trigger on<br />
the transmitter to start the rotors spinning. Continue to run the motor until it stops. Allow the battery<br />
pack to cool, and then recharge it again. Perform this process of running the motor until the battery is<br />
drained at least twice. The battery pack will now supply more power and your first flights will be much<br />
easier and safer!<br />
Final Trim Adjustments Before Flight<br />
For optimum performance, check the Steering Trim and Throttle adjustments before the first flight of your<br />
MegaChopper.<br />
• First check the steering trim adjustment setting. First turn on the transmitter and<br />
then switch on the MegaChopper and place the on a flat hard surface such as a<br />
driveway. Now, slowly pull the throttle (trigger) until the MegaChopper is just<br />
about ready to take off (Getting “light” on it’s landing skids), if the helicopter’s tail<br />
wants to drift left or right, adjust the steering-trim knob (the one closest to the front<br />
of the transmitter.) Do this a little at a time (left or right) until the MegaChopper<br />
stops wanting to turn during lift-off and takes-off straight. (i.e If the tail drifts left,<br />
turn the trim knob counter-clockwise. If the tail drifts right, turn the trim-knob<br />
clockwise.)<br />
Steering Trim<br />
Adjustment<br />
Knob<br />
Throttle Trim<br />
Adjustment<br />
Knob<br />
• Next adjust the throttle trim. With both controls (Wheel and trigger) resting in the neutral position, or untouched by<br />
you, SLOWLY turn the throttle trim knob (The one towards the rear of the transmitter) left or right until the rotors<br />
(main and tail rotor) just start to spin. Now, turn the trim back just enough to turn both rotors off.<br />
You have now adjusted both trim knobs in preparation for your first flight.
Flying Your MegaChopper<br />
1. Fully extend the antenna on the<br />
radio control transmitter.<br />
2. Switch on the radio control<br />
transmitter. A red light on the<br />
transmitter will glow to indicate<br />
power. Never attempt to fly if<br />
the red light on the transmitter is<br />
blinking or not glowing. If the<br />
power light is off or blinking, this <strong>Radio</strong> turned on. Power Light<br />
indicates that the batteries need to<br />
be replaced with fresh alkaline batteries.<br />
3. Slide the switch on the MegaChopper to the “On”<br />
position (all the way to the right or front of the<br />
helicopter). Always switch on the transmitter<br />
before you switch on the helicopter.<br />
4. Center the helicopter on the Charger/Heliport<br />
with the landing gear straddling the “H” as<br />
shown. This is important. It keeps the<br />
MegaChopper from sliding before it lifts off.<br />
5. Step back at least 5 yards and face the helicopter.<br />
6. Double check to make sure that your flying area is clear of people, trees, buildings, electric<br />
lines or other obstructions.<br />
7. Grip the transmitter in your left hand, so that the trigger/throttle is controlled by your left<br />
index finger. Use your right hand to operate the Directional <strong>Control</strong> Knob.<br />
8. Squeeze the trigger/throttle gradually until the rotors begin to spin. The rotors need to spin<br />
for 1.5-2 seconds to build up energy before lifting off.<br />
9. As the helicopter lifts off, it may be shaky. Allow the MegaChopper to stabilize before<br />
attempting to turn. Trying to turn while your helicopter is unbalanced will make it difficult<br />
to control and may lead to a crash.<br />
10. You determine how high your MegaChopper will fly with the proportional trigger/throttle.<br />
The harder you squeeze the trigger, the higher your helicopter will fly.<br />
11. Turn your MegaChopper by using the Directional <strong>Control</strong> Knob like a steering wheel.<br />
Turn it left to turn to the left, right to turn to the right. Be careful not to turn too much.<br />
Small turns should be all you need to hold your MegaChopper in a stable hover. NOTE:<br />
Any wind will make your MegaChopper move, so be ready to correct.<br />
12. MegaChopper average flight time on a full charge is between 3 and 6 minutes. If your<br />
flight times are less than this, you should change the 8 D-size alkaline batteries in your<br />
Charger/Heliport.<br />
Landing Your MegaChopper<br />
1. Find a soft, grassy area to land. Although built to be incredibly tough, your MegaChopper<br />
may be damaged by harsh landings.<br />
2. To land, slowly ease off on the throttle trigger until your MegaChopper starts to<br />
slowly descend in a spiral. Do not ease off too much or the rotors will stop and your<br />
MegaChopper may crash.<br />
7<br />
Flying and Landing
8<br />
Alternate Launch Method<br />
Launch Method / Spare Parts<br />
Hand launching is sometimes necessary in warmer conditions or when high<br />
humidity is present. Hand launching is also possible if longer flight times or<br />
higher altitudes are desired. Please follow these instructions below for a safe<br />
and successful hand launch<br />
• Always have a responsible adult hand launch the MegaChopper for you. Never<br />
attempt to hand launch on your own.<br />
• After fully charging your MegaChopper on the helipad, fully extend the antenna<br />
and turn on the transmitter.<br />
• Have the person hold the MegaChopper by the landing gear (as shown) and<br />
point it with blades away from their body and turn on the MegaChopper.<br />
• Have the person hold the MegaChopper straight and level over their head.<br />
• Squeeze the transmitter trigger to full<br />
throttle, the main and tail rotor blades<br />
will begin to spool up to full RPM.<br />
• The person holding the MegaChopper<br />
will feel the MegaChopper try and lift<br />
out of their hands.<br />
• Give the OK for the person to<br />
release the MegaChopper, and allow<br />
it to fly away on its own.<br />
Ordering Spare Parts<br />
Spare, repair and replacement parts are readily available for your aircraft. Should<br />
you need parts, visit your local hobby dealer first. If unavailable, you may contact<br />
Megatech. Use this sheet as a guide.<br />
830901 MAIN ROTOR BLADE ORANGE<br />
831001 MAIN ROTOR BLADE GREEN<br />
831101 MAIN ROTOR BLADE BLUE<br />
820902 TAIL ROTOR BLADE ORANGE<br />
821002 TAIL ROTOR BLADE GREEN<br />
831102 TAIL ROTOR BLADE BLUE<br />
820903 TRANSMITTER ORANGE<br />
821003 TRANSMITTER GREEN<br />
831103 TRANSMITTER BLUE<br />
821004 Rechargeable Ni-MH Battery Pack<br />
820905 Transmitter Battery Hatch<br />
820906 Landing Gear Orange<br />
821006 Landing Gear Green<br />
831106 Landing Gear Red<br />
820907 Helipad Charging Station Orange<br />
821007 Helipad Charging Station Green<br />
831107 Helipad Charging Station BLUE<br />
821008 Helipad Battery Hatch<br />
821009 Transmitter Antenna<br />
820910 Parts combo 2 main rotors, 2 tail rotors Orange<br />
821010 Parts combo 2 main rotors, 2 tail rotors Green<br />
831110 Parts combo 2 main rotors, 2 tail rotors BLUE
CRASH WARRANTY<br />
9<br />
For a period of 1-year from the date of purchase, if your MegaChopper ® is badly damaged in a crash,<br />
for whatever reason, Megatech will replace the entire helicopter (no questions asked) for a nominal fee<br />
of $39.99 including regular ground shipping to the 48 continental states (AK & HI Add $5.00, For international<br />
orders the actual shipping charges will apply.) Simply return the damaged model to Megatech<br />
with its proof-of-purchase receipt (very important!) and a brand new MegaChopper ® will be immediately<br />
shipped out directly to you.<br />
MEGATECH<br />
ATT: WARRANTY DEPT<br />
8300 TONNELLE AVE<br />
NORTH BERGEN, NJ 07047<br />
Limited Warranty<br />
Megatech International guarantees this item to be free from defects for a period of 90 days from date<br />
of purchase. If any component of this product fails to function properly due to defects in materials or<br />
manufacturing process during this 90 day period, the Manufacturers obligations are limited and manufacturer<br />
can choose to either repair or replace the item.<br />
Limited Warranty<br />
This warranty is void if the product in question has been altered or repaired by anyone other than<br />
Megatech International or an authorized agent.<br />
Under no circumstances will Megatech International or any of its representatives be held liable for<br />
injury to persons or property damage resulting from assembly or use of the product. Megatech is not<br />
liable if any outside radio frequencies interfere with the product’s frequency causing loss of control.<br />
Megatech International will not be held liable for any personal injury or property damage resulting from<br />
an out-of-control model caused by use or misuse of the product.<br />
Megatech International expressly excludes any and all express warranties not specifically stated here<br />
and all implied warranties of merchantability and fitness for a particular purpose. There are no warranties<br />
which extend beyond the description of the warranties contained herein.<br />
Contact the Megatech International Service department before returning any item that is defective<br />
according to the limitations listed above. Please be sure to pack the returned item(s) carefully. The customer<br />
must return the product along with proof of purchase, a letter stating the problem, the customer’s<br />
address and telephone number. At this point in time we will either repair the defective part or replace it<br />
and return it to the customer. Return shipping and handling in the 48 contiguous states is $12.99. Shipping<br />
outside of the 48 states will be quoted by location.<br />
This warranty does not cover any damage caused by use, misuse, alteration, accident, or neglect, nor<br />
does it cover normal wear and tear of the product. Product returned to us which falls under this category<br />
will be submitted to our service department for repair. We reserve the right to charge any service and<br />
parts fees incurred when repairing the item.<br />
Megatech International<br />
8300 Tonnelle Avenue<br />
North Bergen NJ 07047<br />
(201) 662-2800<br />
www.megatech.com<br />
eMail: info@megatech.com
10<br />
Troubleshooting<br />
PROBLEM CAUSE RECOMMENDATION<br />
No power to radio control 1. Power switch is 1. Move switch to the “on”<br />
transmitter or charger. in the “off” position.<br />
position.<br />
2. Batteries are 2. Make sure batteries are<br />
incorrectly installed correctly.<br />
installed.<br />
3. Batteries are 3. Replace the batteries with<br />
exhausted. new alkaline batteries.<br />
No blinking red light when 1. Charge nozzle is 1. Double check the<br />
charging. not properly connection.<br />
plugged into the<br />
charge port on the<br />
MegaChopper.<br />
2. Power switch on 2. Set switch to “on”<br />
charger is in the position.<br />
“off” position.<br />
3. Batteries are 3. Replace all 8<br />
exhausted. D-Size Batteries.<br />
Chopper is not under control. 1. <strong>Radio</strong> control 1. Slide the switch to the<br />
transmitter is not “on” position.<br />
turned on.<br />
2. Transmitter 2. Fully extend the antenna.<br />
antenna is not fully
11<br />
extended.<br />
3. Windy or bad 3. Stop flying at once and<br />
weather. try again on another day.<br />
4. Tuning adjustment 4. Adjust fine tuning knobs<br />
incorrect.<br />
Chopper is not flying high enough. 1. Charger Battery 1. Replace with new<br />
life is nearly batteries.<br />
exhausted.<br />
2. Battery pack is 2. Recharge the MegaChopper.<br />
not fully charged.<br />
3. Tuning adjustment 3. Adjust fine tuning knobs<br />
incorrect.<br />
Helicopter can not rotate left or 1. MegaChopper needs 1. Pause and let the helicopter<br />
right. time to steady and steady itself and then try<br />
balance itself. again. If it does not steady,<br />
the wind may be too strong<br />
to fly.<br />
2. Battery is losing 2. Land immediately and<br />
power. recharge the battery.<br />
MegaChopper crashed to the 1. You may have 1. Try again and release the<br />
ground while landing. released the trigger more slowly to<br />
throttle/trigger too allow the helicopter to<br />
quickly or too far. slow and spiral<br />
down for a landing.<br />
Troubleshooting
LOOK FOR THESE OTHER FINE MEGATECH PRODUCTS<br />
MTC9932<br />
COSMIC FLYER R/C EASY FLYER<br />
MTC9941<br />
FREEDOM FLYER R/C AIRPLANE<br />
MTC7701<br />
H2O ELECTRIC MINI R/C SPEEDBOAT<br />
Megatech International<br />
8300 Tonnelle Avenue, North Bergen, NJ 07047<br />
(201) 662-2800<br />
www.megatech.com