HM-4200 manual GB.book - Soco Systems
HM-4200 manual GB.book - Soco Systems
HM-4200 manual GB.book - Soco Systems

You also want an ePaper? Increase the reach of your titles
YUMPU automatically turns print PDFs into web optimized ePapers that Google loves.
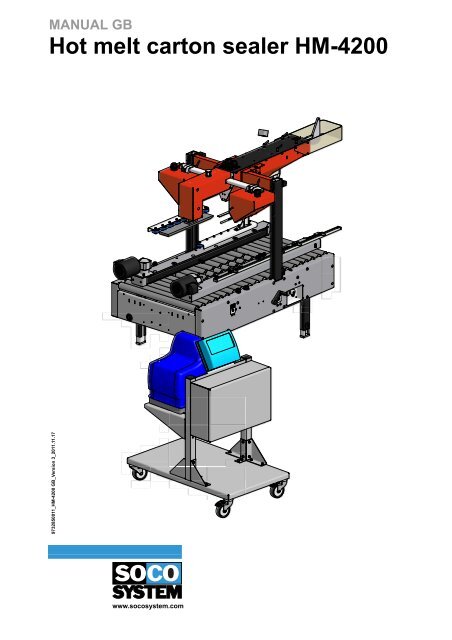
MANUAL <strong>GB</strong><br />
Hot melt carton sealer <strong>HM</strong>-<strong>4200</strong><br />
9732850011_<strong>HM</strong>-<strong>4200</strong> <strong>GB</strong>_Version 3_2011.11.17<br />
www.socosystem.com
Table of contents<br />
1. Introduction ................................................................................................................. 3<br />
1.1. General information ................................................................................................................. 3<br />
1.2. Technical specifications........................................................................................................... 3<br />
1.3. Machine plate........................................................................................................................... 3<br />
2. Safety ........................................................................................................................... 4<br />
2.1. Information about safety .......................................................................................................... 4<br />
2.2. Emergency stop....................................................................................................................... 4<br />
2.3. Disposal ................................................................................................................................... 4<br />
3. Survey and application............................................................................................... 5<br />
3.1. Machine survey........................................................................................................................ 5<br />
3.2. Application and functions......................................................................................................... 6<br />
4. Installation ................................................................................................................... 7<br />
4.1. Demands on place of installation............................................................................................. 7<br />
4.2. Transport.................................................................................................................................. 7<br />
4.3. Installation................................................................................................................................ 7<br />
4.4. Electric connection................................................................................................................... 7<br />
4.5. Connection of compressed air ................................................................................................. 7<br />
5. Operation ..................................................................................................................... 8<br />
5.1. Start-up .................................................................................................................................... 8<br />
5.2. Setting of formats..................................................................................................................... 8<br />
5.3. Glueing..................................................................................................................................... 8<br />
5.4. Start/stop/emergency stop....................................................................................................... 9<br />
6. Fault finding and remedy ........................................................................................... 11<br />
6.1. Fault finding ............................................................................................................................. 11<br />
7. Alarms .......................................................................................................................... 12<br />
7.1. Alarm list .................................................................................................................................. 12<br />
8. Belt adjustment on drive ............................................................................................ 13<br />
8.1. Mounting of drive ..................................................................................................................... 13<br />
8.2. Tightening of driving belt.......................................................................................................... 13<br />
8.3. Adjustment of driving belt......................................................................................................... 13<br />
9. Maintenance and check list........................................................................................ 14<br />
9.1. Maintenance and lubrication.................................................................................................... 14<br />
9.2. Check list ................................................................................................................................ 14<br />
9732850011_<strong>HM</strong>-<strong>4200</strong> <strong>GB</strong>_Version 3_2011.11.17<br />
Tel.: +45 43 52 55 66 Fax: +45 43 52 81 16 info@socosystem.com www.socosystem.com<br />
2
1. Introduction<br />
1.1 General information<br />
Present <strong>manual</strong> describes a standard version of a carton sealer <strong>HM</strong>-<strong>4200</strong> with top sealing with hot melt<br />
and bottom sealing with tape.<br />
This <strong>manual</strong> is for a standard machine and changes may have been made in connection with the specific<br />
product. In that case, such changes are not described in this <strong>manual</strong>.<br />
1.2 Technical specifications<br />
Capacity<br />
Carton dimensions: L (mm) x W (mm) x H (mm)<br />
Supply voltage<br />
Fuse size<br />
Power consumption carton sealer/hot melt system<br />
Control voltage<br />
Air consumption<br />
Air pressure<br />
Air quality<br />
Pneumatics<br />
Noise level<br />
Hot melt system<br />
12-15 cartons/minute.<br />
Minimum/maximum: 200 x 120 x 100 / 750 x 460 x<br />
770.<br />
3 x 400 V AC, 50 Hz, and earth.<br />
25 A as a maximum.<br />
1 kW/6 kW.<br />
24 V DC.<br />
8-10 l / cycle.<br />
600 kPa (oil and grease free).<br />
Must comply with ISO 8573.1 as a minimum.<br />
Festo.<br />
76 dB (A) as a maximum.<br />
Nordson or Robatech. See <strong>manual</strong> from the<br />
manufacturer.<br />
1.3 Machine plate<br />
The machine data appears from the machine<br />
plate.<br />
The machine plate indicates that the machine<br />
is CE certified.<br />
SOCO SYSTEM A/S . Helgeshøj Allé 16D . DK-2630 Taastrup . Denmark<br />
Tel +45 43 52 55 66 . Fax +45 43 52 81 16 . info@socosystem.com<br />
www.socosystem.com<br />
Model<br />
Model<br />
Voltage<br />
Spænding<br />
V<br />
Machine no.<br />
Maskin nr.<br />
Frequency<br />
Frekvens<br />
Hz<br />
9732850011_<strong>HM</strong>-<strong>4200</strong> <strong>GB</strong>_Version 3_2011.11.17<br />
Diagram no.<br />
Eldiagram nr.<br />
Production week<br />
Produktionsuge<br />
Rated current<br />
Fuldlaststrøm<br />
Max. Ik eff.<br />
Max. Ik eff.<br />
kA<br />
A<br />
Tel.: +45 43 52 55 66 Fax: +45 43 52 81 16 info@socosystem.com www.socosystem.com<br />
3
2. Safety<br />
2.1 Information about safety<br />
SOCO SYSTEM products conform to all relevant EC directives on safety and<br />
health and are constructed with reference to EC harmonised standards.<br />
Some SOCO SYSTEM products require further safety guarding before use. This<br />
appears from the EC Declaration of Components.<br />
Local authorities can make demands on the arrangement of a working place. This<br />
does not encompass this delivery.<br />
Before starting the machine, make sure that there are no items within the working<br />
area of the machine and within a possible guarding that can prevent the machine<br />
from operating in standard mode.<br />
2.2 Emergency stop<br />
An emergency stop occurs when the machine’s emergency stop switch is activated or when a door in<br />
the guarding is opened. In connection with an emergency stop, the supply voltage to the machine’s<br />
motors is disconnected, the machine is vented, and the hot melt system pump is disconnected.<br />
Restart after emergency stop<br />
■ Release emergency stop switch and/or close door in guarding.<br />
■ Push the AIR ON button (white).<br />
■ Push the start button (green).<br />
2.3 Disposal<br />
9732850011_<strong>HM</strong>-<strong>4200</strong> <strong>GB</strong>_Version 3_2011.11.17<br />
The product is subject to directive 2003/108/EC on Waste Electrical and Electronic<br />
Equipment (WEEE) and, in jurisdictions adopting that directive, is marked as being put<br />
on the market after August 13, 2005, and should not be disposed of as unsorted<br />
municipal waste. Please utilize your local WEEE collection facilities in the disposal of<br />
this product and otherwise observe all applicable requirements.<br />
Tel.: +45 43 52 55 66 Fax: +45 43 52 81 16 info@socosystem.com www.socosystem.com<br />
4
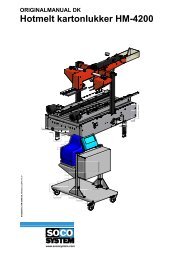
3. Survey and application<br />
3.1 Machine survey<br />
1. Start (green).<br />
2. Stop/reset (black).<br />
3. AIR ON button (white).<br />
4. Turn switch for operation with or<br />
without hot melt system (extra<br />
accessory).<br />
5. Emergency stop switch.<br />
6. Handle for adjustment of side drive.<br />
7. Main switch.<br />
8. Handle for adjustment of pillar.<br />
9. Manometer for operating pressure.<br />
10. Regulator for operating pressure/filter.<br />
11. Finger grips (4 units) for adjustment of<br />
flap bow.<br />
12. Finger grips (2 units) for adjustment of<br />
side flap closing arrangement.<br />
9732850011_<strong>HM</strong>-<strong>4200</strong> <strong>GB</strong>_Version 3_2011.11.17<br />
13. Regulation of compression<br />
arrangement pressure.<br />
Tel.: +45 43 52 55 66 Fax: +45 43 52 81 16 info@socosystem.com www.socosystem.com<br />
5
3.2 Application and functions<br />
<strong>HM</strong>-<strong>4200</strong> is a carton sealer with automatic top flap sealing of folding cartons by use of hot melt. The<br />
carton sealer has a capacity of 12-15 cartons per minute dependent on the construction of the carton<br />
and the cardboard quality. The machine has a compact design and is easily adjusted for variable carton<br />
sizes. Manual adjustment of side and top drives.<br />
The bottom sealed carton is led into the carton sealer, the flap bow folds the front and rear flaps of the<br />
carton, the side drives lead the carton forward for folding of the side flaps and towards the hot melt gun<br />
that applies the glue. The carton is then led out of the machine.<br />
9732850011_<strong>HM</strong>-<strong>4200</strong> <strong>GB</strong>_Version 3_2011.11.17<br />
Tel.: +45 43 52 55 66 Fax: +45 43 52 81 16 info@socosystem.com www.socosystem.com<br />
6
4. Installation<br />
4.1 Demands on place of installation<br />
Demands on place of installation<br />
Base<br />
Room temperature<br />
Humidity<br />
Explosion hazard<br />
Voltage deviation<br />
Frequency deviation<br />
The machine must be protected<br />
against<br />
Level and stable without vibrations.<br />
Between +5°C and +40°C.<br />
May not exceed 90% at +20°C or 50% at +40°C.<br />
The machine may not be placed in a potentially explosive<br />
environment.<br />
10% as a maximum.<br />
2% as a maximum.<br />
Splash of water, excessive amount of dust, acid, corrosive gasses,<br />
and sea air.<br />
4.2 Transport<br />
When the carton sealer is transported and stored in stock, it must be protected against moisture,<br />
vibrations, and shock impacts which might destroy it. The machine must only be subject to temperatures<br />
ranging from -25°C to +55°C.<br />
4.3 Installation<br />
Please note that all screws and nipples must be checked and retightened after transport.<br />
4.4 Electric connection<br />
Electric connection of the machine should be carried out by personnel responsible for electricity.<br />
The standard machine is constructed for 400 V AC, 50 Hz with earth and protected by fuses with 16 A<br />
(2.5). Connection is done in control cabinet on the back of the machine with L1, L2, L3, and earth. See<br />
wire diagram of the machine.<br />
4.5 Connection of compressed air<br />
9732850011_<strong>HM</strong>-<strong>4200</strong> <strong>GB</strong>_Version 3_2011.11.17<br />
Please note that the air must be moisure and oil fee and comply with ISO 8573 as a minimum.<br />
The working pressure must be 600 kPa as a minimum and the pipe connections must have an internal<br />
diameter of 12 mm as a minimum.<br />
See pneumatic diagram.<br />
Tel.: +45 43 52 55 66 Fax: +45 43 52 81 16 info@socosystem.com www.socosystem.com<br />
7
5. Operation<br />
5.1 Start-up<br />
Turn the regulator button (10) clockwise until the working pressure on the manometer (9) shows 5-6 bar.<br />
The button must be pulled out before it can be turned. In this position, the flap bow swings upwards.<br />
5.2 Setting of formats<br />
Width adjustment<br />
Place the carton at the inlet end, approximately opposite the side drive pillars. Loosen the handle for<br />
locking of side drives (6). Move the side drives towards each other until there is a light pressure on the<br />
carton. Tighten handle.<br />
Height adjustment<br />
Place the carton in the machine, move the side drives to their outermost positions and adjust the height<br />
by means of handle (8) for adjustment of pillar up/down.<br />
Side flap closing arrangement<br />
Adjustment of the side flap closing arrangment at each side is carried out on the finger grips (12) placed<br />
on the top part of the machine above the side flaps.<br />
Length adjustment<br />
Adjust the flap bow for rear flap bending by adjusting the infeed stop (13) and the flap bow finger grip<br />
(11). Adjust the flap bow lengthwise by loosening the finger grips (11). Pull out the finger grips when<br />
operating with long cartons.<br />
Adjust the infeed stop (13) roughly so that the distance between flap bow and infeed stop approximately<br />
equals the carton length (a little more at wide cartons and a little less at narrow cartons). Readjust after<br />
the first carton.<br />
Flap bow<br />
Adjust the up/down movement of the flap bow on the finger grips (11). See pneumatic diagram for<br />
throttling of valve.<br />
5.3 Glueing<br />
9732850011_<strong>HM</strong>-<strong>4200</strong> <strong>GB</strong>_Version 3_2011.11.17<br />
On delivery, the length of the glue lines are preprogrammed corresponding to the sample cartons sent.<br />
If new lengths of the glue lines are required, or if new carton formats are added, check the instruction<br />
<strong>manual</strong> of the glue unit manufacturer for further information. Glueing is carried out by the hot melt unit.<br />
The glue temperature depends on the glue type used.<br />
Please note that the glue gun maintains its working temperature and is very hot.<br />
Tel.: +45 43 52 55 66 Fax: +45 43 52 81 16 info@socosystem.com www.socosystem.com<br />
8
5.4 Start/stop/emergency stop<br />
■ The main swith on the machine (7) must be switched to position 1 (ON).<br />
■ Compressed air must be connected and the compressed air cock must be open (9 and 10).<br />
■ The main switch on the glue tank must be switched to ON position. Check that there is glue in the<br />
tank.<br />
■ Check that all necessary carton size settings have been made (see the section “Setting of<br />
formats”).<br />
■ Close the doors in the guarding and check that the emergency stop switch (5) is pulled out.<br />
■ Push the AIR ON button (3). Air is connected to the machine and the white pushbutton with light<br />
(3) lights constantly. If this is not the case see the chapter regarding alarms.<br />
■ Push start (1). The machine now automatically starts a top sealing sequence. The green<br />
pushbutton with light lights constantly. If this is not the case see the chapter on handling of<br />
alarms.<br />
IMPORTANT: The glue tank indicator lamp must light green otherwise it is not possible to start the carton<br />
sealer. If the indicator lamp switches off when the machine is in operation the machine stops and it<br />
cannot be restarted until the indicator lamp lights.<br />
Stop<br />
Push the black button stop/reset (2) briefly to stop the machine when the top sealing sequence has<br />
ended.<br />
Reset<br />
Push the black stop/reset button (2) for 5 seconds to reset the machine until the green start button (1)<br />
flashes 3 times. This function is used when an alarm has occurred (see alarm instructions). All functions<br />
are reset which means that the machine returns to its initial position when air has been supplied to the<br />
machine or when air is supplied to the machine again.<br />
Emergency stop switch<br />
If the emergency stop switch (5) is activated the machine stops and is vented immediately. This also<br />
takes place if a door is opened.<br />
Queue control photocell S10<br />
When the photocell for queue control S10 (see wire diagrams) is activated the top sealing sequence is<br />
completed and the machine waits with the carton in the compression arrangement. When the photocell<br />
is free the carton is led out of compression arrangement and a new carton is led into the compression<br />
arrangement for sealing.<br />
9732850011_<strong>HM</strong>-<strong>4200</strong> <strong>GB</strong>_Version 3_2011.11.17<br />
Programme operation without cartons<br />
The machine is preprogrammed to operate without glueing for demonstration purposes. It is not required<br />
that the glue tank is connected and it is also not required that the movement speeds are adjusted. The<br />
machine must be stopped.<br />
■ Push the start button (1) and the stop button (2) for 3 seconds until the white AIR ON button (3)<br />
flashes 3 times.<br />
■ Now release the start button (1) and then push start again and the machine carries out the entire<br />
sequence over and over again until the stop button is activated.<br />
Tel.: +45 43 52 55 66 Fax: +45 43 52 81 16 info@socosystem.com www.socosystem.com<br />
9
■ Push stop/reset (2) to return to normal operation.<br />
Spacing between cartons<br />
If the machine is not equipped with a SOCO SYSTEM controller the cartons must be spaced at least 300<br />
mm on arrival at the machine.<br />
9732850011_<strong>HM</strong>-<strong>4200</strong> <strong>GB</strong>_Version 3_2011.11.17<br />
Tel.: +45 43 52 55 66 Fax: +45 43 52 81 16 info@socosystem.com www.socosystem.com<br />
10
6. Fault finding and remedy<br />
6.1 Fault finding<br />
Use wire diagrams, pneumatic diagrams, mechanical diagrams, and present instruction <strong>manual</strong> for fault<br />
finding.<br />
■ Check that current is connected to the machine.<br />
■ Check all compressed air and vacuum connections and that the air pressure is correct<br />
(600 kPa, oil and water free).<br />
■ Manually check all mechanical functions.<br />
Error Cause Action<br />
More information<br />
see<br />
9732850011_<strong>HM</strong>-<strong>4200</strong> <strong>GB</strong>_Version 3_2011.11.17<br />
The machine<br />
does not start.<br />
Side drives<br />
operate in the<br />
wrong direction.<br />
Safety circuit error.<br />
Motor overload.<br />
Phases have been changed.<br />
Check for loose connections.<br />
Cooling/repair/replacement of<br />
motor.<br />
Change 2 phases.<br />
Noisy gear. Gear is worn. Replace gear.<br />
Noisy motor.<br />
Carton stops in<br />
the machine.<br />
The rear flap of<br />
the carton is not<br />
bent down.<br />
Carton gets skew<br />
or twisted.<br />
Driving drum is stuck in side<br />
drive profile.<br />
Motor ventilator hits plastic<br />
cap.<br />
Carton overfilled.<br />
Side drive belts too slack or<br />
worn.<br />
The flap bow moves down<br />
too early or too late.<br />
Side drive belts too slack or<br />
out of adjustment.<br />
Top assembly pressure too<br />
hard.<br />
Overfilled cartons or poor<br />
carton quality.<br />
Adjust screws between gear<br />
and side drive.<br />
Carefully push the cap in<br />
place.<br />
Minimise excess contents<br />
and adjust side drives and<br />
side pressure rollers on the<br />
top assembly.<br />
Adjust or replace belt.<br />
Check/adjust air pressure to<br />
6 bar.<br />
Check that the flap bow is<br />
adjusted correctly.<br />
Adjust belts.<br />
Adjust top assembly to<br />
correct level.<br />
Minimise excess contents or<br />
use better carton quality.<br />
Belt adjustment on<br />
drive.<br />
Belt adjustment on<br />
drive.<br />
Belt adjustment on<br />
drive.<br />
Tel.: +45 43 52 55 66 Fax: +45 43 52 81 16 info@socosystem.com www.socosystem.com<br />
11
7. Alarms<br />
7.1 Alarm list<br />
The machine stops if an alarm occurs. The white AIR ON button and the green start button flash<br />
alternately.<br />
Error Cause Action / Check<br />
Motor guard K1 or K2<br />
has tripped.<br />
Folding error.<br />
Electrical or mechanical error on<br />
motor M1 or M2.<br />
All functions of the machine are<br />
controlled by a timer. If a function has<br />
not ended after 4 seconds the<br />
machine stops and it is vented.<br />
Correct the error and reengage the<br />
motor guard.<br />
- Investigate which function has not<br />
been carried out.<br />
- Reset the machine by pushing stop/<br />
reset for approximately 3 seconds.<br />
- Adjust the machine for the current<br />
carton format.<br />
9732850011_<strong>HM</strong>-<strong>4200</strong> <strong>GB</strong>_Version 3_2011.11.17<br />
Tel.: +45 43 52 55 66 Fax: +45 43 52 81 16 info@socosystem.com www.socosystem.com<br />
12
8. Belt adjustment on drive<br />
8.1 Mounting of drive<br />
D<br />
Holes for mounting of drive<br />
B<br />
C<br />
A<br />
8.2 Tightening of driving belt<br />
Dismount cover plate (A). Tighten the retaining iron completely by means of the two screws (B) which<br />
are then loosened one turn. Draw two lines on the slack belt with a distance of 500 mm (alternatively<br />
1000 mm). Tighten by means of screws (C) while making sure that the shaft of the tension rollers is at<br />
right angle to the cassette profile. Tighten approx. 0.5%, i.e. the distance between the two lines must<br />
increase to 502.5 mm (alternatively 1005 mm).<br />
8.3 Adjustment of driving belt<br />
The drives must operate during belt adjustment. Tighten the retaining iron slightly by means of screws<br />
(B). Adjust the belt for operation at the centre of the tension roller by adjusting one of the screws (C).<br />
Adjust at drive end by turning set screw (D). When the belt is adjusted, tighten screws (B), and mount<br />
the cover plate.<br />
9732850011_<strong>HM</strong>-<strong>4200</strong> <strong>GB</strong>_Version 3_2011.11.17<br />
Tel.: +45 43 52 55 66 Fax: +45 43 52 81 16 info@socosystem.com www.socosystem.com<br />
13
9. Maintenance and check list<br />
9.1 Maintenance and lubrication<br />
The machine should be kept thoroughly clean of dust and dirt accumulations on the movable parts on a<br />
daily basis to ensure satisfactory performance. The machine must not be hosed with high pressure<br />
cleaner, fire hose, water hose, etc.<br />
Side drives<br />
Check the alignment. As to necessary adjustment, see the section on side drives. Particularly check the<br />
space between drive roller and gear for accumulation of tape residue, etc.<br />
Guide assembly<br />
Lubricate the guide shafts under the roller table by means of an oil can with brush. It is possible to<br />
lubricate between the rollers. A Teflon-bearing oil, such as for instance Super Lube, or an ordinary thin<br />
oil, is recommended as lubricant. Lubricate the chains approximately every 4 weeks.<br />
9.2 Check list<br />
Interval Check points Action<br />
Additional<br />
information<br />
Daily. Movable parts of the machine. Remove dust, dirt, and tape<br />
residue on side drives<br />
(between drive roller and<br />
gear).<br />
Monthly.<br />
All points of rotation of the<br />
machine.<br />
Check the alignment of the side<br />
drive belts.<br />
Chain.<br />
Check and lubricate.<br />
Adjust for alignment.<br />
Lubricate.<br />
9732850011_<strong>HM</strong>-<strong>4200</strong> <strong>GB</strong>_Version 3_2011.11.17<br />
Tel.: +45 43 52 55 66 Fax: +45 43 52 81 16 info@socosystem.com www.socosystem.com<br />
14
Appendix 1: Index<br />
A<br />
Adjustment of driving belt 13<br />
Air consumption 3<br />
Air pressure 3<br />
Air quality 3<br />
Alarm list 12<br />
C<br />
Capacity 3<br />
Carton dimensions 3<br />
Check list 14<br />
Control voltage 3<br />
D<br />
Disposal 4<br />
E<br />
EC directives 4<br />
Electric connection 7<br />
F<br />
Fuse size 3<br />
H<br />
Hot melt system 3<br />
I<br />
Installation 7<br />
M<br />
Machine plate 3<br />
Machine survey 5<br />
Maintenance and lubrication 14<br />
Mounting of drive 13<br />
N<br />
Noise level 3<br />
P<br />
place of installation 7<br />
Pneumatics 3<br />
Power consumption 3<br />
S<br />
Supply voltage 3<br />
T<br />
Tightening of driving belt 13<br />
W<br />
WEEE 4<br />
9732850011_<strong>HM</strong>-<strong>4200</strong> <strong>GB</strong>_Version 3_2011.11.17<br />
Tel.: +45 43 52 55 66 Fax: +45 43 52 81 16 info@socosystem.com www.socosystem.com<br />
15
Appendix 2: SOCO SYSTEM companies<br />
Main office Denmark:<br />
SOCO SYSTEM A/S<br />
Helgeshøj Allé 16D<br />
2630 Taastrup<br />
Denmark<br />
Tel.: +45 43 52 55 66<br />
Fax: +45 43 52 81 16<br />
E-mail: info@socosystem.com<br />
www.socosystem.com<br />
Sales office Denmark:<br />
SOCO SYSTEM A/S<br />
Jegstrupvej 8<br />
8361 Hasselager<br />
Denmark<br />
Tel.: +45 86 28 77 22<br />
Fax: +45 86 28 77 79<br />
E-mail: hasselager@socosystem.com<br />
U.K.:<br />
SOCO SYSTEM (U.K.) Ltd.<br />
Unit 18, Palmerston Street<br />
Hanley, Stoke-On-Trent<br />
Staffs. ST1 3EU<br />
U.K.<br />
Tel.: +44 1 782 274 100<br />
Fax: +44 1 782 272 696<br />
E-mail: info@socosystem.co.uk<br />
Germany:<br />
SOCO SYSTEM GmbH<br />
Graf-Zeppelin Strasse 12<br />
46149 Oberhausen<br />
Germany<br />
Tel.: +49 (0) 208 629 350<br />
Fax: +49 (0) 208 629 3511<br />
E-mail: info@socosystem.de<br />
Hungary:<br />
SOCO SYSTEM EED KFT.<br />
Eastern Europe Division<br />
1031, Budapest, Záhony u. 7.<br />
1300 Budapest, Pf. 32<br />
Hungary<br />
Tel.: +36 1 436 0460<br />
Fax: +36 1 436 0461<br />
Spain:<br />
SOCO SYSTEM Spain S.A.<br />
Juli Galvé Brusson, 8<br />
Poligono Industrial Sur<br />
08918 Badalona - Barcelona<br />
Spain<br />
Tel.: +34 9 3464 3016<br />
Fax: +34 9 3464 4877<br />
E-mail: info@socosystem.es<br />
France:<br />
SOCO SYSTEM S.A.<br />
Avenue des deux Vallées<br />
Z.A. Actipôle de L’A2<br />
59554 Raillencourt Sainte Olle<br />
France<br />
Tel.: +33 3 27 729 729<br />
Fax: +33 3 27 729 730<br />
E-mail: info@socosystem.fr<br />
USA:<br />
SOCO SYSTEM Inc.<br />
1931 MacArthur Road<br />
Waukesha<br />
Wisconsin, 53188<br />
USA<br />
Tel.: +1 262 547 0777<br />
Fax: +1 262 547 4707<br />
E-mail: info@socosysteminc.com<br />
Forhandler-Dealer-Händler-Agent<br />
Tel.: +45 43 52 55 66 Fax: +45 43 52 81 16 info@socosystem.com www.socosystem.com<br />
16