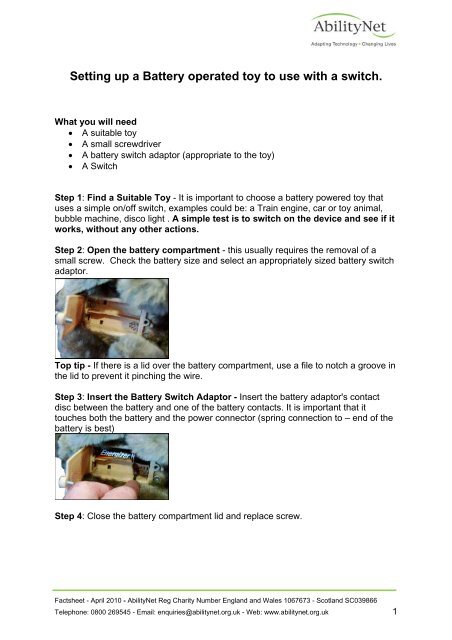
Setting up a Battery operated toy to use with a switch. - AbilityNet
Setting up a Battery operated toy to use with a switch. - AbilityNet
Setting up a Battery operated toy to use with a switch. - AbilityNet

Create successful ePaper yourself
Turn your PDF publications into a flip-book with our unique Google optimized e-Paper software.
<strong>Setting</strong> <strong>up</strong> a <strong>Battery</strong> <strong>operated</strong> <strong><strong>to</strong>y</strong> <strong>to</strong> <strong>use</strong> <strong>with</strong> a <strong>switch</strong>.<br />
What you will need<br />
• A suitable <strong><strong>to</strong>y</strong><br />
• A small screwdriver<br />
• A battery <strong>switch</strong> adap<strong>to</strong>r (appropriate <strong>to</strong> the <strong><strong>to</strong>y</strong>)<br />
• A Switch<br />
Step 1: Find a Suitable Toy - It is important <strong>to</strong> choose a battery powered <strong><strong>to</strong>y</strong> that<br />
<strong>use</strong>s a simple on/off <strong>switch</strong>, examples could be: a Train engine, car or <strong><strong>to</strong>y</strong> animal,<br />
bubble machine, disco light . A simple test is <strong>to</strong> <strong>switch</strong> on the device and see if it<br />
works, <strong>with</strong>out any other actions.<br />
Step 2: Open the battery compartment - this usually requires the removal of a<br />
small screw. Check the battery size and select an appropriately sized battery <strong>switch</strong><br />
adap<strong>to</strong>r.<br />
Top tip - If there is a lid over the battery compartment, <strong>use</strong> a file <strong>to</strong> notch a groove in<br />
the lid <strong>to</strong> prevent it pinching the wire.<br />
Step 3: Insert the <strong>Battery</strong> Switch Adap<strong>to</strong>r - Insert the battery adap<strong>to</strong>r's contact<br />
disc between the battery and one of the battery contacts. It is important that it<br />
<strong>to</strong>uches both the battery and the power connec<strong>to</strong>r (spring connection <strong>to</strong> – end of the<br />
battery is best)<br />
Step 4: Close the battery compartment lid and replace screw.<br />
Factsheet - April 2010 - <strong>AbilityNet</strong> Reg Charity Number England and Wales 1067673 - Scotland SC039866<br />
Telephone: 0800 269545 - Email: enquiries@abilitynet.org.uk - Web: www.abilitynet.org.uk 1
Step 5: Switch on the <strong><strong>to</strong>y</strong> - If you have successfully inserted the <strong>switch</strong> adap<strong>to</strong>r, the<br />
<strong><strong>to</strong>y</strong> will not activate even though <strong>switch</strong>ed on.<br />
Step 6: Connect your Switch - You can now connect your <strong>switch</strong> and <strong>use</strong>. Pressing<br />
the <strong>switch</strong> will activate the <strong><strong>to</strong>y</strong>.<br />
<strong>Battery</strong> tips – although rechargeable batteries often seem a good idea, be aware<br />
that they can lose capacity over time, as they are discharged and recharged.<br />
Alkaline batteries might give better value.<br />
Adapted from:<br />
http://www.semerc.com/inclusion_in_action/<strong>switch</strong>_adapt.asp<br />
and NOF materials http://www.inclusive.net/resources<br />
Factsheet - April 2010 - <strong>AbilityNet</strong> Reg Charity Number England and Wales 1067673 - Scotland SC039866<br />
Telephone: 0800 269545 - Email: enquiries@abilitynet.org.uk - Web: www.abilitynet.org.uk 2