Create successful ePaper yourself
Turn your PDF publications into a flip-book with our unique Google optimized e-Paper software.
Professional Disc Jockey Products<br />
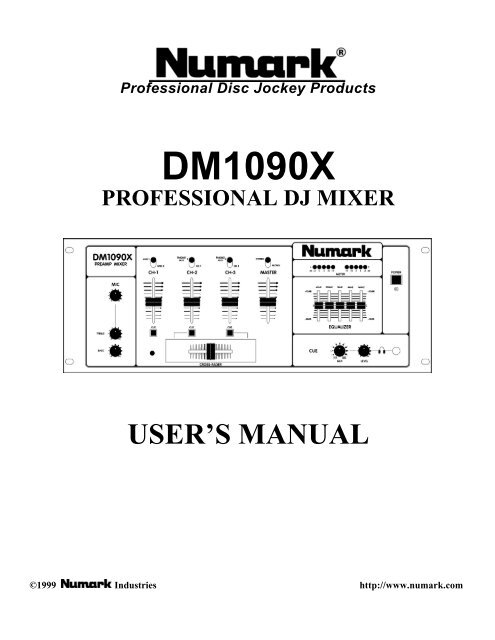
<strong>DM1090X</strong><br />
PROFESSIONAL DJ MIXER<br />
USER’S MANUAL<br />
©1999 Industries http://www.numark.com
<strong>DM1090X</strong><br />
Safety Information<br />
SAFETY INSTRUCTIONS<br />
a) Read Instructions - All the safety and operating<br />
instructions should be read before this product is connected<br />
and used.<br />
b) Retain Instructions - The safety and operating instructions<br />
should be kept for future reference.<br />
c) Heed Warnings - All warnings on this product and in these<br />
operating instructions should be followed.<br />
d) Follow Instructions - All operating and other instructions<br />
should be followed.<br />
e) Water and Moisture - This<br />
product should be kept<br />
away from direct contact<br />
with liquids.<br />
f) Heat - Avoid placing this<br />
product to close to any high heat sources such as radiators.<br />
g) Ventilation - The appliance should be situated so that it’s<br />
location or position does not interfere with it’s proper<br />
ventilation. For example, the appliance should not be<br />
situated on a bed, sofa, rug,<br />
or similar surface that may<br />
block the ventilation<br />
opening; or, placed in a builtinstallation,<br />
such as bookcase<br />
or cabinet that may impede<br />
the flow of air through the ventilation openings.<br />
h) Power Sources - This product should be connected to a<br />
power supply only of the type described in these operating<br />
instructions, or as marked on the unit.<br />
i) Power Cord Protection - Power supply cords should be<br />
routed so that they are not likely to be walked upon or<br />
pinched by items placed on or against them. When<br />
removing the cord from a power outlet be sure to remove<br />
it by holding the<br />
plug attachment<br />
and not by pulling<br />
on the cord.<br />
j) Object and Liquid Entry - Take care that objects do not fall<br />
into and that liquids are not spilled into the inside of the<br />
mixer.<br />
k) Cleaning – The appliance should be cleaned only as<br />
recommended by the manufacturer.<br />
l) Non-use Periods – The power cord of the appliance should<br />
be unplugged from the outlet when left unused for long<br />
periods of time.<br />
m) Damage Requiring Service -<br />
Only qualified personnel<br />
should service this product.<br />
If you have any questions<br />
about service please contact<br />
<strong>Numark</strong> at the number(s)<br />
shown on the back cover of<br />
this manual.<br />
n) Grounding or Polarization - Precautions should be taken<br />
so that the grounding or polarization means built into the<br />
CD player is not defeated.<br />
o) Internal/External Voltage Selectors - Internal or external<br />
voltage selector switches, if any, should only be reset and<br />
re-equipped with a proper plug for alternative voltage by a<br />
qualified service technician. Do not attempt to alter this<br />
yourself.<br />
WARNING: To reduce the risk of fire or electrical shock, do<br />
not expose this appliance to rain or moisture. Electrical<br />
equipment should NEVER be kept or stored in damp<br />
environments.<br />
- The Leader in DJ Technology<br />
©1999 Industries - 2 - http://www.numark.com
VERY IMPORTANT<br />
Please read this entire manual before connecting this unit to your system<br />
For optimum performance:<br />
• The crossfader is a user replaceable item and subject to wear. Excessive force can wear out the fader quickly. This is not a<br />
warranted item.<br />
•<br />
<strong>DM1090X</strong><br />
Never use spray cleaners on the slide controls . Residues cause excessive dirt build-up and this will void your warranty. In normal<br />
use slide controls can last for many years. If they malfunction (usually because of a dirty or dusty environment) consult a<br />
professional technician.<br />
• Always make sure that AC power is OFF while making any connections.<br />
• Use appropriate cables throughout your system. Do not use excessively long cables (i.e. over 50ft/14m) Be sure plugs and jacks<br />
are tightly mated. Loose connections can cause hum, noise or intermittents that could easily damage your speakers. Make the<br />
input and output connections with readily available low-capacitance stereo cables. Quality cable makes a big difference in audio<br />
fidelity and punch. See your <strong>Numark</strong> dealer or an electronics or audio specialist store if you are not sure which cables to get.<br />
• Never attempt to make any adjustments or repairs other than those described in this manual. Take the unit to your dealer or to an<br />
authorized <strong>Numark</strong> Service Center.<br />
• ALWAYS remember: “TURN AMPS ON LAST AND OFF FIRST”. Begin with master faders or volume controls on minimum<br />
and the amplifier gain/input control(s) down. Wait 8 to 10 seconds before turning up the volume. This prevents transients which<br />
may cause severe speaker damage.<br />
• Use restraint when operating controls. Try to move them slowly. Rapid adjustments could damage speakers due to amplifier<br />
clipping.<br />
• Avoid amplifier “clipping” at all costs: this occurs when the red LEDs (usually on the front panel of most professional power<br />
amplifiers) start flashing. “Clipping” is when the power amplifier is distorting and working beyond it’s limits. Amplifier<br />
distortion is THE major cause of speaker failure.<br />
• To prevent fire or shock hazard, do not expose the unit to rain or moisture. Never place cans of beer, soda, glasses of water or<br />
anything wet on top of the unit!<br />
Product Registration<br />
Please record the serial number of your unit as shown on the back of the chassis as well as the name of the<br />
dealer from whom you purchased the unit. Retain this information and your original purchase receipt for your<br />
records. Please return the enclosed warranty card to register your unit with us.<br />
MODEL: __________________________ PURCHASED FROM:_________________________<br />
SERIAL NUMBER:__________________ DATE OF PURCHASE:________________________<br />
- The Leader in DJ Technology<br />
©1999 Industries - 3 - http://www.numark.com
<strong>DM1090X</strong><br />
CONGRATULATIONS!<br />
<strong>DM1090X</strong><br />
PROFESSIONAL DJ MIXER<br />
You have purchased the <strong>DM1090X</strong> Stereo Mixer by . This mixer has been designed to provide<br />
dependable control over your input and output sources. The <strong>DM1090X</strong> brings to you the finest quality of DJ<br />
equipment at a reasonable price. The <strong>DM1090X</strong> features all new circuitry and the latest in manufacturing and<br />
design technology to give you greater quality and better reliability than ever before.<br />
FEATURES...<br />
Thank you for buying <strong>Numark</strong> DJ products!<br />
• 6 line, 2 phono, 1 mic input<br />
• 5-band Equalizer<br />
• Master outputs with Stereo/Mono control<br />
• Cues on each channel<br />
TABLE OF CONTENTS<br />
• Master output meter<br />
• Bass and treble control for Mic input<br />
• Tape Out for direct recording<br />
Safety Measures 2<br />
Important Information 3<br />
Registration 3<br />
Introduction 4<br />
Quick Setup Diagram 5<br />
Specifications 5<br />
Description of the Features 6<br />
Warranty 8<br />
- The Leader in DJ Technology<br />
©1999 Industries - 4 - http://www.numark.com
QUICK SETUP DIAGRAM<br />
<strong>DM1090X</strong><br />
Study this setup diagram. Make sure all faders are at "zero" and all devices are off. First, connect all stereo<br />
input sources. Next, connect your microphone(s) and monitor headphones. Finally, connect the stereo outputs to<br />
the power amplifier(s) and/or audio sources. Plug your mixer into AC power. Now you are ready to switch<br />
everything on. Always switch on your audio input sources such as turntables or CD players first, then your mixer,<br />
and finally any amplifiers. When turning off, always reverse this operation by turning off amplifiers, then your<br />
mixer, and then input devices.<br />
SPECIFICATIONS<br />
INPUTS:<br />
Line: 10kΩ input impedance<br />
90mV rms sensitivity (for 1.22V output)<br />
Mic: 10kΩ input impedance unbalanced<br />
2 mV rms sensitivity (for 1.22V output)<br />
78mV rms max input<br />
Phono: 47kΩ input impedance<br />
1.8mV rms sensitivity @ 1 KHz<br />
(for 1.22V output)<br />
OUTPUTS:<br />
Line: 9V rms max<br />
Headphone Amp: 0.5 watt into 47Ω<br />
Distortion less than 0.01%<br />
SIGNAL TO NOISE RATIOS* (vs. maximum output):<br />
Line: Better than 96 dB<br />
Mic: Better than 78 dB<br />
Phono: Better than 87 dB<br />
*JIS - weighted<br />
FREQUENCY RESPONSE:<br />
Line: 20 Hz- 22k Hz ±0.5 dB<br />
Line: 20 Hz- 20k Hz ±0.5 dB<br />
Phono: ±1 dB except for controlled attenuation of -3 dB<br />
@ 20 Hz to reduce rumble and feedback<br />
EQUALIZER:<br />
±12dB @ 63.250.1K.5K.17KHz<br />
POWER CONSUMPTION:<br />
DIMENSIONS:<br />
10 Watt typical<br />
15 watt with full headphone output<br />
480mm(W) x 175mm(H) x 95mm(D)<br />
19” (W) x 7” (H) x 4 (D)<br />
WEIGHT: 3.5 kgs, 7.6 lbs<br />
- The Leader in DJ Technology<br />
©1999 Industries - 5 - http://www.numark.com
<strong>DM1090X</strong><br />
MIXER FEATURES<br />
3<br />
4<br />
We have divided this section into various functional<br />
blocks: Inputs, Microphone, Crossfader, Equalizer, Outputs,<br />
and Headphone Cueing. It is important to learn how each of<br />
these work.<br />
INPUTS<br />
1. Input faders - control individual source levels in the<br />
mix.<br />
2. Input Toggle Switches - select which source will be<br />
live to that channel based on what you have connected to<br />
the rear panel input section.<br />
MICROPHONE<br />
3. Mic Gain– controls the mic volume for the 1/4”<br />
connector on the rear of the mixer.<br />
4. Treble and Bass – for fine-tuning the tone of your<br />
voice on both mics through the sound system. The<br />
controls are detented for setting tone "flat". For best<br />
results, use a dynamic cardioid microphone.<br />
CROSSFADER<br />
5. Replaceable Crossfader - achieves clean segues<br />
between channels 2 and 3.<br />
"Hard left" selects Channel 2 and "Hard right" selects<br />
Channel 3. With the crossfader centered, both channels are<br />
live. Use the crossfader for fast and seamless segues from<br />
one selected channel to the other.<br />
Note: The crossfader is user replaceable in case of failure.<br />
Simply unscrew the two large screws that hold it in place,<br />
lift it out and disconnect its cable. Re-attach the new<br />
crossfader and screw the mounting plate back onto the unit<br />
- you’re back in business!<br />
2<br />
1<br />
5<br />
10<br />
- The Leader in DJ Technology<br />
©1999 Industries - 6 - http://www.numark.com<br />
8<br />
7<br />
9<br />
11 12<br />
6<br />
14<br />
13<br />
EQUALIZER<br />
6. 5-Band Stereo Graphic Equalizer (EQ) -<br />
compensates for differences in source material sound<br />
quality. In ultra-compact mobile systems this EQ can be<br />
used to tailor the sound to the acoustical requirements of<br />
the room. Center frequencies are 63Hz, 250Hz, 1kHz,<br />
4kHz and 16kHz. Faders have a center detent for an<br />
accurate "flat” response.<br />
This is a typical "house" EQ<br />
curve. Notice how the knobs<br />
above "0" balance out the<br />
knobs below. Start with this<br />
setting if you've never used a<br />
graphic EQ before.<br />
This is an example of a poor<br />
EQ curve because it cuts the<br />
output volume down by 6-<br />
12dB. You have to<br />
compensate by running the<br />
Master output higher.<br />
Below is the worst sort of<br />
curve to use because you are<br />
using EQ to add volume.<br />
With exaggerated boost, you<br />
can easily run your power<br />
amplifiers into “clipping”<br />
and damage your speakers.<br />
GENERAL EQ HINTS<br />
• Boost the 63Hz band for deep bass tones and solid kick drum<br />
sound. Use sparingly because this dramatically increases demand<br />
on power amplifiers and could drive them into “clipping” .<br />
• Cut slightly at 250Hz and more at 1kHz for extra clarity.<br />
Note: Cutting is preferable to boosting.<br />
• Boost 16kHz for a little "sizzle".<br />
• As a general rule, less equalization is better!
OUTPUTS<br />
7. Master Fader – to control the overall output level.<br />
8. Stereo/Mono toggle - adjusts the Master output for<br />
stereo or mono operation.<br />
9. Volume Meter- quickly and accurately tracks dB level<br />
of audio sent to it from the master fader. It's OK to "tap<br />
the red" as long as the red LEDs aren't constantly lit. Set<br />
the equalizer and master fader to avoid overload and<br />
distortion. Proper attention to the meter results in the<br />
punchiest possible sound without audible distortion.<br />
REAR PANEL FEATURES<br />
23<br />
22<br />
15. Line Inputs – are unbalanced RCA jacks for<br />
connecting stereo audio from line level sources such as<br />
CD players, HiFi VCRs, cassette and reel-to-reel tape<br />
decks, DAT machines, laser discs, tuners, even<br />
synthesizers or other mixing consoles.<br />
NOTE: Plug mono audio sources into both Left and<br />
Right inputs using a "Y" cable connector.<br />
16. Phono Inputs – for attaching your turntables. When<br />
these connectors are used, your signal is fed directly to the<br />
high-quality RIAA phono pre-amplifiers. Use this<br />
position only for turntables . Line level sources will<br />
overload the sensitive phono pre-amps and will cause<br />
distortion.<br />
17. Grounding lug - for turntable connection. Always use<br />
this connection when using turntables. (your turntable<br />
cable should have a grounding wire)<br />
21<br />
HEADPHONE CUEING<br />
<strong>DM1090X</strong><br />
10. Channel Cue/Send Assign - are used to route PFL<br />
channel audio to the Monitor Section. The channel<br />
faders do not control the Cue send volume. This audio is<br />
also sent to a rear panel output for use with an external<br />
sampler or other source such as booth monitor.<br />
11. Headphone Mix - controls the mix of PFL and PGM<br />
signals to your headphones. When the slider is moved to<br />
the left, all you will hear is the cue source. When the<br />
slider is all the way right, you will hear what is playing<br />
through the master output. By blending, beats can be<br />
matched exactly and segues can be smooth when a song is<br />
cued.<br />
12. Headphone Level – to adjust cue volume.<br />
13. Headphone Input – for your 1/4” headphone.<br />
14. Power Button – turns unit off and on.<br />
- The Leader in DJ Technology<br />
©1999 Industries - 7 - http://www.numark.com<br />
20<br />
18<br />
18<br />
16 15 16 15 15 15<br />
17<br />
19<br />
18. Line/Phono Input switch - to allow line level<br />
equipment to be plugged into your phono inputs giving<br />
you a total of 8 line input options.<br />
19. Mic Input – for your 1/4” Microphone plug.<br />
20. Record Outputs – are unbalanced RCA jacks used to<br />
send the output of the program to any connected recording<br />
device.<br />
21. Stereo Main Outputs – are unbalanced RCA<br />
connectors controlled by the Master fader.<br />
22. IEC Power Connector – to plug in your power cord.<br />
23. Voltage Selector – to set to your country’s standard.
Professional Disc Jockey Products<br />
LIMITED PRODUCT WARRANTY<br />
What is covered and for how long?<br />
1. NUMARK INDUSTRIES LCC ("NUMARK") warrants to the original purchaser that NUMARK'S DJ mixers and amplifiers are free from defects in material and workmanship under<br />
normal use and service for the period commencing upon the date of purchase from an authorized NUMARK dealer and continuing for the following period of time after that<br />
date for (2) Years. The warranty is extended to (3) Years with the completion of the warranty card provided that the warranty card is completed and returned within (30)<br />
days from the date of purchase. All other NUMARK products are warranted for (1) Year including but not limited to CD players, CD Mix Stations, turntables, preamplifiers,<br />
beatkeepers, equalizers, microphones, headphones, and all other accessories.<br />
What is not covered? This Limited Warranty is conditioned upon proper use of the product by the purchaser.<br />
2. This Limited Warranty does not cover: (a) defects or damage resulting from accident, misuse, abuse, neglect, unusual physical or electrical stress, modification of any part of<br />
the product, or cosmetic damage; (b) equipment that has the serial number removed or made illegible; (c) all plastic surfaces and other externally exposed parts that are<br />
scratched or damaged due to normal use; (d) defects or damage from improper testing, operation, maintenance, installation, adjustment, or service of the mixers; (e)<br />
crossfaders.<br />
3. What are NUMARK'S obligations? During the applicable warranty period, NUMARK will repair or replace, at NUMARK'S sole discretion, without charge to the purchaser, any<br />
defective component part of the mixer. To obtain service under this Limited Warranty, purchaser must first contact NUMARK and obtain a return authorization number<br />
("RA#"). Purchaser must then return the mixer to NUMARK in an adequate container for shipping, accompanied by purchaser's sales receipt or comparable proof of sale<br />
showing the date of purchase, the serial number of the product, and the seller's name and address. To obtain an RA# and assistance on where to return the mixer, contact<br />
NUMARK customer service at 401-295 9000. Upon receipt, NUMARK will repair or replace the defective products. NUMARK may, at NUMARK'S sole discretion, use rebuilt,<br />
reconditioned, or new parts or components when repairing any product or replace a product with a rebuilt, reconditioned or new product. Repaired mixers will be warranted<br />
for a period equal to the remainder of the original Limited Warranty on the original mixer or for (90) days, whichever is longer. All replaced parts, components, boards and<br />
equipment become the property of NUMARK. If NUMARK determines that any mixer is not covered by this Limited Warranty, purchaser must pay all parts, shipping, and labor<br />
charges for the repair or return of such mixer.<br />
4. What are the limits on NUMARK'S liabilities? THE WARRANTIES GIVEN IN THIS LIMITED WARRANTY, TOGETHER WITH ANY IMPLIED WARRANTIES COVERING NUMARK<br />
MIXERS, INCLUDING WITHOUT LIMITATION ANY WARRANTIES OF MERCHANTABILITY OR FITNESS FOR A PARTICULAR PURPOSE, ARE LIMITED TO THE DURATION<br />
OF THIS LIMITED WARRANTY. EXCEPT TO THE EXTENT PROHIBITED BY APPLICABLE LAW, NUMARK SHALL NOT BE LIABLE FOR ANY SPECIAL, INCIDENTAL,<br />
CONSEQUENTIAL, INDIRECT OR SIMILAR DAMAGES, LOSS OF PROFITS, DAMAGES TO PURCHASER'S PROPERTY, OR INJURY TO PURCHASER OR OTHERS ARISING<br />
OUT OF THE USE, MISUSE OR INABILITY TO USE ANY NUMARK MIXER, BREACH OF WARRANTY, OR NEGLIGENCE, INCLUDING BUT NOT LIMITED TO NUMARK'S<br />
OWN NEGLIGENCE, EVEN IF NUMARK OR ITS AGENT HAS BEEN ADVISED OF SUCH DAMAGES, OR FOR ANY CLAIM BROUGHT AGAINST PURCHASER BY ANY OTHER<br />
PARTY. THIS LIMITED WARRANTY IS THE COMPLETE WARRANTY FOR NUMARK'S MIXERS, AND IS GIVEN IN LIEU OF ALL OTHER EXPRESS WARRANTIES. THIS<br />
LIMITED WARRANTY SHALL NOT EXTEND TO ANYONE OTHER THAN THE ORIGINAL PURCHASER OF THIS PRODUCT AND STATES PURCHASER'S EXCLUSIVE<br />
REMEDY. IF ANY PORTION OF THIS LIMITED WARRANTY IS ILLEGAL OR UNENFORCEABLE BY REASON OF ANY LAW, SUCH PARTIAL ILLEGALITY OR<br />
UNENFORCEABILTY SHALL NOT AFFECT THE ENFORCEABILITY OF THE REMAINDER OF THIS LIMITED WARRANTY WHICH PURCHASER ACKNOWLEDGES IS AND<br />
WILL ALWAYS BE CONSTRUED TO BE LIMITED BY ITS TERMS OR AS LIMITED AS THE LAW PERMITS.<br />
5. This Limited Warranty allocates risk of product failure between purchaser and NUMARK, and NUMARK'S product pricing reflects this allocation of risk and the limitations of<br />
liability contained in this Limited Warranty. The agents, employees, distributors, and dealers of NUMARK are not authorized to make modifications to this Limited Warranty, or<br />
make additional warranties binding on NUMARK. Accordingly, additional statements such as dealer advertising or presentation, whether oral or written, do not constitute<br />
warranties by NUMARK and should not be relied upon.<br />
6. How does state law apply to this warranty? SOME STATES DO NOT ALLOW THE EXCLUSION OR LIMITATIONS OF INCIDENTAL OR CONSEQUENTIAL DAMAGES OR<br />
HOW LONG AN IMPLIED WARRANTY LASTS, SO THE ABOVE LIMITATIONS OR EXCLUSIONS MAY NOT APPLY TO PURCHASER.<br />
7. This Limited Warranty gives you specific legal rights. You may also have other rights, which vary from one jurisdiction to another.<br />
RETURN INFORMATION<br />
a) A Return Authorization number must be obtained from <strong>Numark</strong> through the address or phone numbers below.<br />
b) A copy of the original sales receipt must also be included for the equipment to be repaired under warranty.<br />
c) The faulty equipment must be packed in its original packaging.<br />
d) One additional outer layer of packaging must be included to ensure product safety. Failure to do so may inadequately protect the equipment in transit and,<br />
therefore, jeopardize the customer’s warranty.<br />
e) <strong>Numark</strong> will not accept COD shipments and no call tags will be issued for merchandise return.<br />
f) <strong>Numark</strong> will not return repaired merchandise to customers by priority service, unless by written request at the customer’s cost. Requests must be submitted in<br />
writing with merchandise returned.<br />
g) The defective <strong>Numark</strong> equipment should be sent, FREIGHT PREPAID with Return Authorization number clearly printed on the outer packaging and original sales<br />
receipt enclosed to:<br />
INDUSTRIES<br />
Attention: Service Department<br />
11 Helmsman Avenue<br />
North Kingstown, RI 02852 USA<br />
Phone: +1 (401) 295-9000<br />
Fax:: +1 (401) 295-5200<br />
Web: www.numark.com


