- Page 1 and 2:
Aspire One D255 Series Service Guid
- Page 3 and 4:
Copyright Copyright © 2010 by Acer
- Page 5:
Preface Before using this informati
- Page 8 and 9:
Table of Contents VIII Removing the
- Page 10 and 11:
Table of Contents X
- Page 12 and 13:
Color options Display • Aquamarin
- Page 14 and 15:
Software • Productivity • Acer
- Page 16 and 17:
DDR3 Thermal Sensor EMC1402 MINI Ca
- Page 18 and 19:
Closed Front View # Component Icon
- Page 20 and 21:
Bottom View 1 2 # Component Icon De
- Page 22 and 23:
Using the Keyboard The Acer Aspire
- Page 24 and 25:
Hot Keys The computer employs hotke
- Page 26 and 27:
Hardware Specifications and Configu
- Page 28 and 29:
Video Interface Item Specification
- Page 30 and 31:
Hard Disk Drive Interface Vendor &
- Page 32 and 33:
LCD Display Supported Resolution Re
- Page 34 and 35:
I/O Ports Item Specification I/O su
- Page 36 and 37:
26 Chapter 1
- Page 38 and 39:
Information The Information screen
- Page 40 and 41:
Security The Security screen contai
- Page 42 and 43:
Changing a Password 1. Use the ↑
- Page 44 and 45:
Exit The Exit screen allows you to
- Page 46 and 47:
DOS Flash Utility Perform the follo
- Page 48 and 49:
WinFlash Utility Perform the follow
- Page 50 and 51:
Removing BIOS Passwords: To clear t
- Page 52 and 53:
Example 1: Read DMI Information fro
- Page 54 and 55:
Creating a USB Flash Crisis Disk 1.
- Page 56 and 57:
General Information Pre-disassembly
- Page 58 and 59:
Removing the Battery Pack 1. Turn c
- Page 60 and 61:
Removing the 3G Card 1. See “Remo
- Page 62 and 63:
5. Unlock the FPC. 6. Remove the FP
- Page 64 and 65:
4. Turn the computer over and remov
- Page 66 and 67:
5. Remove the four (4) screws, two
- Page 68 and 69:
4. Remove the 3G module from the 3G
- Page 70 and 71:
Main Unit Disassembly Process Main
- Page 72 and 73:
4. Remove the four (4) remaining sc
- Page 74 and 75:
8. Use a plastic tool to unlock the
- Page 76 and 77: 5. Remove the two (2) screws securi
- Page 78 and 79: Removing the Bluetooth Module 1. Se
- Page 81 and 82: 5. Remove the four (4) screws from
- Page 83: 5. Disconnect the DC-In cable from
- Page 87 and 88: NOTE: Circuit boards >10 cm² have
- Page 90 and 91: 8. Remove the LCD module from the c
- Page 92 and 93: Removing the LCD Bezel 1. See “Re
- Page 94 and 95: Removing the LCD Panel 1. CAUTION:
- Page 96 and 97: 7. Remove the camera cable from the
- Page 98 and 99: Removing the LCD Brackets 1. See
- Page 100 and 101: 5. Remove the left 3G antenna. 6. R
- Page 102 and 103: 4. Replace the adhesive foam paddin
- Page 104 and 105: Replacing Microphone Module 1. Adhe
- Page 106 and 107: 3. Place the LCD panel onto the LCD
- Page 108 and 109: 2. Press down around the entire per
- Page 110 and 111: 3. Place the right antenna cables u
- Page 112 and 113: Replacing the Thermal Module IMPORT
- Page 114 and 115: 3. Replace the two (2) screws to se
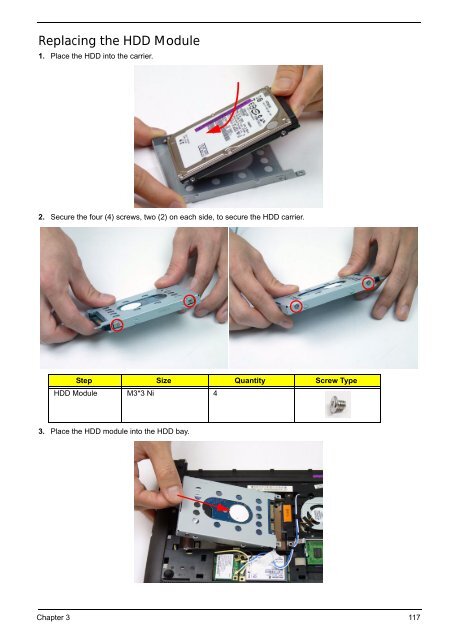
- Page 116 and 117: 9. Adhere the LVDS cable to the adh
- Page 118 and 119: Replacing the RTC Battery 1. Place
- Page 120 and 121: Replacing the Button Board 1. Place
- Page 122 and 123: Replacing the Upper Cover 1. Place
- Page 124 and 125: 5. Connect and lock the LED FFC to
- Page 128 and 129: 4. Push the HDD module forward to e
- Page 130 and 131: 2. Secure the lower cover to the ch
- Page 132 and 133: Replacing the SD Dummy Card 1. Inse
- Page 134 and 135: 124 Chapter 3
- Page 136 and 137: Power On Issue If the system doesn
- Page 138 and 139: Abnormal Video Display If video dis
- Page 140 and 141: Touch Pad Failure If the TouchPad d
- Page 142 and 143: Internal Microphone Failure If the
- Page 144 and 145: USB Failure If the USB fails, perfo
- Page 146 and 147: Cosmetic Failure If an external com
- Page 148 and 149: 13. If the Issue is still not resol
- Page 150 and 151: Post Codes Sec: These tables descri
- Page 152 and 153: Each PEIM entry point used in 80_PO
- Page 154 and 155: Code Description 0x72 MONITER_KEY 0
- Page 156 and 157: 146 Chapter 4
- Page 158 and 159: Mainboard Bottom View (DDR3 Model)
- Page 160 and 161: BIOS Recovery by Crisis Disk BIOS R
- Page 162 and 163: Exploded Diagrams Main Assembly 1 2
- Page 164 and 165: Logic Upper Assembly 1 2 No. Descri
- Page 166 and 167: Aspire D255 FRU List Category ADAPT
- Page 168 and 169: Category Description P/N LOWER CASE
- Page 170 and 171: Category Description P/N Keyboard A
- Page 173 and 174: Category Description P/N ANTENNA WL
- Page 175 and 176: Category Description P/N LCD BEZEL
- Page 177 and 178:
Category Description P/N LCD BRACKE
- Page 179 and 180:
Category Description P/N ANTENNA 3G
- Page 181 and 182:
Category Description P/N LED LCD AU
- Page 183 and 184:
MAINBOARD Category Description P/N
- Page 185 and 186:
Category Description P/N LCD GASKET
- Page 187 and 188:
Model Definition and Configuration
- Page 189 and 190:
Model RO Country Acer Part No Descr
- Page 191 and 192:
Model RO Country Acer Part No Descr
- Page 193 and 194:
Model RO Country Acer Part No Descr
- Page 195 and 196:
Model RO Country Acer Part No Descr
- Page 197 and 198:
Model RO Country Acer Part No Descr
- Page 199 and 200:
Model RO Country Acer Part No Descr
- Page 201 and 202:
Model RO Country Acer Part No Descr
- Page 203 and 204:
Model RO Country Acer Part No Descr
- Page 205 and 206:
Model RO Country Acer Part No Descr
- Page 207 and 208:
Model RO Country Acer Part No Descr
- Page 209 and 210:
Model RO Country Acer Part No Descr
- Page 211 and 212:
Model RO Country Acer Part No Descr
- Page 213 and 214:
Model RO Country Acer Part No Descr
- Page 215 and 216:
Model RO Country Acer Part No Descr
- Page 217 and 218:
Model Country Acer Part No BOM Name
- Page 219 and 220:
Model Country Acer Part No BOM Name
- Page 221 and 222:
Model Country Acer Part No BOM Name
- Page 223 and 224:
Model Country Acer Part No BOM Name
- Page 225 and 226:
Model Country Acer Part No BOM Name
- Page 227 and 228:
Model Country Acer Part No BOM Name
- Page 229 and 230:
Model Country Acer Part No BOM Name
- Page 231 and 232:
Model Country Acer Part No BOM Name
- Page 233 and 234:
Model Country Acer Part No BOM Name
- Page 235 and 236:
Model Country Acer Part No Memory 1
- Page 237 and 238:
Model Country Acer Part No Memory 1
- Page 239 and 240:
Model Country Acer Part No Memory 1
- Page 241 and 242:
Model Country Acer Part No Memory 1
- Page 243 and 244:
Model Country Acer Part No Memory 1
- Page 245 and 246:
Model Country Acer Part No Memory 1
- Page 247 and 248:
Model Country Acer Part No Memory 1
- Page 249 and 250:
Model Country Acer Part No Memory 1
- Page 251 and 252:
Model Country Acer Part No Memory 1
- Page 253 and 254:
Model Country Acer Part No Wireless
- Page 255 and 256:
Model Country Acer Part No Wireless
- Page 257 and 258:
Model Country Acer Part No Wireless
- Page 259 and 260:
Model Country Acer Part No Wireless
- Page 261 and 262:
Model Country Acer Part No Wireless
- Page 263 and 264:
Model Country Acer Part No Wireless
- Page 265 and 266:
Test Compatible Components Microsof
- Page 267 and 268:
Vendor Type Description P/N WD N320
- Page 269 and 270:
Online Support Information Appendix
- Page 271 and 272:
A B C D E F Antennas Removing 89 Ba