Polywater FST-MINI Duct Sealant Instructions for use on conduit, 1 ...
Polywater FST-MINI Duct Sealant Instructions for use on conduit, 1 ...
Polywater FST-MINI Duct Sealant Instructions for use on conduit, 1 ...

You also want an ePaper? Increase the reach of your titles
YUMPU automatically turns print PDFs into web optimized ePapers that Google loves.
<str<strong>on</strong>g>Polywater</str<strong>on</strong>g> ® <str<strong>on</strong>g>FST</str<strong>on</strong>g>-<str<strong>on</strong>g>MINI</str<strong>on</strong>g> <str<strong>on</strong>g>Duct</str<strong>on</strong>g> <str<strong>on</strong>g>Sealant</str<strong>on</strong>g><br />
<str<strong>on</strong>g>Instructi<strong>on</strong>s</str<strong>on</strong>g> <str<strong>on</strong>g>for</str<strong>on</strong>g> <str<strong>on</strong>g>use</str<strong>on</strong>g> <strong>on</strong> c<strong>on</strong>duit, 1 ½-inch or smaller diameter<br />
SolidSeal Kit C<strong>on</strong>tents:<br />
Foam Base Cartridge (protective pouch)<br />
Mixing Nozzles<br />
Pre-cut Foam Disks<br />
Pair Protective Gloves<br />
<str<strong>on</strong>g>Polywater</str<strong>on</strong>g>® <str<strong>on</strong>g>FST</str<strong>on</strong>g>-<str<strong>on</strong>g>MINI</str<strong>on</strong>g> <str<strong>on</strong>g>Duct</str<strong>on</strong>g> <str<strong>on</strong>g>Sealant</str<strong>on</strong>g> <str<strong>on</strong>g>use</str<strong>on</strong>g>s the SolidSeal <str<strong>on</strong>g>Duct</str<strong>on</strong>g> Plug 50 mL Cartridge.<br />
See alternate Saturated Dam Method <str<strong>on</strong>g>for</str<strong>on</strong>g> running water, sealing cut-outs in metal cabinets.<br />
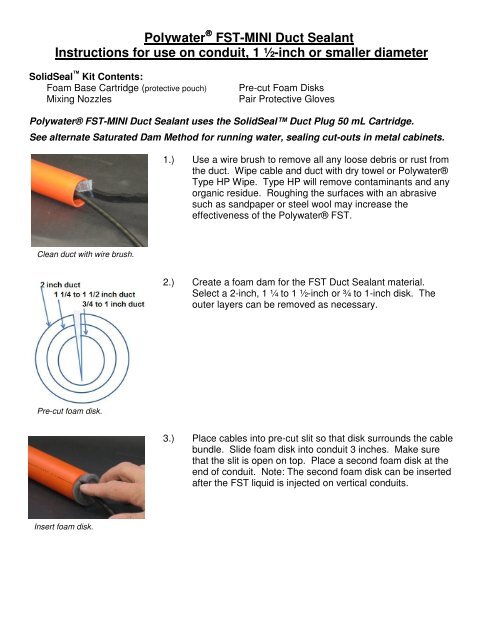
1.) Use a wire brush to remove all any loose debris or rust from<br />
the duct. Wipe cable and duct with dry towel or <str<strong>on</strong>g>Polywater</str<strong>on</strong>g>®<br />
Type HP Wipe. Type HP will remove c<strong>on</strong>taminants and any<br />
organic residue. Roughing the surfaces with an abrasive<br />
such as sandpaper or steel wool may increase the<br />
effectiveness of the <str<strong>on</strong>g>Polywater</str<strong>on</strong>g>® <str<strong>on</strong>g>FST</str<strong>on</strong>g>.<br />
Clean duct with wire brush.<br />
2.) Create a foam dam <str<strong>on</strong>g>for</str<strong>on</strong>g> the <str<strong>on</strong>g>FST</str<strong>on</strong>g> <str<strong>on</strong>g>Duct</str<strong>on</strong>g> <str<strong>on</strong>g>Sealant</str<strong>on</strong>g> material.<br />
Select a 2-inch, 1 ¼ to 1 ½-inch or ¾ to 1-inch disk. The<br />
outer layers can be removed as necessary.<br />
Pre-cut foam disk.<br />
3.) Place cables into pre-cut slit so that disk surrounds the cable<br />
bundle. Slide foam disk into c<strong>on</strong>duit 3 inches. Make sure<br />
that the slit is open <strong>on</strong> top. Place a sec<strong>on</strong>d foam disk at the<br />
end of c<strong>on</strong>duit. Note: The sec<strong>on</strong>d foam disk can be inserted<br />
after the <str<strong>on</strong>g>FST</str<strong>on</strong>g> liquid is injected <strong>on</strong> vertical c<strong>on</strong>duits.<br />
Insert foam disk.
4.) Remove SolidSeal Foam 50 mL Cartridge from foil pouch.<br />
NOTE: Do not remove cartridge from protective foil until<br />
ready to <str<strong>on</strong>g>use</str<strong>on</strong>g>. Wear impermeable gloves and eye protecti<strong>on</strong>.<br />
Install cartridge.<br />
Place the SolidSeal Foam Cartridge into dispensing tool<br />
(Cat # TOOL-50-11) and snap it into place. See instructi<strong>on</strong>s<br />
<strong>on</strong> page 4 <str<strong>on</strong>g>for</str<strong>on</strong>g> <str<strong>on</strong>g>use</str<strong>on</strong>g> in<str<strong>on</strong>g>for</str<strong>on</strong>g>mati<strong>on</strong> <strong>on</strong> the dispensing tool.<br />
5.) Hold cartridge upright and twist cap 90° counterclockwise to<br />
remove from cartridge.<br />
6.) Place mixing nozzle <strong>on</strong>to tool and lock into place by twisting<br />
90° clockwise. Depress handle <strong>on</strong> dispensing tool until <str<strong>on</strong>g>FST</str<strong>on</strong>g><br />
comes out of nozzle tip. Pump a small amount of material<br />
through nozzle until an even mixture is dispensed. Discard<br />
this excess material.<br />
Inject Foam <str<strong>on</strong>g>Sealant</str<strong>on</strong>g>.<br />
7.) Insert mixing nozzle into c<strong>on</strong>duit and inject the desired<br />
amount of foam sealant (see Table 1).<br />
<str<strong>on</strong>g>Duct</str<strong>on</strong>g> Size, O.D., Approximate Quantity<br />
inches Liquid Foam <str<strong>on</strong>g>Sealant</str<strong>on</strong>g><br />
¾<br />
1 squirt<br />
1 2 squirts<br />
1 ¼ 3 squirts<br />
1 ½ 4 squirts<br />
2 8 squirts<br />
Table 1<br />
NOTE: 1 squirt is 1 full pump of TOOL-50-11<br />
There are approximately 20 squirts per<br />
SolidSeal cartridge.<br />
Use as a starting point <strong>on</strong>ly, actual required<br />
quantity will vary. These calculati<strong>on</strong>s are<br />
assuming a 10% cable fill. For ducts larger than<br />
2 inches <str<strong>on</strong>g>use</str<strong>on</strong>g> <str<strong>on</strong>g>FST</str<strong>on</strong>g>-250KIT.<br />
<str<strong>on</strong>g>Sealant</str<strong>on</strong>g> will expand fully in 5 to 7 minutes.<br />
8.) Remove static mixer from cartridge and replace cap.<br />
<str<strong>on</strong>g>Sealant</str<strong>on</strong>g> will harden (set) in 10-15 minutes.<br />
Dispose of any excess material in accordance with local and nati<strong>on</strong>al regulati<strong>on</strong>s.<br />
Storage: <str<strong>on</strong>g>FST</str<strong>on</strong>g> <str<strong>on</strong>g>Duct</str<strong>on</strong>g> <str<strong>on</strong>g>Sealant</str<strong>on</strong>g> is sensitive to sun, water and heat. To keep the SolidSeal <str<strong>on</strong>g>Duct</str<strong>on</strong>g> Plug<br />
cartridge up to a m<strong>on</strong>th after initial <str<strong>on</strong>g>use</str<strong>on</strong>g>, place the partial <str<strong>on</strong>g>use</str<strong>on</strong>g>d cartridge into the foil bag and tape it<br />
shut. Place the foil bag in a dry cool dark place until ready to <str<strong>on</strong>g>use</str<strong>on</strong>g>.
Clogged/leaking Cartridge<br />
<str<strong>on</strong>g>Polywater</str<strong>on</strong>g>® <str<strong>on</strong>g>FST</str<strong>on</strong>g> <str<strong>on</strong>g>Duct</str<strong>on</strong>g> <str<strong>on</strong>g>Sealant</str<strong>on</strong>g> Applicati<strong>on</strong> and Use<br />
The small orifices in the cartridge tip may become clogged. Use a wire to poke through and loosen<br />
hard material or crust. <str<strong>on</strong>g>FST</str<strong>on</strong>g> liquid may be <str<strong>on</strong>g>use</str<strong>on</strong>g>d as directed <strong>on</strong>ce the clog is cleared. If the back<br />
plugs are leaking, do not <str<strong>on</strong>g>use</str<strong>on</strong>g> cartridge.<br />
Re-<str<strong>on</strong>g>use</str<strong>on</strong>g> and Clean-up<br />
Cartridge can be re<str<strong>on</strong>g>use</str<strong>on</strong>g>d <str<strong>on</strong>g>for</str<strong>on</strong>g> several weeks after initial <str<strong>on</strong>g>use</str<strong>on</strong>g>. Remove mixing nozzle and visually<br />
ensure that orifices are not blocked. Seal with replaceable plug. When ready to <str<strong>on</strong>g>use</str<strong>on</strong>g>, remove end<br />
cap assembly and check to make sure orifices are clear of any hardened sealant. Attach a new,<br />
un<str<strong>on</strong>g>use</str<strong>on</strong>g>d mixing nozzle and insert <str<strong>on</strong>g>use</str<strong>on</strong>g>d cartridge into applicati<strong>on</strong> tool.<br />
Unreacted material may be cleaned from surfaces with a solvent wipe such as <str<strong>on</strong>g>Polywater</str<strong>on</strong>g>’s Type<br />
HP, amber resin will react with water if surfaces are washed with soap and water soluti<strong>on</strong>. Once<br />
reacted, material has str<strong>on</strong>g adhesi<strong>on</strong>, and may be scraped or cut from surface. For skin<br />
c<strong>on</strong>taminati<strong>on</strong>, wash thoroughly with soap and water. See MSDS <str<strong>on</strong>g>for</str<strong>on</strong>g> further in<str<strong>on</strong>g>for</str<strong>on</strong>g>mati<strong>on</strong>.<br />
Water in <str<strong>on</strong>g>Duct</str<strong>on</strong>g><br />
<str<strong>on</strong>g>FST</str<strong>on</strong>g> <str<strong>on</strong>g>Sealant</str<strong>on</strong>g> will cure if the duct c<strong>on</strong>tains less than 10% water. If water is relative clean and not<br />
flowing, the foam dam will work as a good block. <str<strong>on</strong>g>FST</str<strong>on</strong>g> <str<strong>on</strong>g>Sealant</str<strong>on</strong>g> will incorporate any excess water<br />
into the body of the cured foam seal. Too much water and/or c<strong>on</strong>taminati<strong>on</strong> will weaken the seal.<br />
For flowing water, <str<strong>on</strong>g>use</str<strong>on</strong>g> the saturated foam method. See alternative instructi<strong>on</strong>s or watch video.<br />
Removal<br />
<str<strong>on</strong>g>Polywater</str<strong>on</strong>g> <str<strong>on</strong>g>FST</str<strong>on</strong>g> <str<strong>on</strong>g>Duct</str<strong>on</strong>g> <str<strong>on</strong>g>Sealant</str<strong>on</strong>g> produces a good, water-tight seal intended <str<strong>on</strong>g>for</str<strong>on</strong>g> permanent <str<strong>on</strong>g>use</str<strong>on</strong>g>. It can<br />
be removed. Use a channel locks and squeeze the HDPE c<strong>on</strong>duit to break the seal. The <str<strong>on</strong>g>FST</str<strong>on</strong>g> <str<strong>on</strong>g>Duct</str<strong>on</strong>g><br />
<str<strong>on</strong>g>Sealant</str<strong>on</strong>g> seal then can be removed. For steel and PVC c<strong>on</strong>duit <str<strong>on</strong>g>use</str<strong>on</strong>g> a screw driver and hammer<br />
break the seal around the edges and remove.<br />
Cold Weather Use<br />
<str<strong>on</strong>g>FST</str<strong>on</strong>g> <str<strong>on</strong>g>Duct</str<strong>on</strong>g> <str<strong>on</strong>g>Sealant</str<strong>on</strong>g> can be <str<strong>on</strong>g>use</str<strong>on</strong>g>d in temperatures down to 40°F (4°C). Reacti<strong>on</strong> is slower, but the<br />
sealant will completely foam and cure with time. At cold temperatures, <str<strong>on</strong>g>FST</str<strong>on</strong>g> <str<strong>on</strong>g>Duct</str<strong>on</strong>g> <str<strong>on</strong>g>Sealant</str<strong>on</strong>g> becomes<br />
slightly viscous and flows through the mixing nozzle at a slower rate. Cure times are as follows:<br />
40° F (4° C) 70° F (21° C)<br />
Foaming, Expansi<strong>on</strong> Complete 8 - 9 Minutes 4 – 5 Minutes<br />
Hard, N<strong>on</strong>-sticky Skin Formati<strong>on</strong> 12 – 15 Minutes 7 – 9 Minutes<br />
To decrease cure time in cold temperatures, keep SolidSeal <str<strong>on</strong>g>Duct</str<strong>on</strong>g> Plug cartridges warm prior to<br />
<str<strong>on</strong>g>use</str<strong>on</strong>g>.
Urethane Safety<br />
Irritating and toxic smoke and vapors may <str<strong>on</strong>g>for</str<strong>on</strong>g>m during combusti<strong>on</strong> of cured <str<strong>on</strong>g>FST</str<strong>on</strong>g> <str<strong>on</strong>g>Duct</str<strong>on</strong>g> <str<strong>on</strong>g>Sealant</str<strong>on</strong>g><br />
foam. Hazardous or irritating decompositi<strong>on</strong> products include oxides of carb<strong>on</strong>, oxides of nitrogen<br />
and hydrogen cyanide. If possible, remove cured sealant prior to any torch cutting operati<strong>on</strong>s.<br />
The <str<strong>on</strong>g>Sealant</str<strong>on</strong>g> can usually be removed from the c<strong>on</strong>duit using chisel style tool or pick. If burning the<br />
sealant material cannot be avoided, provide appropriate ventilati<strong>on</strong>/respiratory protecti<strong>on</strong> against<br />
decompositi<strong>on</strong> products during flame cutting operati<strong>on</strong>s.<br />
Cable Compatibility<br />
<str<strong>on</strong>g>FST</str<strong>on</strong>g> <str<strong>on</strong>g>Duct</str<strong>on</strong>g> <str<strong>on</strong>g>Sealant</str<strong>on</strong>g> Foam is compatible with cable jacket materials. The foam is an inert solid that<br />
will not attack the jacket material.<br />
Dispensing Tool Assembly <str<strong>on</strong>g>Instructi<strong>on</strong>s</str<strong>on</strong>g><br />
1. To assemble the dispensing tool,<br />
insert the pist<strong>on</strong>. Rotate the black<br />
retaining collar <str<strong>on</strong>g>for</str<strong>on</strong>g>ward. While lifting<br />
the metal tab, slide pist<strong>on</strong> with<br />
ratchet teeth side down, into the slot<br />
through the fr<strong>on</strong>t end. Push the<br />
pist<strong>on</strong> all the way through and gently<br />
release the metal tab. The metal<br />
tab should catch <strong>on</strong> the ratchet<br />
teeth.<br />
2. Insert cartridge into the wide<br />
opening <strong>on</strong> the black retaining<br />
collar. Push the collar back and<br />
press firmly to snap into place.<br />
3. Twist cap 90° to remove from<br />
cartridge. Place mixing nozzle <strong>on</strong>to<br />
cartridge and lock into place by<br />
twisting. Save cap <str<strong>on</strong>g>for</str<strong>on</strong>g> storage of<br />
un<str<strong>on</strong>g>use</str<strong>on</strong>g>d material.<br />
Insert Pist<strong>on</strong><br />
Insert Cartridge<br />
Lift Metal Tab<br />
Secure Collar<br />
APC R.M. # 87007-000<br />
Copyright © 2013. American <str<strong>on</strong>g>Polywater</str<strong>on</strong>g> Corporati<strong>on</strong>. All Rights Reserved.<br />
Important Notice: The statements and in<str<strong>on</strong>g>for</str<strong>on</strong>g>mati<strong>on</strong> here are made in good faith based <strong>on</strong> tests and observati<strong>on</strong>s we believe<br />
to be reliable. However, the completeness and accuracy of the in<str<strong>on</strong>g>for</str<strong>on</strong>g>mati<strong>on</strong> is not guaranteed. Be<str<strong>on</strong>g>for</str<strong>on</strong>g>e using, the end-<str<strong>on</strong>g>use</str<strong>on</strong>g>r<br />
should c<strong>on</strong>duct whatever evaluati<strong>on</strong>s are necessary to determine that the product is suitable <str<strong>on</strong>g>for</str<strong>on</strong>g> the intended <str<strong>on</strong>g>use</str<strong>on</strong>g>. The <str<strong>on</strong>g>use</str<strong>on</strong>g>r<br />
assumes all risks and liability in c<strong>on</strong>necti<strong>on</strong> with such <str<strong>on</strong>g>use</str<strong>on</strong>g>.<br />
The statements c<strong>on</strong>tained herein are made in lieu of all warranties, express or implied, including, but not limited to, implied<br />
warranties of merchantability and fitness <str<strong>on</strong>g>for</str<strong>on</strong>g> a particular purpose, which warranties are hereby expressly disclaimed.<br />
American <str<strong>on</strong>g>Polywater</str<strong>on</strong>g>'s <strong>on</strong>ly obligati<strong>on</strong> shall be to replace such quantity of the product proven to be defective. Except <str<strong>on</strong>g>for</str<strong>on</strong>g> the<br />
replacement remedy, American <str<strong>on</strong>g>Polywater</str<strong>on</strong>g> shall not be liable <str<strong>on</strong>g>for</str<strong>on</strong>g> any loss, injury or damage, direct or indirect, arising from<br />
the <str<strong>on</strong>g>use</str<strong>on</strong>g> or the failure to properly <str<strong>on</strong>g>use</str<strong>on</strong>g> these products, regardless of the legal theory asserted. The <str<strong>on</strong>g>for</str<strong>on</strong>g>egoing may not be<br />
altered except by a written agreement by the officers of American <str<strong>on</strong>g>Polywater</str<strong>on</strong>g> Corporati<strong>on</strong>.<br />
P.O. Box 53<br />
Stillwater, MN 55082<br />
U.S.A<br />
USA 1-800-328-9384<br />
TEL 1-651-430-2270<br />
FAX 1-651-430-3634<br />
http://www.polywater.com(URL) custserv@polywater.com(e-mail)