VL2-CCC BMW Monitors With 10pin LVDS ... - AlarmService.ro
VL2-CCC BMW Monitors With 10pin LVDS ... - AlarmService.ro
VL2-CCC BMW Monitors With 10pin LVDS ... - AlarmService.ro

Create successful ePaper yourself
Turn your PDF publications into a flip-book with our unique Google optimized e-Paper software.
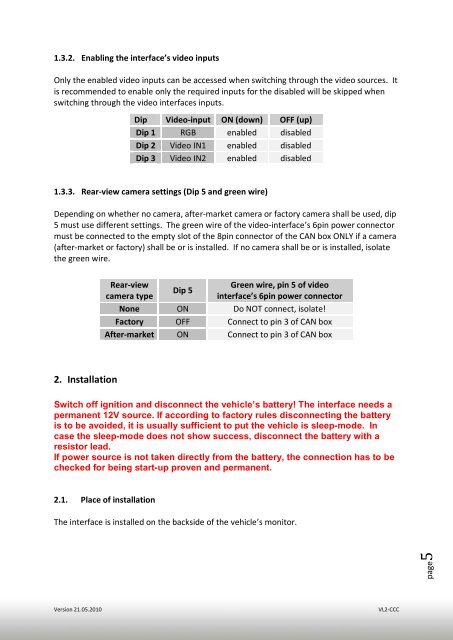
1.3.2. Enabling the interface’s video inputs<br />
Only the enabled video inputs can be accessed when switching th<strong>ro</strong>ugh the video sources. It<br />
is recommended to enable only the required inputs for the disabled will be skipped when<br />
switching th<strong>ro</strong>ugh the video interfaces inputs.<br />
1.3.3. Rear-view camera settings (Dip 5 and green wire)<br />
Depending on whether no camera, after-market camera or factory camera shall be used, dip<br />
5 must use different settings. The green wire of the video-interface’s 6pin power connector<br />
must be connected to the empty slot of the 8pin connector of the CAN box ONLY if a camera<br />
(after-market or factory) shall be or is installed. If no camera shall be or is installed, isolate<br />
the green wire.<br />
2. Installation<br />
Switch off ignition and disconnect the vehicle’s battery! The interface needs a<br />
permanent 12V source. If according to factory rules disconnecting the battery<br />
is to be avoided, it is usually sufficient to put the vehicle is sleep-mode. In<br />
case the sleep-mode does not show success, disconnect the battery with a<br />
resistor lead.<br />
If power source is not taken directly f<strong>ro</strong>m the battery, the connection has to be<br />
checked for being start-up p<strong>ro</strong>ven and permanent.<br />
2.1. Place of installation<br />
Dip Video-input ON (down) OFF (up)<br />
Dip 1 RGB enabled disabled<br />
Dip 2 Video IN1 enabled disabled<br />
Dip 3 Video IN2 enabled disabled<br />
Rear-view<br />
camera type<br />
Dip 5<br />
Green wire, pin 5 of video<br />
interface’s 6pin power connector<br />
None ON Do NOT connect, isolate!<br />
Factory OFF Connect to pin 3 of CAN box<br />
After-market ON Connect to pin 3 of CAN box<br />
The interface is installed on the backside of the vehicle’s monitor.<br />
Version 21.05.2010 <st<strong>ro</strong>ng>VL2</st<strong>ro</strong>ng>-<st<strong>ro</strong>ng>CCC</st<strong>ro</strong>ng><br />
page5