
Create successful ePaper yourself
Turn your PDF publications into a flip-book with our unique Google optimized e-Paper software.
IDE Overview & Matisse<br />
G<br />
<strong>NetBeans</strong><br />
plug-in<br />
catalog<br />
netbeans.org/catalogue<br />
these objects without the need of persistent storage. Only when you<br />
have your functional specs and their implementation well advanced,<br />
at the end of the development process, do you need to worry about<br />
file formats or databases.<br />
In my experience, this two-level prototyping approach improves<br />
productivity, and mixes well with TDD and other Extreme Programming<br />
practices, while keeping costs and schedule under control and meeting<br />
user demands. That leads us to developing the Todo application in<br />
three steps:<br />
1. Build a “static” visual prototype of the user interface, using a<br />
visual GUI builder.<br />
2. Build a “dynamic” prototype of the application, coding user<br />
interface events and associated business logic, and creating<br />
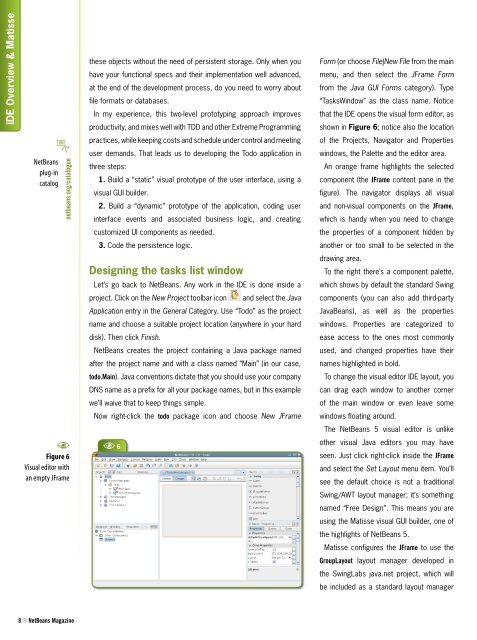
Form (or choose File|New File from the main<br />
menu, and then select the JFrame Form<br />
from the Java GUI Forms category). Type<br />
“TasksWindow” as the class name. Notice<br />
that the IDE opens the visual form editor, as<br />
shown in Figure 6; notice also the location<br />
of the Projects, Navigator and Properties<br />
windows, the Palette and the editor area.<br />
An orange frame highlights the selected<br />
component (the JFrame content pane in the<br />
figure). The navigator displays all visual<br />
and non-visual components on the JFrame,<br />
which is handy when you need to change<br />
customized UI components as needed.<br />
the properties of a component hidden by<br />
3. Code the persistence logic.<br />
another or too small to be selected in the<br />
Designing the tasks list window<br />
drawing area.<br />
To the right there’s a component palette,<br />
Let’s go back to <strong>NetBeans</strong>. Any work in the IDE is done inside a<br />
which shows by default the standard Swing<br />
project. Click on the New Project toolbar icon<br />
and select the Java<br />
components (you can also add third-party<br />
Application entry in the General Category. Use “Todo” as the project<br />
JavaBeans), as well as the properties<br />
name and choose a suitable project location (anywhere in your hard<br />
windows. Properties are categorized to<br />
disk). Then click Finish.<br />
ease access to the ones most commonly<br />
<strong>NetBeans</strong> creates the project containing a Java package named<br />
used, and changed properties have their<br />
after the project name and with a class named “Main” (in our case,<br />
names highlighted in bold.<br />
todo.Main). Java conventions dictate that you should use your company<br />
To change the visual editor IDE layout, you<br />
DNS name as a prefix for all your package names, but in this example<br />
can drag each window to another corner<br />
we’ll waive that to keep things simple.<br />
of the main window or even leave some<br />
Now right-click the todo package icon and choose New JFrame<br />
windows floating around.<br />
A<br />
Figure 6<br />
Visual editor with<br />
an empty JFrame<br />
A 6<br />
The <strong>NetBeans</strong> 5 visual editor is unlike<br />
other visual Java editors you may have<br />
seen. Just click right-click inside the JFrame<br />
and select the Set Layout menu item. You’ll<br />
see the default choice is not a traditional<br />
Swing/AWT layout manager; it’s something<br />
named “Free Design”. This means you are<br />
using the Matisse visual GUI builder, one of<br />
the highlights of <strong>NetBeans</strong> 5.<br />
Matisse configures the JFrame to use the<br />
GroupLayout layout manager developed in<br />
the SwingLabs java.net project, which will<br />
be included as a standard layout manager<br />
N <strong>NetBeans</strong> Magazine