SRT-27 Post - Trinity Highway Products, LLC
SRT-27 Post - Trinity Highway Products, LLC
SRT-27 Post - Trinity Highway Products, LLC

You also want an ePaper? Increase the reach of your titles
YUMPU automatically turns print PDFs into web optimized ePapers that Google loves.
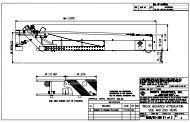
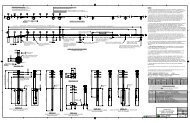
ARRANGING RAIL PANELS FOR <strong>SRT</strong>-<strong>27</strong> AND <strong>SRT</strong>-31<br />
Complete the following steps to arrange the rail panels for the <strong>SRT</strong> -<strong>27</strong><br />
and <strong>SRT</strong>-31 system:<br />
Step<br />
Actions<br />
1. Layout the guardrails (PN-30G, PN-39G) so the Slot Guard<br />
attachment holes are at the end of the slots AWAY from <strong>Post</strong> 1.<br />
(See Figure 5) Position the guardrails with the slots between<br />
<strong>Post</strong>s 1 and 2, <strong>Post</strong>s 2 and 3, <strong>Post</strong>s 3 and 4, and <strong>Post</strong>s 4<br />
and 5.<br />
Slot guard<br />
attachment<br />
hole<br />
Toward <strong>Post</strong> 1<br />
Figure 5<br />
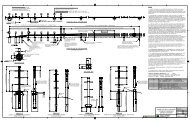
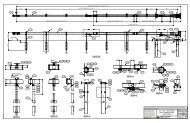
INSTALLING RAIL PANELS FOR THE <strong>SRT</strong>-<strong>27</strong><br />
SYSTEM<br />
Complete the following steps to install the rail panels for the <strong>SRT</strong> -<strong>27</strong><br />
system:<br />
Step<br />
Actions<br />
1. Splice and post bolt the 12' 6" (3.81m) rail panel (PN-9G) at<br />
<strong>Post</strong> 7, to the run of guardrail. Use hardware provided by the<br />
standard guardrail supplier.<br />
Note: Lap the terminal rail in the direction of traffic, unless the<br />
state/agency's policy dictates otherwise.<br />
2. Insert a 5/8” x 10” (16 mm x 255 mm) <strong>Post</strong> Bolt (PN-3500G)<br />
through the Routered Wood (4076B) or composite blockout at<br />
<strong>Post</strong>s 5, 4, and 3. Place a 5/8” (16 mm) Hex HGR Nut on<br />
inserted bolt to secure. Tighten the bolts. (There is no torque<br />
requirement for these bolts.)<br />
3. Insert a 5/8” x 2” (16 mm x 50 mm) HGR <strong>Post</strong> Bolt (PN-3400G)<br />
through the two holes in the Flange Protector (PN-7G) and the<br />
<strong>Post</strong> Shelf Angel (PN-34054G) at <strong>Post</strong> 2. Place a 5/8” (16 mm)<br />
Hex HGR Nut on inserted bolts to secure. Tighten the bolts.<br />
(There is no torque requirement for these bolts.)<br />
4. Splice the 12' 6" (3.81 m) Rail Panel (PN-9G) to the second 12'<br />
6" (3.81 m) Rail Panel (PN-39G) , at <strong>Post</strong> 5, with eight (8) 5 / 8 " x<br />
1 1 / 4 " (16 mm x 32 mm) HGR Splice Bolts (PN-3360G). Place a<br />
5/8” (16 mm) Hex HGR Nut on inserted bolt to secure. Tighten<br />
the bolt. (There is no torque requirement for these bolts.)<br />
5. Insert a 5/8” x 10” (16 mm x 255 mm) HGR <strong>Post</strong> Bolt through<br />
the rail panel, the Routed Wood Block (4076B), or composite<br />
blockout at <strong>Post</strong> 6. Place a 5/8” (16 mm) Hex HGR Nut on<br />
inserted bolt to secure. Tighten the bolts. (There is no torque<br />
requirement for these bolts.)<br />
6. Splice the 12’6” (3.81 m) Rail Panel (PN-39G) to the first 12’6”<br />
(3.81 m) Rail Panel (PN-30G), at <strong>Post</strong> 3, with eight (8) 5/8” x 1-<br />
1/4” (16 mm x 32 mm) HGR Splice Bolts (PN-3360G). Place a<br />
5/8” (16 mm) Hex HGR Nut on inserted bolts to secure. Tighten<br />
the bolts. (There is no torque requirement for these bolts.)<br />
7. Insert a 5/8” x 2” (16 mm x 50 mm) HGR <strong>Post</strong> Bolt through the<br />
rail panel at <strong>Post</strong> 1. Place a 5/8” (16 mm) Hex HGR Nut on<br />
inserted bolt to secure. Tighten the bolts. (There is no torque<br />
requirement for these bolts.)<br />
www.highwayguardrail.com 15 Revised: August 24, 2009