AE/ME 201-- Procedure -- Lab: Tank Draining Instrumentation and ...
AE/ME 201-- Procedure -- Lab: Tank Draining Instrumentation and ...
AE/ME 201-- Procedure -- Lab: Tank Draining Instrumentation and ...

You also want an ePaper? Increase the reach of your titles
YUMPU automatically turns print PDFs into web optimized ePapers that Google loves.
<strong>AE</strong>/<strong>ME</strong> <strong>201</strong> – Spring 2005<br />
the multi-meter in frequency mode <strong>and</strong> measure<br />
the frequency provided.<br />
2. The bridge excitation should be set to approximately:<br />
±2VAC @ 5000Hz<br />
3. Wire the bridge circuit including the immersion<br />
probe.<br />
4. Place the multimeter leads on the bridge output.<br />
Set the multi-meter to AC function using<br />
the voltage setting <strong>and</strong> switching the function<br />
button (it looks like a little sine wave) on the<br />
left side. The liquid crystal display should show<br />
that AC is being measured.<br />
5. Place the immersion probe in the water in the<br />
tank <strong>and</strong> use the meter stick to measure the<br />
liquid level.<br />
6. Balance the bridge by adjusting the trim potentiometer,<br />
P1, in the bridge ciruit. Zero may<br />
not be obtained but the AC reading on the voltmeter<br />
should be minimized.<br />
7. Connect the output cable from ports J8 <strong>and</strong><br />
J12 to the BNC port labeled ACH5 on the NA-<br />
TIONAL INSTRU<strong>ME</strong>NTS interface.<br />
Calibration<br />
1. Insure that the drain will run into a bucket <strong>and</strong><br />
not onto the floor.<br />
2. Launch the <strong>Lab</strong>VIEW Vi, <strong>and</strong> press the run<br />
arrow in the upper left corner of the screen.<br />
You should see a sine wave displayed in one of<br />
the plots <strong>and</strong> a voltage in the digital display in<br />
the upper left h<strong>and</strong> portion of the screen.<br />
3. Measure the initial water level.<br />
4. Record the voltage shown in the display on<br />
LABVIEW VI. The current voltage is displayed<br />
in the ”liquid level” text box in the upper left<br />
h<strong>and</strong> corner of the acquisition window.<br />
5. Slowly drain a small amount of water into the<br />
catch bucket. Measure the new water level.<br />
6. Repeat steps 4 <strong>and</strong> 5 until the immersion probe<br />
is nearly uncovered.<br />
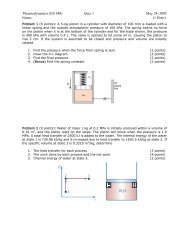
<strong>Tank</strong> <strong>Draining</strong> Test<br />
1. Insure that the drain will run into a bucket <strong>and</strong><br />
not onto the floor.<br />
2. Open the drain valve briefly <strong>and</strong> a small<br />
amount to insure the trap is filled<br />
3. Start the data acquisition routine by pressing<br />
the run arrow in the upper left h<strong>and</strong> corner of<br />
the screen. The output should appear in the<br />
upper plot <strong>and</strong> a Fourier transformed version<br />
of the output appears in the middle plot as a<br />
spike at 5kHz. The lower plot will appear when<br />
you begin storing the data.<br />
4. To begin the data acquisition click the toggle<br />
switch or button beneath the liquid level indicator<br />
text box. Allow the system to acquire a<br />
few seconds worth of data <strong>and</strong> then open the<br />
drain valve fully to begin draining the tank.<br />
5. Close the drain valve when the probe reading<br />
reaches approximately 0.1V or the water<br />
level drops below the bottom of the immersion<br />
probe.<br />
6. Stop the data acquisition by clicking the toggle<br />
switch again, or by clicking the stop button,<br />
<strong>and</strong> save the data onto disk. Your data file will<br />
contain two columns: time <strong>and</strong> voltage.<br />
7. Refill the tank to the starting level <strong>and</strong> repeat<br />
the test procedure with the valve half open.<br />
Software<br />
A <strong>Lab</strong>VIEW virtual instrument titled “<strong>Tank</strong> <strong>Draining</strong>”<br />
is available within the “M<strong>AE</strong> <strong>Lab</strong> Software”<br />
folder on the desktop for use with this experiment.<br />
Tasks:<br />
1. Plot the calibration data: the immersion probe<br />
depth as a function of the voltage. Be sure to<br />
include error bars on your data.<br />
2. Perform a least squares fit of the calibration<br />
curve to obtain a calibration formula <strong>and</strong> plot<br />
a sample curve onto the plot of Task 1 to show<br />
the quality of your data. NOTE: the calibration<br />
curve is not linear, so you should use either an<br />
exponential or a polynomial least squares fit.<br />
3. Use the calibration curve formula to convert<br />
voltage data to immersion probe depth. Plot<br />
your calibrated data as a function of time.<br />
4. Compute the derivative dh/dt to obtain the<br />
draining velocity <strong>and</strong> construct a plot of the<br />
velocity as a function of time.<br />
4