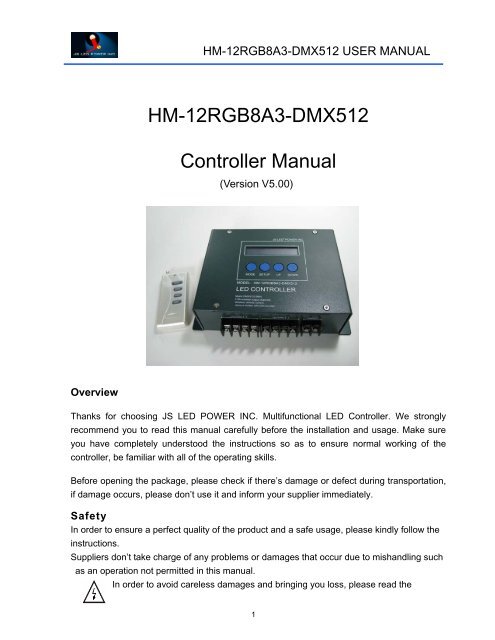
HM-12RGB8A3-DMX512 Controller Manual - Sign Lighting World
HM-12RGB8A3-DMX512 Controller Manual - Sign Lighting World
HM-12RGB8A3-DMX512 Controller Manual - Sign Lighting World

Create successful ePaper yourself
Turn your PDF publications into a flip-book with our unique Google optimized e-Paper software.
<strong>HM</strong>-<strong>12RGB8A3</strong>-<strong>DMX512</strong> USER MANUAL<br />
<strong>HM</strong>-<strong>12RGB8A3</strong>-<strong>DMX512</strong><br />
<strong>Controller</strong> <strong>Manual</strong><br />
(Version V5.00)<br />
Overview<br />
Thanks for choosing JS LED POWER INC. Multifunctional LED <strong>Controller</strong>. We strongly<br />
recommend you to read this manual carefully before the installation and usage. Make sure<br />
you have completely understood the instructions so as to ensure normal working of the<br />
controller, be familiar with all of the operating skills.<br />
Before opening the package, please check if there’s damage or defect during transportation,<br />
if damage occurs, please don’t use it and inform your supplier immediately.<br />
Safety<br />
In order to ensure a perfect quality of the product and a safe usage, please kindly follow the<br />
instructions.<br />
Suppliers don’t take charge of any problems or damages that occur due to mishandling such<br />
as an operation not permitted in this manual.<br />
In order to avoid careless damages and bringing you loss, please read the<br />
1
<strong>HM</strong>-<strong>12RGB8A3</strong>-<strong>DMX512</strong> USER MANUAL<br />
following statements carefully.<br />
1、 To avoid getting on fire or a shock, don’t put the controller in rainy or humid area.<br />
2、 Please avoid install this controller in lightening, intense magnetic and high-voltage<br />
fields.<br />
3、 The controller for indoor use only, makes sure to put it in a waterproof housing for outdoor use.<br />
4、 Make sure correct connection to avoid fire and damage caused by short circuit.<br />
5、 Please install the controller at drafty area to ensure a fitting temperature.<br />
6、 Please check if local voltage and power adapter meet the controller requirements,<br />
and if power positive or negative pole definition is the same as controller.<br />
7、 Choose an install place where can withstand 10 times the weight of the product to<br />
ensure a solid installation<br />
8、 Wipe the cover with soft cloth dipped a little neutral detergent, be sure not to use any<br />
sandpaper, polishing powder or alcohol, gasoline and so on liquor<br />
9、 Don’t connect cables with power on; make sure a correct connection and no short<br />
circuit checked with instrument before power on.<br />
10、 Don’t alter or tear up the label on controller for future system maintenance.<br />
11、 Please don’t dismantle or modify the product.<br />
12、 If you need spare parts, please choose authentic version.<br />
13、 If you have any questions, please contact your supplier.<br />
This manual applies to this model product only, for more information, please contact our<br />
staff.<br />
Function Brief<br />
<strong>HM</strong>-<strong>12RGB8A3</strong>-<strong>DMX512</strong> Multifunction Full-color <strong>Controller</strong> is dedicated to control color<br />
changes of Led lights with 4-pin 3-loop cables (common anode), this compact unit has a small<br />
LCD panel, we adopt hi-performance micro processor as its core part with powerful function,<br />
built-in <strong>DMX512</strong> decoder (3 addresses) & up to 34 color changing modes. This unit can run<br />
standalone or networking with multi controller, or work with DMX 512 console to receive<br />
signals.<br />
Ⅰ. Performance Parameter:<br />
Input Voltage:<br />
12/24 VDC<br />
Input <strong>Sign</strong>al:<br />
<strong>DMX512</strong>(1990)<br />
Transition speed:<br />
250Kbps<br />
Output channel:<br />
3 Channels<br />
Output current: 8A/Channel(totally 24A)<br />
2
<strong>HM</strong>-<strong>12RGB8A3</strong>-<strong>DMX512</strong> USER MANUAL<br />
Remote control distance: 50m<br />
Working temperature: 0~70℃<br />
Description:<br />
Within 36 modes, ,such as flash, fade, etc.<br />
Ⅱ. Basic function:<br />
1、 34 color jumping, color smooth patterns, each pattern’s parameter can be configured<br />
separately.<br />
2、 LED light dimming or color-depth selecting with 0-100 dimming levels per RGB.<br />
3、 Edit auto running Mode & choose designated pattern.<br />
4、 Supports universal <strong>DMX512</strong> protocol, remote control with exterior <strong>DMX512</strong> devices.<br />
5、 Built-in a <strong>DMX512</strong> Decoder (3 addresses).<br />
6、 Used separately or connected to <strong>HM</strong>-<strong>12RGB8A3</strong>-EX power extension module,<br />
unlimited quantities, to have an unlimited power extension output<br />
7、 All led lights can be controlled by operating the function button on the main controller,<br />
easy and flexible when net working.<br />
8、 Auto store parameter, don’t need repeat configuration next time.<br />
9、 Restore default parameter(ex-factory parameter)<br />
Ⅲ. Dimension Diagram:<br />
<strong>HM</strong>-<strong>12RGB8A3</strong>-<strong>DMX512</strong>-AC110V-AC220V<br />
IV. Top Panel Instruction<br />
3
<strong>HM</strong>-<strong>12RGB8A3</strong>-<strong>DMX512</strong> USER MANUAL<br />
1 LCD screen<br />
2 MODE: Change mode by pressing this button<br />
3 SETUP: Press this button to set the program according to user's need<br />
4 UP: Press this button to increase the parameter value of currently item ( keep pressing to<br />
increase continuously), or choose next changing mode or reload default setting<br />
5 DOWN: Press this button to decrease the parameter value of currently item (keep<br />
pressing to decrease continuously), or choose last changing mode or reload default<br />
setting.<br />
V. Front Panel Instruction<br />
1 Power input terminals: 12V/24V DC. Make sure the right connection.<br />
2 Drive output terminals 1: Connect to LED modules.<br />
3 <strong>Sign</strong>al output terminals 2: Connect to LED modules.<br />
Remark: the signal of output port 1 is same with output port 2.<br />
VI. Back Panel Instruction<br />
4
<strong>HM</strong>-<strong>12RGB8A3</strong>-<strong>DMX512</strong> USER MANUAL<br />
1 Switch of <strong>DMX512</strong> signal terminator, turn to "on" to terminate <strong>DMX512</strong> signal.<br />
2 RJ45 input/output interface: connect to <strong>DMX512</strong> signal cable<br />
3 XLR-3 male input/output interface: connect to <strong>DMX512</strong> signal cable<br />
4 XLR 3 Female output interface: connect to <strong>DMX512</strong> signal cable<br />
VII. <strong>Sign</strong>al Interface Instruction<br />
A. RJ45 interface<br />
B. XLR 3 interface<br />
VIII. Button Function of Remote <strong>Controller</strong><br />
5
<strong>HM</strong>-<strong>12RGB8A3</strong>-<strong>DMX512</strong> USER MANUAL<br />
The usage of this remote controller is same with the buttons on panel; please refer to<br />
"<strong>HM</strong>-<strong>12RGB8A3</strong>-<strong>DMX512</strong> Top Panel Instruction" for details.<br />
IX. Instruction<br />
The controller has 4 function setting buttons: MODE、SETUP、UP、DOWN.<br />
1. Press MODE or UP & DOWN to set color pattern in turn:<br />
No Display Description<br />
1 BLACK All Off<br />
2 STATIC RED Static red<br />
3 STATIC GREEN Static green<br />
4 STATIC BLUE Static blue<br />
5 STATIC YELLOW Static yellow<br />
6 STATIC PURPLE Static purple<br />
7 STATIC CYAN Static cyan<br />
8 STATIC WHITE Static white<br />
9 COLOR CHANGE 7 color jumping<br />
10 COLOR CHANGE2 7 color jumping(flicker)<br />
11 SIX COLOR CHANGE 6 color jumping<br />
12 SIX COLOR CHANGE2 6 color jumping(flicker)<br />
13 RGB CHANGE 3 color jumping<br />
14 RGB CHANGE2 3 color jumping(flicker)<br />
15 RG CHANGE RG jumping<br />
16 RB CHANGE RB jumping<br />
17 GB CHANGE GB jumping<br />
18 WHITE CHANGE White screen flicker<br />
19 COLOR SMOOTH 7 color gradual<br />
20 RGB SMOOTH 3 color gradual<br />
21 RG SMOOTH RG gradual<br />
6
<strong>HM</strong>-<strong>12RGB8A3</strong>-<strong>DMX512</strong> USER MANUAL<br />
22 RB SMOOTH RB gradual<br />
23 GB SMOOTH GB gradual<br />
24 COLOR GRADUAL 7 color gradual fade &<br />
change<br />
25 RGB GRADUAL 3 color gradual fade &<br />
change<br />
26 WHITE GRADUAL White fade<br />
27 RG GRADUAL Red/Green fade & change<br />
28 RB GRADUAL Red/Blue fade & change<br />
29 GB GRADUAL Green/Blue fade & change<br />
30 R GRADUAL Red fade<br />
31 G GRADUAL Green fade<br />
32 B GRADUAL Blue fade<br />
33 ADJUST MODE RGB 0-100 color depth<br />
34 AUTO PROGRAM Auto running selected<br />
pattern<br />
35 <strong>DMX512</strong> MODE <strong>DMX512</strong> mode<br />
36 <strong>DMX512</strong> DECODER <strong>DMX512</strong> decoder<br />
2. <strong>HM</strong>-<strong>12RGB8A3</strong>-<strong>DMX512</strong> <strong>Controller</strong> Programming Instructions<br />
Mode 1-8 are static color mode without adjusting functions; Mode 9-32 (preset changing<br />
mode), can be set the program speed, run times in the automatic mode, or reload default<br />
value.<br />
3. Press " SETUP" in stand by status:<br />
Times Description Operation Parameter Remark<br />
1 RUN SPEED Press "UP"/"DOWN" to change 0-100<br />
2 RUN TIMES parameter value 0-100<br />
3<br />
LOAD<br />
factory<br />
Press "UP"/"DOWN" to load default<br />
DEFAULT<br />
default<br />
Press "<br />
MODE" to<br />
exit<br />
Remark: “RUN TIMES“is the running times of this mode under automatic mode.<br />
4. RGB color adjustable mode program instruction:<br />
User can adjust the brightness of R, G, and B separately, and the value will display on<br />
LCD screen:<br />
Step 1: Press “MODE" to select Mode<br />
Step 2: Press “SETUP” to set brightness of Red, change value by "UP" / " DOWN"<br />
Step 3: Press “SETUP" again to set brightness of Green, change value by "UP" / " DOWN"<br />
7
<strong>HM</strong>-<strong>12RGB8A3</strong>-<strong>DMX512</strong> USER MANUAL<br />
Step 4: Press “SETUP" again to set brightness of Blue, change value by "UP" / " DOWN"<br />
Step 5: Press “SETUP" again to reload default value, press “UP" or "DOWN", the R, G, B<br />
brightness will reload factory default.<br />
Step 6: Press “MODE" to exit.<br />
<strong>DMX512</strong> decoder program instruction:<br />
X. <strong>DMX512</strong> decoder program instruction:<br />
The controller can be set as a <strong>DMX512</strong> decoder (3 channels), and select desire <strong>DMX512</strong><br />
address as follows:<br />
Step 1: Press "MODE" to select mode 34: <strong>DMX512</strong> decoder<br />
Step 2: Press “SETUP” to set <strong>DMX512</strong> address, change value by "UP" / " DOWN"<br />
Step 3: Press “MODE" to exit<br />
XI.<strong>DMX512</strong> mode program instruction:<br />
The controller can be set as a 3 channels controller which was controlled by a <strong>DMX512</strong><br />
controller. Set the DMX address as follows:<br />
Step 1: Press "MODE" to select mode 35: <strong>DMX512</strong> mode<br />
Step 2: Press “SETUP” to set <strong>DMX512</strong> address, change value by "UP" / " DOWN"<br />
Step 3: Press “MODE" to exit<br />
to select the led color changing mode according to the dmx512 parameter value in this mode. the<br />
<strong>DMX512</strong> value with corresponding mode as following:<br />
0: Black(all off) 8: 7-color jumping 16: GB jumping 24: RGB fade in, fade out<br />
1: Static Red 9: 7-color flicker 17: White jumping 25: White fade in, fade out<br />
2: Static Greed 10: 6-color jumping 18: 7-color gradual change 26: RG fade in, fade out<br />
3: Static Blue 11: 6 color flicker 19: RGB gradual change 27: RB fade in, fade out<br />
4: Static yellow 12: RGB jumping 20: RG gradual change 28: GB fade in, fade out<br />
5: Static purple 13: RGB flicker 21: RB gradual change 29: Red fade in, fade out<br />
6: Static cyan 14: RG jumping 22: GB gradual change 30: Green fade in, fade out<br />
7: Static white 15: RB jumping 23: 7-color fade in, fade out 31: Blue fade in, fade out<br />
Automatic mode program instruction:<br />
User can select some of 9-32 modes or all of them to run automatically under this mode<br />
according to each mode's speed and run times value.<br />
To reload factory default:<br />
Step 1: Press “mode to select mode 36<br />
Step 2: Press “SETUP”, then press ' UP' / ' DOWN" to reload default<br />
Step 3: Press “MODE" to exit<br />
<strong>HM</strong>-<strong>12RGB8A3</strong>-<strong>DMX512</strong> Wiring Diagram<br />
8
<strong>HM</strong>-<strong>12RGB8A3</strong>-<strong>DMX512</strong> USER MANUAL<br />
9