Assembly Instructions - Whittier Wood Furniture
Assembly Instructions - Whittier Wood Furniture
Assembly Instructions - Whittier Wood Furniture

You also want an ePaper? Increase the reach of your titles
YUMPU automatically turns print PDFs into web optimized ePapers that Google loves.
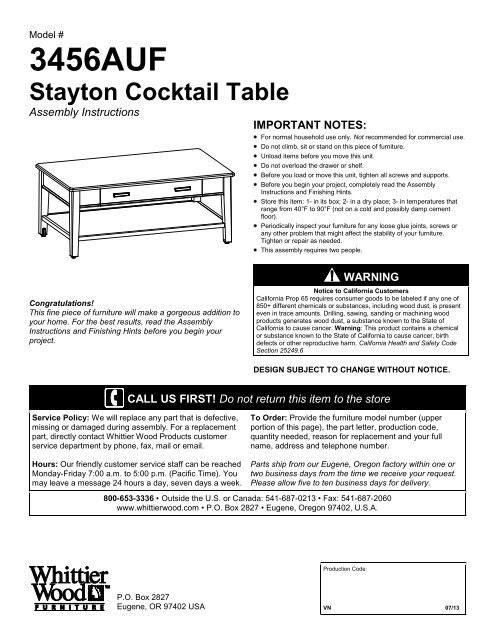
Model #<br />
3456AUF<br />
Stayton Cocktail Table<br />
<strong>Assembly</strong> <strong>Instructions</strong><br />
IMPORTANT NOTES:<br />
For normal household use only. Not recommended for commercial use.<br />
Do not climb, sit or stand on this piece of furniture.<br />
Unload items before you move this unit.<br />
Do not overload the drawer or shelf.<br />
Before you load or move this unit, tighten all screws and supports.<br />
Before you begin your project, completely read the <strong>Assembly</strong><br />
<strong>Instructions</strong> and Finishing Hints.<br />
Store this item: 1- in its box; 2- in a dry place; 3- in temperatures that<br />
range from 40°F to 90°F (not on a cold and possibly damp cement<br />
floor).<br />
Periodically inspect your furniture for any loose glue joints, screws or<br />
any other problem that might affect the stability of your furniture.<br />
Tighten or repair as needed.<br />
This assembly requires two people.<br />
Congratulations!<br />
This fine piece of furniture will make a gorgeous addition to<br />
your home. For the best results, read the <strong>Assembly</strong><br />
<strong>Instructions</strong> and Finishing Hints before you begin your<br />
project.<br />
WARNING<br />
Notice to California Customers<br />
California Prop 65 requires consumer goods to be labeled if any one of<br />
850+ different chemicals or substances, including wood dust, is present<br />
even in trace amounts. Drilling, sawing, sanding or machining wood<br />
products generates wood dust, a substance known to the State of<br />
California to cause cancer. Warning: This product contains a chemical<br />
or substance known to the State of California to cause cancer, birth<br />
defects or other reproductive harm. California Health and Safety Code<br />
Section 25249.6<br />
DESIGN SUBJECT TO CHANGE WITHOUT NOTICE.<br />
CALL US FIRST! Do not return this item to the store<br />
Service Policy: We will replace any part that is defective,<br />
missing or damaged during assembly. For a replacement<br />
part, directly contact <strong>Whittier</strong> <strong>Wood</strong> Products customer<br />
service department by phone, fax, mail or email.<br />
To Order: Provide the furniture model number (upper<br />
portion of this page), the part letter, production code,<br />
quantity needed, reason for replacement and your full<br />
name, address and telephone number.<br />
Hours: Our friendly customer service staff can be reached<br />
Monday-Friday 7:00 a.m. to 5:00 p.m. (Pacific Time). You<br />
may leave a message 24 hours a day, seven days a week.<br />
Parts ship from our Eugene, Oregon factory within one or<br />
two business days from the time we receive your request.<br />
Please allow five to ten business days for delivery.<br />
800-653-3336 • Outside the U.S. or Canada: 541-687-0213 • Fax: 541-687-2060<br />
www.whittierwood.com • P.O. Box 2827 • Eugene, Oregon 97402, U.S.A.<br />
Production Code:<br />
P.O. Box 2827<br />
Eugene, OR 97402 USA<br />
VN 07/13
3456AUF Stayton Cocktail Table<br />
Parts List<br />
Please identify the parts and check that quantities received match those on this list.<br />
If you need to replace a part, refer to the following letter and part name.<br />
Part Description Quantity<br />
A Top <strong>Assembly</strong> (attached) 1<br />
B Left Front/Right Back Leg 2<br />
C Right Front/Left Back Leg 2<br />
D Shelf <strong>Assembly</strong> 1<br />
E Drawer Box (inserted) 1<br />
F Drawer Face (installed) 1<br />
G PVC Wheel (installed) 4<br />
H Drawer Slides (pre-installed sets) 1<br />
I Axle Pin (inserted) 4<br />
J #6 x 3/4" Philtruss Screw (inserted) 6<br />
K #6 x 1/2" Philtruss Screw (inserted) 6<br />
L #8 x 1" Lo-Profile Screw (inserted) 6<br />
34<br />
M #8 x 1-1/4" Pan Head Screw<br />
(30 inserted)<br />
N #8 x 1-1/2" Machine Screw (installed) 4<br />
O #8 Washer (inserted) 23<br />
P 5/16" Flat Washer 4<br />
Q 3/8" x 1" Insert Nut (inserted) 4<br />
R 3/8" x 2-1/2" Hex Bolt 4<br />
S 4 x 10mm Insert Nut (inserted) 4<br />
T Pull (installed) 2<br />
U <strong>Wood</strong> Dowel (inserted) 4<br />
V #8 x 20mm Pan Head Screw (inserted) 9<br />
W Adjustable Angle Bracket (attached) 3<br />
3456AUF — Page 2 — 07/13
3456AUF Stayton Cocktail Table<br />
<strong>Assembly</strong> <strong>Instructions</strong><br />
Tools Required: Phillips Screwdriver, 9/16" or Adjustable Wrench, Rubber Mallet or Padded<br />
Hammer<br />
1. Remove the Drawer (E) from the Top <strong>Assembly</strong> (A). To remove the drawer, pull up on the left<br />
side of the Drawer Release Lever while pushing down on the right Drawer Release Lever. See<br />
Figure 1a.<br />
Fig. 1a<br />
Fig. 1<br />
Drawer Release Lever<br />
2. Turn the Top <strong>Assembly</strong> (A) upside-down on a clean, protected surface. Place a Left Front/Right<br />
Back Leg (B) and a Right Front/Left Back Leg (C) at the back of the Top <strong>Assembly</strong> (A), making<br />
sure the drilled corners of the legs face toward the Corner Blocks. It is important the sides of the<br />
legs exposing the wheel face the drawer opening of the unit. Attach with 5/16" Flat Washers (P)<br />
and 3/8" x 2-1/2" Hex Bolts (R). See Figures 2 and 2a.<br />
Fig. 2a<br />
P<br />
R<br />
x 2<br />
x 2<br />
B<br />
P<br />
R<br />
C<br />
Fig. 2<br />
A<br />
3456AUF — Page 3 — 07/13
3456AUF Stayton Cocktail Table<br />
<strong>Assembly</strong> <strong>Instructions</strong><br />
3. Rotate the Top and Leg assembly so that is sets on the back legs. Turn the Shelf <strong>Assembly</strong> (D)<br />
bottom-side-down and place the dowels into the dowel holes in the Legs. See Figure 3.<br />
D<br />
Fig. 3<br />
4. Using the dowels as guides, place the remaining Left Front/Right Back Leg (B) and Right<br />
Front/Left Back Leg (C) in the remaining two corners making sure the drilled corners of the Legs<br />
face toward the Corner Blocks. It is important the side of the leg exposing the wheel face toward<br />
the back of the unit. See Figure 4.<br />
Fig. 4a<br />
C<br />
B<br />
Fig. 4<br />
3456AUF — Page 4 — 07/13
3456AUF Stayton Cocktail Table<br />
<strong>Assembly</strong> <strong>Instructions</strong><br />
5. Attach the legs to the Top <strong>Assembly</strong> with 5/16" Flat Washers (P) and 3/8" x 2-1/2" Hex Bolts (R)<br />
See Figures 5 and 5a.<br />
P<br />
x 2<br />
Fig. 5a<br />
P<br />
R<br />
x 2<br />
R<br />
Fig. 5<br />
6. Turn the unit onto its top and using the pocket holes as guides, secure the Shelf <strong>Assembly</strong> (D)<br />
to the Legs (B and C) with four #8 x 1-1/4" Pan Head Screws (M). See Figures 6 and 6a.<br />
M x 4<br />
Fig. 6a<br />
M<br />
Fig. 6<br />
3456AUF — Page 5 — 07/13
3456AUF Stayton Cocktail Table<br />
<strong>Assembly</strong> <strong>Instructions</strong><br />
7. Turn the table upright and insert the Drawer. See Figure 7.<br />
Fig. 7<br />
8. The wheels allow the table to easily move away from or toward your seating.<br />
Fig. 8<br />
Fig. 8a<br />
3456AUF — Page 6 — 07/13
<strong>Whittier</strong> Finishing Hints<br />
□ Rubber gloves<br />
□ Lint-free rags<br />
□ Paper towels<br />
□ Cotton swabs<br />
Checklist of materials<br />
□ Tack cloth<br />
□ Drop cloth<br />
□ Stain brushes<br />
(poly bristle<br />
and foam)<br />
□ #220 & #320<br />
sandpaper<br />
□ Painter’s tape<br />
□ <strong>Wood</strong> glue<br />
□ Dust mask<br />
CAUTION: If you have environmental or chemical<br />
sensitivities, please take the necessary precautions and<br />
use personal protective equipment to aid in limiting your<br />
exposure. Personal protective equipment may include but<br />
are not limited to gloves, dust masks or respirators.<br />
NOTICE TO CALIFORNIA CUSTOMERS: California Prop<br />
65 requires consumer goods to be labeled if any one of<br />
850+ different chemicals or substances, including wood<br />
dust, is present, even in trace amounts. Drilling, sawing,<br />
sanding or machining wood products generates wood<br />
dust, a substance known to the State of California to<br />
cause cancer. Warning: This product contains a chemical<br />
or substance known to the State of California to cause<br />
cancer, birth defects or other reproductive harm.<br />
California Health and Safety Code Section 25249.6<br />
Getting started<br />
<strong>Assembly</strong> <strong>Instructions</strong> may contain special finishing<br />
information or gluing requirements for that item.<br />
Completely read both the <strong>Assembly</strong> <strong>Instructions</strong> and these<br />
Finishing Hints before you begin your project.<br />
Choosing the finish: Ask your retailer for advice on how<br />
to finish bare wood. Choose a finish that meets your<br />
expectations for the end use of the product. Will you use it<br />
as a work surface as on a desk or kitchen island Are you<br />
matching a finish on existing furniture The answers to<br />
these questions may affect the type of finish you choose.<br />
Where to work: Choose an area that has good light and<br />
is well ventilated, warm and dry. If the work area is cold<br />
and damp, the wood finishing products may require a<br />
longer drying time than the labels indicate. Do not work in a<br />
dirty or dusty area – dirt and/or dust can embed in the<br />
finish.<br />
Gluing hints<br />
These are general hints. Refer to the <strong>Assembly</strong><br />
<strong>Instructions</strong> for detailed information on how to glue your<br />
specific product. Use wood glue such as Elmer’s <strong>Wood</strong><br />
Glue, Titebond <strong>Wood</strong> Glue or the equivalent. Some<br />
instructions call for a slow drying epoxy glue. Carefully<br />
read the label and instructions of the glue manufacturer.<br />
Your unit may not need glue.<br />
1. We strongly recommend that you lay out all the parts<br />
and familiarize yourself with how they fit together<br />
before assembling with glue. Glue will set up quickly.<br />
You can damage parts if you try to reposition any that<br />
have been assembled incorrectly.<br />
2. For glue to properly bond, it is very important to apply<br />
the wood glue to bare wood. Protect your eyes and<br />
blow into holes to clear excess dust. This will help the<br />
glue to adhere to a clean surface.<br />
3. If you plan on finishing the product before you<br />
assemble it, place painter’s tape three-fourths of the<br />
way up from the end of a dowel, spindle or tenon. This<br />
protects the ends from the finishing product but allows<br />
finish application where it will be visible. Finishing<br />
products inhibit the bonding properties of wood glue.<br />
Remove the tape prior to the final assembly.<br />
4. Avoid getting glue on surfaces to be finished. Most<br />
stains or finishes will not penetrate where glue has<br />
been spilled. Wet glue can be wiped off with a damp<br />
cloth. Follow with a light sanding of the area to ensure<br />
a proper finish.<br />
5. It is important to apply an even coat inside holes and<br />
slots. Use a small dowel, pencil or cotton swab to<br />
spread glue evenly around the inside of the holes. Do<br />
not over glue. The tight fit of the spindles or dowels in<br />
the holes can cause glue to be pushed to the bottom of<br />
the hole. If too much glue is used it will fill the holes<br />
and not allow the spindle or dowel to be fully inserted.<br />
6. Glue usually takes several hours to cure or harden but<br />
it will set up or grab in several seconds. Once you<br />
begin final assembly, proceed quickly.<br />
Finishing hints<br />
1. Use products of the same brand to ensure<br />
compatibility. It is not recommended to mix solvent<br />
based and water based finishes. Always read and<br />
follow all label directions on the can.<br />
2. Alder is a porous hardwood and often looks best when<br />
following the finishing instructions for softwoods.<br />
3. Use a wood conditioner under oil base stains.<br />
P.O. Box 2827<br />
Eugene, OR 97402 USA<br />
Toll Free: 800-653-3336<br />
Ph: 541-687-0213<br />
Fax: 541-687-2060<br />
www.whittierwood.com<br />
Page 1 of 2<br />
Rev. 06/13
<strong>Whittier</strong> Finishing Hints<br />
Preparing the surface<br />
1. Sand each piece with #220 grit sandpaper. Sand with<br />
the grain of the wood on flat surfaces and opposite the<br />
grain on turnings. Some parts may be plywood. Be<br />
careful not to sand through the veneer. End grain such<br />
as table top ends, seat edges and grooves on turnings<br />
accept more stain. Extra sanding in these areas with<br />
#320 grit sandpaper reduces stain absorption and<br />
creates a more evenly stained piece.<br />
2. When sanding is completed, wipe the surface of your<br />
furniture with a lint-free rag or tack cloth. Make sure the<br />
item is free of dust before you proceed.<br />
Staining<br />
1. Always read and follow all label directions. Stir the<br />
stain well before you start. Stir periodically throughout<br />
the duration of the project to maintain uniform color<br />
consistency.<br />
2. Test stain on an inconspicuous spot on your project.<br />
Put at least one coat of your top coat over the test area<br />
as it also affects the look of the stain. Test every type<br />
of wood that is in your kit. These are identified in the<br />
<strong>Assembly</strong> <strong>Instructions</strong>. Different types of wood may<br />
react differently to the stain color. You might need to<br />
add a second coat of stain to lighter woods to match<br />
the darker woods in your kit.<br />
3. Apply stain with a poly brush or lint-free cloth. Apply<br />
stain over a small area and wipe off excess. Working in<br />
small areas will make the color easier to control.<br />
apply additional coats. Lightly sand and wipe surface<br />
with a lint-free rag or tack cloth between coats.<br />
4. Some finishes tend to slightly raise the grain. This can<br />
be easily controlled with a light sanding between coats.<br />
Do not use steel wool when you use water-based<br />
finishes. Strands of steel fiber caught in the wood can<br />
cause rust spots when coated with any water-based<br />
product.<br />
Painting<br />
1. Always read and follow all label directions. Since there<br />
is a large variation between paint manufacturers and<br />
products, ask your paint supplier for specific advice on<br />
how to best use the paint you purchase. Ask them<br />
specifically for advice on finishing bare wood.<br />
2. First coat the wood with a primer. An oil based primer<br />
works best for a smooth finish. If you do not wish to<br />
use a solvent based primer, water based primer works<br />
almost as well. However it may raise the wood grain<br />
and require additional sanding.<br />
3. Buy quality brand paint in a satin, semi-gloss, or gloss<br />
sheen. Apply a second coat for a smooth finish. Lightly<br />
sand between coats using with #320 grit sandpaper so<br />
that the second coat will bond well. Be sure to use a<br />
tack cloth after sanding to remove any residue. Repeat<br />
as desired.<br />
4. No top coat is required when using paint.<br />
4. Cotton swabs are ideal for hard to reach areas.<br />
5. Allow the stain to dry thoroughly before you proceed.<br />
Applying the top coat<br />
1. Always read and follow all label directions. Stir your top<br />
coat gently; do not shake. Shaking the can creates<br />
bubbles that are hard to remove.<br />
2. All surfaces including the underside of table tops and<br />
inside drawers must be sealed with at least one layer<br />
of a top coat. This will help minimize wood swelling,<br />
shrinkage, warping and cupping due to changes in<br />
moisture content or temperature.<br />
3. Apply a minimum of two coats when you use<br />
polyurethane or varnish (especially on all table top and<br />
work surfaces). After allowing the first coat to dry,<br />
sand lightly with #320 grit sandpaper. Remove dust<br />
with a lint-free rag or tack cloth. For added protection,<br />
P.O. Box 2827<br />
Eugene, OR 97402 USA<br />
Toll Free: 800-653-3336<br />
Ph: 541-687-0213<br />
Fax: 541-687-2060<br />
www.whittierwood.com<br />
Page 2 of 2<br />
Rev. 06/13