IDM1C Caravan alarm handbook/manual - The Swift Owners Club
IDM1C Caravan alarm handbook/manual - The Swift Owners Club
IDM1C Caravan alarm handbook/manual - The Swift Owners Club

You also want an ePaper? Increase the reach of your titles
YUMPU automatically turns print PDFs into web optimized ePapers that Google loves.
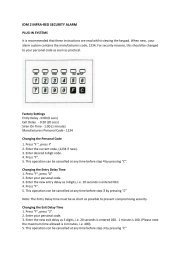
IDM·1C<br />
COMPUTER CONTROLLED ALARM SYSTEM<br />
This Alarm System has been designed for two kinds of user:<br />
(a) <strong>The</strong> casual user who wants to simply arm and disarm the system as required, and<br />
(b) <strong>The</strong> serious user who wants to take advantage of the features and functions available.<br />
<strong>The</strong>se instructions should be read carefully before using the system and, for ease of understanding,<br />
should be read while viewing the IDM-1 Control Panel (keypad).<br />
Note: Your Alarm System, when new, contains the manufacturer's security code (which is 1,2,3,4).<br />
You should change this code to your own preferred four-digit code as soon as possible. To do this,<br />
please refer to 'Change Personal Code'.<br />
TO ARM THE SYSTEM<br />
Simply type in your four-digit security code, you will now hear a regular pulse (one per second) from<br />
the system until the exit delay time has elapsed (to alter the exit delay period, see 'Change Exit<br />
Delay'). If you do not hear these pulses but hear two or four short bursts from the siren then you<br />
should read the fault-finding section for an explanation.<br />
On successfully arming the system you will<br />
hear a double pulse (from outside the caravan) on the siren as the exit period ends. If you want to<br />
'cancel' during the exit period, then all you have to do is press the CLR key.<br />
If you wish to the put the system into EXTernal mode, then during the exit period you should press the<br />
EXT key. This mode will disable the PIR and the Tilt sensors and sounds a warning in the form of five<br />
long pulses and will be heard if either the door or the battery box/gas bottle box are opened. When in<br />
EXTernal mode, you need only press the CLR key to exit this mode. Please note that you cannot exit<br />
this mode while the five pulse warning is active<br />
TO DISARM THE SYSTEM<br />
Upon entering the caravan, you will be given an entry time delay in which you have to enter the four<br />
digit security code (to alter this period see 'Change Entry Delay'. If you lail to enter the correct code,<br />
then the <strong>alarm</strong> will sound for a preset time period (to alter this time period see 'Change Siren On-time'.<br />
Unless you enter through the door, the keypad will not accept any numbers until the siren sounds.<br />
You can check to see if the <strong>alarm</strong> has been triggered and which sensor has been active by pressing<br />
the MEMory key.<br />
One long pulse means the system has been inactive.<br />
Two short pulses means the door sensor has been active.<br />
Three short pulses means the battery box/gas locker sensor has been active.<br />
Four short pulses means the tilt sensor has been active.<br />
If the short pulse(s) are accompanied by two long pulses then this indicates that the system has<br />
RESET due to the siren being active for 20 minutes. This would explain a system that is disarmed<br />
when returning to your caravan.<br />
SYSTEM INFORMATION<br />
<strong>The</strong> on-board computer communicates with the outside world by using the siren to emit pUlse(s) of<br />
energy. <strong>The</strong>se pulses can be interpreted as follows:<br />
• A single pulse is purely an indication that a keypad digit has been pressed and accepted.<br />
• A train of four consecutive pulses is normally associated with the many functions within the<br />
system and always means YES/OK/ACCEPT.<br />
• A single, long pulse is again associated with the functions but normally means NO.<br />
FACTORY SETIINGS<br />
Exit delay period 30 seconds<br />
Entry delay period 20 seconds<br />
Siren on-time 60 seconds<br />
Security Code 1-2-3-4
<strong>The</strong> System will not arm<br />
<strong>The</strong>re are only two reasons for this situation.<br />
(1) <strong>The</strong> code that has been entered was incorrect, or<br />
(2) One of the following sensors is active:<br />
(a) <strong>The</strong> Tilt sensor, upon which the siren would emit two long pulses when attempting to arm the<br />
system or<br />
(b) <strong>The</strong> battery box/gas bottle box sensor(s) are active, upon which the siren would emit one long<br />
pulse when attempting to arm the system,<br />
HINTS AND TIPS<br />
<strong>The</strong> Tilt sensor<br />
Whenever the Tilt sensor is adjusted, always observe the guides (on the side of the housing) as they<br />
are an excellent aid for optimum settings. Setting the sensor with the guides placed in either direction<br />
will reduce the sensitivity for the opposite direction so the user may prefer a mid-setting for the best all<br />
round performance.<br />
Providing that the caravan is level then the guides should be set in the middle for optimum protection.<br />
When your caravan is in storage, you should lower the front end of the caravan so that any attempted<br />
'hitching-up' requires a good degree of lift at the front end. If you set the Tilt sensor so that this area of<br />
lift is well covered, it will be very difficult for anyone to succeed in 'hitching-up' without triggering the<br />
<strong>alarm</strong>.<br />
To set up the Tilt sensor, see 'Test/set-up tilt sensor',<br />
Entry Delay<br />
Try to select a delay period that gives you ample time to disarm the system but with only a few<br />
seconds to spare. Selecting a time such as ninety seconds will also give an intruder this length of<br />
time! To change the Entry delay period see 'Change entry delay'.<br />
Battery Life<br />
A fully charged battery will power the IDM-1 for at least a year (providing the siren is not active more<br />
than four times).<br />
Please charge the battery for at least 48 hours before storing your caravan (the integral charger is<br />
already wired into your caravan electrical system). Always check the battery state before arming the<br />
IDM-1, see 'Test battery status'.<br />
HOW TO CHANGE AND TEST FUNCTIONS<br />
1 Change personal code Press NEW key, then press 1, now enter the old code (1,2,3,4 =<br />
manufacturer's code), now enter your new code and confirm by pressing the NEW key.<br />
2 Change exit delay Press NEW key, then press 2, now enter three digits (e.g. to set a time of 22<br />
seconds enter 0,2,2, the three digits represent minutes, seconds x 10 and seconds x1) and confirm by<br />
pressing NEW key.<br />
3 Change siren-on time Press NEW key, then press 3, now enter three digits (e.g. to set a time of 22<br />
seconds enter 0,2,2, the three digits represent minutes, seconds x 10 and seconds x1) and confirm by<br />
pressing NEW key.<br />
4 Change entry delay Press NEW key, then press 4, now enter new entry delay time (e.g. to set a<br />
time of 22 seconds enter 0,2,2, the three digits represent minutes, seconds x 10 and seconds x1) and<br />
confirm by pressing NEW key.
Note: A time limit of four minutes is imposed when in the test modes described in items 5 to 8<br />
inclusive, at the end of four minutes the siren will emit a short warning after which the system will<br />
return to standby.<br />
5 Test the PIR Press TST key, then press 1, you can now 'walk-test' the PIR. To leave this test mode<br />
press CLR key.<br />
6 Test door sensor Press TST key, then press 2, now test the sensor by opening and closing the exit<br />
door. To leave test mode press CLR key.<br />
7 Test battery/gas bottle box sensor Press TST key, then press 3, now test the sensor(s) by opening<br />
and closing the relevant door(s). Terminate test mode by pressing CLR key.<br />
8 Test/Set-up tilt sensor Press TST key, then press 4, now alter the sensitivity of the tilt sensor by<br />
adjusting the 'Philips' type screw that is accessed from the top of the unit housing, observe the guides<br />
on the side of the housing as they are a good indication for settings. See 'Hints and Tips' for further<br />
information. Press CLR to terminate.<br />
9 Test battery charger status Press TST key, then press 5, a series of four beeps will be heard if the<br />
charger is on, one long beep will be heard if the<br />
charger is off. No need to press CLR key. Your charger is designed to protect the battery from being<br />
overcharged, so it can remain switched on. Please ensure that<br />
the 240v supply is switched on.<br />
10 Test battery status Press TST key, then press 6, you will now hear a series of four long beeps, four<br />
indicates a battery 13v or over, three means 12v to 13v, two means 11 v to 1 and one means under<br />
11 v (needs charging). No need to press CLR key.<br />
11 Test siren Press TST key, then press 7, the siren will sound until the 7 key is released. No need to<br />
press CLR key.