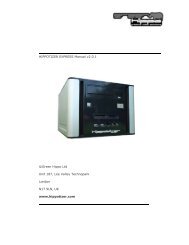
Quasar 15K Operating Manual - Tmb.com
Quasar 15K Operating Manual - Tmb.com
Quasar 15K Operating Manual - Tmb.com

Create successful ePaper yourself
Turn your PDF publications into a flip-book with our unique Google optimized e-Paper software.
<strong>Quasar</strong> <strong>15K</strong><br />
<strong>Operating</strong> <strong>Manual</strong><br />
PRELIMINARY<br />
Revised: 051413
<strong>Quasar</strong> <strong>Operating</strong> <strong>Manual</strong><br />
CONTENTS<br />
OVERVIEW 3<br />
Safety precautions 3<br />
Main features 4<br />
INSTALLATION 5<br />
Unpacking 5<br />
Checking accessories 5<br />
Controls and switches 6<br />
Best location for installation 6<br />
CONNECTING THE UNIT 7<br />
Connection to mains power 7<br />
Connection to a DMX 512 network 7<br />
UNIT CONFIGURATION 8<br />
Menu Operation 8<br />
Menu Option 1: DMX Address 9<br />
Entering DMX mode 9<br />
DMX Features 9<br />
Chaining Multiple Units 9<br />
Menu Option 2: Fixture Modes 10<br />
<strong>Operating</strong> the Unit 14<br />
Re<strong>com</strong>mended Controllers 15<br />
ADDITIONAL INFORMATION 15<br />
Maintenance 15<br />
Changing the Flash Tube 15<br />
MENU MAP 16<br />
TECHNICAL SPECIFICATIONS 17<br />
CONTACT INFORMATION 18<br />
2
<strong>Quasar</strong> <strong>Operating</strong> <strong>Manual</strong><br />
OVERVIEW<br />
Thank you for purchasing the Solaris <strong>Quasar</strong> professional<br />
strobe. Please read this manual carefully before operation and<br />
keep it for future reference.<br />
CAUTION! To avoid danger of fire and electric shock, do not<br />
expose the unit to water or moisture and do not attempt to<br />
remove its cover. Repairs should be done by qualified and<br />
authorized personnel only. During operation, the unit’s<br />
discharge tube may draw power exceeding limit values.<br />
CAUTION! Do not look directly or indirectly into the<br />
discharge tube without eye protection such as welder’s<br />
goggles.<br />
1. Prior to installation, ensure that the mains voltage is<br />
between 190-260 VAC and the mains frequency is<br />
between 50-60 Hz.<br />
2. Make sure that the mains outlet used for powering the unit<br />
is of the earthed/grounded type and in perfect condition.<br />
3. Should any kind of liquid or solid material penetrate the<br />
unit, terminate operation immediately, then unplug the<br />
connector from the mains outlet, and contact an authorized<br />
repair facility.<br />
4. Do not cover the vents on the unit. Adequate ventilation is<br />
required for satisfactory operation and ensures long<br />
operating life.<br />
5. Even when turned off, the unit is powered if the connector<br />
is plugged into the mains outlet.<br />
3
<strong>Quasar</strong> <strong>Operating</strong> <strong>Manual</strong><br />
6. If you do not intend to use the strobe for a long period of<br />
time, unplug the connector from the outlet. When<br />
disconnecting from AC power, grab the mains connector<br />
securely and pull. Do not pull on the power lead.<br />
7. Replacing the connector should only be done by an<br />
authorized repair person. Do not tamper with or remove<br />
the mains plug from the end of the cord. Improper<br />
connection may cause fire owing to the unit’s high power<br />
consumption.<br />
8. Note to qualified service personnel: Before changing the<br />
discharge tube, switch off the equipment, unplug the<br />
mains lead, and wait for the strobe to cool down.<br />
Main Features<br />
• <strong>Quasar</strong>, DMX 512, turbo, normal<br />
• Extra-high intensity flashes<br />
• Optional Continuous duty (100 Hz)<br />
• DMX-512 In/Out<br />
• Software controlled overdrive protection (ETV)<br />
• Auto-detection of mains frequency<br />
• Overheating protection<br />
• Extra-high accuracy of flashes<br />
• 3-phase <strong>com</strong>patibility<br />
• Internal/external controllability: pulse, manual, DMX<br />
• Chain <strong>com</strong>patibility (MASTER – SLAVE)<br />
• Compact<br />
• Self-test functions<br />
• LED indication<br />
4
<strong>Quasar</strong> <strong>Operating</strong> <strong>Manual</strong><br />
INSTALLATION<br />
Unpacking<br />
Do not dispose of the shipping box and the packaging, as they<br />
are useful for transporting the unit. Before shipping, make sure<br />
the unit is packed the same way it was at the factory. During<br />
unpacking, check if the unit is undamaged and clean. If the<br />
unit is damaged, contact the freight <strong>com</strong>pany immediately. If<br />
the unit has be<strong>com</strong>e wet in the box, make sure it is <strong>com</strong>pletely<br />
dry before power-up. If operation should fail, contact the<br />
freight <strong>com</strong>pany with your <strong>com</strong>plaint.<br />
Checking Accessories<br />
After unpacking the unit, check all accessories and the<br />
condition of the discharge tube (use the mirror behind the<br />
tube). If the tube is damaged, report it to the freight <strong>com</strong>pany<br />
immediately.<br />
Accessories:<br />
• XOP 15 (or equivalent) discharge tube<br />
• Mains lead with powerCON connector<br />
• <strong>Operating</strong> manual<br />
• Rack ears<br />
• 2 barn doors<br />
5
Controls and switches<br />
<strong>Quasar</strong> <strong>Operating</strong> <strong>Manual</strong><br />
ENTER<br />
DMX THRU<br />
DMX IN<br />
1 2 3 5 4 6<br />
1. Menu / Enter Button<br />
2. Up / Down Menu Navigation buttons<br />
3. Menu LED<br />
4. DMX Out/Thru<br />
5. DMX Input<br />
6. powerCON Mains Input Connector<br />
Best Location for Installation<br />
Install the unit in a location with adequate ventilation. Avoid<br />
locations where the strobe may be exposed to heat, dust,<br />
vibration, or physical shock. Choose a location that enables<br />
easy connection of both the mains lead and control cables.<br />
Install the unit first before connecting the leads.<br />
CAUTION: The operating temperature of this fixture may<br />
exceed 120° C (240° F). Even after shutting down, touching<br />
the body of the unit may cause burns. Always wait for the<br />
fixture to cool down before handling. Do not place the unit<br />
near flammable materials.<br />
6
Connection to 230 V mains<br />
<strong>Quasar</strong> <strong>Operating</strong> <strong>Manual</strong><br />
CONNECTING THE UNIT<br />
• Use connectors with protective earthed ground only.<br />
• Connect the unit with controls set at minimum values.<br />
• Check connection. Loose connections may cause<br />
malfunction.<br />
• Programmed settings are retained even after a power<br />
loss. When powering up, the unit will return to its last<br />
known settings.<br />
Connection to a DMX-512 Network<br />
• Use standard (XLR 5) connectors. Check for loose<br />
connections, as they are a <strong>com</strong>mon source of malfunction.<br />
• Use high-quality professional DMX cables only.<br />
• The last strobe unit in a chain should have a TMB Arnold<br />
(or equivalent 120 Ω termination plug) installed into its<br />
DMX THRU XLR connector.<br />
• It is possible to change input connections and DMX base<br />
address while the strobe is turned on. The unit will<br />
recognize, execute, and indicate <strong>com</strong>mands even during<br />
operation.<br />
7
<strong>Quasar</strong> <strong>Operating</strong> <strong>Manual</strong><br />
UNIT CONFIGURATION<br />
Configuration of the <strong>Quasar</strong> unit is performed using the<br />
integrated menu system. Selection of menu options occurs<br />
using the Menu/Enter Key and the Up and Down navigation<br />
buttons. Menu options and user input are shown on an<br />
alphanumeric display. These panel features are depicted<br />
below:<br />
DMX addressing and Fixture Mode are configured using<br />
these panel controls to operate the unit menu.<br />
Menu Operation<br />
Fixture Mode is set across eleven (11) Menu options.<br />
Pressing the MENU/ENTER button will alternate between<br />
fixture mode and DMX address.<br />
8
<strong>Quasar</strong> <strong>Operating</strong> <strong>Manual</strong><br />
Menu Option 1: DMX Address<br />
Entering DMX Mode<br />
Press the MENU/ENTER button once. The current DMX base<br />
address (Channel 1) will be depicted on the numeric display.<br />
Pressing the UP/DOWN navigation buttons will increment<br />
or decrement the base address on the display. A single tap will<br />
alter the displayed address by one, while pressing and holding<br />
a navigation button will cause the address to change rapidly.<br />
Valid addresses will range from 1 to 511. Once the desired<br />
Base Address for Channel 1 is reached, pressing the MENU/<br />
ENTER Button will save this address as the new DMX Base<br />
Address.<br />
DMX Features<br />
The <strong>Quasar</strong> unit can be remotely controlled using industry<br />
standard DMX-512 protocol. In DMX Mode, Channel 1<br />
dictates the Strobe Rate. DMX values from 1-90% increase<br />
the frequency of strobe flash from 1-24 Hz. Above 90%<br />
activates Continuous Mode (constant light output). Channel<br />
2 accepts values which dictate flash intensity above 10%.<br />
Chaining Multiple Units<br />
Independent unit control of multiple flash units requires unique<br />
channel addresses to be programmed into each fixture. If<br />
identical control of multiple units from a single control source is<br />
desired, each unit may have the same DMX base address.<br />
9
<strong>Quasar</strong> <strong>Operating</strong> <strong>Manual</strong><br />
Menu Option 2: Fixture Modes<br />
The <strong>Quasar</strong> Fixture has eleven (11) modes of operation (see<br />
menu map, pg. 16).<br />
A - Automatic Mode. Use for standalone operation. The mode<br />
contains menus for Intensity, Duration, and Repeat Rate.<br />
AE2 - Automatic Effect Mode. Use for stand-alone operation.<br />
The mode contains menus for Intensity, Effect Speed, and<br />
Effect Select.<br />
AC1 - Atomic Compatible Mode (1 Channel). This mode is<br />
<strong>com</strong>parable to an Atomic in 1 Channel mode. Allows for<br />
control of Rate on 1 channel of DMX.<br />
DMX Channel Value Percent Function<br />
0-5 0-2 Blackout<br />
1 6-249 3-97 Flash Rate Slow to Fast<br />
250-255 98-100 Continuous On Effect<br />
AC3 - Atomic Compatible Mode (3 Channel). This mode is<br />
<strong>com</strong>parable to an Atomic in 3 Channel mode. Allows for<br />
control of Intensity, Duration, and Rate on 3 channels of DMX.<br />
DMX Channel Value Percent Function<br />
1 Intensity<br />
0-5 0-2 Blackout<br />
6-255 3-100 1-100%<br />
2 Duration 0-255 0-100<br />
3 Rate<br />
0-5 0-2 No Flash<br />
6-255 3-100<br />
0-650ms @50Hz<br />
or, 0-530ms @ 60Hz<br />
0.5-25Hz @ 50Hz or,<br />
0.6-30Hz @ 60Hz<br />
10
<strong>Quasar</strong> <strong>Operating</strong> <strong>Manual</strong><br />
AC4 - Atomic Compatible Mode (4 Channel). This mode is<br />
<strong>com</strong>parable to an Atomic in 4 Channel mode. Allows for<br />
control of Intensity, Duration, Rate, and Effect on 3 channels<br />
of DMX.<br />
DMX Channel Value Percent Function<br />
1 Intensity<br />
0-5 0-1 Blackout<br />
6-255 2-100 1-100%<br />
2 Duration 0-255 0-100<br />
3 Rate<br />
4 Effect<br />
0-5 0-1 No Flash<br />
6-255 2-100<br />
0-5 0-2 No Effect<br />
6-42 2-16 Ramp up<br />
0-650ms @50Hz or,<br />
0-530ms @ 60Hz<br />
0.5-25Hz @ 50Hz or,<br />
0.6-30Hz @ 60Hz<br />
43-85 17-33 Ramp down<br />
86-128 34-50 Ramp up-down<br />
129-171 51-67 Random<br />
172-214 68-84 Lightning<br />
215-255 85-100 Spikes<br />
SLF - Self Test. This mode will flash the strobe in order to test<br />
for proper lamp operation.<br />
FS – Fixture Settings. Allows control of power reduction,<br />
display intensity, and menu mode.<br />
d - DMX Mode. Controls Rate and Intensity on 2 channels of<br />
DMX.<br />
DMX Channel Value Percent Function<br />
0-230 0-90 Slow to Fast<br />
1 Rate<br />
231-255 91-100 Continuous On Effect<br />
2 Intensity 0-255 0-100 0 -100%<br />
11
<strong>Quasar</strong> <strong>Operating</strong> <strong>Manual</strong><br />
dE2 - DMX Effect Mode (2 Channel). Controls Rate/Effect and<br />
Intensity on 2 channels of DMX.<br />
DMX Channel Value Percent Function<br />
0-117 0-45 Rate Slow to Fast<br />
118-127 46-50 Continous On Effect<br />
128-148 51-58 Ramp up (slow to fast)<br />
149-168 59-66 Ramp down (slow to fast)<br />
1 Rate/Effects 168-188 67-74 Ramp up-down (slow to fast)<br />
189-209 75-82 Ramp down-up (slow to fast)<br />
210-229 83-90 Random (slow to fast)<br />
230-250 91-98 Spikes (slow to fast)<br />
251-255 99-100 No effect<br />
2 Intensity 0-255 0-100 0-100%<br />
dE4 - DMX Effect Mode (4 Channel). Controls Rate, Intensity,<br />
Effect, and Effect Speed on 4 channels of DMX.<br />
DMX Channel Value Percent Function<br />
1 Rate 0-255 0-100 Slow to Fast<br />
2 Intensity 0-255 0-100 0-100%<br />
0-26 0-10 No Effect<br />
3 Effect<br />
27-247 11-97 Random Lighting slow to fast<br />
248-251 98 constant on<br />
252-255 99-100 nothing<br />
4 Effect Amplitude 0-255 0-100 Size Small to Large<br />
12
<strong>Quasar</strong> <strong>Operating</strong> <strong>Manual</strong><br />
H - Allows the unit to be controlled by optional Solaris Remote<br />
or High End ® flash control protocol. Similar to DMX operation,<br />
two sequential channels are programmed. In H mode fixture<br />
Intensity and flash Strobe Frequency are controlled by the<br />
refresh rate of the H signal on Channel 1.<br />
The H mode provides preset effects which are selected based<br />
upon the value issued to Channel 2. These values and the<br />
effect selected are depicted below.<br />
DMX Channel Value Percent Function<br />
1 Intensity 0-255 0-100 0-100%<br />
0-10 0-1 Constant Fast Strobe<br />
2 Control<br />
11-255 2-100 Constant On Effect<br />
13
<strong>Quasar</strong> <strong>Operating</strong> <strong>Manual</strong><br />
<strong>Operating</strong> the unit<br />
After proper installation, connection, and Menu Setup, you can<br />
start using all the outstanding features that the <strong>Quasar</strong> offers.<br />
• Extra-high intensity output. This can be achieved by<br />
selecting Turbo Mode, which will double the unit’s light<br />
output (except when in Continuous mode).<br />
• Continuous flashes. The unit can fire flashes at a rate of 100<br />
or 120 Hz if the mains frequency is 50 or 60 Hz, respectively.<br />
Such a high rate of flashes is perceived as continuous<br />
illumination. Regardless of the kind of controller system<br />
being used, this function is always available.<br />
• During operation, the flash tube is under constant electronic<br />
overdrive protection (EVD). In Continuous Mode and with<br />
maximum intensity, the protection allows flashes for 3.5<br />
seconds, with a subsequent downtime of 51.2 seconds. In<br />
Turbo and Normal Modes, the protection times are 11.7 and<br />
52.5 seconds, respectively. Even if the unit is used for<br />
shorter periods of time, the system switches the tube off as<br />
soon as overall duration reaches the given protection time.<br />
Protection time increases with lower intensity.<br />
In order to ensure maximum safety, the strobe has two more<br />
protection systems against overheating. Both systems are<br />
designed to activate in unusual operating conditions and are<br />
“self-resetting”.<br />
14
<strong>Quasar</strong> <strong>Operating</strong> <strong>Manual</strong><br />
When turned on for the first time, the unit automatically<br />
detects mains frequency. No manual setting is required.<br />
• <strong>Quasar</strong> can produce more accurate “jitter free” flashes,<br />
even at frequencies higher than 10Hz.<br />
• Any fixture connected to any phase can be controlled in the<br />
same way. When using more than one strobe, it is<br />
advisable to assign different phases to the fixtures owing to<br />
high power draw.<br />
Re<strong>com</strong>mended Controllers<br />
• Solaris <strong>Quasar</strong> Controller<br />
• High End Dataflash AF1000 Mini Controller (Switch the<br />
JUMPER from DMX to DFLASH position on the PCB).<br />
Maintenance<br />
ADDITIONAL INFORMATION<br />
Keep the fan and surrounding area free of dust and dirt. The<br />
mirror can be cleaned without having to dismantle the unit.<br />
Simply blow air through the grid. The mirror does require any<br />
further cleaning. More thorough cleaning of the mirror and its<br />
surroundings should ONLY be done by the manufacturer or<br />
qualified and authorized repair personnel.<br />
Changing the Flash Tube<br />
The <strong>Quasar</strong> flash tube may only be changed by the<br />
manufacturer or a qualified repair person authorized by the<br />
Manufacturer.<br />
15
<strong>Quasar</strong> <strong>Operating</strong> <strong>Manual</strong><br />
MENU MAP<br />
16
<strong>Quasar</strong> <strong>Operating</strong> <strong>Manual</strong><br />
TECHNICAL SPECIFICATIONS<br />
FIXTURE<br />
POWER CONTROL DEVICES PERFORMANCE LAMP<br />
Maximum continuous flash<br />
discharge<br />
Single flash discharge<br />
Frequency of continuous mode<br />
Flash tube type<br />
Color temperature<br />
57,000 Joules<br />
150 Joules<br />
100 / 120 Hz<br />
Special <strong>Quasar</strong> tube (with plugs)<br />
6,000° Kelvin<br />
Intensity control 0-100 %<br />
Adjustable flash frequency<br />
Power draw (Turbo)<br />
Max. power draw (Continuous)<br />
Modes<br />
Electronic overdrive protection<br />
Overheating protection<br />
Programmed Self-Test 1<br />
Channel 1<br />
Channel 2<br />
0-20/24 Hz<br />
6 kW<br />
15 kW<br />
Normal<br />
Turbo<br />
3.5 seconds max.<br />
Dual, self-resetting<br />
Frequency<br />
Intensity<br />
# of possible starting addresses 511 max.<br />
Connection type<br />
Data conversion<br />
Protocol<br />
Nominal mains voltage<br />
Maximum power consumption<br />
XLR 3-Pin or 5-Pin<br />
From DMX to PULSE<br />
DMX-512<br />
190-260 VAC, 50/60 Hz<br />
Continuous<br />
Turbo<br />
Protection from breaking flash tube Protective grid<br />
Mounting<br />
Corrosion protection<br />
Unit weight<br />
Shipping weight<br />
Unit Dimensions (HxWxD)<br />
Shipping Dimensions (HxWxD)<br />
Adjustable swivel yoke<br />
Electrostatic sintering<br />
7.8 lb. (3.6 Kg)<br />
10.6 lb. (4.8 Kg)<br />
7.5” x 21.5” x 5.5”<br />
(19 x 54.6 x 14 cm)<br />
10.5” x 23.75” x 9”<br />
(27 x 60.5 x 23 cm)<br />
60 A (3.5 sec.)<br />
32 A (11.5 sec.)<br />
17
<strong>Quasar</strong> <strong>Operating</strong> <strong>Manual</strong><br />
CONTACT INFORMATION<br />
TMB Worldwide<br />
TMB LA: +1 818.899.8818<br />
TMB NY: +1 201.896.8600<br />
TMB UK: +44 (0)20.8574.9700<br />
TMB Canada: +1 519.986.9991<br />
TMB Beijing: +86 10.8492.1587<br />
e-mail: tmb-info@tmb.<strong>com</strong><br />
web: www.tmb.<strong>com</strong><br />
TMB 24/7 Technical Support<br />
US/Canada: 1 877.TMB.DUDE (1 877.862.3833)<br />
UK: 0800.652.5418<br />
International: +1 818.794.1286<br />
e-mail: techsupport@tmb.<strong>com</strong><br />
18