A S LD200-12 Operating Manual A S - Energy Matters
A S LD200-12 Operating Manual A S - Energy Matters
A S LD200-12 Operating Manual A S - Energy Matters

Create successful ePaper yourself
Turn your PDF publications into a flip-book with our unique Google optimized e-Paper software.
Notes<br />
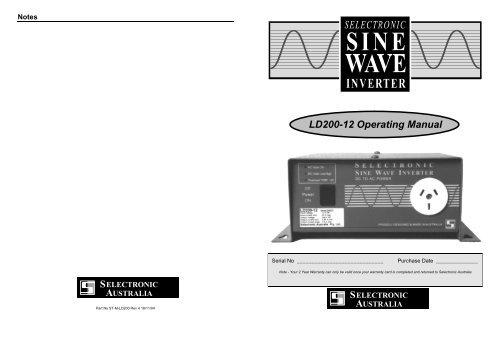
<strong>LD200</strong>-<strong>12</strong> <strong>Operating</strong> <strong>Manual</strong><br />
Serial No _____________________________<br />
Purchase Date ______________<br />
S<br />
A<br />
ELECTRONIC<br />
USTRALIA<br />
Part No ST-M-<strong>LD200</strong> Rev 4 18/11/04<br />
Note - Your 2 Year Warranty can only be valid once your warranty card is completed and returned to Selectronic Australia<br />
S<br />
A<br />
ELECTRONIC<br />
USTRALIA
<strong>LD200</strong>-<strong>12</strong> Volt Owners <strong>Manual</strong><br />
Contents<br />
Page No.<br />
Introduction 1<br />
Warranty Card 1<br />
Installation 1<br />
Batteries and Connections 4<br />
Getting Started Quickly 6<br />
Parts Identification 6<br />
Operation 7<br />
Status Indicators 7<br />
Maintenance 8<br />
Inverter 8<br />
Batteries 8<br />
Radio Frequency Interference 9<br />
Fault Finding 10<br />
Product Warranty Conditions 11<br />
Specifications <strong>12</strong><br />
Selectronic Service Network 13<br />
Selectronic Authorised Service Network<br />
Selectronic Australia<br />
Suite 5, 20 Fletcher Road<br />
Mooroolbark<br />
Victoria 3138<br />
Australia<br />
Ph: +61 3 9727 6600<br />
Fax: +61 3 9727 6601<br />
service@selectronic.com.au<br />
Burley TV Service<br />
Rainbow Power Company<br />
278 Edmondson Ave. 1 Alternative Way<br />
Austral<br />
Nimbin<br />
NSW 2171 NSW 2480<br />
Australia<br />
Australia<br />
Ph: 02 9606-0279 Ph: 02 6689 1430<br />
Fax: 02 6689 1109<br />
Reid Technology Ltd<br />
3-5 Auburn Street<br />
Solar Inverter Services<br />
Takapuna<br />
13 Thirteenth Ave. North Shore City<br />
Sawtell Auckland NZ<br />
NSW Ph: 9 489-8100<br />
2452 Fax: 9 489-8585<br />
Ph: 02 66581733<br />
ps@reidtechnology.co.nz<br />
Legend for Symbols<br />
Warnings and<br />
electrician’s notes Hints and Pointers Examples<br />
<strong>LD200</strong> <strong>Manual</strong><br />
13<br />
Selectronic Australia
<strong>LD200</strong> <strong>12</strong> Volt Specifications<br />
Inverter Type Microprocessor control circuit with PWM full bridge power<br />
stage. True sine wave AC output.<br />
Current draw from Battery<br />
Condition<br />
Inverter ON, with no Load<br />
Maximum Continuous Load (200 Watt)<br />
Surge rating (600 Watt)<br />
Inverter Power Ratings @ 25º C<br />
Condition<br />
Continuous<br />
Half hour rating<br />
Surge rating (3 seconds)<br />
Amperage<br />
0.30 Amps<br />
20.0 Amps<br />
55 Amps<br />
Total Inverter output<br />
Wattage @ 1.0pf<br />
200 Watt<br />
250 Watt<br />
600 Watt<br />
Current<br />
0.83 Amps<br />
1.04 Amps<br />
2.0 Amps<br />
Introduction<br />
Thank you for choosing to purchase the Selectronic <strong>LD200</strong> True Sine<br />
Wave Inverter. Many hours of Research and Development have gone<br />
into the <strong>LD200</strong> to ensure this inverter provides you with many years of<br />
reliable service<br />
Warranty Card<br />
It is imperative that you complete your warranty card NOW. Your <strong>LD200</strong><br />
is covered by a TWO year warranty; this warranty is in addition to your<br />
rights under the trade practices act of your state or territory.<br />
Returning your completed warranty card will register your warranty and<br />
avoid any possible delays should service be required. If you have any<br />
comments about our product that will not fit on the warranty card please<br />
feel free to drop us a line. Yes, constructive criticism will also be welcome.<br />
Installation<br />
Battery Voltage Range<br />
Low DC Volts Cut Out–10 second delay<br />
Low DC Volts Cut In<br />
High DC Volts Cut Out–Instantaneous<br />
Miscellaneous Specifications<br />
Reverse Polarity Protection<br />
Output Voltage Accuracy 0-200 watts<br />
Output Frequency<br />
Total Harmonic Distortion<br />
<strong>Operating</strong> Temperature Range<br />
Socket Outlet<br />
Chassis<br />
Voltage<br />
11 volts<br />
<strong>12</strong> volts<br />
17 volts<br />
Full Electronic Protection<br />
± 4% @ <strong>12</strong> volt input<br />
50Hz ± 0.01%<br />
Product Warranty Conditions<br />
Warning<br />
Large amounts of DC current can be drawn by your <strong>LD200</strong>, care<br />
must be taken.<br />
Fixed Installation<br />
All fixed installation battery connections must be securely bolted,<br />
using stainless steel nuts and bolts. To protect the connection from<br />
corrosion smear a small amount of Vaseline or similar over the<br />
joint. Never place batteries directly onto a concrete floor, place<br />
timber or similar material beneath the batteries.<br />
As a matter of safety, Selectronic strongly recommend that all fixed<br />
installations be designed and installed by appropriately qualified person. The Business<br />
Council for Sustainable <strong>Energy</strong> in your state or territory can provide names of<br />
accredited system designers and installers.<br />
The output voltage from an inverter is as lethal as mains electricity.<br />
All AC wiring MUST be carried out by an accredited electrician and must conform to<br />
AS3000 and/or any relevant local standards.<br />
Electricians Note<br />
• All Earths, AC and DC, should be bonded<br />
• RFI/Lightning Earth stake should be within 3m of the inverter<br />
• The <strong>LD200</strong> is suitable for connection to MEN wiring<br />
• Any AC changeover switch must be a ‘break before make’ type<br />
Warranty<br />
Selectronic Australia Pty Ltd warrants your inverter to be free from<br />
defects in materials and workmanship under normal use and<br />
service, for an initial period of two (2) years. Defective parts will<br />
be replaced or repaired free of charge within this period.<br />
Conditions<br />
This warranty is applicable only from the date of original purchase.<br />
The provision of this warranty shall not apply if the unit has been<br />
subject to misuse, neglect, act of God, accidental damage or has<br />
been used for a purpose for which it is not intended.<br />
Unauthorised modification or repair will void your warranty.<br />
To ensure a smooth and speedy response to your warranty claim,<br />
please complete and return your reply paid warranty card within 30<br />
days from date of purchase.<br />
Within Australia & New Zealand<br />
The inverter must be returned, at the owner’s cost, to an authorised<br />
service centre listed in this manual. There will be no charge for the<br />
return of the inverter.<br />
Outside Australia & New Zealand<br />
Product purchased for use outside Australia & New Zealand must<br />
be returned to Selectronic Australia’s Service Centre to enable<br />
warranty claims to be processed. Freight cost to be borne by the<br />
customer. No charge will be made for the product return.<br />
<strong>LD200</strong> <strong>Manual</strong><br />
2<br />
Selectronic Australia<br />
<strong>LD200</strong> <strong>Manual</strong><br />
11<br />
Selectronic Australia
Fault Finding<br />
No indicators ON when power is first applied<br />
When first connected, if the <strong>LD200</strong> shows no indicators the battery<br />
connections may be reversed. Check that the red battery wire (6) is connected<br />
to the battery positive, and the black battery wire (7) is connected to the<br />
battery negative.<br />
Inverter shuts down during the middle of the day, and comes<br />
back ON late in the afternoon<br />
This is more than likely caused by high battery volts during peak charging<br />
times from Solar Panels. Battery volts should never exceed 17 volts. If this is<br />
the case, have your Solar Regulator checked.<br />
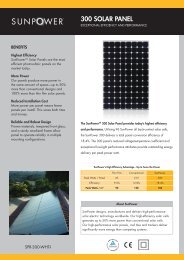
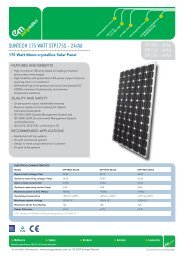
Portable Use<br />
By connecting battery clips, the <strong>LD200</strong> can be clipped directly to a vehicle<br />
battery. When using battery clips ensure they have a tight grip around the<br />
battery post. Wherever possible battery connections should be bolted. If<br />
connecting the <strong>LD200</strong> through a cigarette lighter socket the maximum<br />
power output of the <strong>LD200</strong> will be severely restricted, this practice should<br />
be avoided. Check with your supplier or installer if you are unsure.<br />
Do not use battery clips in a moving vehicle<br />
Start Battery<br />
Earth (to chassis)<br />
<strong>LD200</strong> Inverter<br />
Isolator<br />
Vehicle<br />
Alternator<br />
Auxiliary Battery<br />
Earth (to chassis)<br />
By incorporating an auxiliary battery in the manner above, the starting battery<br />
should remain charged for vehicle starting (see your auto electrician).<br />
The <strong>LD200</strong> has sufficient battery cable length to allow it to sit underneath the<br />
vehicle whilst in use. If the ground is wet, place the <strong>LD200</strong> on a waterproof<br />
liner.<br />
<strong>LD200</strong> <strong>Manual</strong><br />
10<br />
Selectronic Australia<br />
<strong>LD200</strong> <strong>Manual</strong><br />
3<br />
Selectronic Australia
Batteries and Connections<br />
Batteries are the key to maximum performance from your <strong>LD200</strong>, if a<br />
battery is too small or not fully charged it may result in de-rated<br />
performance from your <strong>LD200</strong>.<br />
Battery ratings<br />
Batteries can be rated in one of two ways:<br />
1. CCA = Cold Cranking Ability. This is the amount of power or current<br />
that a battery can deliver for a short period, typically a few seconds. This<br />
how a car battery would normally be rated.<br />
2. Ah = Ampere Hours. This is the maximum amount of energy that can be<br />
stored in a battery; this figure will generally be stated at a particular hour<br />
rate. This is how a deep cycle or storage battery would normally be rated.<br />
100Ah @100hr, this means that when this battery is discharged over<br />
a period of 100 hours, the battery has a capacity of 100Ah. This in<br />
theory means 1 Amp for 100 hours, although this would in practice<br />
result in a totally discharged battery that may not then recover.<br />
To achieve maximum performance from your <strong>LD200</strong> you must have a<br />
battery capable of delivering 50 Amps for a short period whilst maintaining<br />
at least 10.5 volts. To increase the capacity of your battery you may need to<br />
join more than one battery together.<br />
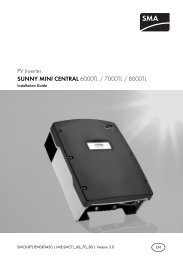
• Where batteries are joined<br />
in series, add the voltage of<br />
each battery.<br />
The capacity will equal the capacity of the smallest battery. 2 x <strong>12</strong><br />
Volt 100 Ah batteries connected in series would have a total<br />
capacity of 24 Volts – 100 Ah. This would not suit your <strong>12</strong> Volt<br />
<strong>LD200</strong>.<br />
3. Once a fortnight or as directed in your battery manufacturer, check the<br />
specific gravity (SG) of each battery cell using a hydrometer, to ensure<br />
that all cells are performing correctly and are properly charged. Any<br />
serious imbalance should be reported to your system designer in case<br />
remedial action needs to be taken.<br />
Radio Frequency Interference<br />
Radio Frequency Interference (RFI) can be a problem for owners of inverters.<br />
RFI in a domestic situation may produce noise or interference on a radio or<br />
TV receiver.<br />
Considerable development time has resulted in a reduction of the RFI<br />
generated by the inverter to a level that complies with C-tick requirements.<br />
Compliance to this standard means RFI is low, but how well the inverter<br />
performs in a particular installation can vary. Below are some suggestions to<br />
help reduce the effects of RFI in your installation;<br />
• It is recommended that the power system including the inverter be<br />
housed at least 15 metres from the home.<br />
• Ensure an earth stake is placed as close to the inverter as possible and<br />
connected to the inverter via a short length of wire. See page 2 for<br />
wiring details.<br />
• Avoid running DC cables into the home, if at all possible. If this<br />
cannot be avoided, run DC and AC in separate conduits separated by<br />
as much distance as practicable. All DC wiring should also be kept<br />
together and be as short as possible.<br />
• If your inverter is to be installed in a mobile home or similar, try to<br />
keep your inverter at least one metre away from your radio or audio<br />
equipment. The further the better.<br />
<strong>LD200</strong> <strong>Manual</strong><br />
4<br />
Selectronic Australia<br />
<strong>LD200</strong> <strong>Manual</strong><br />
9<br />
Selectronic Australia
Maintenance<br />
Inverter<br />
Periodic maintenance of your <strong>LD200</strong> inverter involves little more than<br />
checking for any obstructions to the black cooling heatsink at the rear of the<br />
inverter. The heatsink must be cleared of any accumulated foreign matter that<br />
may have lodged itself between the fins since the last maintenance check, e.g.<br />
insect nests. Also verify that airflow around the inverter has not become<br />
restricted.<br />
Batteries<br />
1. Every week, carry out a thorough visual inspection of all battery<br />
wiring, taking particular note of the condition of inter-connections<br />
between cells. This maintenance should be carried out in conjunction<br />
with the battery manufacturers recommended maintenance.<br />
Safety Hint<br />
When working on batteries of such high capacity it is<br />
essential that you wear protective clothing, some form of eye<br />
protection and rubber-soled work boots. Please regard your<br />
batteries with a great deal of caution, and if in any doubt,<br />
entrust this work to your supplier / installer.<br />
2. Check that the stainless steel inter-connecting bolts are tight and have<br />
no corrosion. If corrosion is evident, carefully follow the following<br />
procedure.<br />
• Disconnect the system battery fuse before working on the battery<br />
bank.<br />
• Unbolt the stainless steel bolts and nuts of any corroded<br />
connections and thoroughly clean the joint with a wire brush or<br />
file, taking extreme care not to short circuit any battery cells with<br />
any tools.<br />
• Re-assemble and smear a small amount of Vaseline or similar<br />
grease over the surface of the joint to slow down any future<br />
corrosion.<br />
• Where batteries are joined<br />
in parallel, add the capacities<br />
together, the voltage will<br />
remain the same as each<br />
batteries voltage.<br />
2 x <strong>12</strong> Volt 100 Ah batteries connected in parallel would have a<br />
capacity of <strong>12</strong> Volts – 200 Ah.<br />
Only use identical batteries when joining batteries together.<br />
How long will my battery last<br />
To work out how long your battery will last follow this basic guide.<br />
This guide presumes commencing with a fully charged battery.<br />
Take the total rating of the appliance being run<br />
1 light globe 25watts<br />
1 20 inch TV 67watts<br />
1 VCR 30watts<br />
Total load =<strong>12</strong>2watts<br />
Divide this figure (<strong>12</strong>2) by 10 to know the approximate DC current draw<br />
=<strong>12</strong>.2Amps<br />
To convert this to Ampere hours, multiply by the number of hours used -<br />
Say 1 hour<br />
=<strong>12</strong>.2Ah<br />
So if we have a 50Ah battery, then with the above example we should have<br />
50 minus <strong>12</strong>.2 = 37.8 Ah remaining in the battery.<br />
As a general guide never discharge a battery below 50%. The deeper<br />
a battery is discharged on a regular basis, the less life you can<br />
expect from the battery. See you battery specifications for full<br />
details.<br />
<strong>LD200</strong> <strong>Manual</strong><br />
8<br />
Selectronic Australia<br />
<strong>LD200</strong> <strong>Manual</strong><br />
5<br />
Selectronic Australia
Getting Started Quickly<br />
If you want to get powered up quickly here are the 10 simple steps.<br />
1. Familiarise yourself with the details in the first 6 pages on this manual.<br />
2. Unpack the <strong>LD200</strong> from the packaging.<br />
3. Check unit for any damage that may have resulted during transport, if any<br />
damage is evident report this to your supplier immediately.<br />
4. Make sure the <strong>LD200</strong> ON/OFF switch (8) is in the off position.<br />
5. Connect battery positive wire (red) (6) to battery positive or battery fuse.<br />
6. Connect battery neg. wire (black) (7) to battery negative or battery fuse.<br />
7. Plug a 230 - 240V appliance into inverter front power point (4) but do<br />
not switch on.<br />
8. Turn ON/OFF switch (8) to ON.<br />
9. LED (1) will illuminate. If no LEDs light, check for correct connection to<br />
battery.<br />
10. You’re away.<br />
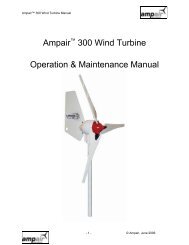
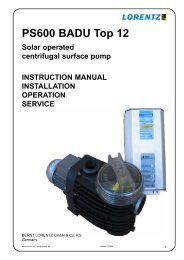
Parts Identification.<br />
LED (1)<br />
LED (2)<br />
LED (3) Socket Outlet (4)<br />
Operation<br />
Three LEDs are provided on the front panel to indicate the operating Status<br />
of the <strong>LD200</strong> Inverter.<br />
STATUS indicator LED’s<br />
LED 1, “ON”. Indicates that the inverter is supplying power to the load.<br />
LED 2, DC Volts Low / DC Volts High.<br />
“Flashing” If the inverter shuts down due to low battery voltage ( the battery<br />
is flat) then LED 2 will flash. Charge the battery by starting the vehicle or use<br />
a battery charger. When the battery is charged the battery voltage will rise,<br />
LED 2 will turn OFF and the inverter re-activate.<br />
“Permanently ON” If the inverter shuts down due to high battery voltage<br />
then LED 2 will stay ON. When the battery voltage is reduced LED 2 will<br />
turn OFF and the inverter re-activate.<br />
LED 3, Over temperature / AC Overload.<br />
“Flashing” If the inverter shuts down due to internal components getting too<br />
hot, then LED 3 will FLASH, and will FLASH until the temperature has<br />
dropped to a safe level. LED 3 will then turn OFF and the inverter reactivate.<br />
• If LED 3 is FLASHING regularly, either reduce the amount of load on<br />
the inverter or, if possible, move the inverter to a cooler location.<br />
“Permanently ON” If the inverter shuts down due to too much AC load<br />
being drawn from it then LED 3 will come ON. The inverter will remain in<br />
this condition for 1 minute after the AC load has been decreased to a safe<br />
level.<br />
ON/OFF Switch (8)<br />
Positive (Red) Battery lead (6) can be viewed from the rear.<br />
Negative (Black) Battery Lead (7) can be viewed from the rear.<br />
• If the inverter remains in this overload condition beyond one minute,<br />
switch 8 (ON /OFF Switch ) should be turned OFF and then back ON to<br />
re-activate the inverter.<br />
<strong>LD200</strong> <strong>Manual</strong><br />
6<br />
Selectronic Australia<br />
<strong>LD200</strong> <strong>Manual</strong><br />
7<br />
Selectronic Australia