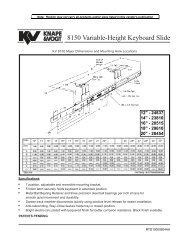
dovetail jig supplementary instruction manual (39887) - Rockler.com
dovetail jig supplementary instruction manual (39887) - Rockler.com
dovetail jig supplementary instruction manual (39887) - Rockler.com

Create successful ePaper yourself
Turn your PDF publications into a flip-book with our unique Google optimized e-Paper software.
TEMPLATES MOUNTED TO CLAMPING BOARDS<br />
You can mount the <strong>jig</strong> templates to clamping boards and take the templates to the workpiece to make the joint. The<br />
benefits of this operation are:<br />
1. You can maneuver a mounted template onto a large workpiece easier than clamping a large workpiece to the<br />
<strong>jig</strong>. This process allows you to join boards wider than 12" by routing a part of the joint, sliding the mounted<br />
template just past the original cut, and routing the remainder of the joint.<br />
Fig. 4A<br />
Fig. 4B<br />
Fig. 4C<br />
2. By using the clamping boards, you can rout boards that<br />
are too short to clamp in the <strong>jig</strong> base, allowing you to<br />
<strong>dovetail</strong> small decorative boxes.<br />
3. You can make half-blind joints in thicker wood than the <strong>jig</strong> can handle.<br />
4. You can make steeply-angled joints with the clamping boards.<br />
5. You can make joints using a router table by inverting the mounted templates.<br />
THROUGH-DOVETAILS WITH CLAMPING BOARDS<br />
You can use both the normal through-<strong>dovetail</strong> template (included with the 4212 Jig and the 4213 Accessory Kit),<br />
and the miniature through-<strong>dovetail</strong> template (included with the 4215 Accessory Kit) with a clamping board.<br />
NOTE: You can modify these clamping board methods to make box joints.<br />
SETUP<br />
Step 1 -<br />
Step 2 -<br />
Step 3 -<br />
Step 4 -<br />
Step 5 -<br />
Make a clamping board 2" x 3" x 19". Make sure<br />
that all four sides are square (You may need to<br />
glue thinner sections of wood together and<br />
plane them to make the 2" board).<br />
Drill the pilot holes for #10 screws on the face of<br />
the board as indicated in the drawing (Fig. 6A).<br />
Remove the brackets from the template (Fig.<br />
6B).<br />
Align the lines of the template with the edges of<br />
the clamping board. You should be able to see<br />
the pilot holes in the elongated slot of the<br />
template Fig. 6C).<br />
Drive two #10 wood screws through the<br />
elongated slots of the template into the<br />
clamping board (Fig. 6D).<br />
DRILL PILOT HOLES<br />
FOR #10 WOOD SCREWS<br />
19 "<br />
WOOD GRAIN<br />
13 "<br />
3 "<br />
1 "<br />
Fig. 6A<br />
2 "<br />
3 "<br />
6