SERVICE MANUAL - Page de test
SERVICE MANUAL - Page de test
SERVICE MANUAL - Page de test

You also want an ePaper? Increase the reach of your titles
YUMPU automatically turns print PDFs into web optimized ePapers that Google loves.
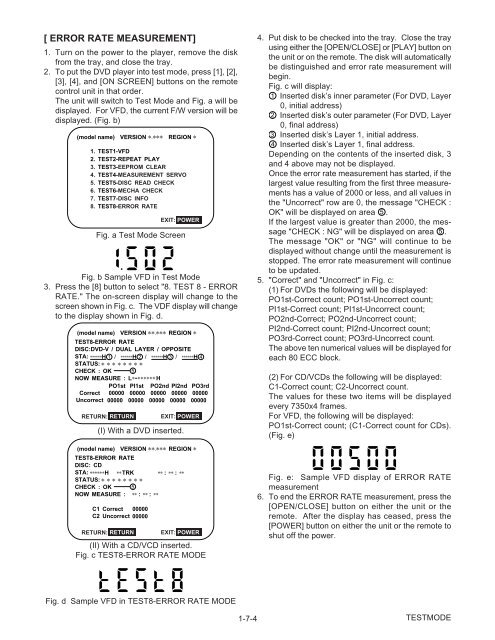
[ ERROR RATE MEASUREMENT]<br />
1. Turn on the power to the player, remove the disk<br />
from the tray, and close the tray.<br />
2. To put the DVD player into <strong>test</strong> mo<strong>de</strong>, press [1], [2],<br />
[3], [4], and [ON SCREEN] buttons on the remote<br />
control unit in that or<strong>de</strong>r.<br />
The unit will switch to Test Mo<strong>de</strong> and Fig. a will be<br />
displayed. For VFD, the current F/W version will be<br />
displayed. (Fig. b)<br />
(mo<strong>de</strong>l name) VERSION . REGION<br />
1. TEST1-VFD<br />
2. TEST2-REPEAT PLAY<br />
3. TEST3-EEPROM CLEAR<br />
4. TEST4-MEASUREMENT SERVO<br />
5. TEST5-DISC READ CHECK<br />
6. TEST6-MECHA CHECK<br />
7. TEST7-DISC INFO<br />
8. TEST8-ERROR RATE<br />
EXIT: POWER<br />
Fig. a Test Mo<strong>de</strong> Screen<br />
Fig. b Sample VFD in Test Mo<strong>de</strong><br />
3. Press the [8] button to select "8. TEST 8 - ERROR<br />
RATE." The on-screen display will change to the<br />
screen shown in Fig. c. The VDF display will change<br />
to the display shown in Fig. d.<br />
(mo<strong>de</strong>l name) VERSION . REGION<br />
TEST8-ERROR RATE<br />
DISC:DVD-V / DUAL LAYER / OPPOSITE<br />
STA:<br />
STATUS:<br />
H 1 / H 2 / H 3 / H 4<br />
CHECK : OK 5<br />
NOW MEASURE : L H<br />
PO1st PI1st PO2nd PI2nd PO3rd<br />
Correct 00000 00000 00000 00000 00000<br />
Uncorrect 00000 00000 00000 00000 00000<br />
RETURN: RETURN<br />
EXIT: POWER<br />
(I) With a DVD inserted.<br />
(mo<strong>de</strong>l name) VERSION . REGION<br />
TEST8-ERROR RATE<br />
DISC: CD<br />
STA:<br />
STATUS:<br />
H TRK : :<br />
CHECK : OK 5<br />
NOW MEASURE : : :<br />
C1 Correct 00000<br />
C2 Uncorrect 00000<br />
RETURN: RETURN<br />
EXIT: POWER<br />
(II) With a CD/VCD inserted.<br />
Fig. c TEST8-ERROR RATE MODE<br />
4. Put disk to be checked into the tray. Close the tray<br />
using either the [OPEN/CLOSE] or [PLAY] button on<br />
the unit or on the remote. The disk will automatically<br />
be distinguished and error rate measurement will<br />
begin.<br />
Fig. c will display:<br />
1 Inserted disk’s inner parameter (For DVD, Layer<br />
0, initial address)<br />
2 Inserted disk’s outer parameter (For DVD, Layer<br />
0, final address)<br />
3 Inserted disk’s Layer 1, initial address.<br />
4 Inserted disk’s Layer 1, final address.<br />
Depending on the contents of the inserted disk, 3<br />
and 4 above may not be displayed.<br />
Once the error rate measurement has started, if the<br />
largest value resulting from the first three measurements<br />
has a value of 2000 or less, and all values in<br />
the "Uncorrect" row are 0, the message "CHECK :<br />
OK" will be displayed on area 5 .<br />
If the largest value is greater than 2000, the message<br />
"CHECK : NG" will be displayed on area 5 .<br />
The message "OK" or "NG" will continue to be<br />
displayed without change until the measurement is<br />
stopped. The error rate measurement will continue<br />
to be updated.<br />
5. "Correct" and "Uncorrect" in Fig. c:<br />
(1) For DVDs the following will be displayed:<br />
PO1st-Correct count; PO1st-Uncorrect count;<br />
PI1st-Correct count; PI1st-Uncorrect count;<br />
PO2nd-Correct; PO2nd-Uncorrect count;<br />
PI2nd-Correct count; PI2nd-Uncorrect count;<br />
PO3rd-Correct count; PO3rd-Uncorrect count.<br />
The above ten numerical values will be displayed for<br />
each 80 ECC block.<br />
(2) For CD/VCDs the following will be displayed:<br />
C1-Correct count; C2-Uncorrect count.<br />
The values for these two items will be displayed<br />
every 7350x4 frames.<br />
For VFD, the following will be displayed:<br />
PO1st-Correct count; (C1-Correct count for CDs).<br />
(Fig. e)<br />
Fig. e: Sample VFD display of ERROR RATE<br />
measurement<br />
6. To end the ERROR RATE measurement, press the<br />
[OPEN/CLOSE] button on either the unit or the<br />
remote. After the display has ceased, press the<br />
[POWER] button on either the unit or the remote to<br />
shut off the power.<br />
Fig. d Sample VFD in TEST8-ERROR RATE MODE<br />
1-7-4 TESTMODE