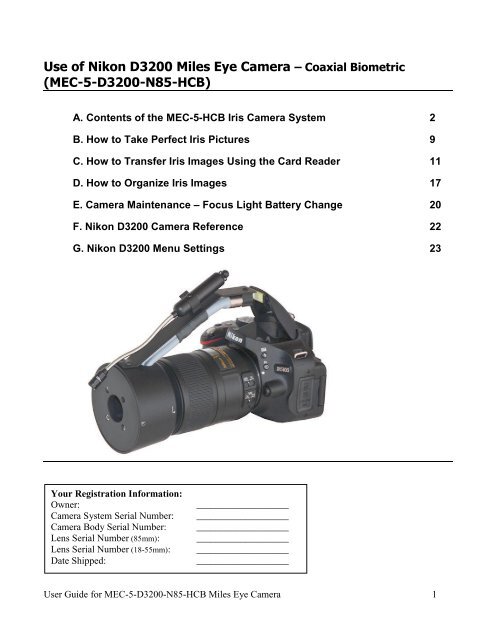
Use of Nikon D3200 Miles Eye Camera – Coaxial ... - Miles Research
Use of Nikon D3200 Miles Eye Camera – Coaxial ... - Miles Research
Use of Nikon D3200 Miles Eye Camera – Coaxial ... - Miles Research

Create successful ePaper yourself
Turn your PDF publications into a flip-book with our unique Google optimized e-Paper software.
<strong>Use</strong> <strong>of</strong> <strong>Nikon</strong> <strong>D3200</strong> <strong>Miles</strong> <strong>Eye</strong> <strong>Camera</strong> – <strong>Coaxial</strong> Biometric<br />
(MEC-5-<strong>D3200</strong>-N85-HCB)<br />
A. Contents <strong>of</strong> the MEC-5-HCB Iris <strong>Camera</strong> System 2<br />
B. How to Take Perfect Iris Pictures 9<br />
C. How to Transfer Iris Images Using the Card Reader 11<br />
D. How to Organize Iris Images 17<br />
E. <strong>Camera</strong> Maintenance – Focus Light Battery Change 20<br />
F. <strong>Nikon</strong> <strong>D3200</strong> <strong>Camera</strong> Reference 22<br />
G. <strong>Nikon</strong> <strong>D3200</strong> Menu Settings 23<br />
Your Registration Information:<br />
Owner: ___________________<br />
<strong>Camera</strong> System Serial Number: ___________________<br />
<strong>Camera</strong> Body Serial Number: ___________________<br />
Lens Serial Number (85mm): ___________________<br />
Lens Serial Number (18-55mm): ___________________<br />
Date Shipped: ___________________<br />
<strong>Use</strong>r Guide for MEC-5-<strong>D3200</strong>-N85-HCB <strong>Miles</strong> <strong>Eye</strong> <strong>Camera</strong> 1
<strong>Use</strong> <strong>of</strong> MEC-5-<strong>D3200</strong>-HCB Iris <strong>Camera</strong><br />
A. Contents <strong>of</strong> the <strong>Camera</strong> Carry Case – MEC-5-<strong>D3200</strong>-N85-HCB<br />
Contents<br />
1. <strong>Camera</strong> with macro lens<br />
2. Illuminator<br />
3. <strong>Camera</strong> Batteries<br />
4. <strong>Camera</strong> Battery Charger<br />
5. Zoom Lens<br />
6. USB Card Reader<br />
7. SDHC memory card (8GB)<br />
8. Cord Compartment<br />
8a. <strong>Camera</strong> USB cord<br />
8b. Lens rear cap/body cap<br />
8c. Spare batteries (focus light)<br />
8d. <strong>Camera</strong> A/V cord (D5100 only)<br />
<strong>Use</strong>r Guide for MEC-5-<strong>D3200</strong>-N85-HCB <strong>Miles</strong> <strong>Eye</strong> <strong>Camera</strong> 2
Preparing the Iris <strong>Camera</strong> for <strong>Use</strong> – MEC-5-<strong>D3200</strong>-N85-HCB<br />
1. Open <strong>Camera</strong> Carry Case by lifting up each latch.<br />
2. Remove the camera from the foam padding and set down.<br />
3. Lift Illuminator out <strong>of</strong> foam-padded case<br />
<strong>Use</strong>r Guide for MEC-5-<strong>D3200</strong>-N85-HCB <strong>Miles</strong> <strong>Eye</strong> <strong>Camera</strong> 3
4. Remove lens cap and turn the camera on. Mode dial is set to A=Aperture priority<br />
5. Pop up the built-in flash by pressing button on left side<br />
6. Place illuminator onto lens at the 9:00 position (Flash is in the up position, Mode=A):<br />
<strong>Use</strong>r Guide for MEC-5-<strong>D3200</strong>-N85-HCB <strong>Miles</strong> <strong>Eye</strong> <strong>Camera</strong> 4
7. Rotate Illuminator until it snaps into place at 12:00 position:<br />
8. Press focus light power switch:<br />
9. Your camera is now ready to take iris pictures. When complete with the photography, reverse these<br />
steps to put the camera away.<br />
10. This camera-lens-illuminator is optimized for aut<strong>of</strong>ocus photography <strong>of</strong> the iris; it is especially easy to<br />
take consistently good iris images when using the Chinrest (CRCS-TTB-AF). However it is also<br />
possible to use manual focus or (in handheld mode only) fixed focus methods. For imaging animal<br />
iris, it is always best to use aut<strong>of</strong>ocus.<br />
11. For using manual focus, the lens switch is changed from the M/A setting to the M setting. The<br />
focussing is accomplished by rotating the focus ring <strong>of</strong> the lens.<br />
<strong>Use</strong>r Guide for MEC-5-<strong>D3200</strong>-N85-HCB <strong>Miles</strong> <strong>Eye</strong> <strong>Camera</strong> 5
12. For using fixed focus, the lens is set to the M setting and the lens focus is dialed to a minimum focus<br />
(rotate focus ring all the way to 1:1 (opposite end from the “infinity” symbol). Unclip the camera from<br />
the chinrest and hold the camera up to the client’s eye. While viewing through the viewfinder, move<br />
closer or further from the eye until the image is sharply in focus, then take the picture.<br />
13. <strong>Use</strong> the main command dial at the upper rear <strong>of</strong> the camera for adjusting the aperture.<br />
The Main Command Dial is operated with the right thumb<br />
and is used to adjust aperture. Normally, the best practice<br />
is to take 3 or 4 pictures <strong>of</strong> each iris, each picture shot<br />
with a different consecutive aperture.<br />
The aperture dial (situated where the right thumb<br />
would be when holding the camera with the right hand)<br />
is changed by the thumb; clicking the wheel inboard (to<br />
left) decreases aperture number and clicking the wheel<br />
outboard (to the right) increases it. Larger aperture<br />
values mean smaller aperture diameter -- less light will<br />
be allowed in. Images with higher f/numbers will be<br />
darker than those taken with lower f/numbers. For 1:1<br />
macro photography, it is a good idea to take a sequence<br />
<strong>of</strong> 3 or so photos, each with an increasing aperture.<br />
Note: If the just-taken image is showing, you must press the picture-taking button slightly (or press the<br />
play button) to stop the image playback before adjusting aperture. Aperture will not change if an image<br />
is being displayed.<br />
14. Note: for general photography, use the enclosed Zoom lens (18-55mm). You may also use any <strong>Nikon</strong><br />
aut<strong>of</strong>ocus lens that has a built-in motor (AF-S and AF-I).<br />
15. For general photography using the included zoom lens, switch the top Mode dial to AUTO:<br />
For Iris Photography:<br />
Mode Dial set to A (Aperture Priority):<br />
For General Photography:<br />
Mode Dial set to AUTO:<br />
16. When you return to iris photography, switch the top Mode dial back to A (A=Aperture Priority), and<br />
mount the 105mm macro lens-illuminator.<br />
<strong>Use</strong>r Guide for MEC-5-<strong>D3200</strong>-N85-HCB <strong>Miles</strong> <strong>Eye</strong> <strong>Camera</strong> 6
17. IMPORTANT: Adjust the <strong>Eye</strong>piece Dioptric setting. (Initial Setup Only) This is a small rotary<br />
switch to the right <strong>of</strong> the viewfinder that can go up or down through several positions, and is designed<br />
to match the viewfinder optics to your vision. When this is set: if you see the subject in focus, the<br />
camera sees it in focus. If you normally wear corrective lenses, always wear them when taking a<br />
picture. To make this adjustment for your eye:<br />
How to Set <strong>Eye</strong>piece Focus<br />
1. Move the rotary switch to one end <strong>of</strong> the range (all the way up<br />
or down).<br />
2. Look through the viewfinder at a bright surface (such as a<br />
white wall) that is in the distance (this white surface should<br />
appear blurry).<br />
3. While viewing through the viewfinder, move the switch up<br />
and down through the range <strong>of</strong> positions until you can see the<br />
black brackets ( [ ] ) in the viewfinder with maximum<br />
clarity and focus.<br />
4. Note the optimal position <strong>of</strong> this switch for your vision, and<br />
always use this setting. Once you set it for your eye’s vision,<br />
you do not need to change it. If someone else uses the camera,<br />
they need to find the correct setting for their vision (and when<br />
you resume using the camera, you need to return this switch<br />
to the setting you found for your vision).<br />
18. Batteries: Be sure to always have a fully charged camera battery available. It is okay to leave the<br />
lithium-ion camera battery in the charger overnight.<br />
<strong>Use</strong>r Guide for MEC-5-<strong>D3200</strong>-N85-HCB <strong>Miles</strong> <strong>Eye</strong> <strong>Camera</strong> 7
B. How to Take Perfect Iris Pictures<br />
1. Be sure the client is comfortably seated and relaxed.<br />
2. If a chinrest is not used, have the client open their own lids by putting the index finger touching the<br />
thumb up to the closed eye (using the arm on the same side <strong>of</strong> the eye being photographed), and then<br />
separating the index finger and thumb while holding them against the upper and lower lids<br />
respectively. Often this method is helped by having the elbow <strong>of</strong> this arm on a table.<br />
The client covers the eye not being photographed with one hand and separates the lids with the other.<br />
3. Have the client place the free hand (opposite <strong>of</strong> the iris side being photographed) over the opposite<br />
eye so as to prevent looking through it. Due to the fact that people have eye dominance (preferring to<br />
use one eye more than the other), it is important to have the client only looking through the eye<br />
being photographed, and looking straight into the camera lens. If people do not cover the opposite<br />
eye, they tend to look around the room with the uncovered eye, causing the eye being photographed<br />
to wander. Often it is helpful to have the client spread apart the eyelids with the index finger and<br />
thumb.<br />
4. The client will see a small reflection <strong>of</strong> their eye in the camera lens, and may be guided to observe<br />
this in order to maintain correct positioning. Ask the client to observe the reflection <strong>of</strong> their eye in<br />
the camera lens. This will ensure the client's eye is lined up with the camera. Often it is helpful to<br />
have the client spread apart the eyelids with the index finger and thumb.An alternative method (if lid<br />
retraction is not needed) is to have the client put the chin on the palm with the elbow on the table.<br />
For the right iris picture, the right arm is used for support this way, and for the left iris picture, it is<br />
reversed.<br />
<strong>Use</strong>r Guide for MEC-5-<strong>D3200</strong>-N85-HCB <strong>Miles</strong> <strong>Eye</strong> <strong>Camera</strong> 8
5. If a chinrest is used, adjust the height so the center <strong>of</strong> the iris is about 1” (25mm) below the bottom<br />
<strong>of</strong> the forehead rest.<br />
When a chinrest is used, lid retraction can be accomplished using two 6” cotton swabs in one hand to separate lids.<br />
6. Bring the camera (with focusing light switched on) into alignment with the center <strong>of</strong> the iris by<br />
panning in from the lateral side. For handheld photography, it is best for the photographer to have<br />
both elbows on the table and the left hand supporting the lens. If a table is not available, the<br />
photographer can brace the camera with both elbows pressing on anterior ribs.<br />
7. When pointing the camera (with the focus light on) at your client's eye, be conservative about<br />
exposing the client to the focus light. One wants to get nearly in position first with the light shining<br />
just past the client’s face temporal to the eye or above it, pointing at the forehead, at the approximate<br />
range. The eye camera will focus at 3” away from the front illumination cone.<br />
8. Using Fixed Manual Focus Mode: With one or both elbows on the table, rock toward or away from<br />
the client's eye (fractions <strong>of</strong> an inch here) until the image is sharp in the view finder. Focus on the<br />
collarette. You can normally get good camera stability with just one elbow on the table.<br />
9. After taking a photo, the image will play back on the screen for 1 minute (this setting can be<br />
changed). Before changing the aperture, press the shutter release (picture-taking button) halfway<br />
<strong>Use</strong>r Guide for MEC-5-<strong>D3200</strong>-N85-HCB <strong>Miles</strong> <strong>Eye</strong> <strong>Camera</strong> 9
lightly to discontinue the image playback; the aperture wheel (main command dial in A mode) can<br />
then be rotated to go to the next aperture.<br />
10. Always take all the right eye pics first then all the left eye pics. If you take ASLeral pics, start with<br />
the iris <strong>of</strong> that eye, followed by the four quadrants <strong>of</strong> the ASLera (normally Left, Right, Upper,<br />
Lower).<br />
11. Adjust the camera position until the pupil <strong>of</strong> the iris is centered on the viewfinder. With this type <strong>of</strong><br />
1:1+ photography, focus is accomplished by moving the camera toward or away from the subject.<br />
12. Adjust focus until the image is sharp around the collarette at the four cardinal points.<br />
13. Take picture.<br />
14. Check exposure. The image may appear differently on the computer monitor compared to the LCD<br />
viewer; angle <strong>of</strong> view and ambient light will affect the apparent brightness in both cases..<br />
15. <strong>Use</strong> exposure bracketing by Aperture. Normally, it is best to take a sequence <strong>of</strong> images <strong>of</strong> each<br />
eye, and bracket the exposure by using a range <strong>of</strong> aperture values. Typically for a blue iris the range<br />
would by 29, 32, 36; for a brown iris 20, 22, 25. <strong>Use</strong> increasing numeric aperture numbers for the<br />
right eye, then the same sequence but in decreasing order for the left iris.<br />
16. To increase the exposure, adjust the Aperture using the main (rear) Command dial. Note: If the justtaken<br />
image is showing, you must press the picture-taking button slightly (or press the play<br />
button) to stop the image playback before adjusting aperture. Aperture will not change if an<br />
image is being displayed. The aperture will only change when the playback is stopped. The aperture<br />
number is shown in the viewfinder and on the display.<br />
The aperture dial is operated with the right<br />
thumb. You must discontinue image<br />
playback first (by pressing the picture-taking<br />
button lightly). Rotation to the right<br />
(“outboard”) will increase the aperture number<br />
(less light); rotation to the left (“inboard”) will<br />
decrease the aperture. To bracket your<br />
exposure, take the right eye (first) with<br />
apertures ranging upwards across 3 or 4<br />
settings, then photograph the left eye with the<br />
aperture ranging downwards through the same<br />
settings.<br />
For brown irises, the image should be overexposed to bring out the low-contrast detail.<br />
For Blue iris use aperture 29, 32, 36, 40, 45, or 51<br />
For Brown iris use aperture 18, 20, 22, 25, 29, or 32<br />
<strong>Use</strong>r Guide for MEC-5-<strong>D3200</strong>-N85-HCB <strong>Miles</strong> <strong>Eye</strong> <strong>Camera</strong> 10
C. How to Transfer Iris Images Using the Card Reader<br />
Three Methods<br />
There are three basic methods <strong>of</strong> getting the iris images into a computer.<br />
1. Eject the memory card and use a card reader with a computer to place the image files onto the<br />
hard drive. This is the simplest method, and can work with any computer or printer.<br />
2. Attach the USB cord from the camera to the computer, and browse the memory card to select<br />
image files to copy. This method causes additional drain on the camera battery. The camera is<br />
basically being used as a card reader, and the transfer procedure is the same as Method #1.<br />
3. <strong>Use</strong> a camera control program such as <strong>Nikon</strong> <strong>Camera</strong> Control Pro ($180) while the camera is<br />
tethered to the computer via the USB cord. This method is best when using a chinrest, but it is<br />
also convenient even with handheld photography when the photography is being done right<br />
before a clinical review. One advantage <strong>of</strong> this method is that every captured image is stored on<br />
the hard drive and is never put on the memory card, so there is no need for image transfer.<br />
Another advantage is that the newly captured image is immediately displayed on the computer<br />
screen, where it can be reviewed for quality, focus, exposure, etc.<br />
Method 1: Using the Card Reader<br />
Removing the Memory Card From <strong>Camera</strong><br />
Start with the camera turned OFF.<br />
Note: as <strong>of</strong> 2011-04-20, the <strong>Nikon</strong><br />
<strong>Camera</strong> Control Pro v.2.8 is not updated<br />
to work with the D5100.<br />
1. Slide memory card door open by pushing it to the rear until it pops open<br />
2. The SD card is visible<br />
3. Push the card in slightly until it is unlocked and springs out<br />
4. After pushing the card, it will now be released and protruding enough to grasp<br />
5. Grab memory card and pull out<br />
<strong>Use</strong>r Guide for MEC-5-<strong>D3200</strong>-N85-HCB <strong>Miles</strong> <strong>Eye</strong> <strong>Camera</strong> 11
6. The card is now ready for the card reader.<br />
Accessing the Memory Card Using the Card Reader<br />
Start with the memory card reader unplugged.<br />
1. Insert the white USB cord into the computer USB socket (Step 1)<br />
2. The SD Flash memory card socket is on the upper left <strong>of</strong> the front panel (Step 2)<br />
3. Plug the card reader’s USB cord into the card reader’s USB socket (Step 3)<br />
4. The blue light on the card reader will illuminate (Step 4)<br />
5. When complete with the transfer, discontinue the USB device (see below) and remove the card<br />
(Step 5)<br />
6. The memory card can now be returned to the camera (step 6)<br />
7. The drive letters should show up in “My Computer” in a few seconds. Most Windows operating<br />
systems, including XP, will recognize the card reader without need <strong>of</strong> installing any driver from<br />
the mini-CD. When plugged in to a USB port, it shows the assigned drive letter.<br />
8. At this point the flash memory module can be opened up like any other folder on a disk drive.<br />
You can then copy pictures from the flash memory to the hard drive by dragging the<br />
filename/icons.<br />
9. Normally inserting a memory card will trigger a dialog box asking what you would like to do<br />
with the newly available drive letter. The simplest method is to open the memory card as a folder<br />
and drag image files over to a hard drive folder.<br />
10. <strong>Camera</strong> memory cards normally have a folder named DCIM (Digital <strong>Camera</strong> Image Memory). If<br />
the card is inserted into a camera it has never been in before, a new folder is created. For <strong>Nikon</strong><br />
cameras, the folder is named something like 100<strong>D3200</strong> (<strong>Nikon</strong> <strong>Camera</strong> <strong>D3200</strong>), and the image<br />
files have a prefix “DSC_” (Digital Still <strong>Camera</strong>). Other types <strong>of</strong> cameras may use slightly<br />
different file name prefix, or folder names, but they all will put new folders and files within the<br />
<strong>Use</strong>r Guide for MEC-5-<strong>D3200</strong>-N85-HCB <strong>Miles</strong> <strong>Eye</strong> <strong>Camera</strong> 12
top-level DCIM folder. You can store other folders and files on the memory card (normally at<br />
the root level), and the camera will disregard the extra folders.<br />
11. IMPORTANT: When you are done transferring files via the USB memory card reader, you must<br />
be careful about how you disconnect it from Windows. First, close out any folders or programs<br />
(such as any picture viewer or browser window), so that nothing is referencing the memory card.<br />
12. With Windows 2000 and Windows XP, you need to “Stop” the USB device by clicking a small<br />
icon in the lower right corner that has a green arrow on it.<br />
a. If you click it with the left button, a list <strong>of</strong> USB devices will pop up. Click on the “Mass<br />
Storage Drive” that has the drive letter associated with it.<br />
b. If you click it with the right button:<br />
i. Click the popup “Safely Remove Hardware” with the left button.<br />
ii. Select the Card Reader device (e.g. USB Mass Storage Device) and click Stop.<br />
iii. Highlight the USB Mass Storage Device again and click Stop.<br />
13. If the message complains that the folder is in use, check all folders, and even if it is not in use,<br />
click it again, possibly a third time. Then it will say it is safe to unplug your device. The LED<br />
light on the card reader will go <strong>of</strong>f.<br />
14. Disconnect the USB card reader from the computer.<br />
15. Then remove the memory card.<br />
Important – Card Usage:<br />
a. If you are using a card reader, close each window that is referring to the memory card, and any<br />
program that may be accessing it. Then go to the small icon tray at the lower right <strong>of</strong> the<br />
Windows toolbar (normally at the bottom <strong>of</strong> the screen) and left-click the icon with the leftpointing<br />
green arrow, then left-click the item in the list <strong>of</strong> USB devices that has 1 to 4<br />
(depending on which card reader you have) drive letters. The most recently added USB device is<br />
usually at the top <strong>of</strong> this list.<br />
b. A message will pop up saying it is now safe to remove the USB device. Unplug the USB cord<br />
and then remove the memory card and re-insert it into the camera. If you do not see the USB<br />
icon with the green arrow, click the “
Using The Card Reader – In Detail<br />
Card Reader Disconnection In Detail – Multi-HCBot Card Reader<br />
Windows XP – Memory Card Reader Disconnection Procedure<br />
1. Close out all folders that reference the memory card reader drive letter. When closing a folder in<br />
Windows, pressing the shift key at the same time will also close all parent windows.<br />
2. In the lower right part <strong>of</strong> the Windows XP Task Bar, locate the USB Device icon in the “Tray”<br />
area. If you see a “
6. The list will go away and a message will pop up indicating that it is “Safe To Remove<br />
Hardware”:<br />
7. After Clicking the Card Reader Device, The blue light on the Card Reader will go out, indicating<br />
that the power is no longer being supplied to the card reader and it is now safe to remove the card<br />
reader from the USB socket.<br />
Windows 7 – Memory Card Reader Disconnection Procedure<br />
8. On Windows 7, the blue light does not go out, and the sockets are listed and “ejected”<br />
(dismounted) independently.<br />
The procedure in Windows 7:<br />
1. Click the up-pointing arrow at the far left <strong>of</strong> the taskbar<br />
2. Click the USB Disconnect icon<br />
3. Click the “Eject Removable Disk” that corresponds to the memory card.<br />
9. In the above example using Windows 7, only the drive letter corresponding to the occupied<br />
memory card slot is shown, The Card Reader (depicted above) is the Transcend TS-RDP8, which<br />
has 4 different card slots.<br />
<strong>Use</strong>r Guide for MEC-5-<strong>D3200</strong>-N85-HCB <strong>Miles</strong> <strong>Eye</strong> <strong>Camera</strong> 15
D. How to Organize <strong>Eye</strong> Pictures<br />
There are many possible methods <strong>of</strong> image management, but how best to download and organize a<br />
collection <strong>of</strong> eye pictures? I’ve been comparing the many ways <strong>of</strong> getting pictures from the camera, and<br />
different ways <strong>of</strong> storing them. This is a write-up <strong>of</strong> my current preferences in acquiring and organizing<br />
images from the digital eye camera. Image transfer is detailed here for Methods 1 and 2; a separate<br />
document details Method 3 (use <strong>of</strong> <strong>Nikon</strong> <strong>Camera</strong> Control Pro).<br />
There are three basic methods <strong>of</strong> getting the iris images into a computer.<br />
1. Eject the memory card and use a card reader with a computer to place the image files onto the<br />
hard drive. This is the simplest method, and can work with any computer or printer.<br />
4. Attach the USB cord from the camera to the computer, and browse the memory card to select<br />
image files to copy. This method causes additional drain on the camera battery. The camera is<br />
basically being used as a card reader, and the transfer procedure is the same as Method #1.<br />
2. <strong>Use</strong> a camera control program such as <strong>Nikon</strong> <strong>Camera</strong> Control Pro ($180) while the camera is<br />
tethered to the computer via the USB cord. This method is best when using a chinrest, but it is<br />
also convenient even with handheld photography when the photography is being done right<br />
before a clinical review. One advantage <strong>of</strong> this method is that every captured image is stored on<br />
the hard drive and is never put on the memory card, so there is no need for image transfer.<br />
Another advantage is that the newly captured image is immediately displayed on the computer<br />
screen, where it can be reviewed for quality, focus, exposure, etc.<br />
Step 1: Transferring Image Files to the Computer (Method 1 & 2: Using Card Reader/<strong>Camera</strong>)<br />
1. After taking a batch <strong>of</strong> pictures, turn <strong>of</strong>f the camera, eject the memory card and insert it into the<br />
card reader, then plug the card reader into a USB socket on the computer. Alternatively: Method<br />
2 – Using the <strong>Camera</strong> as Card Reader: Attach the camera (powered <strong>of</strong>f) to the computer with<br />
the <strong>Camera</strong>’s USB cord. Turn on the camera.<br />
2. The computer will ask what you want to do – which program you want to use to bring the images<br />
into the computer hard drive. It will raise a dialog box and normally, you select the last or second<br />
to last option, which is “Open Folder”.<br />
3. Select the Open Folder option, which has a yellow folder icon next to it and it will just open the<br />
memory card as a drive letter. You will first see a folder named “DCIM” (Digital <strong>Camera</strong> Image<br />
Memory). Open this, and you will see another folder named something like “100NCD50” or<br />
“101<strong>D3200</strong>” etc. Open this and you will see the list <strong>of</strong> image files. If the same card is used in<br />
different cameras, you will see a different folder for each camera. Create a destination folder<br />
with a name such as “2010-06-27 Iris – San Marcos” or “Iris Pics 20100627” etc. Drag the files<br />
from the source folder (on the memory card) to the destination folder (on the hard drive). To<br />
move the files instead <strong>of</strong> copying them, use a right-click drag, and then select “Move Here”<br />
instead <strong>of</strong> the default “Copy Here.”<br />
4. Alternatively: If you want to use s<strong>of</strong>tware to transfer the image files (instead <strong>of</strong> just dragging<br />
them), I would recommend that you select the "Micros<strong>of</strong>t Scanner and <strong>Camera</strong> Wizard" since it<br />
has the best behavior and options. I do not bother with <strong>Nikon</strong> Picture Project but some people<br />
<strong>Use</strong>r Guide for MEC-5-<strong>D3200</strong>-N85-HCB <strong>Miles</strong> <strong>Eye</strong> <strong>Camera</strong> 16
find that it works well. The Micros<strong>of</strong>t Scanner and <strong>Camera</strong> Wizard is good at putting your image<br />
files into a logical place with conventional filenames. You can specify the directory name and<br />
the first part <strong>of</strong> the file name (left part), and it will use consecutive numbers to make the filename<br />
suffix (right part). I usually have it remove the pics from the camera at this time, because the<br />
default behavior is to download all the pics but leave a copy on the memory card, and the next<br />
time you have a new batch <strong>of</strong> pictures to transfer, you would not want to download the first batch<br />
again. The Wizard shows you a list <strong>of</strong> thumbnails <strong>of</strong> all the pics, with a checked checkbox by<br />
each one. When the Wizard is finished, just close out and then turn <strong>of</strong>f the camera. It is now<br />
ready for the next batch and you disconnect the USB cable from the camera at this point. For<br />
Advanced <strong>Use</strong>rs: Alternatively, consider using Adobe Bridge and <strong>Camera</strong> Raw (part <strong>of</strong><br />
Photoshop CS5) and work with the uncompressed NEF image file format.<br />
Step 2: Selecting and Archiving Image Files on the Computer<br />
5. Next, make a subfolder for each person using their last & first name as the folder name in proper<br />
case. Sometimes it is convenient to have the folder name prefixed with a 2-digit number that<br />
represents the sequence the clients were photographed in. I recommend using this filename<br />
convention (e.g. the first person is Jon <strong>Miles</strong>, and the folder name is either “<strong>Miles</strong> Jon” or "01<br />
<strong>Miles</strong> Jon ").<br />
6. Then view the folder <strong>of</strong> downloaded pics in either Thumbnail mode or Filmstrip mode (Filmstrip<br />
mode is available only in Windows XP). The viewing mode is the second group <strong>of</strong> choices in the<br />
View menu in Windows. If the OS is XP and the top item is not “Filmstrip” then select the<br />
“Customize this folder” and specify “Pictures” for file type.<br />
7. Sort the list <strong>of</strong> image files by name (which is also by time since the files are numbered<br />
sequentially in time) by clicking the Date Modified column header twice (once for Windows 7).<br />
8. Select and drag groups <strong>of</strong> consecutive images corresponding to each client, into their<br />
corresponding folder.<br />
9. Review the images in Filmstrip (Windows XP) or Thumbnail mode, and select the best image <strong>of</strong><br />
each eye. In Windows Vista and Windows 7, use Windows Photo Gallery to browse, review, and<br />
select the images. I usually select images with the same aperture, and prefer the brighter images<br />
for the added detail.<br />
10. Make a subfolder named "extra" in the client's folder and put all images in there except the<br />
selected right & left eye images.<br />
11. A more advanced method: while browsing the sequence <strong>of</strong> iris images (in Filmstrip Mode, sorted<br />
by name), highlight the selected “best-overall” image, then copy and paste the file, then later<br />
rename the copy. When processing (selecting and renaming) a large number <strong>of</strong> image files, this<br />
method is best, since you can do all the select+copy+paste steps first (in filmstrip mode). Also it<br />
preserves the original image file <strong>of</strong> the selected best image, which can sometimes be useful.<br />
After this step, all the original image files for the client are in sequence, and after that would be<br />
the two copied files, with a name such as “Copy <strong>of</strong> DSC_01234.JPG” (Windows XP) or<br />
<strong>Use</strong>r Guide for MEC-5-<strong>D3200</strong>-N85-HCB <strong>Miles</strong> <strong>Eye</strong> <strong>Camera</strong> 17
“DSC_01234 - Copy.JPG” (Windows 7). The next step is to move all original image files into<br />
the “extra” folder and then do the renaming <strong>of</strong> the copied & pasted (selected) files.<br />
Step 3: Renaming Image Files<br />
12. For each selected image, rename the file with a format such as:<br />
LastName_FirstName_RE_20050922.jpg.<br />
13. Alternatively: LastName_FirstName_RE_20100922_01234.jpg, where “01234” are the original<br />
image file sequence number as set by the camera. Often it is convenient to retain this sequence<br />
number (as the last part <strong>of</strong> the file name) so as to have an index and reference to the original<br />
files. I archive all images (that are useable) from the camera for possible future reference, and the<br />
archive has the sequence numbering as the file name (e.g. “DSC_01234.JPG”), so it is easy to<br />
find other images taken at the same time.<br />
14. Then open the image in a photo editor (such as Paint Shop Pro or Photoshop) and crop it down to<br />
the smallest rectangle that encloses the iris. This is saved with the same filename but a "c" at the<br />
end, prior to ".jpg" (c=cropped).<br />
15. Next, adjust the image if necessary in terms <strong>of</strong> brightness and contrast, and save this version,<br />
adding an "e" (enhanced) to the filename. It is best to avoid this step by selecting images <strong>of</strong><br />
matching brightness.<br />
16. In some cases you may want to annotate the image with the client's name, eye (RE or LE) and<br />
date, and/or any other markings. Annotations can be done on a separate layer in programs such<br />
as Paint Shop Pro or Photoshop, then saved as both a layered image file and an exported JPG.<br />
For the right eye, I put this photo data (when needed) in the lower left corner, for the left eye it<br />
goes in the lower right corner. I save this version with an "a" (annotated) at the end <strong>of</strong> the<br />
filename. So for example, if the image file (<strong>of</strong> e.g. my right eye) did not need enhancement and<br />
was processed, the resulting filename would be "<strong>Miles</strong>_Jon_RE_20100922ca.jpg"<br />
17. Alternatively: the image can be left unannotated and the filename (which has the annotation data<br />
encoded into it) can be printed or displayed along with the image. Sometimes it is convenient to<br />
have the images in 2-up format (right and left cropped iris, side by side); the file name for this<br />
type <strong>of</strong> double-wide image file would be Last_First_2E_YYYYMMDD.jpg, etc.<br />
18. If the client is provided with a CD, put the folder with their name (and all contents) onto the CD.<br />
Additional other info can be added onto the CD. Print a label for the CD using any CD disk label<br />
printing program, or just use a Word merge document template for CD Labels (available by<br />
email on request from info@milesresearch.com ).<br />
19. For most purposes (such as printing out a copy or emailing to the client), it is best to use the<br />
cropped and (optionally) annotated version <strong>of</strong> the image file. For best value, print one croppedto-iris<br />
image on each letter-size sheet <strong>of</strong> premium glossy photo paper. The ink usually costs more<br />
than the paper, so it is best to use premium paper. Non-premium paper will have problems with<br />
the ink coming <strong>of</strong>f or changing.<br />
<strong>Use</strong>r Guide for MEC-5-<strong>D3200</strong>-N85-HCB <strong>Miles</strong> <strong>Eye</strong> <strong>Camera</strong> 18
How to use the enclosed universal 12-sector iris grids with chart<br />
If you do not use printouts, just place the grids over the images on the monitor.<br />
<strong>Use</strong>r Guide for MEC-5-<strong>D3200</strong>-N85-HCB <strong>Miles</strong> <strong>Eye</strong> <strong>Camera</strong> 19
E. <strong>Camera</strong> Maintenance – Battery Change<br />
<strong>Camera</strong> Maintenance – Focus Light Type 3 – FLV8F<br />
(LED focus light with flex end)<br />
Battery Change<br />
1. Remove the focus light from its mounting clip.<br />
2. Open the battery compartment by unscrewing the end cap. <strong>Use</strong> a small screwdriver or paper clip to<br />
twist <strong>of</strong>f the end cap (it has a small hole in the end).<br />
3. Slide out the button-style batteries.<br />
<strong>Use</strong>r Guide for MEC-5-<strong>D3200</strong>-N85-HCB <strong>Miles</strong> <strong>Eye</strong> <strong>Camera</strong> 20
4. Have four (4) replacement batteries ready. The battery type is LR44, also known as the equivalent:<br />
AG-13, A76, PX76A, GPA76, L1154, 1128MP, 1166A, AG13, D76A, G13A, GPA7, GPA76, LR44,<br />
LR1154, L1154, PX675A, PX76A, RPX675, S76, V13GA, 357A, RW82, KA, A76, 208-904, SB-F9,<br />
G13-A, CA18, CA19, LR44, A-76, 76A.<br />
5. Put in the new batteries with the button end (positive) first.<br />
6. Replace the end cap by screwing it in all the way.<br />
The easy way to load the 4 button cells<br />
is to stack them up (button end up) on a<br />
sheet <strong>of</strong> paper or card, slide the focus<br />
light over them, then tilt the light with<br />
paper upright.<br />
<strong>Use</strong>r Guide for MEC-5-<strong>D3200</strong>-N85-HCB <strong>Miles</strong> <strong>Eye</strong> <strong>Camera</strong> 21
F. <strong>Camera</strong> Settings for <strong>Nikon</strong> <strong>D3200</strong><br />
For Iris Photography<br />
<strong>Camera</strong> Switch Settings – <strong>Nikon</strong> <strong>D3200</strong><br />
1. Be sure that the Mode is set to A (Aperture-priority).<br />
Set Mode Dial to A (Aperture Priority) for Iris Photography; Set to AUTO for General Photography<br />
<strong>Camera</strong> Menu Settings – <strong>Nikon</strong> <strong>D3200</strong><br />
Note: These steps are already done in manufacturing and are described here for reference. Only the<br />
two critical (required) steps are given in this list (Steps 2 and 3).<br />
1. View/Edit Menu Settings:<br />
a. With camera switched on, press the Menu button<br />
b. Press left arrow to go to left vertical Navbar and select the second icon (camera) for<br />
Shooting Menu; Press Right Arrow to enter the submenu.<br />
2. Set the camera’s White Balance to Flash:<br />
a. Press the Down arrow; go down to White Balance<br />
b. Enter the submenu by pressing the right-arrow on the command disc<br />
c. Press Down Arrow until “Flash” is highlighted, then Press the OK button twice to<br />
confirm setting.<br />
3. Put the camera in Manual Flash Mode:<br />
a. Press the Down arrow repeatedly to go down to Built-in flash; Press OK for submenu.<br />
b. Move down the submenu using the command disc and highlight Manual ; Press OK for<br />
submenu.<br />
c. Select Full – for full flash power; Press OK to confirm setting and exit submenu.<br />
d. For less light, select ½ or ¼ power.<br />
Note: If you want to use the larger apertures (e.g. f/8 thru f/16) to operate closer to the<br />
optimal performance point <strong>of</strong> the lens (5.6-8), then set flash power to 1/8.<br />
4. Press the Menu button twice to exit all menus.<br />
5. If you have further questions, please contact Jon <strong>Miles</strong> at jon@milesresearch.com<br />
For detailed technical information on the <strong>D3200</strong>:<br />
http://www.dpreview.com/reviews/nikon<strong>D3200</strong>/<br />
<strong>Use</strong>r Guide for MEC-5-<strong>D3200</strong>-N85-HCB <strong>Miles</strong> <strong>Eye</strong> <strong>Camera</strong> 22
G. Menu Settings for <strong>Nikon</strong> <strong>D3200</strong><br />
Note: These steps are already done in manufacturing, but you may need to reset these<br />
setting if the camera is used in an automatic mode for other photography.<br />
Iris <strong>Camera</strong> Menu Settings:<br />
(initial setup for iris photography – camera is in A mode: top mode dial is set to “A”=aperture priority)<br />
Shooting Menu<br />
White Balance change from AUTO to Flash<br />
(required for iris photography. Note: when using zoom lens, switch mode dial to AUTO will over-ride this setting)<br />
Built-in flash change from TTL to Manual-Full power<br />
(required for iris photography. If images are tending too bright, set to ½ power.)<br />
Setup Menu<br />
Auto <strong>of</strong>f timers change from NORM to Custom (1 minute)<br />
(This will give the playback and info displays enough on-time to be read)<br />
File number sequence change from OFF to ON<br />
(This setting makes sure that each photo has a consecutive number, even after changing the memory card)<br />
Settings Changes: <strong>Use</strong> <strong>of</strong> Iris <strong>Camera</strong> for General Photography<br />
(Just change the Mode dial to Auto, and most settings will be made automatic. No need to edit the Menu selections.)<br />
<strong>Use</strong>r Guide for MEC-5-<strong>D3200</strong>-N85-HCB <strong>Miles</strong> <strong>Eye</strong> <strong>Camera</strong> 23
Menu Reference for <strong>D3200</strong><br />
The <strong>Nikon</strong> <strong>D3200</strong> has five menus, each one signified by a different icon in the leftmost column.<br />
To access the menus, switch the camera on and press the MENU button on the back <strong>of</strong> the camera.<br />
<strong>Use</strong> the command disc (circular shaped control with four arrows) to move the highlighted selection: left<br />
or right to go into or out <strong>of</strong> a submenu; up or down to move the highlighted selection up or down.<br />
The five icons arranged vertically in the left column are:<br />
1. Playback Menu: Blue forward-pointing arrow (yellow → blue when in submenu)<br />
2. Shooting Menu: Green camera icon (yellow → green when in submenu)<br />
3. Set-up Menu: Gold wrench icon (yellow → gold when in submenu)<br />
4. Retouch Menu: Purple paintbrush icon (yellow → purple when in submenu)<br />
5. Recent Settings: Grey icon<br />
<strong>Nikon</strong> <strong>D3200</strong> Menu Settings ( -- signifies a submenu & not a critical setting)<br />
Playback Menu Default Iris Photography GeneralPhotography<br />
Delete -- -- --<br />
Playback folder <strong>D3200</strong> <strong>D3200</strong> <strong>D3200</strong><br />
Playback display options None None None<br />
Image Review ON ON ON<br />
Rotate Tall ON ON ON<br />
Slide Show 2s 2s 2s<br />
Print Set (DPOF) -- -- --<br />
Shooting Menu Default Iris Photography GeneralPhotography<br />
Reset shooting options -- -- --<br />
Set Picture Control (see Note 1) SD SD or VI SD<br />
Image Quality (see Note 2) NORM NORM NORM<br />
Image Size L L L<br />
White Balance (see Note 3) Auto Flash Auto<br />
ISO sensitivity settings (set Auto ISO <strong>of</strong>f) 100 100 100<br />
Active D-Lighting OFF OFF OFF<br />
Auto distortion control OFF OFF OFF<br />
Color space sRGB sRGB sRGB<br />
Noise reduction ON ON ON<br />
AF-area mode see Note 4) -- VF:Auto-area --<br />
Built-in AF-assist illuminator ON OFF OFF<br />
Metering Center wtd Spot<br />
Movie Settings -- -- --<br />
Flash cntrl for built-in flash see Note 5) TTL M/Full (or ½) M/Full (TTL)<br />
Setup Menu<br />
Reset setup options -- -- --<br />
Format memory card -- -- --<br />
<strong>Use</strong>r Guide for MEC-5-<strong>D3200</strong>-N85-HCB <strong>Miles</strong> <strong>Eye</strong> <strong>Camera</strong> 24
Monitor brightness 0 0 0<br />
Info display format (see Note 6) Graphic Classic/Blue Classic/Blue<br />
Auto info display ON ON ON<br />
Clean image sensor -- -- --<br />
Lock mirror up for cleaning -- -- --<br />
Video mode (see Note 7) NTSC NTSC NTSC<br />
HDMI AUTO AUTO AUTO<br />
Flicker reduction 60Hz 60Hz 60Hz<br />
Time zone and date (see Note 8) -- -- --<br />
Language (see Note 9) EN EN EN<br />
Image comment OFF OFF OFF<br />
Auto image rotation ON ON ON<br />
Image Dust Off ref photo -- -- --<br />
Auto <strong>of</strong>f timers (see Note 10) Short Custom: 1m Custom: 1m<br />
Self-timer 10s 10s 10s<br />
Remote on duration 1m 1m 1m<br />
Beep (pitch) Low High High<br />
Rangefinder OFF ON ON<br />
File number sequence (see Note 11) OFF ON ON<br />
Buttons -- -- --<br />
Slot empty release lock LOCK LOCK LOCK<br />
Print date OFF OFF OFF<br />
Storage folder <strong>D3200</strong> <strong>D3200</strong> <strong>D3200</strong><br />
GPS -- -- --<br />
Firmware version -- -- --<br />
Retouch Menu These commands are not used for iris imaging<br />
D-lighting -- -- --<br />
Red-eye correction -- -- --<br />
Trim -- -- --<br />
Monochrome -- -- --<br />
Filter effects -- -- --<br />
Color balance -- -- --<br />
Image overlay -- -- --<br />
NEF (RAW) processing -- -- --<br />
Resize -- -- --<br />
Quick retouch -- -- --<br />
Straighten -- -- --<br />
Distortion control -- -- --<br />
Fisheye -- -- --<br />
Color outline -- -- --<br />
Color sketch -- -- --<br />
<strong>Use</strong>r Guide for MEC-5-<strong>D3200</strong>-N85-HCB <strong>Miles</strong> <strong>Eye</strong> <strong>Camera</strong> 25
Perspective control -- -- --<br />
Miniature effect -- -- --<br />
Selective color -- -- --<br />
Edit movie -- -- --<br />
Recent Settings This is a short list <strong>of</strong> recently used commands<br />
Notes<br />
1. Set Picture Control – Set to SD=Standard for most uses. You may want to try VI=Vivid for more color<br />
emphasis.<br />
2. Image quality – For more advanced technique, use NEF+JPG-Fine. Raw camera files represent the<br />
image with maximum detail and no compression. They can be as large as 25MB each, so this may not be<br />
necessary for routine operation.<br />
3. White Balance – Set to Flash -- a required setting for standard iris imaging. Setting the top Mode dial to<br />
Auto will over-ride this setting, changing back to Auto-WB until the dial is set back to P/A/S/M Modes.<br />
4. AF-area mode – Viewfinder: Single-point AF;Live view/movie: Normal-area AF. Using Single-point AF<br />
seems to give the best results for use <strong>of</strong> aut<strong>of</strong>ocus on the iris. The point to select should be the first point<br />
to either the right or left <strong>of</strong> the center point; this point will normally fall on the collarette area <strong>of</strong> the iris.<br />
5. Built-in flash – for standard iris photography this is a required setting. If the images are too bright or the<br />
aperture needs to be at a higher number, then set the Flash power to ½ instead <strong>of</strong> full.<br />
6. Info display format – Classic allows for easiest settings change (press button to change a setting,<br />
then navigate items via control disc and press OK to edit setting).<br />
7. <strong>Use</strong> PAL (instead <strong>of</strong> NTSC) -- if that is standard in your region.<br />
8. Time zone and date – if you travel, then just change the time zone.<br />
9. Language – Available languages for the <strong>D3200</strong>: �<br />
10. Auto <strong>of</strong>f timers – normally the display will go blank in a few seconds to save<br />
battery life. This setting is more convenient at 1 minute for each timer<br />
(Playback/Menus, Image review, Live view (3m), Autometer-<strong>of</strong>f). For keeping the<br />
aperture display on longer than 4 seconds, set the last item to 1m and the<br />
aperture display will show for a minute.<br />
11. File number sequence – this is set to ON and is best always left ON. This way<br />
each photo taken with this camera will have a unique image number, even when<br />
changing cards. This avoids having two different images with the same name.<br />
<strong>Use</strong>r Guide for MEC-5-<strong>D3200</strong>-N85-HCB <strong>Miles</strong> <strong>Eye</strong> <strong>Camera</strong> 26<br />
a. Czech<br />
b. Danish<br />
c. German<br />
d. English<br />
e. Spanish<br />
f. Greek<br />
g. French<br />
h. Indonesian<br />
i. Italian<br />
j. Magyar<br />
k. Dutch<br />
l. Norwegian<br />
m. Polish<br />
n. Portuguese (BR)<br />
o. Portuguese (PT)<br />
p. Russian<br />
q. Romanian<br />
r. Finnish<br />
s. Swedish<br />
t. Turkish<br />
u. Ukranian<br />
v. Arabic<br />
w. Chinese<br />
x. Chinese 2<br />
y. Japanese<br />
z. Korean<br />
aa. Thai<br />
bb. Hindu
Exposure Guide – Aperture Settings for Manual Exposure Mode<br />
<strong>Camera</strong>: <strong>D3200</strong><br />
Lens: <strong>Nikon</strong> 85mm<br />
Illuminator: CB/SL/ASL/FLO<br />
Flash Power: 1/2<br />
ISO: 100<br />
EV: 1/3<br />
Brown: 18---20---22---25<br />
Tan: 20---22---25---29<br />
Mixed: 22---25---29---32<br />
Blue: 25---29---32---36---40<br />
Sclera: 40---45<br />
Do not use: 5, 5.6, 6.3<br />
<strong>Use</strong> for brown: 16 thru 25<br />
<strong>Use</strong> for blue or mixed: 22 thru 40<br />
<strong>Use</strong> for sclera only: 45<br />
<strong>Camera</strong>: <strong>D3200</strong><br />
Lens: <strong>Nikon</strong> 85mm<br />
Illuminator: Single Central Lighting<br />
Flash Power: 1/2<br />
ISO: 100<br />
EV: 1/3<br />
Brown: 18---20---22---25<br />
Tan: 20---22---25---29<br />
Mixed: 22---25---29---32<br />
Blue: 25---29---32---36---40<br />
Sclera: 40---45<br />
Do not use: 5, 5.6, 6.3<br />
<strong>Use</strong> for brown: 16 thru 25<br />
<strong>Use</strong> for blue or mixed: 22 thru 40<br />
<strong>Use</strong> for sclera only: 45<br />
Contact <strong>Miles</strong> <strong>Research</strong> for additional information or technical support<br />
Jon <strong>Miles</strong><br />
<strong>Miles</strong> <strong>Research</strong><br />
141 E 13th Ave<br />
Escondido, CA 92025<br />
760-746-7415<br />
jon@milesresearch.com<br />
www.milesresearch.com<br />
<strong>Use</strong>r Guide for MEC-5-<strong>D3200</strong>-N85-HCB <strong>Miles</strong> <strong>Eye</strong> <strong>Camera</strong> 27