
You also want an ePaper? Increase the reach of your titles
YUMPU automatically turns print PDFs into web optimized ePapers that Google loves.
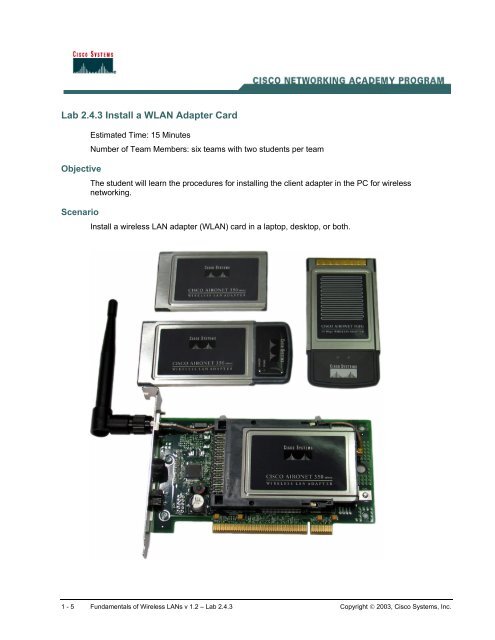
Lab 2.4.3 <strong>Install</strong> a <strong>WLAN</strong> Adapter Card<br />
Estimated Time: 15 Minutes<br />
Number of Team Members: six teams with two students per team<br />
Objective<br />
The student will learn the procedures for installing the client <strong>adapter</strong> in the PC for wireless<br />
networking.<br />
Scenario<br />
<strong>Install</strong> a wireless LAN <strong>adapter</strong> (<strong>WLAN</strong>) <strong>card</strong> in a laptop, desktop, or both.<br />
1 - 5 Fundamentals of Wireless LANs v 1.2 – Lab 2.4.3 Copyright © 2003, Cisco Systems, Inc.
Preparation<br />
This lab will require the following materials:<br />
• Desktop or Laptop PC<br />
• One Cisco Aironet PCI352, CB20A, or PCM 352 Client Adapter Network Interface Card.<br />
• One PC installed with a Microsoft Operating System<br />
• One Screwdriver for PCI <strong>card</strong> installation<br />
• Instructor should preconfigure SSIDs on the APs and determine the IP addresses needed for<br />
the PCs or laptop computers that are used in this lab<br />
Step 1 <strong>Install</strong>ing the client <strong>adapter</strong> <strong>card</strong> in a laptop<br />
Before installing a new <strong>adapter</strong> <strong>card</strong> into the laptop, the laptop may need to have an integrated<br />
wireless NIC disabled. To disable an integrated wireless NIC, click on the Start button and select the<br />
Control Panel option. If in Classic View, select Network Connections or the appropriate Network<br />
Control panel. If in Category View, select the Network and Internet Connections category and<br />
select Network Connections. Right-click on the integrated wireless <strong>adapter</strong> and select Disable.<br />
Note When inserting a wireless NIC into a laptop, the power can be on or off.<br />
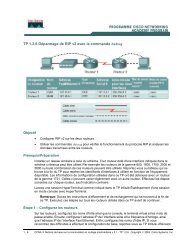
Insert the Cisco Aironet PCM 352 Client Adapter into the PCMCIA slot. The CB20A installs into the<br />
Laptop PC <strong>card</strong>bus slot. A CardBus <strong>adapter</strong> will not fit completely into a PCMCIA laptop slot. This<br />
may be a problem on older laptops. A PCMCIA <strong>adapter</strong>, however, will fit in a PCMCIA slot or a<br />
CardBus slot. Below is a comparison of the <strong>card</strong>s.<br />
Notice the different shape on the right hand side of the <strong>card</strong>s.<br />
a. Which <strong>card</strong> is located in the top of the graphic?<br />
_____________________________________________________________________________<br />
b. Which <strong>card</strong> is located on bottom?<br />
_____________________________________________________________________________<br />
2 - 5 Fundamentals of Wireless LANs v 1.2 – Lab 2.4.3 Copyright © 2003, Cisco Systems, Inc.
Step 2 <strong>Install</strong>ing the client <strong>adapter</strong> <strong>card</strong> in a desktop<br />
a. Turn off the PC and all the components.<br />
b. Remove the computer cover.<br />
c. Remove the screw from the top of the CPU back panel above an empty PCI expansion slot. This<br />
screw holds the metal bracket on the back panel.<br />
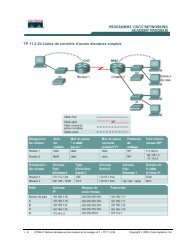
d. Examine the client <strong>adapter</strong>. The antenna connector and the LEDs face out of the computer and<br />
are visible when the cover is placed back on. Prior to installing the <strong>card</strong>, check to make sure the<br />
2-dB dipole 'rubber ducky" antenna has been removed to prevent damage during the <strong>card</strong><br />
insertion.<br />
e. Tilt the <strong>adapter</strong> to allow the antenna connector and LEDs to slip through the opening in the CPU<br />
back panel.<br />
f. Press the client <strong>adapter</strong> into the empty slot until the connector is firmly seated. <strong>Install</strong> the screw.<br />
3 - 5 Fundamentals of Wireless LANs v 1.2 – Lab 2.4.3 Copyright © 2003, Cisco Systems, Inc.
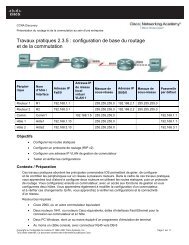
g. Reinstall the screw on the CPU back panel and replace the computer cover.<br />
h. Attach the 2-dB dipole antenna to the <strong>adapter</strong> antenna connector until it is finger-tight.<br />
i. For optimal reception, position the antenna so it is straight up.<br />
j. Boot up the computer and proceed to Step 3. <strong>Install</strong> the drivers for Windows.<br />
Step 3 <strong>Install</strong> the drivers for Windows<br />
a. After the client <strong>adapter</strong> is installed into the computer, Windows automatically detects it and<br />
briefly opens the Found New Hardware window.<br />
b. The Found New Hardware Wizard window opens and indicates that the wizard will help to install<br />
the driver.<br />
c. Click Next. Another window opens and asks what the wizard should do.<br />
d. Select the recommended Search for a suitable driver for my device and click Next.<br />
e. Select CD-ROM drives. Deselect all other options. Insert the Cisco Aironet Series Wireless LAN<br />
Adapters CD into the computer CD-ROM drive. Click Next.<br />
f. The wizard finds the installation files on the CD and displays the search results.<br />
g. When the client <strong>adapter</strong> driver is displayed, click Next to copy the required files.<br />
h. When Windows has finished the installation, click Finish.<br />
i. Remove the CD from the computer CD-ROM drive.<br />
Step 4 Configure the SSID through Windows<br />
a. Double-click My Computer, Control Panel, and System. For Windows XP, click Start>My<br />
Computer>Control Panel>System. See your instructor for instructions for other operating<br />
systems<br />
b. In the System Properties window, click the Hardware tab.<br />
c. Click Device Manager.<br />
d. In the Device Manager window, double-click Network Adapters.<br />
4 - 5 Fundamentals of Wireless LANs v 1.2 – Lab 2.4.3 Copyright © 2003, Cisco Systems, Inc.
e. Right-click the Cisco Systems 350 Series PCMCIA Wireless LAN <strong>adapter</strong>, or the applicable<br />
Aironet Card.<br />
f. Click Properties.<br />
g. In the client <strong>adapter</strong> Properties window, click the Advanced tab.<br />
h. In the Advanced window, select Client Name. Type the unique client name of the computer in<br />
the Value dialog box.<br />
i. Select SSID. Type the RF network SSID, as assigned by the instructor, in the Value dialog box.<br />
Remember the SSID is case-sensitive. Click OK.<br />
Note The Service Set Identifier (SSID) is a unique identifier that stations must use to be able to<br />
communicate with an AP. The SSID can be any alphanumeric entry up to a maximum of 32<br />
characters.<br />
Step 5 Complete the driver installation without a DHCP server<br />
a. Double-click My Computer, Control Panel, and Network and Dial-up Connections. For<br />
Windows XP, click Start>Control Panel then double-click Network and Dial-up Connections.<br />
See your instructor for instructions for other operating systems<br />
b. Right-click Local Area Connection.<br />
c. Click Properties, Internet Protocol (TCP/IP), and Properties.<br />
d. Click Use the following IP address and enter the IP address, subnet mask, and default<br />
gateway address of the computer which can be obtained from the instructor. Click OK.<br />
e. In the Local Area Connection Properties window, click OK.<br />
f. If prompted to restart the computer, click Yes.<br />
g. The driver installation is complete.<br />
Step 6 Verify the TCP/IP settings<br />
a. Select Start > Run and enter the following:<br />
b. On Win2000 or XP, enter cmd to bring up the command prompt. While at the command prompt,<br />
type in ipconfig /all to verify the IP settings.<br />
c. On Win9x, enter the winipcfg command from Start>Run and press Enter<br />
Step 7 (Optional) <strong>Install</strong>ing on other operating systems<br />
The URLs below provide information for installing the Aironet Client Adapter <strong>card</strong> on non-Windows<br />
Operating Systems:<br />
a. http://www.cisco.com/en/US/products/hw/wireless/ps4555/products_installation_and_configurati<br />
on_guides_list.html<br />
b. http://www.cisco.com/en/US/products/hw/wireless/ps4555/ps448/index.html<br />
5 - 5 Fundamentals of Wireless LANs v 1.2 – Lab 2.4.3 Copyright © 2003, Cisco Systems, Inc.