This Copy - Microtek
This Copy - Microtek
This Copy - Microtek

Create successful ePaper yourself
Turn your PDF publications into a flip-book with our unique Google optimized e-Paper software.
The procedure how to keep your <strong>Microtek</strong> scanners to work under WinXP system<br />
For some of old model of <strong>Microtek</strong> scanners which did not get logo certification of WinXP from<br />
Microsoft before, you can refer to the following procedure and keep your scanner to work under<br />
WinXP system. ( Make sure your scanner S/W can support scanner to work under WinXP system. )<br />
( The logo certification of scanner driver for WinXP is saved in C : \ WINDOWS \ System32 \<br />
MSMxxw.dll. xx is model code of scanner driver. )<br />
ScanMaker V6USL did not claim the certification of WinXP logo from Microsoft before, hence, if<br />
WinXP claimed the driver of “ New Hardware Device “ from linking device, please refer to the<br />
following procedure, and complete the driver installation of SM V6USL under PC Win XP system.<br />
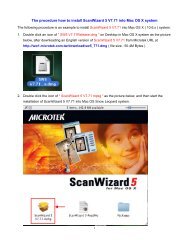
1. Make sure ScanMaker V6USL is powered up and has linked with PC Win XP system via USB<br />
connection.<br />
2. Make sure ScanWizard 5 V5.76 or its later version had installed into Windows XP system.<br />
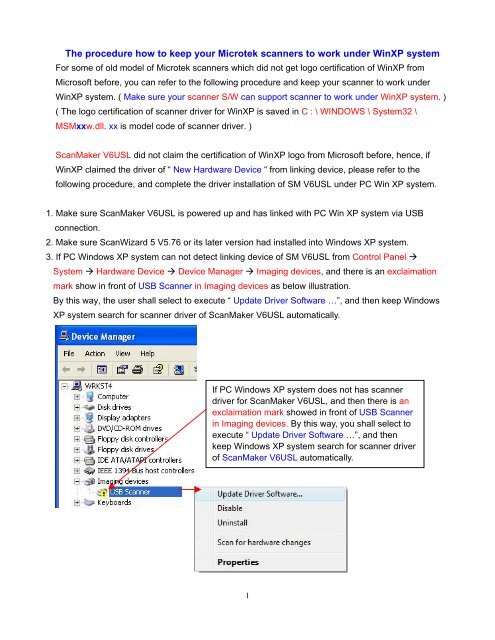
3. If PC Windows XP system can not detect linking device of SM V6USL from Control Panel <br />
System Hardware Device Device Manager Imaging devices, and there is an exclaimation<br />
mark show in front of USB Scanner in Imaging devices as below illustration.<br />
By this way, the user shall select to execute “ Update Driver Software …”, and then keep Windows<br />
XP system search for scanner driver of ScanMaker V6USL automatically.<br />
If PC Windows XP system does not has scanner<br />
driver for ScanMaker V6USL, and then there is an<br />
exclaimation mark showed in front of USB Scanner<br />
in Imaging devices. By this way, you shall select to<br />
execute “ Update Driver Software …”, and then<br />
keep Windows XP system search for scanner driver<br />
of ScanMaker V6USL automatically.<br />
1
Select this item,<br />
and then click “ Next “.<br />
Select this item,<br />
and then click “ Next “.<br />
2
Click “ Continue Anyway “ to<br />
complete driver installation for your<br />
SM V6USL under WinXP system.<br />
WinXP system had found the<br />
driver of SM V6USL already.<br />
Click “ Finish “ to complete<br />
“ Found New Hardware Wizard ”.<br />
3
4. Check device connection of SM V6USL is O.K. or not from Control Panel System Hardware<br />
Device Device Manager Imaging devices as below illustration.<br />
PC Windows XP system has recognized the<br />
linking device of scanner is ScanMaker V6USL.<br />
5. Make sure Scanner Finder can detect USB linking device and show the icon as below illustration.<br />
If Scanner Finder can detect USB linking device while<br />
ScanMaker V6USL link with PC via USB cable connection<br />
well, and then this icon will show up in resident area of PC<br />
Windows XP system.<br />
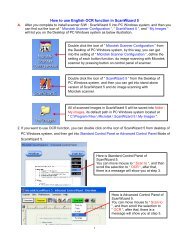
6. Double click the icon of “ ScanWizard 5 “ from the desktop of PC Windows system, and then do<br />
image scanning in Standard Control Panel of <strong>Microtek</strong> ScanWizard 5 as below illustration.<br />
Double click the icon of “ ScanWizard 5 “ from the Desktop of PC Windows<br />
system, and then you can get into stand-alone version of ScanWizard 5<br />
and do image scanning with <strong>Microtek</strong> scanner.<br />
You can click this icon, and change the setting to<br />
Advanced Control Panel of ScanWizard 5.<br />
Here is stand-alone version of ScanWizard 5, it is<br />
in Standard Control Panel of ScanWizard 5 now.<br />
4
Below illustration is in Advanced Control Panel of <strong>Microtek</strong> ScanWizard 5.<br />
You can click this icon,<br />
and change the setting to<br />
Standard Control Panel of<br />
ScanWizard 5.<br />
Here is Settings Window in<br />
Advanced Control Panel of<br />
<strong>Microtek</strong> ScanWizard 5.<br />
5