BLACKBOARD SUPPORT (Faculty) - William Paterson University
BLACKBOARD SUPPORT (Faculty) - William Paterson University
BLACKBOARD SUPPORT (Faculty) - William Paterson University
Create successful ePaper yourself
Turn your PDF publications into a flip-book with our unique Google optimized e-Paper software.
Instruction and Research Technology<br />
<strong>William</strong> <strong>Paterson</strong> <strong>University</strong><br />
http://bb.wpunj.edu<br />
<strong>BLACKBOARD</strong> <strong>SUPPORT</strong> (<strong>Faculty</strong>)<br />
home<br />
Blackboard ABCs<br />
This document covers the basic items needed to use Bb successfully.<br />
a. a. Support b. b. WPUNJ Bb tools c. c. Log in<br />
d. d. Course site overview e. e. Edit My Courses module f. f. Edit the Course Menu<br />
g. g. Course activation h. h. Announcements i. i. Add a content area<br />
j. j. Upload files k. k. Create a group l. l. Discussion board<br />
m. m. Assignments n. n. Grade Center<br />
a. Support options<br />
We offer Blackboard support 365 days a year through the Bb Support Center:<br />
https://liberty.wpunj.edu/bb/support-center/<br />
Questions, comments, corrections Contact Robert Harris, harrisr@wpunj.edu<br />
One of the benefits of the form is that it asks for the kind of information we need to resolve your problems quickly<br />
and efficiently. It seems to make sense that leaving a phone message or email would be quicker but that is not<br />
normally the case. Messages often don’t include the kind of information we need to resolve a problem quickly and<br />
efficiently, and the Support Center remains the best venue of help.<br />
The Bb Support Center is staffed 12 hours a day during the semester and throughout the weekends. We promise a<br />
response within 24 hours during the week and 48 hours during the weekends, but response times can be within<br />
minutes or hours.<br />
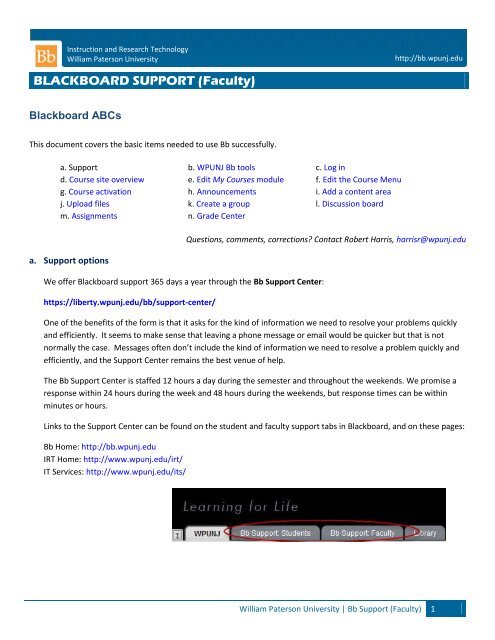
Links to the Support Center can be found on the student and faculty support tabs in Blackboard, and on these pages:<br />
Bb Home: http://bb.wpunj.edu<br />
IRT Home: http://www.wpunj.edu/irt/<br />
IT Services: http://www.wpunj.edu/its/<br />
<strong>William</strong> <strong>Paterson</strong> <strong>University</strong> | Bb Support (<strong>Faculty</strong>) 1
Instruction and Research Technology<br />
<strong>William</strong> <strong>Paterson</strong> <strong>University</strong><br />
http://bb.wpunj.edu<br />
A new support feature is Blackboard On Demand, over 30 video tutorials that offer step-by-step interactive help<br />
with issues including content, collaboration, and assessment. Links to various On Demand files are available in this<br />
document. Access the site:<br />
Bb On Demand:<br />
http://www.wpunj.edu/bb/on-demand/<br />
home<br />
b. WPUNJ Blackboard Tools/Standard Procedures<br />
Course creation<br />
Courses are created approximately two months before the beginning of the semester. For any number of reasons<br />
faculty might not be assigned to their proper courses; if you don’t see your course please contact the Bb Support<br />
Center (see above). Course names are comprised of the department designation, four-digit course number and<br />
section, and are prepended with the year and semester designation, for example: 201240-bio1010-10. Semester<br />
designations are two digit numbers: 10 = Spring, 25 = Summer, 40 = Fall, 50 = Winter<br />
Course population<br />
Students are added to course shells on the first day of the semester. Database updates are performed twice daily<br />
during the add/drop period and once a day for the rest of the semester. Students can not be added to courses for<br />
which they are not registered without the express written consent of the Registrar.<br />
Course Archiving<br />
Courses are archives two years (four Fall/Spring semesters) after they are offered. The content can be restored or<br />
used to update an existing course shell upon request.<br />
Transfer course content<br />
Please use this form to request a transfer of course content from a previous semester to an existing shell:<br />
https://liberty.wpunj.edu/bb/transfer/<br />
Merge course shells<br />
Please use this form if you’d like students of several sections diverted to one course shell from which you can<br />
manage the course. Only multi-section and cross-listed courses are eligible to be merged. Shells not being used will<br />
still be on your Bb site but should be left unavailable.<br />
https://liberty.wpunj.edu/bb/combine/<br />
Welcome letters for online courses<br />
Distance learning courses are usually accompanied by a welcome letter that serves as a combination of mini-syllabus<br />
and guide to Bb. It is posted on a page outside of Bb so it can be accessed by students who have no idea how to<br />
access the course management system.<br />
https://liberty.wpunj.edu/bb/welcome-letter/<br />
<strong>William</strong> <strong>Paterson</strong> <strong>University</strong> | Bb Support (<strong>Faculty</strong>) 2
Instruction and Research Technology<br />
<strong>William</strong> <strong>Paterson</strong> <strong>University</strong><br />
http://bb.wpunj.edu<br />
home<br />
c. Login to Blackboard<br />
Open a web browser and enter this address:<br />
http://bb.wpunj.edu<br />
One may also log in through WPConnect, but accessing Bb directly prevents some potential problems.<br />
In the text area provided enter your university credentials: username and password<br />
English is the default language, but users can also select :<br />
Arabic, Chinese, French, German, Japanese, Korean, Spanish and Turkish<br />
<br />
<br />
<br />
Other languages are available – if you teach in another language please contact the Bb administrator<br />
through the support center.<br />
<strong>Faculty</strong> who need help with their university credentials should contact the Help Desk:<br />
Email: help@wpunj.edu<br />
Phone: 973.720.help (x4357)<br />
Students can find their credentials on this page:<br />
http://www.wpunj.edu/username/<br />
<strong>William</strong> <strong>Paterson</strong> <strong>University</strong> | Bb Support (<strong>Faculty</strong>) 3
Instruction and Research Technology<br />
<strong>William</strong> <strong>Paterson</strong> <strong>University</strong><br />
http://bb.wpunj.edu<br />
home<br />
d. Course site overview<br />
Click here for a video course tour<br />
Support tools!<br />
Course Menu:<br />
Customizable navigation tool<br />
Control Panel:<br />
Administration tool for faculty<br />
(not visible to students)<br />
Edit Mode needs to be ON in order to update the course<br />
Turn the Edit Mode to OFF in order to see the student view<br />
Tabs across the top include:<br />
<br />
<br />
<br />
<br />
<br />
Bb Support: Students/<strong>Faculty</strong><br />
David and Lorraine Cheng Library<br />
Instruction & Research Technology<br />
Content – a course-independent content management tool<br />
Scholar -- bookmark collection tool<br />
<strong>William</strong> <strong>Paterson</strong> <strong>University</strong> | Bb Support (<strong>Faculty</strong>) 4
Instruction and Research Technology<br />
<strong>William</strong> <strong>Paterson</strong> <strong>University</strong><br />
http://bb.wpunj.edu<br />
home<br />
e. Edit the My Courses module<br />
Courses are archived every two years, but that can still leave a long trail of entries on a course site. To manage<br />
which shells are visible in the My Courses module click on the asterisk icon:<br />
Use the Personalize interface to select which course names are displayed on your site. Courses are hidden, not<br />
deleted, and the process can be reversed.<br />
home<br />
f. Edit the Course Menu<br />
Click here for a video on adding and editing items in the course menu<br />
Select the cross-shaped icon in the upper-left corner of the Course Menu:<br />
Then choose the Create Content Area option<br />
Enter your own name for the new content<br />
area, click Available to Users, then Submit<br />
<strong>William</strong> <strong>Paterson</strong> <strong>University</strong> | Bb Support (<strong>Faculty</strong>) 5
Instruction and Research Technology<br />
<strong>William</strong> <strong>Paterson</strong> <strong>University</strong><br />
http://bb.wpunj.edu<br />
You can edit the names and availability of both the course items you create and those that come in the course<br />
template. Left-click the chevron-like icon to the right of the menu item and choose to rename, hide or delete<br />
home<br />
g. Course Availability - activate your course<br />
Courses are unavailable to students by default, and each faculty member is responsible for activating the course<br />
shell. Students will not see a course shell until it has been activated.<br />
Begin by selecting Customization from the Control Panel:<br />
From the ensuing menu select Properties:<br />
Select the Yes radio button, then Submit:<br />
<strong>William</strong> <strong>Paterson</strong> <strong>University</strong> | Bb Support (<strong>Faculty</strong>) 6
Instruction and Research Technology<br />
<strong>William</strong> <strong>Paterson</strong> <strong>University</strong><br />
http://bb.wpunj.edu<br />
home<br />
h. Create and edit Announcements<br />
Click here for a video demonstration of adding an announcement<br />
In the Announcements area select<br />
Create Announcement:<br />
In the Options area you can determine when the Announcement will appear, and for how long. You can also<br />
choose to mount the announcement permanently.<br />
Use the calendar tool to set dates<br />
Use the clock tool to set times<br />
Enter content using<br />
the visual editor, then<br />
Submit:<br />
To edit an announcement left-click the chevron-like icon next to the announcement name and select Edit:<br />
<strong>William</strong> <strong>Paterson</strong> <strong>University</strong> | Bb Support (<strong>Faculty</strong>) 7
Instruction and Research Technology<br />
<strong>William</strong> <strong>Paterson</strong> <strong>University</strong><br />
http://bb.wpunj.edu<br />
home<br />
i. Add a content area<br />
Click here to see a video demonstration of adding a content area to the course menu<br />
The course menu is standardized across the curriculum, but it can be customized.<br />
Start by left-licking the cross-shaped icon in the<br />
upper left corner of the Course Menu:<br />
Next, choose Create Content Area from the menu<br />
Other menu options allow users to add a tool and to create hyperlinks,<br />
modules, sub headers and dividers<br />
Enter a name for the new area and<br />
check the availability box:<br />
to Edit a content area left-click the chevron-like<br />
icon to the right of the area name and select<br />
rename, hide, or delete.<br />
Both template items and items added by the<br />
faculty member can be edited.<br />
<strong>William</strong> <strong>Paterson</strong> <strong>University</strong> | Bb Support (<strong>Faculty</strong>) 8
Instruction and Research Technology<br />
<strong>William</strong> <strong>Paterson</strong> <strong>University</strong><br />
http://bb.wpunj.edu<br />
home<br />
j. Upload files<br />
Course material can be any digital file: Word, Excel, PowerPoint, HTML, audio, video, etc.<br />
In any course area select<br />
the Create Item button<br />
1. Click on the Choose File button and browse your computer for the file to upload. If you have material in your<br />
content area choose the Link to Content Collection button.<br />
2. Add a name for the file – the name is the link students will see; if you leave this area blank students will see the<br />
filename<br />
3. The default action is to create a link to the file, see #3 below<br />
k. Tools menu<br />
Twenty items are present in the Tools area of the Course Menu. Confusingly there is also an area with the same<br />
name in the Control Panel, but it serves a different purpose.<br />
Announcements Blogs Calendar Collaboration Contacts Course Portfolio<br />
Discussion Board Glossary Groups McGraw-Hill Journals Messages<br />
My Grades My Scholar Portfolios Home Roster Scholar Home Send Email<br />
Tasks User Manual Wimba Pronto<br />
Most of these items are self-explanatory, but some are less very clear:<br />
<strong>William</strong> <strong>Paterson</strong> <strong>University</strong> | Bb Support (<strong>Faculty</strong>) 9
Instruction and Research Technology<br />
<strong>William</strong> <strong>Paterson</strong> <strong>University</strong><br />
http://bb.wpunj.edu<br />
<br />
<br />
<br />
<br />
Collaboration: Also found in the Communications tab, Collaboration allows users to chat in real time on the class<br />
level (Lecture Hall) or one-on-one (Office Hours).<br />
McGraw Hill Higher Education: Use books and other content supplied by McGraw Hill in the Bb interface<br />
Messages: This tool posts messages that can be retrieved in the Bb environment; Messages are not send to a<br />
users email box (see Send Email)<br />
Roster: A course roster with a confusing interface. The roster will appear to be empty until the user selects the<br />
Go button to the right of the text-entry box:<br />
<br />
<br />
Send Email: Also found in the Communication tab, this tool does just what it says it will, but is confusingly placed;<br />
while the tool listing is alphabetical the email tool is filed under S rather than E, and can be hard to find.<br />
Wimba Pronto: This is a tool that allows users to chat independently of the Blackboard interface, but the name<br />
of the tool is Bb IM, not Wimba Pronto!<br />
Contact an instructional technologist through the Support Center for help with any of these tools.<br />
home<br />
k. Create a group<br />
Click here for a video demonstration of group creation / adding students<br />
Use Groups to sub-divide class members into working units.<br />
Start by selecting Groups in the Course Menu. If you don’t see a Groups option you can add it – see above,<br />
f. Edit Course Menu<br />
In the Groups area select the button reading Create Single Group<br />
<strong>William</strong> <strong>Paterson</strong> <strong>University</strong> | Bb Support (<strong>Faculty</strong>) 10
Instruction and Research Technology<br />
<strong>William</strong> <strong>Paterson</strong> <strong>University</strong><br />
http://bb.wpunj.edu<br />
You can allow the students to select their own groups, or choose to assign them to groups yourself with the<br />
Manual Enroll option:<br />
In the Tool Availability area select from nine options:<br />
Finally, choose group Membership by using the arrow tool<br />
(highlighted) to shunt students from the class list on the<br />
left to the group list on the right:<br />
home<br />
l. Discussion Board<br />
Click here for a video tour of the discussion board<br />
Use the Discussion Board to manage asynchronous discussions. Posts can include images, movies, and audio.<br />
Start by selecting Discussion Board from the Course Menu.<br />
If that option is not available add the tool by following the<br />
instructions above in:<br />
f. Edit Course Menu<br />
Discussion Board can also be found in the Tools area<br />
<strong>William</strong> <strong>Paterson</strong> <strong>University</strong> | Bb Support (<strong>Faculty</strong>) 11
Instruction and Research Technology<br />
<strong>William</strong> <strong>Paterson</strong> <strong>University</strong><br />
http://bb.wpunj.edu<br />
Click here to see a video demonstration of forum creation<br />
In the Discussion Board interface select the Create Forum button. Forums are sites within which Threads can be<br />
created. Bb discussions happen in Threads, and more than one thread can be created within one Forum.<br />
Most of the forum settings – see<br />
the screen shot on the right --<br />
are self-explanatory.<br />
Post tagging refers to the<br />
practice of post organization by<br />
the creation of an individualized<br />
naming – tagging -- structure.<br />
If you want students to create<br />
their own discussion topics select<br />
the New Threads area.<br />
If the Rate Posts area is selected<br />
students have the ability to grade<br />
each others comments.<br />
Moderation refers to the practice<br />
of faculty oversight of all new<br />
posts.<br />
When a forum is created the next step is to<br />
create a thread. Either click on the forum<br />
name or left-click the chevron-like icon and<br />
select Open<br />
<strong>William</strong> <strong>Paterson</strong> <strong>University</strong> | Bb Support (<strong>Faculty</strong>) 12
Instruction and Research Technology<br />
<strong>William</strong> <strong>Paterson</strong> <strong>University</strong><br />
http://bb.wpunj.edu<br />
Click here to see a video demonstration of thread creation<br />
Select the Create Thread button and fill out the interface with the subject and message, illustrated below<br />
Both questions and answers can feature external links, images, and multimedia.<br />
When you are done students will be able to reply:<br />
<strong>William</strong> <strong>Paterson</strong> <strong>University</strong> | Bb Support (<strong>Faculty</strong>) 13
Instruction and Research Technology<br />
<strong>William</strong> <strong>Paterson</strong> <strong>University</strong><br />
http://bb.wpunj.edu<br />
home<br />
m. Assignments<br />
When you need students to submit a paper or other project the Assignments area is useful. In older versions of<br />
Blackboard users engaged the digital drop box for this purpose. A Grade Center column is created when an<br />
Assignment is deployed.<br />
Pass your cursor over the Evaluate button in any<br />
content area and select Create Assignment<br />
In the assignment interface the Availability dialogue allows users to specify how many times a student can<br />
attempt to upload an file. Because students can sometimes miss the first attempt many faculty allow unlimited<br />
attempts. Each submission is recorded, allowing the instructor to keep track of submissions.<br />
Click here to see a video demonstration of downloading an Assignment<br />
<strong>William</strong> <strong>Paterson</strong> <strong>University</strong> | Bb Support (<strong>Faculty</strong>) 14
Instruction and Research Technology<br />
<strong>William</strong> <strong>Paterson</strong> <strong>University</strong><br />
http://bb.wpunj.edu<br />
home<br />
n. Grade Center<br />
Formerly known as the Gradebook, the Grade Center is a sophisticated interface for maintaining the class record.<br />
Students can view their own grade by using the My Grades function in the Tools area.<br />
Start by accessing Evaluation in the<br />
Control Panel, then Grade Center<br />
A column is automatically created for all Assessments and Assignments you deploy. To generate your own column<br />
select the Create Column button<br />
Click here to see a video demonstration of grade column creation<br />
A grade column can be<br />
assigned both a primary and<br />
secondary display, and one<br />
must indicate the total<br />
possible points. Categories<br />
are generally not important.<br />
<strong>William</strong> <strong>Paterson</strong> <strong>University</strong> | Bb Support (<strong>Faculty</strong>) 15
Instruction and Research Technology<br />
<strong>William</strong> <strong>Paterson</strong> <strong>University</strong><br />
http://bb.wpunj.edu<br />
Grade Center navigation:<br />
Use the chevron-like icon to edit grade properties<br />
Use the blue slide bar to move between columns<br />
Edit the number of rows you’d like to see in a single view<br />
One way to manage the Grade Center is to download students and columns in Excel format<br />
Click here to see a video demonstration of downloading grades<br />
Select the Manage button to organize the Grade Center<br />
<strong>William</strong> <strong>Paterson</strong> <strong>University</strong> | Bb Support (<strong>Faculty</strong>) 16


