LG Ceiling Cassette-Type Air Conditioner
LG Ceiling Cassette-Type Air Conditioner
LG Ceiling Cassette-Type Air Conditioner

You also want an ePaper? Increase the reach of your titles
YUMPU automatically turns print PDFs into web optimized ePapers that Google loves.
Visit us at http://www.lgservice.com<br />
<strong>LG</strong> <strong>Ceiling</strong> <strong>Cassette</strong>-<strong>Type</strong><br />
<strong>Air</strong> <strong>Conditioner</strong><br />
OWNER'S MANUAL<br />
Dear Owner<br />
Thank you for installing <strong>LG</strong> <strong>Air</strong> <strong>Conditioner</strong>.<br />
Your best choice guarantees you a great<br />
performance and service to make your life<br />
comfortable & pleasant.<br />
IMPORTANT<br />
• Please read this owner's manual carefully and thoroughly<br />
before installing and operating your room air conditioner.<br />
• Please retain this owner's manual for future reference after<br />
reading it thoroughly.<br />
<strong>LG</strong><br />
ENGLISH ITALIANO ESPAÑOL FRANÇAIS DEUTSCH ∂§§∏¡πÃÕ PORTUGUÊS DUTCH
<strong>Ceiling</strong> <strong>Cassette</strong>- <strong>Type</strong> <strong>Air</strong> <strong>Conditioner</strong> Owner’s Manual<br />
TABLE OF CONTENTS<br />
A. Safety Precautions .......................3<br />
B. Product Introduction....................6<br />
Name and function of parts ...........6<br />
What to do before operation..........6<br />
Operation Indication Lamps ..........6<br />
Wired Remote Controller...............7<br />
Wireless Remote Controller (Optional)...8<br />
C. Operating instructions.................9<br />
Cooling Mode - Standard Operation....9<br />
Cooling Mode - Power Cooling............9<br />
Heating Mode ......................................9<br />
Dehumidification Mode ......................10<br />
Auto Changeover Mode.....................10<br />
Auto Operation Mode ........................11<br />
Fan Mode ..........................................11<br />
Ariflow Setting....................................11<br />
Temperature setting/ room temperature<br />
check .................................................12<br />
Sub function : Plasma<br />
Purification(Optional) .........................12<br />
Function setting : Child Lock .............13<br />
Function Setting :<br />
Mode Change Temp ..........................13<br />
Function setting :<br />
Elevation Grill(Optional).....................14<br />
Function setting : Filter Sign Clear ....14<br />
Function setting : Vane Angle Control15<br />
Setting Current Time .........................16<br />
Programming :<br />
Setting Simple Reservation ...............17<br />
Programming : Weekly Reservation ..17<br />
Programming :<br />
Setting Sleep Reservation .................18<br />
Programming :<br />
Setting ON Reservation.....................19<br />
Programming :<br />
Setting OFF Reservation ...................20<br />
Programming : Holiday Reservation..21<br />
Ventilation Kit Control(Optional) ........22<br />
D. Maintenance and Service ..........23<br />
Indoor Unit...................................23<br />
Purifying filter(Optional)...............24<br />
Operation Tips!............................25<br />
When the air conditioner is not going.... 25<br />
Troubleshooting Tips! Save<br />
time and money!..........................26<br />
Call the service immediately in<br />
the following situations ................26<br />
2 <strong>Ceiling</strong> <strong>Cassette</strong>-<strong>Type</strong> <strong>Air</strong> <strong>Conditioner</strong><br />
FOR YOUR RECORDS<br />
Write the model and serial numbers here:<br />
Model #<br />
Serial #<br />
You can find them on a label on the side of each unit.<br />
Dealer's Name<br />
Date Purchased<br />
■ Staple your receipt to this page in the event you need it<br />
to prove date of purchase or for warranty issues.<br />
READ THIS MANUAL<br />
Inside you will find many helpful hints on how to use and<br />
maintain your air conditioner properly. Just a little<br />
preventive care on your part can save you a great deal<br />
of time and money over the life of your air conditioner.<br />
You'll find many answers to common problems in the<br />
chart of troubleshooting tips. If you review our chart of<br />
Troubleshooting Tips first, you may not need to call for<br />
service at all.<br />
PRECAUTION<br />
• Contact the authorized service technician for repair or<br />
maintenance of this unit.<br />
• Contact the installer for installation of this unit.<br />
• The air conditioner is not intended for use by young<br />
children or invalids without supervision.<br />
• Young children should be supervised to ensure that<br />
they do not play with the air conditioner.<br />
• When the power cord is to be replaced, replacement<br />
work shall be performed by authorized personnel only<br />
using only genuine replacement parts.<br />
• Installation work must be performed in accordance<br />
with the National Electric Code by qualified and<br />
authorized personnel only.
Safety Precautions<br />
Safety Precautions<br />
To prevent injury to the user or other people and property damage, the following instructions must be followed.<br />
■ Incorrect operation due to ignoring instruction will cause harm or damage. The seriousness is classified by<br />
the following indications.<br />
WARNING<br />
CAUTION<br />
Always ground the product.<br />
• There is a risk of electric shock.<br />
For electrical work, contact the dealer, seller,<br />
a qualified electrician, or an Authorized<br />
Service Center. Do not disassemble or repair<br />
the product by yourself.<br />
• There is risk of fire or electric shock.<br />
Use the correctly rated breaker or fuse.<br />
• There is risk of fire or electric shock.<br />
Do not install the product on a defective<br />
installation stand. Be sure that the<br />
installation area does not deteriorate with<br />
age.<br />
• It may cause product to fall.<br />
Be sure to check the refrigerant to the<br />
used. Please read the label on the product.<br />
• Incorrect refrigerant used can prevent the<br />
normal operation of the unit.<br />
Do not place a heater or other heating<br />
appliances near the power cable.<br />
• There is risk of fire and electric shock.<br />
This symbol indicates the possibility of death or serious injury.<br />
This symbol indicates the possibility of injury or damage.<br />
WARNING<br />
Do not use a defective or underrated<br />
circuit breaker. Use the correctly rated<br />
breaker and fuse.<br />
• There is risk of fire or electric shock .<br />
Always ground the product as per the<br />
wiring diagram. Do not connect the<br />
ground wire to gas or water pipes<br />
lightening rod or telephone ground wire.<br />
• There is risk of fire or electric shock.<br />
Do not modify or extend the power cable.<br />
If the power cable or cord has scrathes or<br />
skin peeled off or deteriorated then it<br />
must be replaced.<br />
• There is risk of fire or electric shock.<br />
Never install the outdoor unit on a<br />
moving base or a place from where it<br />
can fall down.<br />
• The falling outdoor unit can cause damage or<br />
injury or even death of a person.<br />
Don't use a power cord, a plug or a loose<br />
socket which is damaged.<br />
• Otherwise it may cause a fire or electrical<br />
shock.<br />
Do not allow water to run into electric<br />
parts. Install the unit away from water<br />
sources.<br />
• There is risk of fire, failure of the product, or<br />
electric shock.<br />
Do not use a multi consent. Always use<br />
this appliance on a dedicated cicuit and<br />
breaker.<br />
• Otherwise it can cause electric shock or fire.<br />
Install the panel and the cover of control<br />
box securely.<br />
• There is risk of fire or electric shock due to<br />
dust , water etc.<br />
For installation, removal or reinstall ,<br />
always contact the dealer or an<br />
Authorized Service Center.<br />
• There is risk of fire, electric shock, explosion,<br />
or injury.<br />
When the product is soaked (flooded or<br />
submerged) in water , contact an<br />
Authorized Service Center for repair<br />
before using it again.<br />
• There is risk of fire or eletric shock.<br />
Do not touch , operate, or repair the<br />
product with wet hands. Hold the plug by<br />
hand when taking out<br />
• There is risk of electric shock or fire.<br />
Do not store or use or even allow<br />
flammable gas or combustibles near the<br />
product.<br />
• There is risk of fire.<br />
Owner's Manual 3<br />
ENGLISH
Safety Precautions<br />
Indoor/outdoor wiring connections must<br />
be secured tightly and the cable should<br />
be routed properly so that there is no<br />
force pulling the cable from the<br />
connection terminals.<br />
• Improper or loose connections can cause<br />
heat generation or fire.<br />
In outdoor unit the step-up capacitor<br />
supplies high voltage electricity to the<br />
electrical components. Be sure to<br />
discharge the capacitor completely<br />
before conducting the repair work.<br />
• An charged capacitor can cause electrical<br />
shock.<br />
Do not use the product in a tightly closed<br />
space for a long time. Perform ventilation<br />
regularly.<br />
• Oxygen deficiency could occur and hence<br />
harm your health.<br />
Ventilate the product room from time to<br />
time when operating it together with a<br />
stove, or heating element etc.<br />
• Oxygen deficiency can occur and hence harm<br />
your health.<br />
Take care to ensure that nobody<br />
especially kids could step on or fall onto<br />
the outdoor unit.<br />
• This could result in personal injury and<br />
product damage.<br />
Do not plug or unplug the power supply plug to turn the unit<br />
ON/OFF .<br />
• There is risk of fire or electric shock.<br />
Two or more people must lift and<br />
transport the product.<br />
• Avoid personal injury.<br />
Keep level even when installing the<br />
product.<br />
• To avoid vibration or noise.<br />
4 <strong>Ceiling</strong> <strong>Cassette</strong>-<strong>Type</strong> <strong>Air</strong> <strong>Conditioner</strong><br />
Safely dispose off the packing materials.<br />
Like screws, nails, batteries, broken<br />
things etc after installation or svc and<br />
then tear away and thraw away the plastic<br />
packaging bags.<br />
• Children may play with them and cause<br />
injury.<br />
When installing the unit, use the<br />
installation kit provided with the product.<br />
• Otherwise the unit may fall and cause severe<br />
injury.<br />
Do not open the front grille of the product<br />
during operation. (Do not touch the<br />
electrostatic filter, if the unit is so equipped.)<br />
• There is risk of physical injury, electric shock,<br />
or product failure.<br />
Turn the main power off and unplug the<br />
unit when cleaning or repairing the<br />
product.<br />
• There is risk of electric shock.<br />
Take care to ensure that power cable<br />
could not be pulled out or damaged<br />
during operation.<br />
• There is risk of fire or electric shock.<br />
Make sure to check that the power cable<br />
plug is not dirty, loose or broken and<br />
then only insert the plug completely.<br />
• Dirty, loose or broken power plug can<br />
cause electric shock or fire.<br />
If strange sounds, smell or smoke comes<br />
from product.Immediately turn the breaker<br />
off or disconnect the power supply cable.<br />
• There is risk of electric shock or fire.<br />
When the product is not to be used for a<br />
long time, disconnect the power supply<br />
plug or turn off the breaker.<br />
• There is risk of product damage or failure, or<br />
unintended operation.<br />
Do not place ANYTHING on the power<br />
cable.<br />
• There is risk of fire or electric shock.<br />
When flammable gas leaks, turn off the gas and open a window<br />
for ventilation before turn the product on.<br />
• Do not use the telephone or turn switches on or off. There is risk of<br />
explosion or fire.<br />
CAUTION<br />
Do not install the product where it will be<br />
exposed to sea wind (salt spray) directly.<br />
• It may cause corrosion on the product.<br />
Do not install the product where the noise<br />
or hot air from the outdoor unit could<br />
damage or disturb the neighborhoods.<br />
• It may cause a problem for your neighbors<br />
and hence dispute.<br />
Be sure to use only those parts which<br />
are listed in the svc parts list. Never<br />
attempt to modify the equipment.<br />
• The use of inappropriate parts can cause an<br />
electrical shock, excessive heat generation or<br />
fire.<br />
Install the drain hose to ensure that the<br />
condensed water is drained away properly.<br />
• A bad connection may cause water leakage.<br />
Always check for gas (refrigerant)<br />
leakage after installation or repair of<br />
product.<br />
• Low refrigerant levels may cause failure of<br />
product.
Do not use the product for special purposes,<br />
such as preserving foods, works of art, etc. It<br />
is a consumer air conditioner, not a precision<br />
refrigeration system.<br />
• There is risk of damage or loss of property.<br />
Do not touch the metal parts of the<br />
product when removing the air filter.<br />
• There is risk of personal injury.<br />
Do not insert hands or other objects<br />
through the air inlet or outlet while the<br />
product is operating.<br />
• There are sharp and moving parts that could<br />
cause personal injury.<br />
Do not tilt the unit when removing or<br />
uninstalling it.<br />
• The condensed water inside can spill .<br />
Dismantling the unit, treatment of the<br />
refrigerant oil and eventual parts should<br />
be done in accordance with local and<br />
national standards.<br />
If the liquid from the batteries gets onto<br />
your skin or clothes, wash it well with<br />
clean water. Do not use the remote if the<br />
batteries have leaked.<br />
• The chemicals in batteries could cause burns<br />
or other health hazards.<br />
Do not expose your skin or kids or<br />
plants to the cool or hot air draft.<br />
• This could harm to your health.<br />
Do not block the inlet or outlet of air flow.<br />
• It may cause product failure.<br />
Do not step on or put anyting on the<br />
product. (outdoor units)<br />
• There is risk of personal injury and failure of<br />
product.<br />
Be cautious when unpacking and<br />
installing the product.<br />
• Sharp edges could cause injury.<br />
Do not mix air or gas other than the<br />
specified refrigerant used in the system .<br />
• If air enters the refrigerant system, an<br />
excessively high pressure results, causing<br />
equipment damage or injury.<br />
Replace the all batteries in the remote<br />
control with new ones of the same type.<br />
Do not mix old and new batteries or<br />
different types of batteries.<br />
• There is risk of fire or product failure.<br />
If you eat the liquid from the batteries,<br />
brush your teeth and see doctor.<br />
Do not use the remote if the batteries<br />
have leaked.<br />
• The chemicals in batteries could cause<br />
burns or other health hazard.<br />
Do not drink the water drained from the<br />
product.<br />
• It is not sanitary and could cause serious<br />
health issues.<br />
Safety Precautions<br />
Use a soft cloth to clean. Do not use<br />
harsh detergents, solvents or splashing<br />
water etc .<br />
• There is risk of fire, electric shock, or damage<br />
to the plastic parts of the product.<br />
Always insert the filter securely after<br />
cleaning. Clean the filter every two weeks<br />
or more often if necessary.<br />
• A dirty filter reduces the efficiency.<br />
If the refrigerant gas leaks during the<br />
repair, do not touch the leakaing<br />
refrigerant gas.<br />
• The refrigernat gas can cause frostbite (cold<br />
burn)<br />
If the refrigerant gas leaks during the<br />
installation, ventilate the area immediately.<br />
• Otherwise it can be harmfull for your health.<br />
Do not recharge or disassemble the<br />
batteries. Do not dispose off batteries in<br />
a fire.<br />
• They may burn or explode.<br />
Do not let the air conditioner run for a<br />
long time when the humidity is very high<br />
and a door or a window is left open.<br />
• Moisture may condense and wet or damage<br />
furniture.<br />
Use a firm stool or ladder when cleaning,<br />
maintaining or repairing the product at<br />
an height.<br />
• Be careful and avoid personal injury.<br />
Owner's Manual 5<br />
ENGLISH
Product Introduction<br />
Product Introduction<br />
Name and function of parts<br />
1<br />
5<br />
A<br />
B<br />
4<br />
6 7<br />
3<br />
What to do before operation<br />
1 2<br />
1 1<br />
Operation Indication Lamps<br />
6 <strong>Ceiling</strong> <strong>Cassette</strong>-<strong>Type</strong> <strong>Air</strong> <strong>Conditioner</strong><br />
2<br />
8<br />
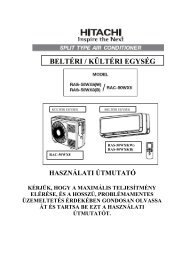
1: Indoor unit<br />
2: Outdoor unit<br />
3: Remote controller<br />
4: Inlet air<br />
5: Discharge air<br />
6: Refrigerant piping, connection<br />
electric wire<br />
7: Drain pipe<br />
8: Ground wire<br />
Wire to ground outdoor unit to<br />
prevent electrical shocks.<br />
If your installation has a customized<br />
control system, ask your <strong>LG</strong> dealer for<br />
the operation that corresponds to your<br />
system.<br />
A: Pair system or simultaneous<br />
operation system<br />
B: Multi system<br />
1: Unit with remote controller<br />
2: Unit without remote controller (when<br />
used as simultaneous operation)<br />
On/Off : Lights up during the system operation.<br />
Filter Sign : Lights up after 2400 hours from the time of first operating unit.<br />
Timer : Lights up during Timer operation.<br />
Defrost Mode : Lights up during Defrost Mode or Hot Start operation.(Heat pump model only)<br />
• Forced : To operate the unit when the remote control can't be used<br />
for any reason.
1<br />
2<br />
3<br />
4<br />
5<br />
6<br />
7<br />
8<br />
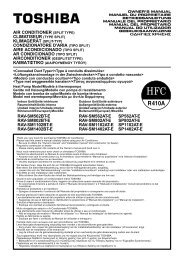
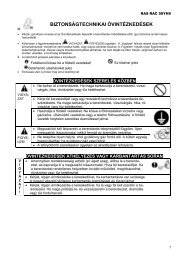
Wired Remote Controller<br />
Product Introduction<br />
OPERATION INDICATION<br />
SCREEN<br />
SET TEMPERATURE Button<br />
WIRELESS REMOTE<br />
CONTROLLER RECEIVER<br />
• Some products don't receive the<br />
wireless signals.<br />
VENTILATION Button<br />
OPERATION MODE SELECTION<br />
Button<br />
SUBFUNCTION Button<br />
FUNCTION SETTING Button<br />
EXIT Button<br />
ON/ OFF Button<br />
ROOM TEMPERATURE Button<br />
FAN SPEED Button<br />
AIR FLOW Button<br />
RESERVATION/ TIME SETTING<br />
Button<br />
SETTING/ CANCEL Button<br />
UP, DOWN, LEFT, RIGHT Button<br />
RESET Button<br />
NOTE<br />
❈ Display temperature can be different from actual room temperature if the remote controller is<br />
installed at the place where sun-rays are falling directly or the place nearby heat source.<br />
❈ The actual product can be different from above contents depending upon model type.<br />
9<br />
16<br />
10<br />
11<br />
12<br />
13<br />
14<br />
15<br />
1<br />
2<br />
3<br />
4<br />
5<br />
6<br />
7<br />
8<br />
9<br />
10<br />
11<br />
12<br />
13<br />
14<br />
15<br />
16<br />
Owner's Manual 7<br />
ENGLISH
Product Introduction<br />
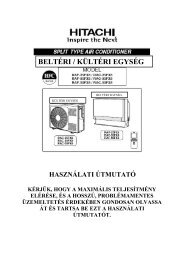
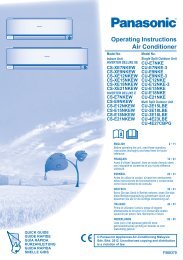
Wireless Remote Controller (Optional)<br />
This air-conditioner is equipped with wired remote controller basically. But if you want to be available with<br />
wireless remote controller, you pay for it.<br />
CAUTION:of handling the Remote Controller<br />
• Aim at the signal receiver on the wired remote controller so as to operate.<br />
• The remote control signal can be received at a distance of up to about 7m.<br />
• Be sure that there are no obstructions between the remote controller and the signal receptor.<br />
• Do not drop or throw the remote controller.<br />
• Do not place the remote controller in a location exposed to direct sunlight, or near the heating unit, or<br />
any other heat source.<br />
• Block a strong light over the signal receptor with a curtain or etc. so as to prevent the abnormal<br />
operation. (ex:electronic quick start, ELBA, inverter type fluorescent lamp)<br />
NOTE<br />
CANCEL<br />
ON OFF SET<br />
AUTO CLEAN<br />
Signal transmitter<br />
5 1<br />
6<br />
3<br />
4<br />
2<br />
7<br />
11<br />
8<br />
13<br />
14<br />
10<br />
9<br />
12<br />
Flip-up door<br />
(opened)<br />
❈ The wireless remote controller do not operate the vane angle control.(4Way <strong>Type</strong>)<br />
❈ For more details refer to the Wireless Remote Control Accessory manual.<br />
❈ The actual product can be different from above contents depending upon model type.<br />
8 <strong>Ceiling</strong> <strong>Cassette</strong>-<strong>Type</strong> <strong>Air</strong> <strong>Conditioner</strong><br />
15<br />
1. ON/OFF BUTTON<br />
Used to Turn off/on the unit.<br />
2. OPERATION MODE SELECTION BUTTON<br />
Used to select the operation mode.<br />
3. ROOM TEMPERATURE SETTING BUTTONS<br />
Used to select the room temperature.<br />
4. INDOOR FAN SPEED SELECTOR<br />
Used to select fan speed in four steps<br />
low, medium, high and CHAOS.<br />
5. JET COOL BUTTON<br />
Used to start or stop the speed cooling.<br />
(Speed cooling operates super high fan speed.)<br />
6. CHAOS SWING BUTTON<br />
Used to stop or start louver movement and set the desired up/down<br />
airflow direction.<br />
7. ON/OFF TIMER BUTTONS<br />
Used to set the time of starting and stopping operation.<br />
8. TIME SETTING BUTTONS<br />
Used to adjust the time.<br />
9. TIMER SET/CANCEL BUTTON<br />
Used to set and to cancel the Timer operation.<br />
10. SLEEP MODE AUTO BUTTON<br />
Used to set Sleep Mode Auto operation.<br />
11. AIR CIRCULATION BUTTON<br />
Used to circulate the room air without cooling or heating.<br />
12. ROOM TEMPERATURE CHECKING BUTTON<br />
Used to check the room temperature.<br />
13. PLASMA<br />
Used to start or stop the plasma-purification function.<br />
14. RESET BUTTON<br />
Initialize remote controller.<br />
15. 2nd F Button<br />
Used prior to using modes printed in blue at the bottom of buttons.
Cooling Mode - Standard Operation<br />
1<br />
2<br />
3<br />
Operating instructions<br />
Press button to turn on the indoor.<br />
Press button to select Cooling operation mode.<br />
Adjust the desired temperature by pressing buttons.<br />
Press button to check the Room temperature.<br />
When setting the desired temperature higher than room<br />
temperature, only ventilation wind is blow out instead of cooling<br />
wind.<br />
❖ Setting Temp Range : 18˚C~30˚C.<br />
Cooling Mode - Power Cooling<br />
It makes the room cool using pleasant and fresh air quickly<br />
Press button to turn on the indoor.<br />
1<br />
Press button to select Cooling operation mode.<br />
2<br />
3<br />
Press button continuously until "Po" displayed.<br />
What is power cooling?<br />
• Desired temperature: 18°C<br />
• Fan Speed: special high cool (Power air)<br />
❈ It quickly lowers the room temperature by operating.<br />
Heating Mode<br />
Press button to turn on the indoor.<br />
1<br />
Press button to select Heating mode.<br />
2<br />
Adjust the desired temperature by pressing buttons.<br />
3<br />
When setting the desired temperature lower than room temperature,<br />
there is only ventilation wind.<br />
❖ Setting Temp Range : 16˚C~30˚C.<br />
Operating Instructions<br />
Owner's Manual 9<br />
ENGLISH
Operating Instructions<br />
Dehumidification Mode<br />
1<br />
2<br />
3<br />
Press button to turn on the indoor.<br />
Press button to select Dehumidification mode<br />
The temperature setting can not be adjusted during operation this<br />
mode.<br />
Press the button to select airflow rate SLO → LO ’ MED → HI<br />
→ (NONE) →<br />
(The lists depends on products function)<br />
❖ NONE : Power level of Fan Speed<br />
In rainy season or high humidity climate, it is possible to operate simultaneously dehumidifier and<br />
cooling mode to remove humidity effectively.<br />
Auto Changeover Mode<br />
1<br />
2<br />
3<br />
Press button to turn on the indoor.<br />
Press button to select Auto Changeover Mode.<br />
The setting temperature as the right side picture can be set in both<br />
cooling/ heating model.<br />
❖ Setting Temp Range : 18˚C~30˚C.<br />
10 <strong>Ceiling</strong> <strong>Cassette</strong>-<strong>Type</strong> <strong>Air</strong> <strong>Conditioner</strong>
Auto Operation Mode<br />
Press button to turn on the indoor.<br />
1<br />
Press button to select Auto Operation Mode.<br />
2<br />
Incase of operating under only cooling mode, set '0' as standard<br />
3 level, we can adjust the temperature from step -2 to step 2.<br />
During operating Auto Operation mode:<br />
• We can use the FAN SPEED button<br />
• We can change manually to other operation mode.<br />
Fan Mode<br />
Press button to turn on the indoor.<br />
1<br />
Press button to select Fan mode<br />
2<br />
Press the button to select airflow rate SLO → LO ’ MED<br />
3 → HI → (NONE) →<br />
(The lists depends on products function)<br />
❊ When operating in wind mode, the outdoor compressor doesn't work.<br />
❊ FAN operation doesn't bring out cold air but air from regular fan comes out.<br />
Operating Instructions<br />
❊ Auto Changeover mode and Auto Operation mode may not operate depending on product type.<br />
Ariflow Setting<br />
We can simply adjust the desired airflow rate<br />
1<br />
Press buttons to set the desired airflow direction.<br />
• → (NONE) → → →<br />
• Display of these lists depends on products function.<br />
❖ NONE : Released swirl<br />
Please refer to the manual of product.<br />
<br />
Symbol Description<br />
Swril : vane paired opend cross<br />
Up·Down : Vane move from up to down automatically and continuously<br />
Left·Right : Vane move from left to right automatically and continuously<br />
❈ Some functions may not be operated and displayed depending on the product type.<br />
Owner's Manual 11<br />
ENGLISH
Operating Instructions<br />
Temperature setting/ room temperature check<br />
1<br />
2<br />
We can simply adjust the desired temperature.<br />
• Press the buttons to adjust the desired temperature.<br />
: Increase 1˚C per one time pressing<br />
: Decrease 1˚C per one time pressing<br />
Room temp: Indicate the current room temperature.<br />
Set temp: Indicate the temperature that user want to set.<br />
Depend on what kind of controller, the desired temperature can be adjusted at<br />
0.5˚C.<br />
Cooling operation: The cooling mode doesn't work if desired temperature is<br />
higher than room temperature Please lower the desired temperature.<br />
Heating operation: The heating mode doesn't work if desired temperature is<br />
higher than room temperature Please lower the desired temperature.<br />
Whenever press button, the room temperature will be displayed within 5<br />
seconds.<br />
After 5 seconds, it turns to display the desired temperature.<br />
Because of location of remote controller, the real room temperature and the this<br />
displayed value can be different<br />
Sub function : Plasma Purification(Optional)<br />
1<br />
2<br />
3<br />
Repeat pressing button until icon flash.<br />
Operate or cancel Plasma Purification function by pressing<br />
button.<br />
( icon appears/disappears on display part up<br />
to selection )<br />
After setting, press button to exit.<br />
When turn the machine off, Plasma function is off (And also off when restart indoor)<br />
In case of such model that has no Plasma sub function, it doesn't appear when pressing button.<br />
12 <strong>Ceiling</strong> <strong>Cassette</strong>-<strong>Type</strong> <strong>Air</strong> <strong>Conditioner</strong>
Function setting : Child Lock<br />
This function is to prevent children or other people from using indoor.<br />
• Press button.<br />
• Repeat pressing button until the icon flash.<br />
• When the button flashing, press button to set this function.<br />
• When setting this function, icon<br />
will be displayed whenever entering any operation except for Room<br />
temperature access. However, it is possible to control normally by<br />
wireless remote controller.<br />
To release this setting, keep pressing button until<br />
icon flash and then enter button.<br />
Function Setting : Mode Change Temp<br />
This function is to set converting temp. of Auto Changeover<br />
Press button. 1<br />
Repeat pressing button until icon flash.<br />
2<br />
Press button to change converting temp value : 1~7<br />
3<br />
4<br />
5<br />
Press button to complete and active the setting process.<br />
Press button to exit or system will automatically release<br />
without any input after 25 seconds.<br />
Operating Instructions<br />
Owner's Manual 13<br />
ENGLISH
Operating Instructions<br />
Function setting : Elevation Grill(Optional)<br />
This function is to move the indoor filter<br />
up/ down for cleaning filter.<br />
The setting is applied only to product that has this function.<br />
• Press button.<br />
• Repeat pressing button until icon flash.<br />
• Press button to control the grill Up/ Down or stop it<br />
• button: move grill up from stopping or stop grill from moving<br />
• button: move grill down from stopping or stop grill from moving.<br />
After setting, press button to exit or system will automatically release<br />
without input after 60 seconds.<br />
Details:<br />
In case of such model that has no this sub function, it doesn't appear when pressing button.<br />
<br />
Direction: Up Direction: Down Direction: Stop<br />
Function setting : Filter Sign Clear<br />
This function is to clear the indicator of indoor filter cleaning.<br />
1<br />
2<br />
Press button.<br />
Repeat pressing button until the icon flash.<br />
When the flashing, press the button to clear this display.<br />
When filter is covered by dust, it will reduce cooling/ heating efficiency and accumulate more electric<br />
power. Therefore, do clean the filter whenever cleaning time is expired.<br />
14 <strong>Ceiling</strong> <strong>Cassette</strong>-<strong>Type</strong> <strong>Air</strong> <strong>Conditioner</strong>
Function setting : Vane Angle Control<br />
This function is to adjust angle at which airflow is blow out.<br />
1<br />
2<br />
3<br />
4<br />
5<br />
6<br />
7<br />
Press button.<br />
Repeat pressing button until icon flash.<br />
Ex) Setting second Vane Angle as 'P3'<br />
Press button to select active vane: 1/2/3/4/All<br />
1-4: control individually each vane<br />
All: control all vane with the same duration.<br />
Press button to select Vane number/ Vane angle.<br />
Vane angle : 6 Step(P1~P6) & Sd<br />
Sd : Standard angle<br />
Press button to adjust the angle value.<br />
Press button to complete and active the setting process.<br />
(<strong>Air</strong>flow direction function will be released whenever setting vane<br />
angle)<br />
Press button to exit or system will automatically release<br />
without any input after 25 seconds.<br />
Operating Instructions<br />
Owner's Manual 15<br />
ENGLISH
Operating Instructions<br />
Setting Current Time<br />
1<br />
2<br />
3<br />
4<br />
5<br />
6<br />
7<br />
8<br />
9<br />
10<br />
Keep pressing button for 4 secs to enter Setting current<br />
time mode.<br />
Press key to adjust the current day.<br />
Press key to move to AM/ PM setting mode<br />
(the 'AM/ PM segment will flash).<br />
Setting AM/ PM value by pressing button.<br />
Press button to move to 'Hour' setting mode.<br />
(the 'Hour' segment will flash)<br />
Setting Hour value by pressing button.<br />
Press button to move to 'Minute' setting mode.<br />
(the 'Minute' segment will flash)<br />
Setting Minute value by pressing button.<br />
Press button to finish.<br />
In the process, press button to release and exit from setting<br />
mode. (In case of exit with incomplete information, it will return to<br />
the previous setting<br />
16 <strong>Ceiling</strong> <strong>Cassette</strong>-<strong>Type</strong> <strong>Air</strong> <strong>Conditioner</strong>
Programming : Setting Simple Reservation<br />
Operating Instructions<br />
In case of there is not any reservation setup on system, it is possible to make a SIMPLE reservation on indoor unit.<br />
1<br />
2<br />
3<br />
4<br />
Press button to enter the Programming mode.<br />
(the segment flashing)<br />
Press button to adjust reservation time.<br />
Press button to finish setting.<br />
Adjusting the reservation time after finish reservation setting<br />
will release the previous one.<br />
❊ If the indoor is ON, we can make the reservation for turning OFF. In reserve, if the indoor is OFF,<br />
we can set the timer for turning ON. The reservation time is from 1 to 7 hours.<br />
Programming : Weekly Reservation<br />
The weekly reservation is active after setting current time<br />
1<br />
2<br />
3<br />
4<br />
Press button to enter the reservation setting mode.<br />
Repeat pressing button to enter the weekly reservation<br />
setting mode. ( segment flashing)<br />
Set the ON/ OFF reservation for day in week<br />
- Press to adjust timing and Left/ Right to shift to<br />
next setting mode.<br />
- A day is considered as non-reservation if there is not any<br />
time reservation within.<br />
Press button to finish setting.<br />
Owner's Manual 17<br />
ENGLISH
Operating Instructions<br />
Programming : Setting Sleep Reservation<br />
This function is able to turn off <strong>Air</strong> conditioner when sleeping or after some hours.<br />
1<br />
2<br />
3<br />
4<br />
5<br />
Press button to enter the Programming mode.<br />
Repeat pressing button to enter the SLEEP reservation setting mode.<br />
( segment flashing)<br />
Press button to adjust reservation time.<br />
The SLEEP reservation time is from 1 to 7 hours.<br />
Press button to finish setting.<br />
Whenever reservation is done, icon will flash.<br />
When this setting is released, icon will disappear.<br />
Adjust the reservation time after finish reservation setting will<br />
release the previous one.<br />
CAUTION<br />
Please set a suitable time for sleep reservation.<br />
(turning cooling for long time may be harmful to health)<br />
18 <strong>Ceiling</strong> <strong>Cassette</strong>-<strong>Type</strong> <strong>Air</strong> <strong>Conditioner</strong>
Programming : Setting ON Reservation<br />
This function is able to turn air conditioner ON after a setting time.<br />
1<br />
2<br />
3<br />
4<br />
5<br />
6<br />
Press button.<br />
Repeat pressing button to enter the ON reservation<br />
setting mode.<br />
( segment flashing)<br />
Press button to adjust AM/ PM setting.<br />
Press button to Hour setting mode. When the Hour<br />
icon flash, please setting time.<br />
The setting range is within 1~12.<br />
Press button to shift to Minute setting mode. When<br />
the Minute icon flash, please setting minute the setting<br />
range is within 00~59.<br />
Press button to finish setting.<br />
Operating Instructions<br />
Owner's Manual 19<br />
ENGLISH
Operating Instructions<br />
Programming : Setting OFF Reservation<br />
This function is able to turn air conditioner OFF after a setting time.<br />
1<br />
2<br />
3<br />
4<br />
5<br />
6<br />
Press button.<br />
Repeat pressing button to enter the OFF reservation<br />
setting mode.<br />
( segment flashing)<br />
Press button to adjust AM/ PM setting.<br />
Press button to shift to Hour setting mode. When the<br />
Hour icon flash, please setting time.<br />
The setting range is within 1~12.<br />
Press button to shift to Minute setting mode. When<br />
the Minute icon flash, please setting minute the setting range<br />
is within 00~59.<br />
Press button to finish setting.<br />
20 <strong>Ceiling</strong> <strong>Cassette</strong>-<strong>Type</strong> <strong>Air</strong> <strong>Conditioner</strong>
Programming : Holiday Reservation<br />
This function is to automatically stop the machine working on some days.<br />
1<br />
2<br />
3<br />
4<br />
5<br />
6<br />
7<br />
Press button to enter the reservation setting mode.<br />
Repeat pressing button to enter the holiday<br />
reservation setting mode. ( segment flashing)<br />
Press button to move to holiday position.<br />
Press button to set or release a selected day as<br />
holiday or not. (❊ the holiday is indicated with a underline)<br />
If there is any holiday from Monday to Sunday,<br />
segment on LCD will be displayed.<br />
Press the button to exit or if there is not any input,<br />
system will release any setting after 10 seconds.<br />
It is possible to set the air conditioner OFF in every "holiday"<br />
( ex. 9:00, 10:00, 13:00 )<br />
Operating Instructions<br />
Owner's Manual 21<br />
ENGLISH
Operating Instructions<br />
Ventilation Kit Control(Optional)<br />
If there is a linkage between ventilator and air conditioner, it is able to control this ventilator.<br />
1<br />
2<br />
3<br />
22 <strong>Ceiling</strong> <strong>Cassette</strong>-<strong>Type</strong> <strong>Air</strong> <strong>Conditioner</strong><br />
Press Ventilation button to turn ON/ OFF<br />
the ventilator.<br />
In case of operating the ventilator, the<br />
‘Ventilation’ icon will be displayed.<br />
Operating ventilation Stop ventilation<br />
4<br />
When turn off ventilator, the ‘Ventilation’<br />
icon disappears.<br />
Please refer the Ventilation instruction in<br />
function setting menu in order to connect<br />
a ventilator to air conditioner.<br />
In case of not-connected ventilator, this<br />
ventilation function can not be operated.
Maintenance and Service<br />
Indoor Unit<br />
Maintenance and Service<br />
Grille, Case and Remote Control<br />
❐ Turn the system off before cleanining, To clean, wipe with a soft, dry cloth. Do not use bleach or abrasives.<br />
NOTE<br />
Supply power must be disconnected before cleaning the indoor unit.<br />
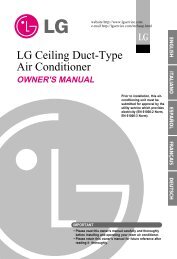
<strong>Air</strong> Filters<br />
The air filters behind the front grille should be checked<br />
and cleaned once every 2 weeks or more often if<br />
neccessary.<br />
■ Never use any of the followings:<br />
• Water hotter than 40°C.<br />
Could cause deformation and/or discoloration.<br />
• Volatile substances.<br />
Could damage the<br />
surfaces of the air<br />
conditioner.<br />
B enzene<br />
SINNER<br />
SCOURING<br />
CLBARGER<br />
1<br />
2<br />
3<br />
4<br />
Remove the <strong>Air</strong> filters.<br />
■ Take hold of the tab and pull slightly forward to<br />
remove the filter.<br />
CAUTION: When the air filter is to<br />
be removed, do not touch the metal<br />
parts of the indoor unit.<br />
It may cause an injury.<br />
Clean dirt from the air filter using a vacuum<br />
cleaner or washing with water.<br />
■ If dirt is conspicuous, wash with a neutral<br />
detergent in lukewarm water.<br />
■ If hot water (50°C or more) is used, it may be<br />
deformed.<br />
After washing with water, dry well in the<br />
shade.<br />
■ Do not expose the air filter to direct sunlight<br />
or heat from a fire when drying it.<br />
Install the air filter.<br />
Owner's Manual 23<br />
ENGLISH
Maintenance and Service<br />
Purifying filter(Optional)<br />
Cleaning<br />
The PLASMA filter behind the air filters should be<br />
checked and cleaned once every 3 months or more<br />
often if necessary.<br />
Replacement<br />
• Recomended use period : About 2 years<br />
1<br />
2<br />
3<br />
Open front panel and remove air filter.<br />
Remove air purifying filter.<br />
Insert new air purifying filter.<br />
24 <strong>Ceiling</strong> <strong>Cassette</strong>-<strong>Type</strong> <strong>Air</strong> <strong>Conditioner</strong><br />
2<br />
1<br />
2<br />
3<br />
4<br />
5<br />
4<br />
3<br />
After removing the air filters, pull slightly forward to<br />
remove the PLASMA filter.<br />
Dip the PLASMA filter into the water mixed with neutral<br />
detergent, for 20~30 minutes.<br />
Dry the PLASMA filter in the shade for a day<br />
(Especially, the humidity must be removed perfectly on<br />
this parts).<br />
Note the cuts of electric discharge lines.<br />
Re-install the PLASMA filter to the original position.<br />
CAUTION:Don’t touch this<br />
PLASMA Filter within 10 seconds<br />
after opening the inlet grille, it<br />
may cause an electric shock.<br />
Reinsert air filter and close front panel.<br />
2<br />
3<br />
1<br />
2
Operation Tips!<br />
Do not overcool the room.<br />
This is not good for the health and<br />
wastes electricity.<br />
Make sure that the doors<br />
and windows are shut tight.<br />
Avoid opening doors and windows<br />
as much as possible to keep the<br />
cool air in the room.<br />
Keep blinds or curtains<br />
closed.<br />
Do not let direct sunshine enter the<br />
room when the air conditioner is in<br />
operation.<br />
Clean the air filter regularly.<br />
Blockages in the air filter reduce the<br />
airflow and lower cooling and<br />
dehumidifying effects. Clean at least<br />
once every two weeks.<br />
When the air conditioner is not going....<br />
Maintenance and Service<br />
Keep the room temperature<br />
uniform.<br />
Adjust the vertical and horizontal<br />
airflow direction to ensure a uniform<br />
temperature in the room.<br />
Ventilate the room<br />
occasionally.<br />
When air conditioner is not going to be used for a long time.<br />
1 Operate the air conditioner at the following settings for 2 to 3 hours.<br />
• <strong>Type</strong> of operation: Fan operation mode.(Refer to page 14.)<br />
• This will dry out the internal mechanisms.<br />
2 Turn off the breaker.<br />
Since windows are kept closed, it is<br />
a good idea to open them and<br />
ventilate the room now and then.<br />
CAUTION: Turn off the breaker when the air conditioner is not going to be<br />
used for a long time.<br />
Dirt may collect and may cause a fire.<br />
3. Remove the batteries from the Remote Controller.<br />
Helpful information<br />
The air filters and your electiric bill.<br />
If the air filters become clogged with dust, the cooling capacity will drop, and 6% of the electricity used to<br />
operate the air conditioner will be wasted.<br />
When the air conditioner is to be used again.<br />
1. Clean the air filter and install it in the indoor unit.<br />
(Refer to page 22 for cleaning it.)<br />
2. Check that the air inlet and outlet of the indoor/outdoor unit are not blocked.<br />
3. Check that the ground wire is connected correctly. It may be connect to the indoor unit side.<br />
Owner's Manual 25<br />
ENGLISH
Maintenance and Service<br />
Troubleshooting Tips! Save time and money!<br />
Check the following points before requesting repairs or service.... If the malfunction persist, please contact your dealer.<br />
The air conditioner does not<br />
operate.<br />
The room has a peculiar odor.<br />
It seems that condensation is<br />
leaking from the air conditioner.<br />
<strong>Air</strong> conditioner does not operate<br />
for about 3 minutes when restart.<br />
Does not cool or heat effectively.<br />
The air conditioner operation is<br />
noisy.<br />
Crack sound is heard.<br />
Case Explanation See page<br />
Filter sign lamp (LED) is ON.<br />
Remote control display is faint, or<br />
no display at all.<br />
Call the service immediately in the following situations<br />
1. Anything abnormal such as burning smell, loud noise etc. happen. Stop the unit and turn the breaker off.<br />
Never try to repair by yourself or restart the system in such cases.<br />
2. Main power cord is too hot or damaged.<br />
3. Error code is generated by self diagnosis.<br />
4. Water leaks from indoor unit even if the humidity is low.<br />
5. Any switch, breaker (safety, earth) or fuse fails to work properly<br />
User must carry routine checkup & cleaning to avoid unit’s poor performance.<br />
In case of special situation, the job must be carried out by service person only.<br />
26 <strong>Ceiling</strong> <strong>Cassette</strong>-<strong>Type</strong> <strong>Air</strong> <strong>Conditioner</strong><br />
• Have you made a mistake in timer operation?<br />
• Has the fuse blown or has the circuit breaker<br />
been tripped?<br />
• Check that this is not a damp smell exuded by the<br />
walls, carpet, furniture or cloth items in the room.<br />
• Condensation occurs when the airflow from the<br />
air conditioner cools the warm room air.<br />
• This is the protector of the mechanism.<br />
• Wait about three minutes and operation will begin.<br />
• Is the air filter dirty? See air filter cleaning instructions.<br />
• The room may have been very hot when the<br />
room air conditioner was first turned on. Allow<br />
time for it to cool down.<br />
• Has the setting temperature been set incorrectly?<br />
• Are the indoor unit's air inlet or outlet vents obstructed?<br />
• For a noise that sounds like water flowing.<br />
-This is the sound of freon flowing inside the air<br />
conditioner unit.<br />
• For a noise that sounds like the compressed air<br />
releasing into atmosphere.<br />
-This is the sound of the dehumidifying water<br />
being processed inside the air conditioning unit.<br />
• This sound is generated by the<br />
expansion/contraction of the inlet grille, etc. due<br />
to changes of temperature.<br />
• Cleaning the filter, press the Timer button and button<br />
of wired remote controller at the same time for 3 sec.<br />
• Has the circuit breaker been tripped?<br />
• Are the batteries inserted in the opposite (+) and<br />
(-) directions?<br />
17~21<br />
-<br />
-<br />
-<br />
-<br />
23<br />
12<br />
-<br />
-<br />
-
P/No.: MFL42619108 Printed in Korea<br />
After reading this manual, keep it in a place easily accessible to the user for future reference.