LG Ceiling Duct-Type Air Conditioner
LG Ceiling Duct-Type Air Conditioner
LG Ceiling Duct-Type Air Conditioner

Create successful ePaper yourself
Turn your PDF publications into a flip-book with our unique Google optimized e-Paper software.
IMPORTANT<br />
website http://www.lgservice.com<br />
e-mail http://lgservice.com/techsup.html<br />
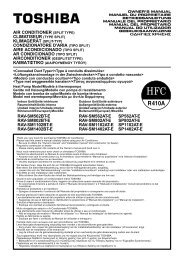
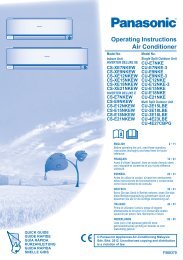
<strong>LG</strong> <strong>Ceiling</strong> <strong>Duct</strong>-<strong>Type</strong><br />
<strong>Air</strong> <strong>Conditioner</strong><br />
OWNER'S MANUAL<br />
<strong>LG</strong><br />
Prior to installation, this airconditioning<br />
unit must be<br />
submitted for approval by the<br />
utility service which provides<br />
electricity (EN 61000-2 Norm,<br />
EN 61000-3 Norm).<br />
• Please read this owner's manual carefully and thoroughly<br />
before installing and operating your room air conditioner.<br />
• Please retain this owner's manual for future reference after<br />
reading it thoroughly.<br />
ENGLISH<br />
ITALIANO ESPAÑOL FRANÇAIS DEUTSCH
2 <strong>Ceiling</strong> DUCT <strong>Type</strong> <strong>Air</strong> <strong>Conditioner</strong><br />
<strong>Ceiling</strong> DUCT <strong>Type</strong> <strong>Air</strong> <strong>Conditioner</strong> Owner’s Manual<br />
TABLE OF CONTENTS<br />
Safety Precautions.........................3<br />
Operating Instructions...................8<br />
Care and maintenance.................25<br />
Before you call for service... .......27<br />
FOR YOUR RECORDS<br />
Write the model and serial numbers here:<br />
Model #<br />
Serial #<br />
You can find them on a label on the side of each unit.<br />
Dealer's Name<br />
Date Purchased<br />
■ Staple your receipt to this page in the event you need<br />
it to prove date of purchase or for warranty issues.<br />
READ THIS MANUAL<br />
Inside you will find many helpful hints on how to use<br />
and maintain your air conditioner properly. Just a little<br />
preventive care on your part can save you a great deal<br />
of time and money over the life of your air conditioner.<br />
You'll find many answers to common problems in the<br />
chart of troubleshooting tips. If you review our chart of<br />
Troubleshooting Tips first, you may not need to call<br />
for service at all.<br />
PRECAUTION<br />
• Contact the authorized service technician for<br />
repair or maintenance of this unit.<br />
• Contact the installer for installation of this unit.<br />
• The air conditioner is not intended for use by<br />
young children or invalids without supervision.<br />
• Young children should be supervised to ensure<br />
that they do not play with the air conditioner.<br />
• When the power cord is to be replaced,<br />
replacement work shall be performed by<br />
authorized personnel only using only genuine<br />
replacement parts.<br />
• Installation work must be performed in<br />
accordance with the National Electric Code by<br />
qualified and authorized personnel only.
Safety Precautions<br />
Safety Precautions<br />
To prevent injury to the user or other people and property damage, the following instructions must be<br />
followed.<br />
■ Incorrect operation due to ignoring instruction will cause harm or damage. The seriousness is classified<br />
by the following indications.<br />
This symbol indicates the possibility of death or serious injury.<br />
This symbol indicates the possibility of injury or damage to properties only.<br />
■ Meanings of symbols used in this manual are as shown below.<br />
■ Installation<br />
Do not use a defective or<br />
underrated circuit breaker.<br />
Use this appliance on a<br />
dedicated circuit.<br />
• There is risk of fire or electric<br />
shock.<br />
Install the panel and the<br />
cover of control box<br />
securely.<br />
• There is risk of fire or electric<br />
shock.<br />
Be sure not to do.<br />
Be sure to follow the instruction.<br />
For electrical work, contact<br />
the dealer, seller, a qualified<br />
electrician, or an Authorized<br />
Service Center.<br />
• Do not disassemble or repair<br />
the product. There is risk of fire<br />
or electric shock.<br />
Always install a dedicated<br />
circuit and breaker.<br />
• Improper wiring or installation<br />
may cause fire or electric shock<br />
Always ground the product.<br />
• There is risk of fire or electric<br />
shock.<br />
Use the correctly rated<br />
breaker or fuse.<br />
• There is risk of fire or electric<br />
shock.<br />
Owner's Manual 3<br />
ENGLISH
Safety Precautions<br />
Do not modify or extend the<br />
power cable.<br />
• There is risk of fire or electric<br />
shock.<br />
For installation, always contact the<br />
dealer or an Authorized Service Center.<br />
• There is risk of fire, electric<br />
shock, explosion, or injury.<br />
Do not let the air conditioner run for a<br />
long time when the humidity is very high<br />
and a door or a window is left open.<br />
• Moisture may condense and<br />
wet or damage furniture.<br />
Do not plug or unplug the<br />
power supply plug during<br />
operation.<br />
• There is risk of fire or electric<br />
shock.<br />
4 <strong>Ceiling</strong> DUCT <strong>Type</strong> <strong>Air</strong> <strong>Conditioner</strong><br />
Do not install, remove, or<br />
re-install the unit by<br />
yourself (customer).<br />
• There is risk of fire, electric<br />
shock, explosion, or injury.<br />
Do not install the product on<br />
a defective installation stand.<br />
• It may cause injury, accident, or<br />
damage to the product.<br />
■ Operation<br />
Take care to ensure that power<br />
cable could not be pulled out<br />
or damaged during operation.<br />
• There is risk of fire or electric<br />
shock.<br />
Do not touch(operate) the<br />
product with wet hands.<br />
• There is risk of fire or electrical<br />
shock.<br />
Be cautious when<br />
unpacking and installing<br />
the product.<br />
• Sharp edges could cause injury.<br />
Be especially careful of the<br />
case edges and the fins on the<br />
condenser and evaporator.<br />
Be sure the installation area<br />
does not deteriorate with age.<br />
• If the base collapses, the air<br />
conditioner could fall with it,<br />
causing property damage,<br />
product failure, and personal<br />
injury.<br />
Do not place anything on<br />
the power cable.<br />
• There is risk of fire or electric<br />
shock.<br />
Do not place a heater or<br />
other appliances near the<br />
power cable.<br />
• There is risk of fire and electric<br />
shock.
Do not allow water to run<br />
into electric parts.<br />
• It may cause There is risk of<br />
fire, failure of the product, or<br />
electric shock.<br />
When flammable gas leaks,<br />
turn off the gas and open a<br />
window for ventilation<br />
before turn the product on.<br />
• Do not use the telephone or<br />
turn switches on or off.<br />
There is risk of explosion or fire<br />
Do not open the inlet grill of the<br />
product during operation.<br />
(Do not touch the electrostatic<br />
filter, if the unit is so equipped.)<br />
• There is risk of physical injury,<br />
electric shock, or product<br />
failure.<br />
Do not store or use flammable<br />
gas or combustibles near the<br />
product.<br />
• There is risk of fire or failure of<br />
product.<br />
If strange sounds, or small or<br />
smoke comes from product. Turn<br />
the breaker off or disconnect the<br />
power supply cable.<br />
• There is risk of electric shock or<br />
fire.<br />
When the product is soaked<br />
(flooded or submerged),<br />
contact an Authorized<br />
Service Center.<br />
• There is risk of fire or electric<br />
shock.<br />
Ventilate the product from time to time<br />
when operating it together with a stove, etc.<br />
• There is risk of fire or electric shock.<br />
Gasolin<br />
Safety Precautions<br />
Do not use the product in a<br />
tightly closed space for a<br />
long time.<br />
• Oxygen deficiency could occur.<br />
Stop operation and close the window<br />
in storm or hurricane. If possible,<br />
remove the product from the window<br />
before the hurricane arrives.<br />
• There is risk of property<br />
damage, failure of product, or<br />
electric shock.<br />
Be cautious that water<br />
could not enter the product.<br />
• There is risk of fire, electric<br />
shock, or product damage.<br />
Turn the main power off when cleaning or<br />
maintaining the product.<br />
• There is risk of electric shock.<br />
Owner's Manual 5<br />
ENGLISH
Safety Precautions<br />
When the product is not be used for a long<br />
time, disconnect the power supply plug or<br />
turn off the breaker.<br />
• There is risk of product damage or failure, or<br />
unintended operation.<br />
■ Installation<br />
Always check for gas<br />
(refrigerant) leakage after<br />
installation or repair of product.<br />
• Low refrigerant levels may<br />
cause failure of product.<br />
Do not install the product where the<br />
noise or hot air from the outdoor unit<br />
could damage the neighborhoods.<br />
• It may cause a problem for your<br />
neighbors.<br />
■ Operation<br />
6 <strong>Ceiling</strong> DUCT <strong>Type</strong> <strong>Air</strong> <strong>Conditioner</strong><br />
Install the drain hose to ensure<br />
that water is drained away<br />
properly.<br />
• A bad connection may cause<br />
water leakage.<br />
Use two or more people to lift<br />
and transport the product.<br />
• Avoid personal injury.<br />
Do not expose the skin directly to cool air<br />
for long periods of time.<br />
(Don't sit in the draft.)<br />
• This could harm to your health.<br />
Take care to ensure that nobody could step<br />
on or fall onto the outdoor unit.<br />
• This could result in personal injury and product<br />
damage.<br />
Keep level even when<br />
installing the product.<br />
• To avoid vibration or water<br />
leakage.<br />
90˚<br />
Do not install the product<br />
where it will be exposed to<br />
sea wind (salt spray) directly.<br />
• It may cause corrosion on the product.<br />
Corrosion, particularly on the condenser<br />
and evaporator fins, could cause product<br />
malfunction or inefficient operation.<br />
Do not use the product for special purposes, such as<br />
preserving foods, works of art, etc. It is a consumer<br />
air conditioner, not a precision refrigeration system.<br />
• There is risk of<br />
damage or<br />
loss of property.
Do not block the inlet or<br />
outlet of air flow.<br />
• It may cause product failure.<br />
Do not step on or put<br />
anyting on the product.<br />
(outdoor units)<br />
• There is risk of personal injury<br />
and failure of product.<br />
Do not drink the water<br />
drained from the product.<br />
• It is not sanitary and could<br />
cause serious health issues.<br />
Do not recharge or disassemble the<br />
batteries. Do not dispose of batteries in a<br />
fire.<br />
• They may burn or explode.<br />
Use a soft cloth to clean. Do<br />
not use harsh detergents,<br />
solvents, etc.<br />
• There is risk of fire, electric<br />
shock, or damage to the plastic<br />
parts of the product.<br />
Wax<br />
Thinner<br />
Always insert the filter<br />
securely. Clean the filter<br />
every two weeks or more<br />
often if necessary.<br />
• A dirty filter reduces the efficiency<br />
of the air conditioner and could<br />
cause product malfunction or<br />
damage.<br />
Use a firm stool or ladder<br />
when cleaning or<br />
maintaining the product.<br />
• Be careful and avoid personal<br />
injury.<br />
Safety Precautions<br />
Do not touch the metal parts of<br />
the product when removing the<br />
air filter. They are very sharp!<br />
• There is risk of personal injury.<br />
Do not insert hands or other<br />
objects through the air inlet<br />
or outlet while the product<br />
is operated.<br />
• There are sharp and moving<br />
parts that could cause personal<br />
injury.<br />
Replace the all batteries in the<br />
remote control with new ones<br />
of the same type. Do not mix<br />
old and new batteries or<br />
different types of batteries.<br />
• There is risk of fire or explosion<br />
If the liquid from the batteries gets onto your skin<br />
or clothes, wash it well with clean water. Do not<br />
use the remote if the batteries have leaked.<br />
• The chemicals in batteries could cause burns or<br />
other health hazards.<br />
Owner's Manual 7<br />
ENGLISH
Operating Instructions<br />
Operating Instructions<br />
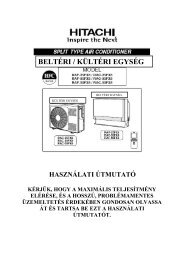
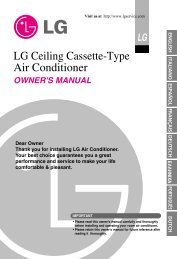
Name and Function of Remote Controller<br />
3<br />
Signal Receiver<br />
5<br />
8<br />
9<br />
10<br />
11<br />
12<br />
13<br />
14<br />
Timer Cancel<br />
8 <strong>Ceiling</strong> DUCT <strong>Type</strong> <strong>Air</strong> <strong>Conditioner</strong><br />
AUTO SWING OPERATION SET TEMP FAN SPEED SUB FUNCTION<br />
Room Temp<br />
HI AUTO Heater Preheat<br />
MED JET Defrost Humidify<br />
LO<br />
Filter Out door<br />
Time ZONE 1 2 3 4<br />
Timer Operation unit<br />
Program set<br />
On Off<br />
Set no. Time 01 03 05 07 09 11 13 15 17 19 21 23<br />
Program Week Holiday<br />
Hour<br />
Min<br />
SET/CLR<br />
1. Operation display<br />
Displays the operation conditions.<br />
2. On/Off Button<br />
Operation starts when this button is pressed, and<br />
stops when the button is pressed again.<br />
3. Set Temperature Button<br />
Used to set the temperature when the desired<br />
temperature is obtained.<br />
4. FAN Operation Button<br />
Used to circulate room air without cooling or<br />
heating.<br />
5. Electric Heater Button(optional)<br />
Used to set the Electric Heater.<br />
6. Fan Speed Button<br />
Used to set desired fan speed.<br />
7. Operation Mode Selection Button<br />
Used to select the operation mode.<br />
• Auto Operation Mode.<br />
• Cooling Operation Mode.<br />
• Soft Dry Operation Mode.<br />
• Heating Operation Mode.(except cooling model)<br />
8. Timer Cancel Button<br />
Used to cancel the timer.<br />
Plasma<br />
RESET<br />
1<br />
2<br />
6<br />
7<br />
4<br />
15<br />
16<br />
17<br />
9. Timer Set Button<br />
Used to set the timer when the desired time is<br />
obtained.<br />
10. Week Button<br />
Used to set a day of the week.<br />
11. Program Button<br />
Used to set the weekly timer.<br />
12. Holiday Button<br />
Used to set a holiday of the week.<br />
13. Time Set Button<br />
Used to set the time of the day and change the<br />
time in the weekly timer Function.<br />
14. Set and Clear Button<br />
Used to set and clear the weekly timer.<br />
15. Room Temperature Checking Button<br />
Used to check the room temperature.<br />
16. Plasma <strong>Air</strong> Clean Button(optional)<br />
17. Reset Button<br />
Used to set the current time and clear the setting<br />
time.<br />
❈ Display temperature can be different from actual room temperature if the remote controller is<br />
installed at the place where sun-rays are falling directly or the place nearby heat source.
Optional Function<br />
1<br />
4<br />
3<br />
5<br />
6<br />
A/CL<br />
11<br />
10<br />
9<br />
2<br />
7<br />
8<br />
Operating Instructions<br />
• WIRELESS REMOTE CONTROLLER<br />
This air-conditioner is equipped with wired remote controller basically. But if you want to have the wireless<br />
remote controller, you pay for it.<br />
Signal transmitter<br />
Transmits the signals to the signal receptor.<br />
CAUTION : for handling the Remote Controller<br />
1. FAN Operation Button<br />
Used to circulate room air without cooling or heating.<br />
2. Cooling Operation Button<br />
3. Soft Dry Operation Button<br />
Used to dehumidify without overcooling.<br />
4. Heating Operation Button<br />
(Heat pump model only)<br />
5. Timer Set Button<br />
Used to set the timer when the desired time is<br />
obtained.<br />
Then the wired remote controller is set up to 24 hours<br />
by an hour but the wireless remote controller is set up<br />
to 7 hours by an hour. Therefore, if you want to set<br />
over 7 hours, use the wired remote controller.<br />
6. Fan Speed Button<br />
Used to set the desired fan speed.<br />
7. On/Off Button<br />
Operation starts when this button is pressed, and<br />
stops when the button is pressed again.<br />
8. Set Temperature Button<br />
Used to set the temperature when the desired<br />
temperature is obtained<br />
9. Auto Operation Button<br />
10. Plasma <strong>Air</strong> Clean Button(Optional)<br />
11. Electric Heater Button(Optional) Used to set the<br />
Electric Heater.<br />
• Aim at the signal receptor on the wired remote controller so as to operate.<br />
• The remote control signal can be received at a distance of up to about 7m.<br />
• Be sure that there are no obstructions between the remote controller and the signal<br />
receptor.<br />
• Do not drop or throw the remote controller.<br />
• Do not place the remote controller in a location exposed to direct sunlight, or near the<br />
heating unit, or any other heat source.<br />
• Block a strong light over the signal receptor with a curtain or etc. so as to prevent the<br />
abnormal operation. (ex:electronic quick start, ELBA, inverter type fluorescent lamp)<br />
Owner's Manual 9<br />
ENGLISH
Operating Instructions<br />
Set the Current Time and a day of the Week<br />
1 Press<br />
2 Press<br />
3 Press<br />
4 Press<br />
the ' ' button.<br />
Each time the button is pressed, the number is changed from 00 to 23.<br />
You can set the number of the current hour.<br />
Hour<br />
the ' ' button.<br />
Min<br />
Week<br />
RESET<br />
10 <strong>Ceiling</strong> DUCT <strong>Type</strong> <strong>Air</strong> <strong>Conditioner</strong><br />
AUTO SWING OPERATION SET TEMP FAN SPEED SUB FUNCTION<br />
Room Temp<br />
HI AUTO Heater Preheat<br />
MED JET Defrost Humidify<br />
LO<br />
Filter Out door<br />
Time ZONE 1 2 3 4<br />
Timer Operation unit Program set<br />
On Off<br />
Set no. Time 01 03 05 07 09 11 13 15 17 19 21 23<br />
Each time the button is pressed, the number is increased from 00 to 59.<br />
You can set the number of the current minute.<br />
Week<br />
Hour<br />
Min<br />
' ' button.<br />
AUTO SWING OPERATION SET TEMP FAN SPEED SUB FUNCTION<br />
Room Temp<br />
HI AUTO Heater Preheat<br />
MED JET Defrost Humidify<br />
LO<br />
Filter Out door<br />
Time ZONE 1 2 3 4<br />
Timer Operation unit Program set<br />
On Off<br />
Set no. Time 01 03 05 07 09 11 13 15 17 19 21 23<br />
Each time the button is pressed, a day of the week is shifted from sunday to saturday.<br />
You can set the day of the week.<br />
the ' RESET<br />
' button.<br />
AUTO SWING OPERATION SET TEMP FAN SPEED SUB FUNCTION<br />
Room Temp<br />
HI AUTO Heater Preheat<br />
MED JET Defrost Humidify<br />
LO<br />
Filter Out door<br />
Time ZONE 1 2 3 4<br />
Timer Operation unit Program set<br />
On Off<br />
Set no. Time 01 03 05 07 09 11 13 15 17 19 21 23<br />
If you want to reset the current time and a day of the week, click the Reset button.<br />
AUTO SWING OPERATION SET TEMP FAN SPEED SUB FUNCTION<br />
Room Temp<br />
HI AUTO Heater Preheat<br />
MED JET Defrost Humidify<br />
LO<br />
Filter Out door<br />
Time ZONE 1 2 3 4<br />
Timer Operation unit Program set<br />
On Off<br />
Set no. Time 01 03 05 07 09 11 13 15 17 19 21 23
Weekly Programming<br />
1 Press<br />
2 Press<br />
4 Press<br />
the Program button.<br />
The remote controller is displayed like a picture. Then ' Program set ', ' ' and '01' is blinked.<br />
Program<br />
Week<br />
the ' ' button.<br />
Press button repeatedly until desired mode appears.<br />
For example, if you want Thu, press button 4 times.<br />
3 Select<br />
Week<br />
the time you want.<br />
Press Hour or Min button, then blinking letter is shown.<br />
SET/CLR<br />
If you press button, then ' ' shape appears.<br />
unit<br />
05<br />
' ' shape means that five o'clock is reserved.<br />
Using below buttons, you can reserve time.<br />
Hour<br />
Min<br />
SET/CLR<br />
AUTO SWING OPERATION SET TEMP FAN SPEED SUB FUNCTION<br />
Room Temp<br />
HI AUTO Heater Preheat<br />
MED JET Defrost Humidify<br />
LO<br />
Filter Out door<br />
Time ZONE 1 2 3 4<br />
Timer Operation unit<br />
Program set<br />
On Off<br />
Set no. Time 01 03 05 07 09 11 13 15 17 19 21 23<br />
Week<br />
* For example, the air-conditioner is on 6,7,8 and 13~22 o'clock.<br />
AUTO SWING OPERATION SET TEMP FAN SPEED SUB FUNCTION<br />
Room Temp<br />
HI AUTO Heater Preheat<br />
MED JET Defrost Humidify<br />
LO<br />
Filter Out door<br />
Time ZONE 1 2 3 4<br />
Timer Operation unit<br />
Program set<br />
On Off<br />
Set no. Time 01 03 05 07 09 11 13 15 17 19 21 23<br />
the Program button again to finish weekly programmining.<br />
Week<br />
Program<br />
Operating Instructions<br />
Owner's Manual 11<br />
ENGLISH
Operating Instructions<br />
Holiday Setting<br />
If Tuesday is a holiday in this week, you may set a holiday.<br />
1.Press the Program button.<br />
2. Press the Week button.<br />
Select the Tuesday.<br />
3. Press the Holiday button.<br />
Then the remote controller will be displayed ' '.<br />
The outside rectangular means holiday.<br />
4. Press the Program button again to finish holiday<br />
setting.<br />
Timer Setting(Delay start/Pre-set stop)<br />
1. Press the Timer button<br />
to turn Timer on or off.<br />
Program<br />
Week<br />
Holiday<br />
This function is used to turn on or turn off in several hours.<br />
Timer<br />
2. Change the timer setting until the desired time is set.<br />
12 <strong>Ceiling</strong> DUCT <strong>Type</strong> <strong>Air</strong> <strong>Conditioner</strong><br />
Program<br />
3. If you want to cancel the timer setting, press the Cancel button.<br />
Hour<br />
AUTO SWING OPERATION SET TEMP FAN SPEED SUB FUNCTION<br />
Room Temp<br />
HI AUTO Heater Preheat<br />
MED JET Defrost Humidify<br />
LO<br />
Filter Out door<br />
Time ZONE 1 2 3 4<br />
Timer Operation unit<br />
Program set<br />
On Off<br />
Set no. Time 01 03 05 07 09 11 13 15 17 19 21 23<br />
Min<br />
Cancel
Operation Mode<br />
Cooling Mode Cooling Mode<br />
Soft Dry Mode<br />
Heating Mode<br />
Auto Mode<br />
(Heat Pump Model)<br />
Operation Procedure<br />
1st<br />
2nd<br />
3rd<br />
4th<br />
On/Off Button<br />
Operation Mode Selection Button<br />
Room Temperature Setting Button<br />
Indoor Fan Speed Selection Button<br />
3<br />
AUTO SWING OPERATION SET TEMP FAN SPEED SUB FUNCTION<br />
Room Temp<br />
HI AUTO Heater Preheat<br />
MED JET Defrost Humidify<br />
LO<br />
Filter Out door<br />
Time ZONE 1 2 3 4<br />
Timer Operation unit<br />
Program set<br />
On Off<br />
Set no. Time 01 03 05 07 09 11 13 15 17 19 21 23<br />
Timer Cancel<br />
Program Week Holiday<br />
Hour<br />
Min<br />
Soft Dry Mode<br />
SET/CLR<br />
Auto Mode<br />
(Cooling Model)<br />
Plasma<br />
RESET<br />
Operating Instructions<br />
1<br />
2<br />
4<br />
Owner's Manual 13<br />
ENGLISH
Operating Instructions<br />
Cooling Operation Mode<br />
1 Press<br />
2 Select<br />
3 Set<br />
4 Set<br />
the On/Off Button.<br />
Cooling Operation.<br />
Press the Operation Mode Selection Button.<br />
Each time the button is pressed, the operation mode is shifted in the arrow direction.<br />
HEAT PUMP MODEL<br />
COOLING MODEL<br />
the temperature<br />
lower than the room<br />
temperature.<br />
the fan speed.<br />
Operation Display<br />
AUTO SWING OPERATION SET TEMP FAN SPEED SUB FUNCTION AUTO SWING OPERATION SET TEMP FAN SPEED SUB FUNCTION AUTO SWING OPERATION SET TEMP FAN SPEED SUB FUNCTION AUTO SWING OPERATION SET TEMP FAN SPEED SUB FUNCTION<br />
Room Temp<br />
HI AUTO Heater Preheat<br />
Room Temp<br />
HI AUTO Heater Preheat<br />
Room Temp<br />
HI AUTO Heater Preheat<br />
Room Temp<br />
HI AUTO Heater Preheat<br />
MED JET Defrost Humidify<br />
MED JET Defrost Humidify<br />
MED JET Defrost Humidify<br />
MED JET Defrost Humidify<br />
LO<br />
Filter Out door<br />
LO<br />
Filter Out door<br />
LO<br />
Filter Out door<br />
LO<br />
Filter Out door<br />
Time ZONE 1 2 3 4<br />
Time ZONE 1 2 3 4<br />
Time ZONE 1 2 3 4<br />
Time ZONE 1 2 3 4<br />
Timer Operation unit<br />
On Off<br />
Program set<br />
Timer Operation unit<br />
On Off<br />
Program set<br />
Timer Operation unit<br />
On Off<br />
Program set<br />
Timer Operation unit<br />
On Off<br />
Program set<br />
Set no. Time 01 03 05 07 09 11 13 15 17 19 21Set no. 23 Time 01 03 05 07 09 11 13 15 17 19 21Set no. 23 Time 01 03 05 07 09 11 13 15 17 19 21Set no. 23 Time 01 03 05 07 09 11 13 15 17 19 21 23<br />
Cooling Operation Soft Dry Operation Heating Operation Auto Operation<br />
Operation Display<br />
AUTO SWING OPERATION SET TEMP FAN SPEED SUB FUNCTION<br />
Room Temp<br />
HI AUTO Heater Preheat<br />
MED JET Defrost Humidify<br />
LO<br />
Filter Out door<br />
Time ZONE 1 2 3 4<br />
Timer Operation unit Program set<br />
On Off<br />
Set no. Time 01 03 05 07 09 11 13 15 17 19 21 23<br />
14 <strong>Ceiling</strong> DUCT <strong>Type</strong> <strong>Air</strong> <strong>Conditioner</strong><br />
AUTO SWING OPERATION SET TEMP FAN SPEED SUB FUNCTION<br />
Room Temp<br />
HI AUTO Heater Preheat<br />
MED JET Defrost Humidify<br />
LO<br />
Filter Out door<br />
Time ZONE 1 2 3 4<br />
Timer Operation unit Program set<br />
On Off<br />
Set no. Time 01 03 05 07 09 11 13 15 17 19 21 23<br />
Cooling Operation Soft Dry Operation<br />
Operation Display<br />
AUTO SWING OPERATION SET TEMP FAN SPEED SUB FUNCTION<br />
Room Temp<br />
HI AUTO Heater Preheat<br />
MED JET Defrost Humidify<br />
LO<br />
Filter Out door<br />
Time ZONE 1 2 3 4<br />
Timer Operation unit Program set<br />
On Off<br />
Set no. Time 01 03 05 07 09 11 13 15 17 19 21 23<br />
AUTO SWING OPERATION SET TEMP FAN SPEED SUB FUNCTION<br />
Room Temp<br />
HI AUTO Heater Preheat<br />
MED JET Defrost Humidify<br />
LO<br />
Filter Out door<br />
Time ZONE 1 2 3 4<br />
Timer Operation unit Program set<br />
On Off<br />
Set no. Time 01 03 05 07 09 11 13 15 17 19 21 23<br />
AUTO SWING OPERATION SET TEMP FAN SPEED SUB FUNCTION<br />
Room Temp<br />
HI AUTO Heater Preheat<br />
MED JET Defrost Humidify<br />
LO<br />
Filter Out door<br />
Time ZONE 1 2 3 4<br />
Timer Operation unit Program set<br />
On Off<br />
Set no. Time 01 03 05 07 09 11 13 15 17 19 21 23<br />
• Select the fan speed in three steps- high, low, medium.<br />
• The display shows high fan speed.<br />
• Each time the button is pressed, the fan speed mode is shifted.<br />
AUTO SWING OPERATION SET TEMP FAN SPEED SUB FUNCTION<br />
Room Temp<br />
HI AUTO Heater Preheat<br />
MED JET Defrost Humidify<br />
LO<br />
Filter Out door<br />
Time ZONE 1 2 3 4<br />
Timer Operation unit Program set<br />
On Off<br />
Set no. Time 01 03 05 07 09 11 13 15 17 19 21 23<br />
Auto Operation<br />
• The temperature can be set<br />
within a range of 18°C ~ 30°C<br />
by 1°C .<br />
To raise the Temperature.<br />
To lower the Temperature.<br />
AUTO SWING OPERATION SET TEMP FAN SPEED SUB FUNCTION<br />
Room Temp<br />
HI AUTO Heater Preheat<br />
MED JET Defrost Humidify<br />
LO<br />
Filter Out door<br />
Time ZONE 1 2 3 4<br />
Timer Operation unit Program set<br />
On Off<br />
Set no. Time 01 03 05 07 09 11 13 15 17 19 21 23
Soft Dry Operation Mode<br />
This mode dehumidifies without overcooling.<br />
1 Press<br />
2 Select<br />
3 During<br />
the On/Off Button.<br />
Soft Dry Operation.<br />
HEAT PUMP MODEL<br />
COOLING MODEL<br />
Operation Display<br />
AUTO SWING OPERATION SET TEMP FAN SPEED SUB FUNCTION AUTO SWING OPERATION SET TEMP FAN SPEED SUB FUNCTION AUTO SWING OPERATION SET TEMP FAN SPEED SUB FUNCTION AUTO SWING OPERATION SET TEMP FAN SPEED SUB FUNCTION<br />
Room Temp<br />
HI AUTO Heater Preheat<br />
Room Temp<br />
HI AUTO Heater Preheat<br />
Room Temp<br />
HI AUTO Heater Preheat<br />
Room Temp<br />
HI AUTO Heater Preheat<br />
MED JET Defrost Humidify<br />
MED JET Defrost Humidify<br />
MED JET Defrost Humidify<br />
MED JET Defrost Humidify<br />
LO<br />
Filter Out door<br />
LO<br />
Filter Out door<br />
LO<br />
Filter Out door<br />
LO<br />
Filter Out door<br />
Time ZONE 1 2 3 4<br />
Time ZONE 1 2 3 4<br />
Time ZONE 1 2 3 4<br />
Time ZONE 1 2 3 4<br />
Timer Operation unit<br />
On Off<br />
Program set<br />
Timer Operation unit<br />
On Off<br />
Program set<br />
Timer Operation unit<br />
On Off<br />
Program set<br />
Timer Operation unit<br />
On Off<br />
Program set<br />
Set no. Time 01 03 05 07 09 11 13 15 17 19 21Set no. 23 Time 01 03 05 07 09 11 13 15 17 19 21Set no. 23 Time 01 03 05 07 09 11 13 15 17 19 21Set no. 23 Time 01 03 05 07 09 11 13 15 17 19 21 23<br />
Cooling Operation Soft Dry Operation Heating Operation Auto Operation<br />
Operation Display<br />
AUTO SWING OPERATION SET TEMP FAN SPEED SUB FUNCTION<br />
Room Temp<br />
HI AUTO Heater Preheat<br />
MED JET Defrost Humidify<br />
LO<br />
Filter Out door<br />
Time ZONE 1 2 3 4<br />
Timer Operation unit Program set<br />
On Off<br />
Set no. Time 01 03 05 07 09 11 13 15 17 19 21 23<br />
Soft Dry Operation.<br />
AUTO SWING OPERATION SET TEMP FAN SPEED SUB FUNCTION<br />
Room Temp<br />
HI AUTO Heater Preheat<br />
MED JET Defrost Humidify<br />
LO<br />
Filter Out door<br />
Time ZONE 1 2 3 4<br />
Timer Operation unit Program set<br />
On Off<br />
Set no. Time 01 03 05 07 09 11 13 15 17 19 21 23<br />
Operating Instructions<br />
Press the operation Mode Selection Button.<br />
Each time the button is pressed, the operation mode is shifted in the arrow direction.<br />
AUTO SWING OPERATION SET TEMP FAN SPEED SUB FUNCTION<br />
Room Temp<br />
HI AUTO Heater Preheat<br />
MED JET Defrost Humidify<br />
LO<br />
Filter Out door<br />
Time ZONE 1 2 3 4<br />
Timer Operation unit Program set<br />
On Off<br />
Set no. Time 01 03 05 07 09 11 13 15 17 19 21 23<br />
Cooling Operation Soft Dry Operation Auto Operation<br />
• The indoor fan speed is automatically set to the low, so the shift of the indoor fan speed is<br />
impossible because it's already being set to the best speed for Dry Operation by Micom<br />
Control.<br />
Owner's Manual 15<br />
ENGLISH
Operating Instructions<br />
Heating Operation Mode (Heat pump model only)<br />
1 Press<br />
2 Select<br />
3 Set<br />
4 Set<br />
5 This<br />
6 If<br />
the On/Off Button.<br />
Heating Operation.<br />
Press the Operation Mode Selection Button.<br />
Each time the button is pressed, the operation mode is shifted in the arrow direction.<br />
Operation Display<br />
the temperature.<br />
AUTO SWING OPERATION SET TEMP FAN SPEED SUB FUNCTION AUTO SWING OPERATION SET TEMP FAN SPEED SUB FUNCTION AUTO SWING OPERATION SET TEMP FAN SPEED SUB FUNCTION AUTO SWING OPERATION SET TEMP FAN SPEED SUB FUNCTION<br />
Room Temp<br />
HI AUTO Heater Preheat<br />
Room Temp<br />
HI AUTO Heater Preheat<br />
Room Temp<br />
HI AUTO Heater Preheat<br />
Room Temp<br />
HI AUTO Heater Preheat<br />
MED JET Defrost Humidify<br />
MED JET Defrost Humidify<br />
MED JET Defrost Humidify<br />
MED JET Defrost Humidify<br />
LO<br />
Filter Out door<br />
LO<br />
Filter Out door<br />
LO<br />
Filter Out door<br />
LO<br />
Filter Out door<br />
Time ZONE 1 2 3 4<br />
Time ZONE 1 2 3 4<br />
Time ZONE 1 2 3 4<br />
Time ZONE 1 2 3 4<br />
Timer Operation unit<br />
On Off<br />
Program set<br />
Timer Operation unit<br />
On Off<br />
Program set<br />
Timer Operation unit<br />
On Off<br />
Program set<br />
Timer Operation unit<br />
On Off<br />
Program set<br />
Set no. Time 01 03 05 07 09 11 13 15 17 19 21Set no. 23 Time 01 03 05 07 09 11 13 15 17 19 21Set no. 23 Time 01 03 05 07 09 11 13 15 17 19 21Set no. 23 Time 01 03 05 07 09 11 13 15 17 19 21 23<br />
Cooling Operation Soft Dry Operation Heating Operation Auto Operation<br />
AUTO SWING OPERATION SET TEMP FAN SPEED SUB FUNCTION<br />
Room Temp<br />
HI AUTO Heater Preheat<br />
MED JET Defrost Humidify<br />
LO<br />
Filter Out door<br />
Time ZONE 1 2 3 4<br />
Timer Operation unit Program set<br />
On Off<br />
Set no. Time 01 03 05 07 09 11 13 15 17 19 21 23<br />
the fan speed.<br />
Operation Display<br />
AUTO SWING OPERATION SET TEMP FAN SPEED SUB FUNCTION<br />
Room Temp<br />
HI AUTO Heater Preheat<br />
MED JET Defrost Humidify<br />
LO<br />
Filter Out door<br />
Time ZONE 1 2 3 4<br />
Timer Operation unit Program set<br />
On Off<br />
Set no. Time 01 03 05 07 09 11 13 15 17 19 21 23<br />
16 <strong>Ceiling</strong> DUCT <strong>Type</strong> <strong>Air</strong> <strong>Conditioner</strong><br />
AUTO SWING OPERATION SET TEMP FAN SPEED SUB FUNCTION<br />
Room Temp<br />
HI AUTO Heater Preheat<br />
MED JET Defrost Humidify<br />
LO<br />
Filter Out door<br />
Time ZONE 1 2 3 4<br />
Timer Operation unit Program set<br />
On Off<br />
Set no. Time 01 03 05 07 09 11 13 15 17 19 21 23<br />
• Select the fan speed in three steps - high, low, medium.<br />
• The display shows high fan speed<br />
• Each time the button is pressed, the fan speed mode is shifted.<br />
air-conditioner is set to the hot start control in<br />
order not to discharge the cold air during the<br />
heating operation. This time, the remote controller<br />
indicates ‘Preheat’.<br />
the outdoor temperature is too low during the<br />
heating operation, this air-conditioner is set to the<br />
defrosting operation and the remote controller<br />
indicates ‘Defrost’.<br />
• The temperature can be set within a<br />
range of 16˚ C ~ 30˚ C by 1˚ C.<br />
To raise the Temperature.<br />
To lower the Temperature.<br />
AUTO SWING OPERATION SET TEMP FAN SPEED SUB FUNCTION<br />
Room Temp<br />
HI AUTO Heater Preheat<br />
MED JET Defrost Humidify<br />
LO<br />
Filter Out door<br />
Time ZONE 1 2 3 4<br />
Timer Operation unit Program set<br />
On Off<br />
Set no. Time 01 03 05 07 09 11 13 15 17 19 21 23<br />
AUTO SWING OPERATION SET TEMP FAN SPEED SUB FUNCTION<br />
Room Temp<br />
HI AUTO Heater Preheat<br />
MED JET Defrost Humidify<br />
LO<br />
Filter Out door<br />
Time ZONE 1 2 3 4<br />
Timer Operation unit Program set<br />
On Off<br />
Set no. Time 01 03 05 07 09 11 13 15 17 19 21 23<br />
AUTO SWING<br />
OPERATION SET TEMP FAN SPEED SUB FUNCTION<br />
Room Temp<br />
HI AUTO Heater Preheat<br />
MED JET Defrost Humidify<br />
LO<br />
Filter Out door<br />
Time ZONE 1 2 3 4<br />
Timer Operation unit Program set<br />
On Off<br />
Set no. Time 01 03 05 07 09 11 13 15 17 19 21 23
Auto Operation Mode<br />
1 Press<br />
2 To<br />
3<br />
the On/Off Button.<br />
select Auto Operation, press the Operation Mode Selection button.<br />
Each time the button is pressed, the operation mode is shifted in the direction of the arrow.<br />
HEAT PUMP MODEL<br />
COOLING MODEL<br />
Operation Display<br />
AUTO SWING OPERATION SET TEMP FAN SPEED SUB FUNCTION AUTO SWING OPERATION SET TEMP FAN SPEED SUB FUNCTION AUTO SWING OPERATION SET TEMP FAN SPEED SUB FUNCTION AUTO SWING OPERATION SET TEMP FAN SPEED SUB FUNCTION<br />
Room Temp<br />
HI AUTO Heater Preheat<br />
Room Temp<br />
HI AUTO Heater Preheat<br />
Room Temp<br />
HI AUTO Heater Preheat<br />
Room Temp<br />
HI AUTO Heater Preheat<br />
MED JET Defrost Humidify<br />
MED JET Defrost Humidify<br />
MED JET Defrost Humidify<br />
MED JET Defrost Humidify<br />
LO<br />
Filter Out door<br />
LO<br />
Filter Out door<br />
LO<br />
Filter Out door<br />
LO<br />
Filter Out door<br />
Time ZONE 1 2 3 4<br />
Time ZONE 1 2 3 4<br />
Time ZONE 1 2 3 4<br />
Time ZONE 1 2 3 4<br />
Timer Operation unit<br />
On Off<br />
Program set<br />
Timer Operation unit<br />
On Off<br />
Program set<br />
Timer Operation unit<br />
On Off<br />
Program set<br />
Timer Operation unit<br />
On Off<br />
Program set<br />
Set no. Time 01 03 05 07 09 11 13 15 17 19 21Set no. 23 Time 01 03 05 07 09 11 13 15 17 19 21Set no. 23 Time 01 03 05 07 09 11 13 15 17 19 21Set no. 23 Time 01 03 05 07 09 11 13 15 17 19 21 23<br />
Cooling Operation Soft Dry Operation Heating Operation Auto Operation<br />
Operation Display<br />
AUTO SWING OPERATION SET TEMP FAN SPEED SUB FUNCTION<br />
Room Temp<br />
HI AUTO Heater Preheat<br />
MED JET Defrost Humidify<br />
LO<br />
Filter Out door<br />
Time ZONE 1 2 3 4<br />
Timer Operation unit Program set<br />
On Off<br />
Set no. Time 01 03 05 07 09 11 13 15 17 19 21 23<br />
AUTO SWING OPERATION SET TEMP FAN SPEED SUB FUNCTION<br />
Room Temp<br />
HI AUTO Heater Preheat<br />
MED JET Defrost Humidify<br />
LO<br />
Filter Out door<br />
Time ZONE 1 2 3 4<br />
Timer Operation unit Program set<br />
On Off<br />
Set no. Time 01 03 05 07 09 11 13 15 17 19 21 23<br />
AUTO SWING OPERATION SET TEMP FAN SPEED SUB FUNCTION<br />
Room Temp<br />
HI AUTO Heater Preheat<br />
MED JET Defrost Humidify<br />
LO<br />
Filter Out door<br />
Time ZONE 1 2 3 4<br />
Timer Operation unit Program set<br />
On Off<br />
Set no. Time 01 03 05 07 09 11 13 15 17 19 21 23<br />
Cooling Operation Soft Dry Operation Auto Operation<br />
HEAT PUMP MODEL<br />
AUTO SWING OPERATION SET TEMP FAN SPEED SUB FUNCTION<br />
Room Temp<br />
HI AUTO Heater Preheat<br />
MED JET Defrost Humidify<br />
LO<br />
Filter Out door<br />
Time ZONE 1 2 3 4<br />
Timer Operation unit Program set<br />
On Off<br />
Set no. Time 01 03 05 07 09 11 13 15 17 19 21 23<br />
COOLING MODEL<br />
AUTO SWING OPERATION SET TEMP FAN SPEED SUB FUNCTION<br />
Room Temp<br />
HI AUTO Heater Preheat<br />
MED JET Defrost Humidify<br />
LO<br />
Filter Out door<br />
Time ZONE 1 2 3 4<br />
Timer Operation unit Program set<br />
On Off<br />
Set no. Time 01 03 05 07 09 11 13 15 17 19 21 23<br />
(This indication will be shifted to the initial<br />
Auto Mode Display state after 4 seconds.)<br />
To raise the Temperature.<br />
To lower the Temperature.<br />
Cold Cool Proper Warm Hot<br />
To raise the Temperature.<br />
(When you feel too cool or cold.)<br />
To lower the Temperature.<br />
(When you feel too warm or hot.)<br />
Operating Instructions<br />
Set the temperature lower than the room themperature.<br />
The temperature can be set within a range of 18˚ C ~ 30˚ C by 1˚ C.<br />
Set the temperature upper or lower than the standard temperature.<br />
The temperature can be set within a range of -2 ~ 2 by 1 level.<br />
During Auto Operation:<br />
❏ You can switch the indoor fan speed.<br />
❏ The system will automatically switch from the cooling mode to the heating mode as the room temperature<br />
and set temperature.(Heat pump model only)<br />
Owner's Manual 17<br />
ENGLISH
Operating Instructions<br />
FAN Operation<br />
1 Press<br />
2 Press<br />
3 Each<br />
the On/Off Button.<br />
FAN Operation Button.<br />
time Indoor Fan Speed button is pressed, the fan speed mode is shifted in the<br />
arrow direction.<br />
AUTO SWING OPERATION SET TEMP FAN SPEED SUB FUNCTION<br />
Room Temp<br />
HI AUTO Heater Preheat<br />
MED JET Defrost Humidify<br />
LO<br />
Filter Out door<br />
Time ZONE 1 2 3 4<br />
Timer Operation unit Program set<br />
On Off<br />
Set no. Time 01 03 05 07 09 11 13 15 17 19 21 23<br />
AUTO SWING OPERATION SET TEMP FAN SPEED SUB FUNCTION<br />
Room Temp<br />
HI AUTO Heater Preheat<br />
MED JET Defrost Humidify<br />
LO<br />
Filter Out door<br />
Time ZONE 1 2 3 4<br />
Timer Operation unit Program set<br />
On Off<br />
Set no. Time 01 03 05 07 09 11 13 15 17 19 21 23<br />
AUTO SWING OPERATION SET TEMP FAN SPEED SUB FUNCTION<br />
Room Temp<br />
HI AUTO Heater Preheat<br />
MED JET Defrost Humidify<br />
LO<br />
Filter Out door<br />
Time ZONE 1 2 3 4<br />
Timer Operation unit Program set<br />
On Off<br />
Set no. Time 01 03 05 07 09 11 13 15 17 19 21 23<br />
18 <strong>Ceiling</strong> DUCT <strong>Type</strong> <strong>Air</strong> <strong>Conditioner</strong><br />
• Fan speed is high.<br />
• Fan speed is low.<br />
• Fan speed is medium.<br />
* You can't set the temperature in Fan Operation mode. To exit this mode, press 'Operation Mode'<br />
button.
Electric Heater Operation Mode(Optional)<br />
1 Press<br />
2 Select<br />
3<br />
4<br />
the On/Off Button.<br />
heating+ E/heater Operation.<br />
To raise the Temperature.<br />
To lower the Temperature.<br />
AUTO SWING OPERATION SET TEMP FAN SPEED SUB FUNCTION<br />
Room Temp<br />
HI AUTO Heater Preheat<br />
MED JET Defrost Humidify<br />
LO<br />
Filter Out door<br />
Time ZONE 1 2 3 4<br />
Timer Operation unit Program set<br />
On Off<br />
Set no. Time 01 03 05 07 09 11 13 15 17 19 21 23<br />
Operating Instructions<br />
Press the Operation Mode Selection Button.<br />
Press the Heater Operation Button on the remote controller.(When the unit operates in heating mode.)<br />
Set the temperature upper than the room temperature.<br />
The temperature can be set within a range of 16°C~30°C by 1°C.<br />
Set the Fan Speed.<br />
AUTO SWING OPERATION SET TEMP FAN SPEED SUB FUNCTION<br />
Room Temp<br />
HI AUTO Heater Preheat<br />
MED JET Defrost Humidify<br />
LO<br />
Filter Out door<br />
Time ZONE 1 2 3 4<br />
Timer Operation unit Program set<br />
On Off<br />
Set no. Time 01 03 05 07 09 11 13 15 17 19 21 23<br />
• Each time the Button is pressed, the Fan Speed mode is<br />
shifted.<br />
Owner's Manual 19<br />
ENGLISH
Operating Instructions<br />
PLASMA Purification Operation (Optional)<br />
AUTO SWING OPERATION SET TEMP FAN SPEED SUB FUNCTION<br />
Room Temp<br />
HI AUTO Heater Preheat<br />
MED JET Defrost Humidify<br />
LO<br />
Filter Out door<br />
Time ZONE 1 2 3 4<br />
Timer Operation unit<br />
Program set<br />
On Off<br />
Set no. Time 01 03 05 07 09 11 13 15 17 19 21 23<br />
Timer Cancel<br />
Program Week Holiday<br />
Hour<br />
Min<br />
SET/CLR<br />
Plasma<br />
RESET<br />
Child Lock Function<br />
20 <strong>Ceiling</strong> DUCT <strong>Type</strong> <strong>Air</strong> <strong>Conditioner</strong><br />
1 Press<br />
2 Open<br />
3 New<br />
This is the Function that any children cannot used to the air-conditioner.<br />
Operation procedure<br />
1. To set the Child-Lock Function<br />
Press the Timer button and Minute Set button for three seconds. Then the<br />
operation mode shift to child lock mode and it is displayed ‘CL’ in the operation<br />
display.<br />
When you press any button in this time, the remote controller is not converted to<br />
any selected mode and the ‘CL’ is displayed in the remote controller for about<br />
three seconds. But the Room Temperature function is operated in spite of child<br />
lock mode.<br />
2. To cancel the Child-Lock Function<br />
Press the Timer button and Minute Set button for three seconds. Then the<br />
child-lock mode is cancelled and the preselected mode is displayed in the<br />
remote controller.<br />
the On/Off button. The unit will<br />
start.<br />
the door on the remote control.<br />
Press the PLASMA On/OFF button.<br />
Operation will start when the button is pressed<br />
and stop when the button is pressed again.<br />
Fan speed can be set after opening the<br />
door of the remote control. You can select the<br />
fan speed in three steps-low, medium or high.<br />
Each time the button is pressed, the fan<br />
speed mode is shifted.<br />
✴ <strong>Air</strong> purifying operation (PLASMA) is available<br />
during cooling, heating or any other operations.<br />
Plasma<br />
AUTO SWING OPERATION SET TEMP FAN SPEED SUB FUNCTION<br />
Room Temp<br />
HI AUTO Heater Preheat<br />
MED JET Defrost Humidify<br />
LO<br />
Filter Out door<br />
Time ZONE 1 2 3 4<br />
Timer Operation unit<br />
Program set<br />
On Off<br />
Set no. Time 01 03 05 07 09 11 13 15 17 19 21 23<br />
Timer Cancel<br />
Program Week Holiday<br />
Hour Min<br />
SET/CLR<br />
Plasma<br />
RESET
Operating Instructions<br />
How to operate Multi Indoor Unit (Simultaneous operating)<br />
- Keep the following procedure when simultaneously operating two units or more cassette type, duct type, and<br />
convertible type of indoor units via the free joint.<br />
1<br />
2<br />
3<br />
4<br />
5<br />
R<br />
Turn on the power of the unit by the installed remote controller, a wire<br />
or a wireless remote controller. When an installation professional<br />
installs it, only one wire remote controller is installed except the<br />
location with only the Convertible combination installed (using the<br />
wireless remote controller) when completing the indoor unit setting<br />
(Cassette ceiling top/bottom, <strong>Duct</strong> E.S.P. value).<br />
After setting the desired operation mode and temperature and then<br />
starting the unit to operate, wait for 2 or 3 seconds.<br />
The remaining unites simultaneously starts with the same setting<br />
mode to operate.<br />
If you want to stop operating, the remaining units are operated to stop<br />
in 2 or 3 seconds by the installed remote controller. (However, the<br />
location with only the Convertible combination is operated by the<br />
wireless remote controller.)<br />
For more information about how to operate the remote controller, refer<br />
to the previous pages.<br />
R<br />
Owner's Manual 21<br />
ENGLISH
Operating Instructions<br />
Telephone Control Operation(optional)<br />
Calling from outside, you can start the air conditioner to keep the room comfortable.<br />
Even though you went out with the air conditioner on, you can turn it off using the phone outside.<br />
TURN ON<br />
ON ON ON OFF<br />
TURN OFF<br />
ON OFF OFF OFF<br />
22 <strong>Ceiling</strong> DUCT <strong>Type</strong> <strong>Air</strong> <strong>Conditioner</strong><br />
1. Dial the number which is connected with the air<br />
conditioner.<br />
2. After ringing 5 times.<br />
3. You can hear the "Beep" sound (if the air<br />
conditioner is off), then press "0" "0" "7" "8"<br />
accordingly.<br />
4. With the sound "Beep, Beep" the air conditioner<br />
starts on.<br />
5. Hang up the phone.<br />
1. Dial the number which is connected with the air<br />
conditioner.<br />
2. After ringing 5 times.<br />
3. You can hear the "Beep Beep" sound (if the air<br />
conditioner is on), then press "0" "0" "7" "9"<br />
accordingly.<br />
4. With the sound "Beep---" the air conditioner is<br />
turned off.<br />
5. Hang up the phone.<br />
NOTICE<br />
❐ This product works after telephone rings 5 times.<br />
❐ If internal user picks up the phone before 5 rings, Telephone control function does not work.<br />
❐ If user doesn't push the telephone button 25 seconds after beep, Telephone control function doesn't work.<br />
❐ If it is connected through EPABX system, Tele control doesn't work.
Operating Instructions<br />
Telephone Control Operation(When using along with ARS telephone)<br />
Calling from outside, you can start the air conditioner to keep the room comfortable.<br />
Even though you went out with the air conditioner on, you can turn it off using the phone outside.<br />
TURN ON<br />
TURN OFF<br />
ON ON ON OFF<br />
ON OFF OFF OFF<br />
1. Dial the number which is connected with the air<br />
conditioner.<br />
2. OGM guide is provided after signal sound rings<br />
four times and then "Beep"(sounds from<br />
telephone itself) sounds so that outside<br />
recording can be done.<br />
3. Slowly press password "0" "0" "7" and "8" in<br />
order.<br />
4. With the sound "Beep, Beep" the air conditioner<br />
starts on.<br />
5. Hang up the phone.<br />
1. Dial the number which is connected with the air<br />
conditioner.<br />
2. OGM guide is provided after signal sound rings<br />
four times and then "Beep"(sounds from<br />
telephone itself) sounds so that outside<br />
recording can be done.<br />
3. Slowly press password "0" "0" "7" and "9" in<br />
order.<br />
4. With the sound "Beep---" the air conditioner is<br />
turned off.<br />
5. Hang up the phone.<br />
NOTICE<br />
❐ The numbers of response bell should be adjusted to four times if pressing "Out-of-office" button or taking other<br />
action for automatic response.<br />
❐ The recording time of OGM (Outgoing Message) should be less than approximately 15 seconds.<br />
❐ If it is connected to key phone, it cannot be worked.<br />
Owner's Manual 23<br />
ENGLISH
Operating Instructions<br />
Operation Details<br />
• Cooling Operation Mode<br />
When the room temperature is higher than the set temperature, it operates in cooling mode at the set<br />
temperature, the set fan speed, and then it will be in automatically turn off when the room temperature<br />
reaches the set temperature +0.5°C.<br />
ROOM TEMP.<br />
OPERATION START<br />
SET TEMP. +0.5°C)<br />
OPERATION STOP<br />
SET TEMP. -0.5°C)<br />
INDOOR FAN<br />
OUTDOOR FAN/COMP<br />
SETTING<br />
FAN SPEED<br />
24 <strong>Ceiling</strong> DUCT <strong>Type</strong> <strong>Air</strong> <strong>Conditioner</strong><br />
More 3 minutes<br />
LOW COOL<br />
OPERATION<br />
Helpful information<br />
<strong>Air</strong>flow speed and cooling capacity.<br />
The cooling capacity indicated in the specification is<br />
the value when the fan speed is set to high, and the<br />
capacity will be lower at low or medium fan speed.<br />
High fan speed is recommended when you wish to<br />
cool the room quickly.<br />
• After main power is on, Fan will start 7 seconds later.<br />
Self-Diagnosis Function<br />
SETTING<br />
FAN SPEED<br />
LOW COOL<br />
OPERATION<br />
SETTING<br />
FAN SPEED<br />
ON OFF ON OFF ON<br />
High<br />
Speed<br />
'CH' will flash in the remote controller display when a problem occurs. Then please contact your dealer.
Care and maintenance<br />
Indoor Unit<br />
<strong>Air</strong> outlet vent<br />
<strong>Air</strong> outlet vent<br />
<strong>Air</strong> filters<br />
Care and maintenance<br />
Caution: Before performing any maintenance, turn off the main power to the system.<br />
Grille, Case, and Remote Control<br />
❏ Turn the system off before cleaning. To clean,<br />
wipe with a soft, dry cloth. Do not use bleach or<br />
abrasives.<br />
Note:<br />
Supply power must be disconnected before<br />
cleaning the indoor unit.<br />
<strong>Air</strong> Filter<br />
The air filters behind Indoor unit<br />
(the suction side) should be checked and cleaned<br />
once every 2 weeks or more often if necessary.<br />
PLASMA Filter (Optional)<br />
The PLASMA filter should be checked and cleaned,<br />
once every month or more often, if necessary.<br />
PLASMA Filter<br />
<strong>Air</strong> Inlet Vent<br />
Don’t touch this PLASMA Filter within 10<br />
seconds after drawing out <strong>Air</strong> Cleaner<br />
Bracket, it may cause an electric shock.<br />
❏ Never use any of the followings:<br />
• Water hotter than 40°C<br />
Could cause deformation and/or<br />
discoloration.<br />
• Volatile substances<br />
Could damage the surfaces<br />
of the air conditioner.<br />
B enzene<br />
S INNER<br />
SCOURING<br />
CLBARGER<br />
1. Clean the filter with a vacuum or warm, soapy<br />
water.<br />
• If very dirty, wash with a solution of<br />
detergent in lukewarm water.<br />
• If hot water (50°C or more) is used, filter<br />
may be deformed.<br />
2. After washing with water, dry well in the shade.<br />
3. Re-install the air filter.<br />
1. After removing the Panel-Cover, draw the <strong>Air</strong><br />
Cleaner Bracket slightly sideward to remove the<br />
PLASMA filter.<br />
2. Dip the PLASMA filter into the water mixed with<br />
mild detergent, for 20~30 minutes.<br />
3. Dry the PLASMA filter in the shade for a day.<br />
(Especially, the humidity must be removed<br />
perfectly from this parts).<br />
4. Be careful not to cut the electric discharge lines<br />
while washing.<br />
5. Re-install the PLASMA filter to the original position.<br />
Owner's Manual 25<br />
ENGLISH
Care and maintenance<br />
When the air conditioner is not going to be used for a long time.<br />
When air conditioner is not going to be used for a long time.<br />
1. Operate the air conditioner on <strong>Air</strong> circulation mode for 2 to 3 hours.<br />
• This will dry out the internal parts.<br />
2. Turn off the circuit breaker.<br />
CAUTION Turn off the circuit breaker when the air conditioner is not going to be used<br />
for a long time. Dirt may collect and may cause a fire.<br />
When the air conditioner is to be used again.<br />
• Check that the air inlet and outlet of the indoor/outdoor unit are not blocked.<br />
Operation Tips<br />
Do not overcool the room.<br />
This is not good for your health<br />
and wastes electricity.<br />
Clean the air filter regularly.<br />
Blockages in the air filter<br />
reduce the airflow and lower<br />
cooling and dehumidifying<br />
effects. Clean at least once<br />
every two weeks.<br />
26 <strong>Ceiling</strong> DUCT <strong>Type</strong> <strong>Air</strong> <strong>Conditioner</strong><br />
Keep blinds or curtains<br />
closed.<br />
Do not let direct sunshine enter<br />
the room when the air<br />
conditioner is in operation.<br />
Ventilate the room<br />
occasionally.<br />
Since windows are kept closed,<br />
it is a good idea to open them<br />
and ventilate the room now and<br />
then.<br />
Make sure that the doors<br />
and windows are shut tight.<br />
Avoid opening doors and<br />
windows as much as possible<br />
to keep the cool air in the room.
Before you call for service...<br />
Troubleshooting Tips! Save time and money!<br />
Before you call for service...<br />
Check the following points before requesting repairs or service.... If the malfunction persist, please contact your<br />
dealer.<br />
Case Explanation See page<br />
The air conditioner does not<br />
operate.<br />
The room has a peculiar odor.<br />
It seems that condensate is<br />
leaking from the air <strong>Conditioner</strong>.<br />
<strong>Air</strong> conditioner does not operate<br />
for about 3 minutes when restart.<br />
Does not cool or heat effectively.<br />
The air conditioner operation is<br />
noisy.<br />
Crack sound is heard.<br />
Remote control display is faint, or<br />
no display at all.<br />
• Have you made a mistake in timer operation?<br />
• On first starting, the indoor unit operates in<br />
fifteen seconds.<br />
• Has the fuse blown or has the circuit breaker<br />
been tripped?<br />
• Check that this is not a damp smell exuded by<br />
the walls, carpet, furniture or cloth items in the<br />
room.<br />
• Condensation occurs when the airflow from the<br />
air conditioner cools the warm room air.<br />
• This is the protector of the mechanism.<br />
• Wait about three minutes and operation will<br />
begin.<br />
• Is the air filter dirty? See air filter cleaning<br />
instructions.<br />
• The room may have been very hot when the<br />
room air conditioner was first turned on. Allow<br />
time for it to cool down.<br />
• Has the setting temperature been set<br />
incorrectly?<br />
• Are the indoor unit's air inlet or outlet vents<br />
obstructed?<br />
• For a noise that sounds like water flowing.<br />
-This is the sound of freon flowing inside the air<br />
conditioner unit.<br />
• For a noise that sounds like the compressed air<br />
releasing into atmosphere.<br />
-This is the sound of the dehumidifying water<br />
being processed inside the air conditioning<br />
unit.<br />
• This sound is generated by the<br />
expansion/contraction of the inlet grille, etc. due<br />
to changes of temperature.<br />
• Has the circuit breaker been tripped?<br />
12<br />
-<br />
-<br />
-<br />
-<br />
25<br />
14, 17<br />
-<br />
-<br />
-<br />
Owner's Manual 27<br />
ENGLISH
Memo<br />
28 <strong>Ceiling</strong> DUCT <strong>Type</strong> <strong>Air</strong> <strong>Conditioner</strong>
P/No.: 3828A22012E Printed in Korea<br />
After reading this manual, keep it in a place easily accessible to the user for future reference.