Advanced Deferred Rendering Techniques
Advanced Deferred Rendering Techniques
Advanced Deferred Rendering Techniques

Create successful ePaper yourself
Turn your PDF publications into a flip-book with our unique Google optimized e-Paper software.
<strong>Advanced</strong> <strong>Deferred</strong> <strong>Rendering</strong> <strong>Techniques</strong><br />
NCCA, Thesis Portfolio<br />
Peter Smith<br />
August 2011
Abstract<br />
The following paper catalogues the improvements made to a <strong>Deferred</strong> Renderer created<br />
for an earlier NCCA project. It covers advanced techniques in post processing,<br />
specifically referring to screen-space anti-aliasing. The work presented surrounds this<br />
second iteration of the renderer and the relevant improvements to features and system<br />
architecture.<br />
i
Contents<br />
Abstract<br />
Contents<br />
List of Figures<br />
i<br />
ii<br />
iii<br />
1 Introduction 1<br />
1.1 <strong>Deferred</strong> Renderer: A Summary . . . . . . . . . . . . . . . . . . . . . . . 1<br />
1.2 Post Processing and <strong>Advanced</strong> <strong>Techniques</strong> . . . . . . . . . . . . . . . . . 2<br />
2 Implementation Review 5<br />
2.1 Application Architecture . . . . . . . . . . . . . . . . . . . . . . . . . . . 5<br />
2.2 Full-Screen Effects . . . . . . . . . . . . . . . . . . . . . . . . . . . . . . 6<br />
2.3 Anti-Aliasing . . . . . . . . . . . . . . . . . . . . . . . . . . . . . . . . . 6<br />
3 Conclusion and Future Work 11<br />
3.1 Future Work . . . . . . . . . . . . . . . . . . . . . . . . . . . . . . . . . 11<br />
3.2 Conclusion . . . . . . . . . . . . . . . . . . . . . . . . . . . . . . . . . . 11<br />
4 Appendices 12<br />
Bibliography 14<br />
ii
List of Figures<br />
1.1 What Makes up The g-buffer . . . . . . . . . . . . . . . . . . . . . . . . 2<br />
1.2 Symbolic representation of light accumulation . . . . . . . . . . . . . . . 3<br />
2.1 Examples of bloom. Top: Bethesdas “Elder Scrolls 4: Oblivion”. Bottom:<br />
Lionheads“Fable 3” . . . . . . . . . . . . . . . . . . . . . . . . . . 7<br />
2.2 Scene Without Bloom . . . . . . . . . . . . . . . . . . . . . . . . . . . . 8<br />
2.3 Scene with Bloom . . . . . . . . . . . . . . . . . . . . . . . . . . . . . . 8<br />
2.4 Scene Without Depth of Field . . . . . . . . . . . . . . . . . . . . . . . . 9<br />
2.5 Scene with Depth of Field . . . . . . . . . . . . . . . . . . . . . . . . . . 9<br />
2.6 Edge Detection for AA . . . . . . . . . . . . . . . . . . . . . . . . . . . . 10<br />
iii
Chapter 1<br />
Introduction<br />
The following work will attempt to explain the need for, and use of advanced image<br />
processing techniques in a deferred renderer. As such, the fundamentals of what a<br />
deferred shading pipeline is will not be covered in great depth; only a brief explanation<br />
will be offered. For more information on the basis of this renderer, see Smith, 2011 [1].<br />
1.1 <strong>Deferred</strong> Renderer: A Summary<br />
<strong>Deferred</strong> rendering 1 is a method of real-time rendering that has gained popularity in<br />
the games industry in recent years. The traditional method of forward rendering shades<br />
a scene on a per-object basis, limiting the amount of lights able to exist in a scene.<br />
This is because per-object lighting calculations can quickly become computationally<br />
expensive in large scenes. The main idea of deferred rendering is to move the lighting<br />
further down in the pipeline. This is done by rendering the entire scene once, to a<br />
frame buffer object (FBO). An FBO can be defined as a container for several pixel<br />
arrays of the same dimensions. They can have several textures drawn into their colour<br />
attachments, mimicking the behaviour of the screen or default frame buffer. 2<br />
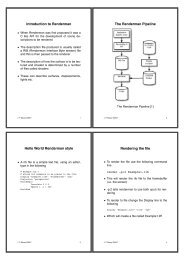
The scene is rendered to an FBO called the geometry buffer (G-buffer). Various<br />
different types of information can be stored in the red, green, blue and alpha (RGBA)<br />
channels of these textures. Typically however, the key data is the lighting information.<br />
In the G-buffer the albedo (diffuse) colour contribution of the rendered surfaces, the<br />
vertex normals and the vertex position are stored. In addition to this specular information<br />
and other material attributes can be held. Figure 1.1 shows the g-buffer layout<br />
of the current version of the renderer:<br />
With the G-buffer stored, geometry is rasterized which approximates the shape of<br />
our lights. 3 Whilst in the fragment shader for each of these lights, the G-buffer textures<br />
are sampled and the scene is lit on a per-pixel basis. The lighting calculations vary<br />
1 sometimes called deferred shading or lighting<br />
2 at the time of writing, the typical number of colour attachments available is four<br />
3 A cube for a point light, a cone for a spot light etc<br />
1
Constant<br />
LIght<br />
Normal<br />
R G B<br />
X Y Z<br />
Albedo<br />
Position /<br />
Specular<br />
R G B<br />
X Y Z Ks<br />
Figure 1.1: What Makes up The g-buffer<br />
depending on light type but the outcome is similar; a new texture is output based on<br />
a blend of the scene and the lights. See Figure 1.2.<br />
When the light accumulation is complete post process operations on the final lit<br />
image can be started.<br />
1.2 Post Processing and <strong>Advanced</strong> <strong>Techniques</strong><br />
Post processing is a step that occurs at the end of both the forward and deferred<br />
rendering pipelines. It is in this stage that the ‘final’ lit image texture is sampled<br />
using a wide array of shaders. These shaders apply various aesthetic effects by drawing<br />
textures onto full screen quads. The process is sometimes referred to as applying fullscreen<br />
effects. The basis of this idea is that a new pixel value can be calculated based<br />
on pixel values that already exist in texture memory. The pseudo-code for a simple<br />
grayscale effect might look something like this:<br />
src = Sample the source pixel<br />
grey = src.r * 0.21 + src.g * 0.71 + src * 0.07<br />
output = Vec4(grey)<br />
In general, a post-process effect will read in a source texture, manipulate samples<br />
from this map, and output a new texture map with the affected pixel values. In some<br />
cases however, effects need to sample many maps to attain the appropriate information.<br />
For example, a motion blur effect would require both colour and velocity maps as input.<br />
Some examples of post-process effects are:<br />
• Bloom<br />
• Radial Blur<br />
• Gaussian Blur<br />
• Color Grading (Greyscale, Sepia)<br />
2
Scene<br />
Light 1<br />
Added<br />
Light 2<br />
Added<br />
Light 3<br />
Added<br />
Figure 1.2: Symbolic representation of light accumulation<br />
• Depth of Field<br />
• Motion Blur<br />
• Night Vision Filter<br />
The use of effects like these has seen a rise in the variety of aesthetics found in<br />
modern computer games.<br />
3
In a deferred renderer however, these effects have much more practical implications.<br />
There are two key areas of the deferred pipeline that are not hardware supported as they<br />
in forward rendering: anti-aliasing and transparency. In this implementation, a solution<br />
for anti-aliasing proposed by nVidia was explored [4].This solution uses comparisons in<br />
depth and normals to detect edges used in anti-aliasing.<br />
The remainder of this paper will explain the implementation of three key areas of<br />
a deferred renderer: application architecture, post-process effects and anti-aliasing.<br />
4
Chapter 2<br />
Implementation Review<br />
The following chapter assesses the implementation of improved application architecture,<br />
in comparison to the first version of the renderer. It will also explore how several fullscreen<br />
effects can be implemented and their results. Finally, a solution to anti-aliasing<br />
will be explicated.<br />
2.1 Application Architecture<br />
Earlier iterations of the renderer saw a reliance on and instance of the FrameBufferObject<br />
class to control the input and output textures of the G-buffer. This implementation<br />
was not generic and did not allow a very wide-spread application control of textures; it<br />
was too restrictive. It was this factor that motivated a separation of texture logic from<br />
FBO logic.<br />
This means by having an application-wide engine for all textures, users have to<br />
be more explicit when binding and altering them. Naming textures enables higher<br />
verbosity in the code, whilst also keeping the flow of control of texture units transparent.<br />
In the context of a deferred renderer, this is a major advantage as the key element of<br />
the pipeline is the textures.<br />
Another goal of the texture management system is to facilitate a simpler pipeline for<br />
post-process effects. A single effect can be identified as having the following properties.<br />
• Input Texture(s)<br />
• Shader<br />
• Output Texture(s)<br />
• Name<br />
So, in order to encapsulate an effects behaviour, methods were implemented to allow<br />
for drawing preparation, input/output configuration and execution. This was then<br />
wrapped into a Post-Processor in order to manage the different effects in the pipeline.<br />
5
The advantage of this structure is that, in future iterations of the renderer, effects<br />
options will be read from configuration files to allow ease of use. This architecture,<br />
in turn will allow for automatic generation of textures on a per-effect basis; removing<br />
user-responsibility for a large part of the post-process pipeline.<br />
This architecture is also echoed in the renderers Lighting system. It was designed<br />
with user-configuration in mind. A utility class that manages all the lights in the scene<br />
was implemented to allow for simple configuration of each type of light from a scene<br />
description file.<br />
2.2 Full-Screen Effects<br />
One of the most fundamental post-process effects is Gaussian Blur . Not only can it be<br />
applied easily for full-screen blur, but it can be used in a variety of other effects. The<br />
method for applying screen-space Gaussian Blur is one of weighted averaging. Firstly,<br />
pixels on the left and right are sampled and a proportion of these values is blended into<br />
the current pixel and written to a new texture. This process is then repeated vertically.<br />
These two outputs can then be combined to apply full-screen blur. Code for horizontal<br />
blur is listed in Appendix A.1.<br />
Another widely used post-process technique is bloom. Lionhead and Bethesda have<br />
used this technique widely in their fantasy games as shown in figure 2.1. The reason<br />
for this is that it applies a certain ethereal glow to the brightest areas of the image.<br />
There are different ways to implement this technique. One method is to fill a value<br />
in the G-buffer to indicate to the post-process engine to what extent bloom should be<br />
applied. This method of bloom allows a very high level of control over what parts of the<br />
scene will glow. Another method is to sample the texture that needs bloom applied and<br />
take the brightest pixels based on a pre-defined tolerance. Put simply, the brightest<br />
pixels are sampled and enhanced. This is not done simply by brightening them, but by<br />
outputting a bloom-map, applying Gaussian Blur to it and then blending it back into<br />
the scene. Figures 2.2 and 2.3 show these the scene with and without bloom.<br />
In addition to blur and bloom a simple implementation of depth of field was implemented.<br />
Simulating depth of field in screen space is a process of sampling depth and<br />
blurring the areas not ‘in focus’. This is a simplified simulation of an effect created by<br />
the focal length of cameras. Despite being a rather naive implementation, the effect<br />
achieved is still aesthetically pleasing; figures 2.4 and 2.5 show this.<br />
2.3 Anti-Aliasing<br />
Anti Aliasing refers to the smoothing of edges to counter-balance inherent coarseness<br />
of shader sampling rates. One of the major drawbacks of using deferred rendering is<br />
the lack of hardware support for this feature. This essentially means that the current<br />
6
Figure 2.1: Examples of bloom. Top: Bethesdas “Elder Scrolls 4: Oblivion”. Bottom:<br />
Lionheads“Fable 3”<br />
hardware design and OpenGL implementation does not support user screen-space antialiasing.<br />
It cannot be used when rendering to an FBO. A solution for this is presented<br />
by Nvidia in GPU Gems [4]. This solution was adopted and integrated into the renderer.<br />
The premise of the algorithm is that, by sampling the depth and the normal of a<br />
pixel in relation to its surrounding pixels, a weighting can be obtained for the amount<br />
of anti-aliasing blur it should receive. For this to work, the normal and position buffers<br />
can be sampled from the g-buffer and used in the following way:<br />
• Calculate each angle cosine between current and 4 surrounding pixels<br />
• Use these values to calculate a weighting value<br />
• Calculate the difference in depth of the current pixel and 4 surrounding pixels<br />
• Use these depth values to calculate a second weighting<br />
7
Figure 2.2: Scene Without Bloom<br />
Figure 2.3: Scene with Bloom<br />
• Sample the 4 surrounding pixels scaled by the coefficients and make the current<br />
pixel an average of these<br />
Figure 2.6 shows the edge detection in action.<br />
As described above these edge are then used to smooth the colour of the current<br />
pixel. Appendix A.2 shows the colour-blending portion of the shader.<br />
8
Figure 2.4: Scene Without Depth of Field<br />
Figure 2.5: Scene with Depth of Field<br />
9
Figure 2.6: Edge Detection for AA<br />
10
Chapter 3<br />
Conclusion and Future Work<br />
3.1 Future Work<br />
The work explicated above summarises a short list of changes and improvements made<br />
as a second iteration of the earlier renderer. It is a feature of this portfolio, and as such,<br />
can be expanded upon and improved. For example, in future iterations of the renderer<br />
the problem of transparency will be handled which is likely to involve performing a<br />
final pass to re-render transparent objects.<br />
In addition to this the next version of the renderer will be written to accommodate<br />
a complete pipeline. The ability to communicate with the renderer in a generic way is<br />
an important feature that will allows future abstraction and extension. The aim is to<br />
allow a general description of geometry and scene layout to be supplied that will allow<br />
users to simply specify their mesh, texture and lighting details. This will, in turn allow<br />
the renderer to handle the rest of the process. In addition to these higher level features<br />
there are some low-level optimisations that can be made. An example of this would be<br />
re-structuring the G-buffer to allow more lighting information to be stored. This could<br />
be achieved by encoding position into one depth value is one examples of this.<br />
3.2 Conclusion<br />
Overall, the outcome of this second iteration of the renderer was successful. The overhaul<br />
of design allowed for the post-process stage to be implemented more easily. The<br />
entire system is designed in such a way that allows for abstracted customisation of a<br />
users scene and lighting. Moreover, the effects system is designed for extensibility. This<br />
allows users to write shaders and output their own screen-space effects.<br />
The post-process effects that are currently part of renderer like bloom, depth of field<br />
and greyscale are an example of the kind effects available in many established packages.<br />
The Unity Game Engine, for example includes many of these techniques. Perhaps most<br />
important to this iteration was the solution implemented for anti-aliasing. It is a feature<br />
seen as an integral part of any renderer that is expected to produce a good aesthetic.<br />
11
Chapter 4<br />
Appendices<br />
Appendix A<br />
1. Horizontal Blur Code<br />
uniform sampler2D u Sampler ;<br />
uniform f l o a t u p i x e l ;<br />
varying vec2 v TextureCoord ;<br />
void main ( )<br />
{<br />
vec4 sum = vec4 ( 0 . 0 ) ;<br />
// blur in y ( v e r t i c a l )<br />
// take nine samples ,<br />
// use d i s t a n c e b l u r S i z e between them<br />
sum += texture2D ( u Sampler ,<br />
vec2 ( v TextureCoord . x − 5.0∗ u p i x e l ,<br />
v TextureCoord . y ) ) ∗ 0 . 0 4 ;<br />
sum += texture2D ( u Sampler ,<br />
vec2 ( v TextureCoord . x − 4.0∗ u p i x e l ,<br />
v TextureCoord . y ) ) ∗ 0 . 0 4 ;<br />
sum += texture2D ( u Sampler ,<br />
vec2 ( v TextureCoord . x − 3.0∗ u p i x e l ,<br />
v TextureCoord . y ) ) ∗ 0 . 0 8 ;<br />
sum += texture2D ( u Sampler ,<br />
vec2 ( v TextureCoord . x − 2.0∗ u p i x e l ,<br />
v TextureCoord . y ) ) ∗ 0 . 1 2 ;<br />
sum += texture2D ( u Sampler ,<br />
vec2 ( v TextureCoord . x − u p i x e l ,<br />
v TextureCoord . y ) ) ∗ 0 . 1 4 ;<br />
sum += texture2D ( u Sampler ,<br />
vec2 ( v TextureCoord . x ,<br />
v TextureCoord . y ) ) ∗ 0 . 1 8 ;<br />
sum += texture2D ( u Sampler ,<br />
vec2 ( v TextureCoord . x + u p i x e l ,<br />
12
v TextureCoord . y ) ) ∗ 0 . 1 4 ;<br />
sum += texture2D ( u Sampler ,<br />
vec2 ( v TextureCoord . x + 2.0∗ u p i x e l ,<br />
v TextureCoord . y ) ) ∗ 0 . 1 2 ;<br />
sum += texture2D ( u Sampler ,<br />
vec2 ( v TextureCoord . x + 3.0∗ u p i x e l ,<br />
v TextureCoord . y ) ) ∗ 0 . 0 8 ;<br />
sum += texture2D ( u Sampler ,<br />
vec2 ( v TextureCoord . x + 4.0∗ u p i x e l ,<br />
v TextureCoord . y ) ) ∗ 0 . 0 4 ;<br />
sum += texture2D ( u Sampler ,<br />
vec2 ( v TextureCoord . x + 5.0∗ u p i x e l ,<br />
v TextureCoord . y ) ) ∗ 0 . 0 4 ;<br />
}<br />
g l F r a g C o l o r = sum ;<br />
2. The final blend of the Anti Alias Shader<br />
// WEIGHT<br />
// e k e r n e l . x ( 0 . 5 )<br />
f l o a t f i n a l W e i g h t i n g = ( 1 . 0 − depthWeight ∗<br />
normalWeight ) ∗ u k e r n e l ;<br />
//SMOOTH<br />
vec2 o f f s e t = v TextureCoord ∗ (1.0 − f i n a l W e i g h t i n g ) ;<br />
vec4 s0 = vec4 ( texture2D ( u ColorMap ,<br />
o f f s e t + top ∗ f i n a l W e i g h t i n g ) . xyz , 1 . 0 ) ;<br />
vec4 s1 = vec4 ( texture2D ( u ColorMap ,<br />
o f f s e t + bottom ∗ f i n a l W e i g h t i n g ) . xyz , 1 . 0 ) ;<br />
vec4 s2 = vec4 ( texture2D ( u ColorMap ,<br />
o f f s e t + r i g h t ∗ f i n a l W e i g h t i n g ) . xyz , 1 . 0 ) ;<br />
vec4 s3 = vec4 ( texture2D ( u ColorMap ,<br />
o f f s e t + l e f t ∗ f i n a l W e i g h t i n g ) . xyz , 1 . 0 ) ;<br />
g l F r a g C o l o r = ( s0 + s1 + s2 + s3 ) / 4 . 0 ;<br />
13
Bibliography<br />
[1] Smith, P (2011). <strong>Deferred</strong> <strong>Rendering</strong>.<br />
NCCA, Bournemouth.<br />
[2] Rost, R (2010). Opengl Shading Language. 3rd ed.<br />
Boston: Addison Wesley. p101-461.<br />
[3] Hargreaves, S. Harris, M. (2004). 6800 Leagues Under the Sea.<br />
Available: http://http.download.nvidia.com/developer/presentations<br />
/2004/6800_Leagues/6800_Leagues_<strong>Deferred</strong>_Shading.pdf.<br />
Last accessed 17th May 2011.<br />
[4] Shishkovtsov, O (2005) <strong>Deferred</strong> <strong>Rendering</strong> in S.T.A.L.K.E.R<br />
Available: http.developer.nvidia.com/gpugems2/gpugems2_chapter09.html<br />
Last accessed 11th Aug 2011<br />
14